Part 2: Provision
What Will You Do
In this part of the self-paced exercise, you will provision an Amazon EKS cluster with a GPU node group based on a declarative cluster specification
Step 1: Cluster Spec
- Open Terminal (on macOS/Linux) or Command Prompt (Windows) and navigate to the folder where you forked the Git repository
- Navigate to the folder "
/getstarted/gpueks/cluster"
The "eks-gpu.yaml" file contains the declarative specification for our Amazon EKS Cluster.
Cluster Details
The following items may need to be updated/customized if you made changes to these or used alternate names.
- cluster name: demo-gpu-eks
- cloud provider: aws-cloud-credential
- project: defaultproject
- region: us-west-2
- ami: ami-0114d85734fee93fb
Step 2: Provision Cluster
- On your command line, navigate to the "cluster" sub folder
- Type the command
rctl apply -f eks-gpu.yaml
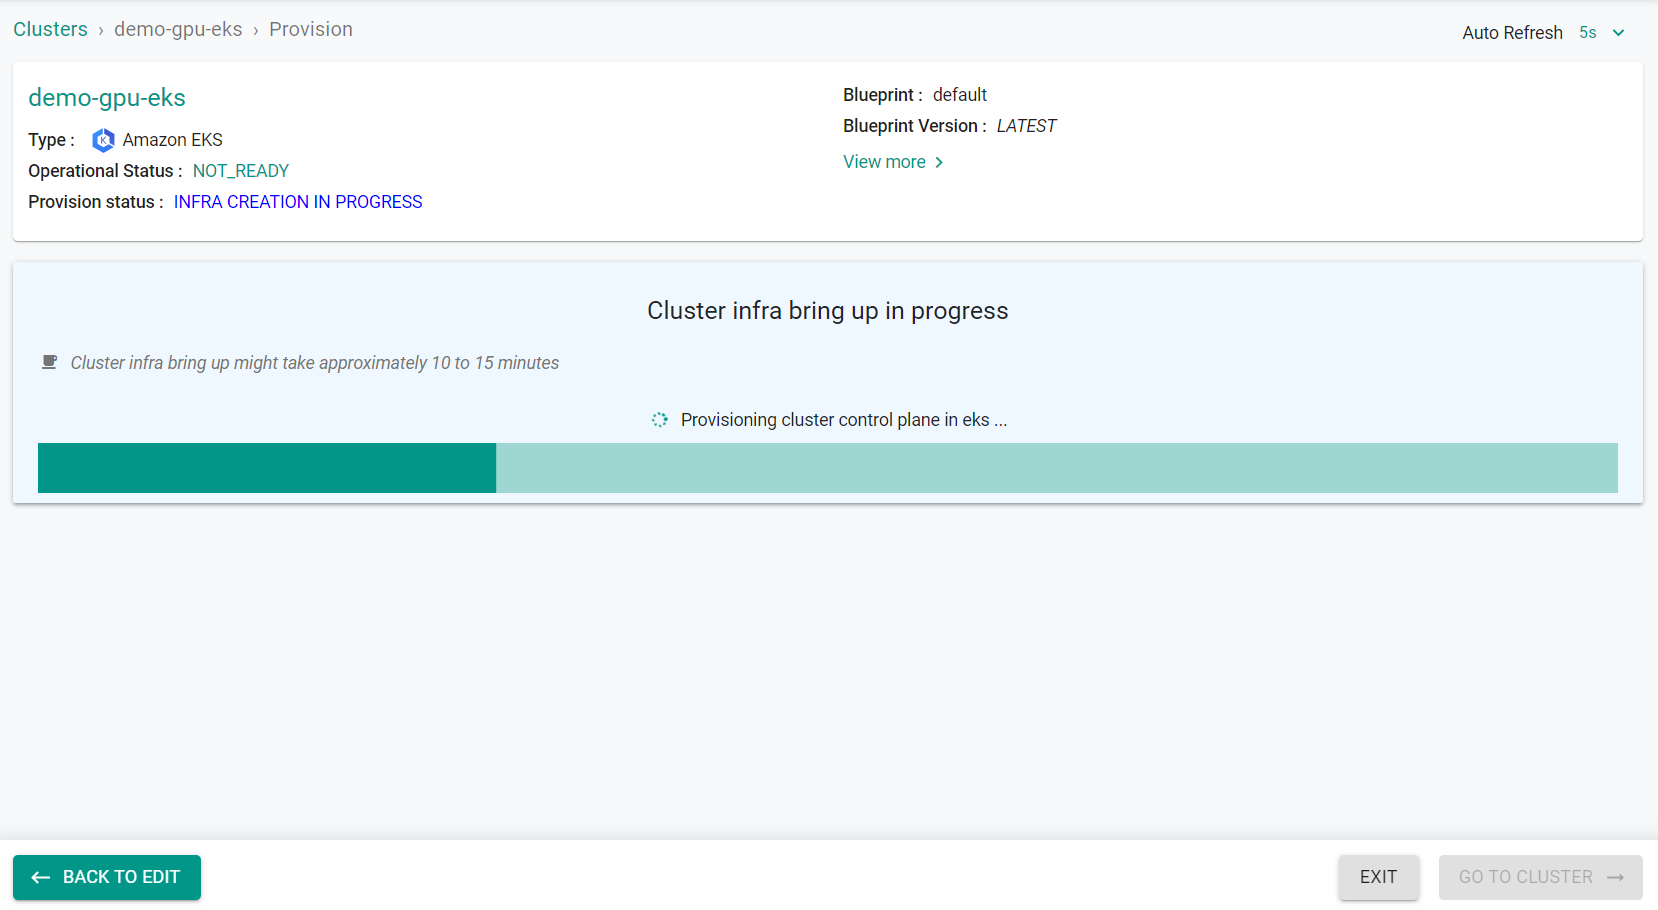
If there are no errors, you will be presented with a "Task ID" that you can use to check progress/status. Note that this step requires creation of infrastructure in your AWS account and can take ~20-30 minutes to complete.
{
  "taskset_id": "d27l3rk",
  "operations": [
    {
      "operation": "ClusterCreation",
      "resource_name": "demo-gpu-eks",
      "status": "PROVISION_TASK_STATUS_PENDING"
    },
    {
      "operation": "NodegroupCreation",
      "resource_name": "t3-nodegroup",
      "status": "PROVISION_TASK_STATUS_PENDING"
    },
    {
      "operation": "NodegroupCreation",
      "resource_name": "gpu-nodegroup",
      "status": "PROVISION_TASK_STATUS_PENDING"
    },
    {
      "operation": "BlueprintSync",
      "resource_name": "demo-gpu-eks",
      "status": "PROVISION_TASK_STATUS_PENDING"
    }
  ],
  "comments": "The status of the operations can be fetched using taskset_id",
  "status": "PROVISION_TASKSET_STATUS_PENDING"
}
- Navigate to the project in your Org
- Click on Infrastructure -> Clusters. You should see something like the following

- Click on the cluster name to monitor progress
Step 3: Verify Cluster
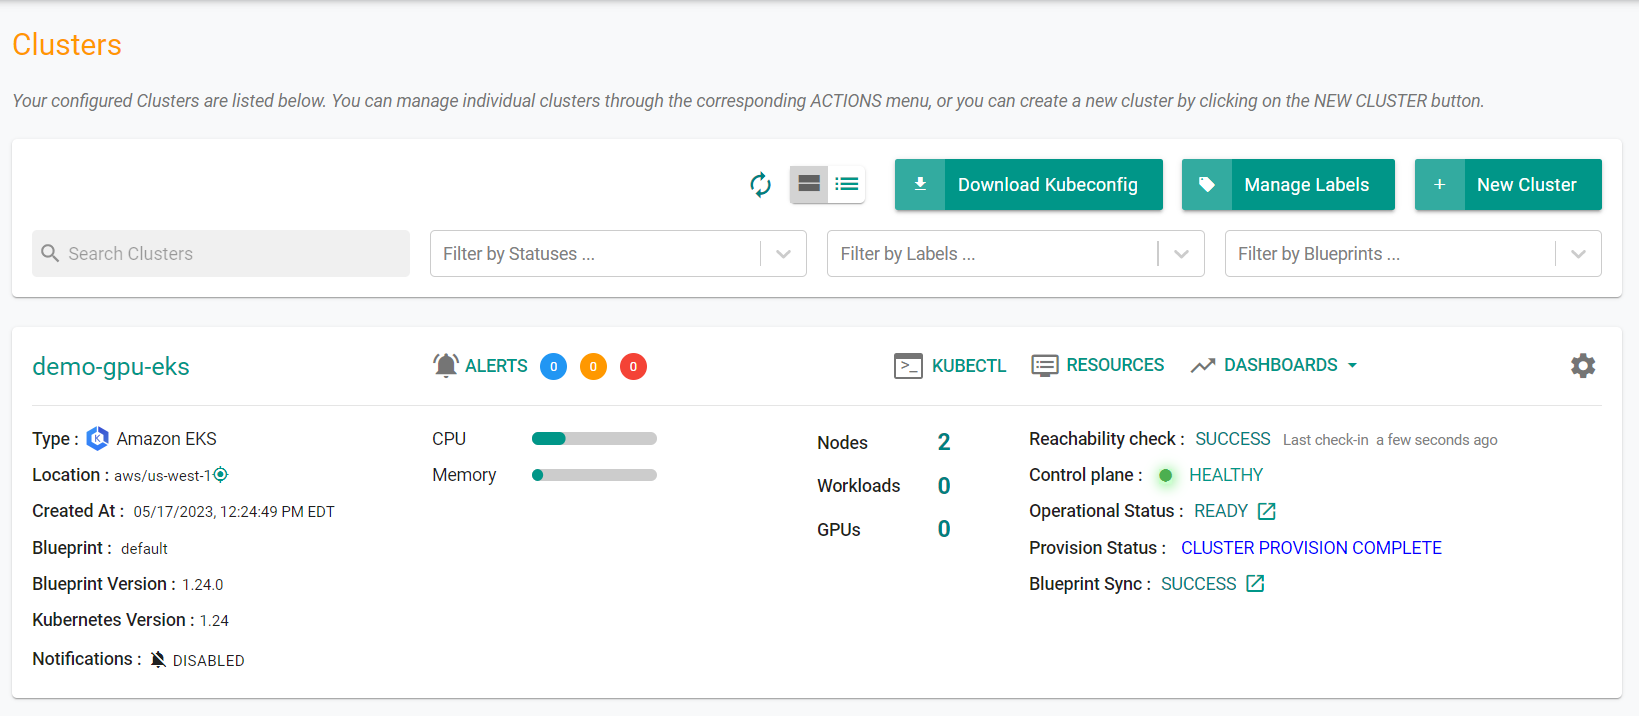
Once provisioning is complete, you should see a healthy cluster in the web console
- Click on the kubectl link and type the following command
kubectl get nodes -o wide
You should see something like the following
NAME                                            STATUS   ROLES    AGE   VERSION                INTERNAL-IP       EXTERNAL-IP     OS-IMAGE             KERNEL-VERSION                  CONTAINER-RUNTIME
ip-192-168-109-113.us-west-2.compute.internal   Ready    <none>   16m   v1.24.11-eks-a59e1f0   192.168.109.113   <none>          Amazon Linux 2       5.10.178-162.673.amzn2.x86_64   containerd://1.6.19
ip-192-168-52-184.us-west-2.compute.internal    Ready    <none>   15m   v1.24.10               192.168.52.184    54.193.37.206   Ubuntu 20.04.6 LTS   5.15.0-1034-aws                 containerd://1.6.12
Step 4: Remove EKS GPU Daemonset
You will now remove the EKS installed Nvidia daemonset. This daemonset will install the GPU drivers. However, we will be using the Nvidia Operator which will install the needed drivers.
- Navigate to Infrastructure -> Clusters
- Click on Resources on the cluster card
- Click on DaemonSets on the left hand side of the page
- Find the daemonset with the name nvidia-device-plugin-daemonset
- Click on the actions button next to the previously located daemonset
- Click Delete
- Click Yes to confirm the deletion

Recap
Congratulations! At this point, you have successfully configured and provisioned an Amazon EKS cluster with a GPU node group in your AWS account using the RCTL CLI. You are now ready to move on to the next step where you will create a deploy a custom cluster blueprint that contains the GPU Operator as an addon.