Rafay Partners are provided with access to a Multi-tenant "Operations Console" providing them with critical capabilities to manage multiple customers and their tenants (i.e. Orgs).
Note
Providers can also integrate their existing mgmt systems with their Partner Operations Console using Rafay's Swagger based APIs.
Organizations
An Organization is an isolated tenant on the controller managed by a partner. An Org typically maps to a customer. After logging into the Operations Console, click on Organizations to view the list of organizations. A partner/provider can manage as many organizations as they require.
Create Org
Sign up for Organization is available in three (3) ways:
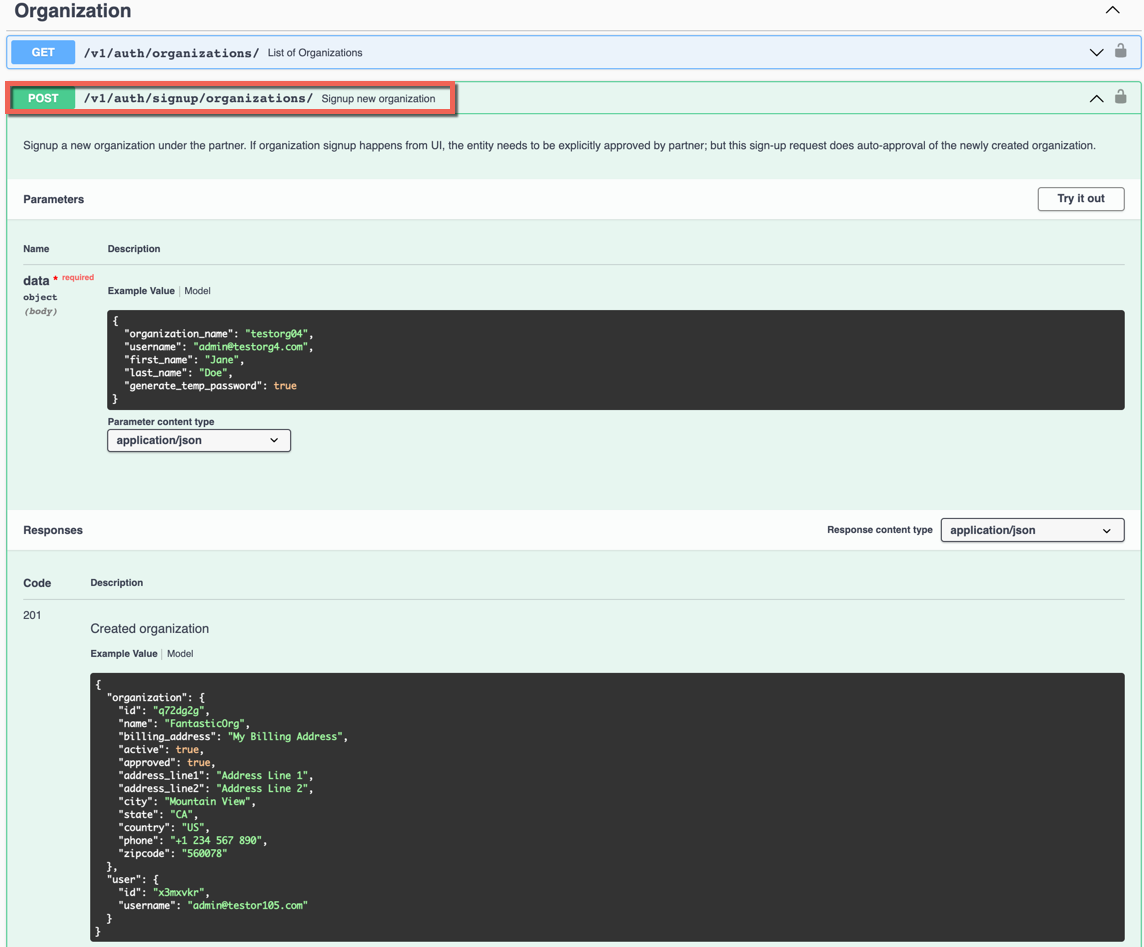
1. Using the Swagger based REST APIs
- Login to the console and click API DOCS from the Home page menubar

Platform API screen appears
- Under Organization, use the available REST APIs to signup for new organization(s)
2. Self-service Sign up
A self-service signup page is available for the end users to sign up for a new organization
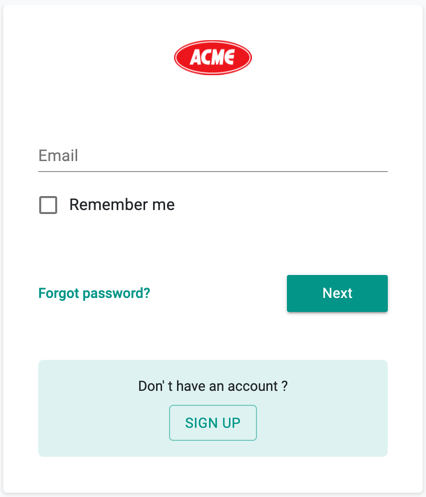
- Click SIGN UP and provide the required details
- Click Register
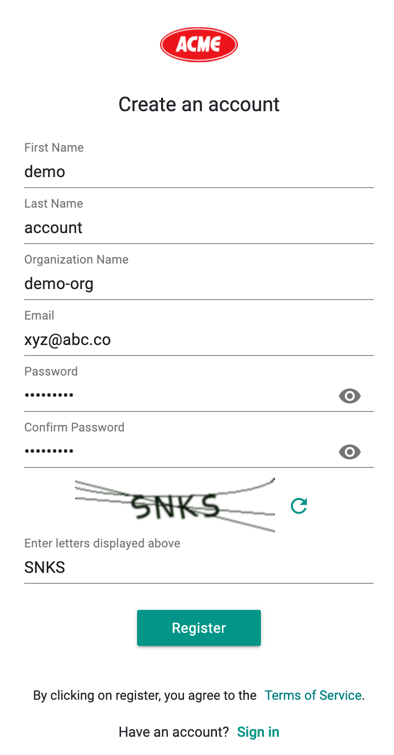
On successful registration, the user will receive a verification email on the given email id. A non-existing user will receive an email with a random password, whereas the existing users will receive successful org creation email
These Organizations need to be reviewed and approved by a Partner Admin before they are considered active
Important
Super Admin can enable or disable the Self Signup option via Ops Console
3. Register to Add Organization
Add Organization button is available in the Ops Console for Super Admins
- Login to the Operations Console and click Add Organization
- Provide the required details and click Register
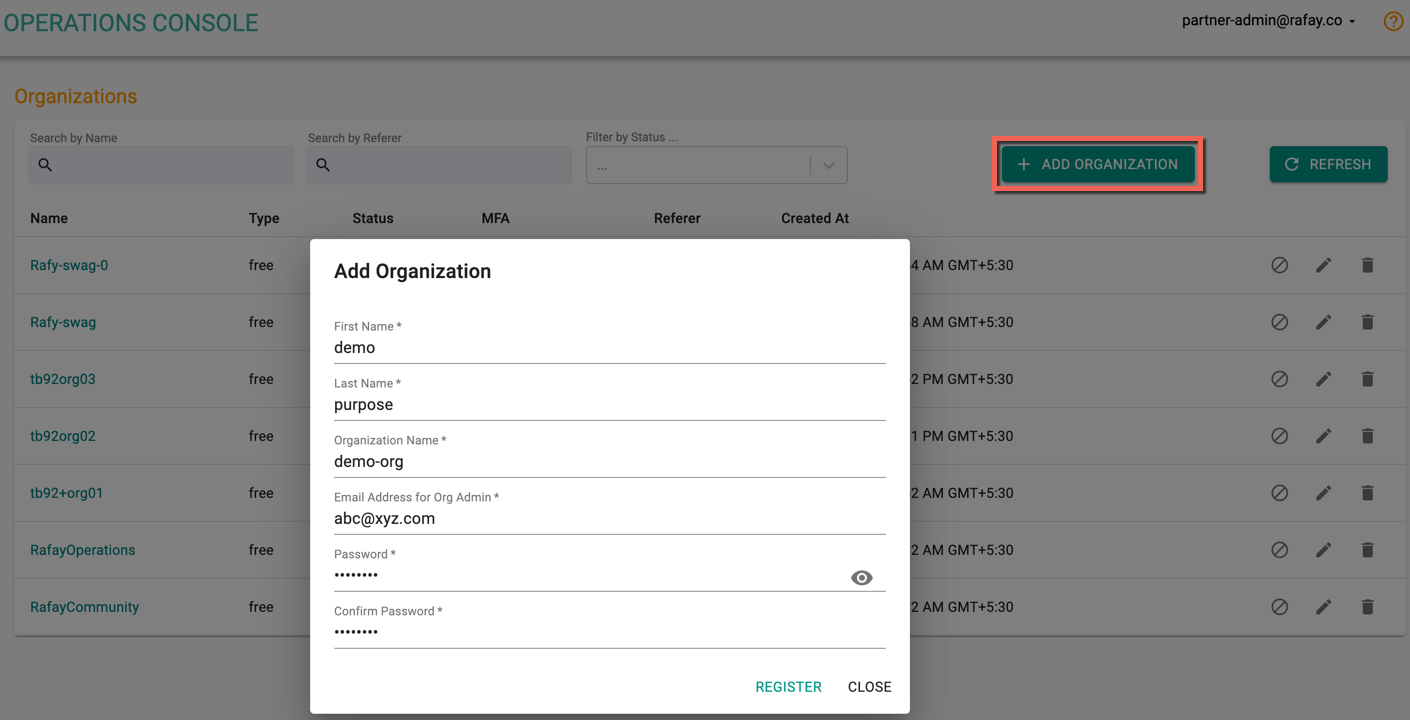
On successful registration, user will receive a verification email.
View Org
Click on Organizations to view the list of Organizations under management by the Partner/Provider.
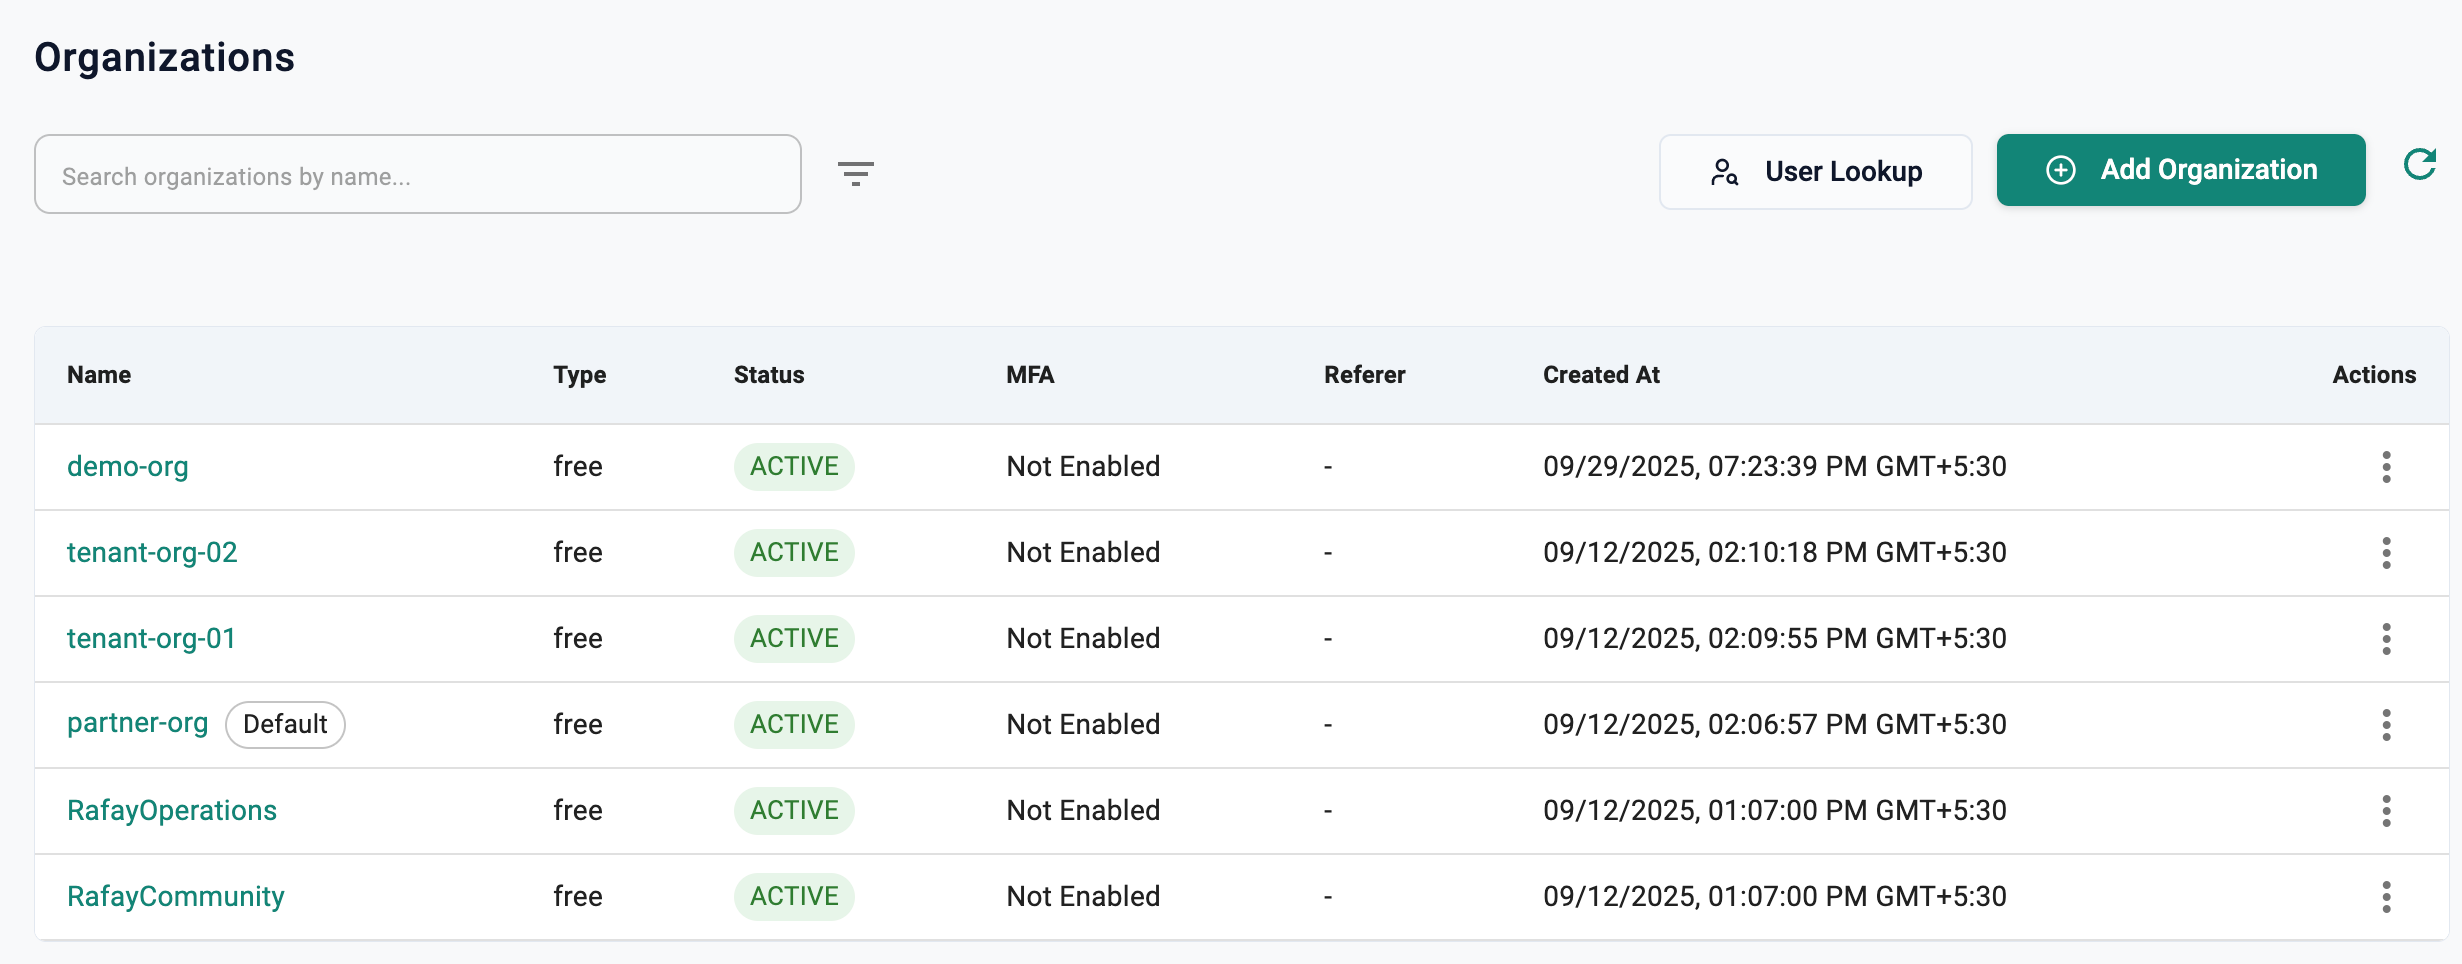
Search Options
There are multiple search options provided allowing the user to quickly search and list the organizations that match the specified criteria.
- Search by Name: Provide the Organization name to get a specific Organization details
- Filter by Status: Select the status, Approved (or) Approval Pending from the drop-down and retrieve the required organization status
- Filter by Partner: Select a partner from the drop-down to view all the organizations available with a specific partner
Update Org
Partner Admins can update an Org using the Operations Console.
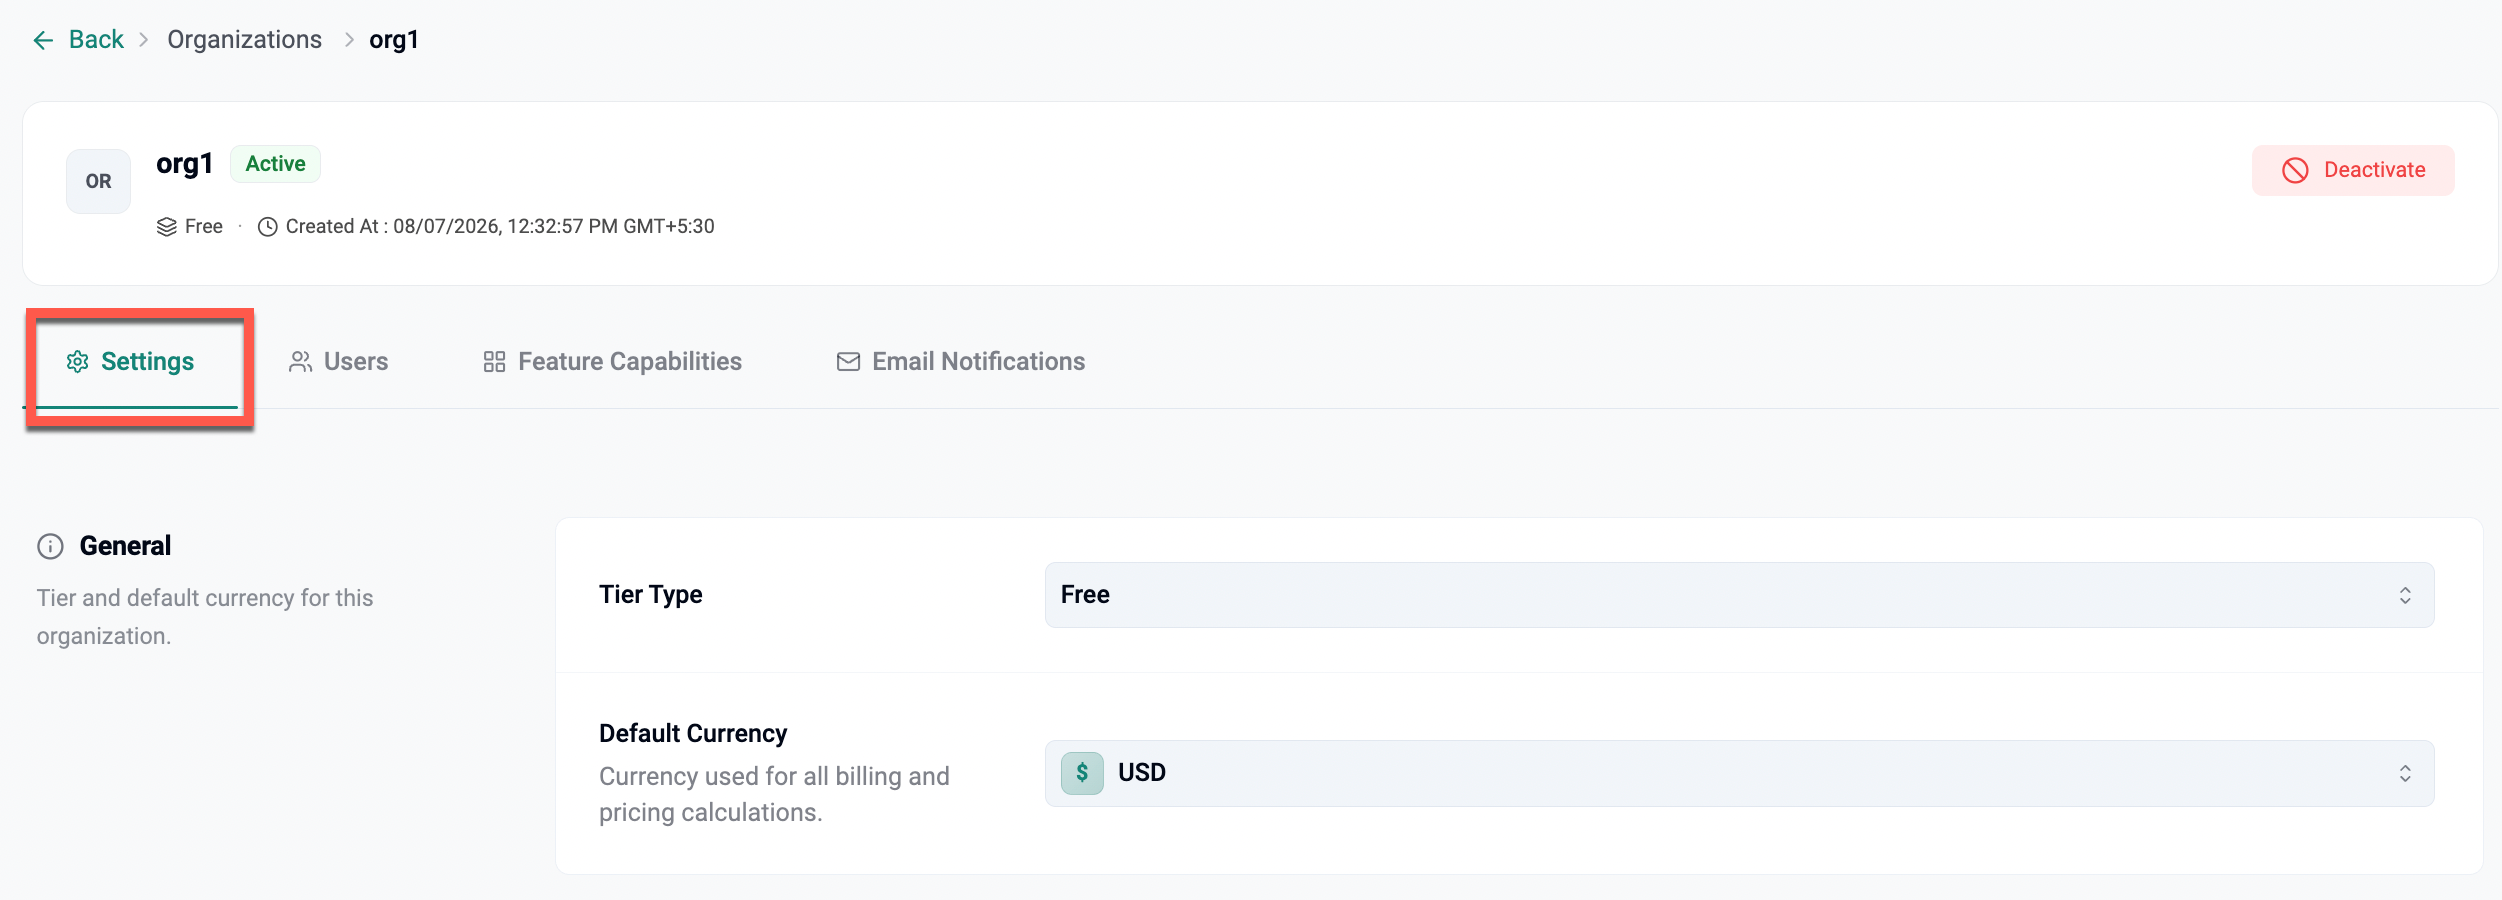
- Click on an Org and use the Edit icon to perform any changes in the existing organization. The following changes can be made to an existing Org.
General Settings
- Tier Type: Defines the subscription tier assigned to the organization. Available options:
- Free: Default tier with limited feature access, primarily for evaluation and small-scale usage.
- POC (Proof of Concept): Temporary tier for trial and testing purposes with extended capabilities beyond Free, but time-bound.
- Paid: Full-featured subscription tier with production-grade capabilities, enterprise features, and support enabled.
- Default Currency: Currency used for billing and pricing calculations (e.g., USD, EUR).
Registry Configuration
- Registry FQDN: Custom registry Fully Qualified Domain Name (FQDN) used for pulling container images. Example:
registry.example.com. - External ID: A unique identifier assigned to this organization, typically used for integrations or external tracking.
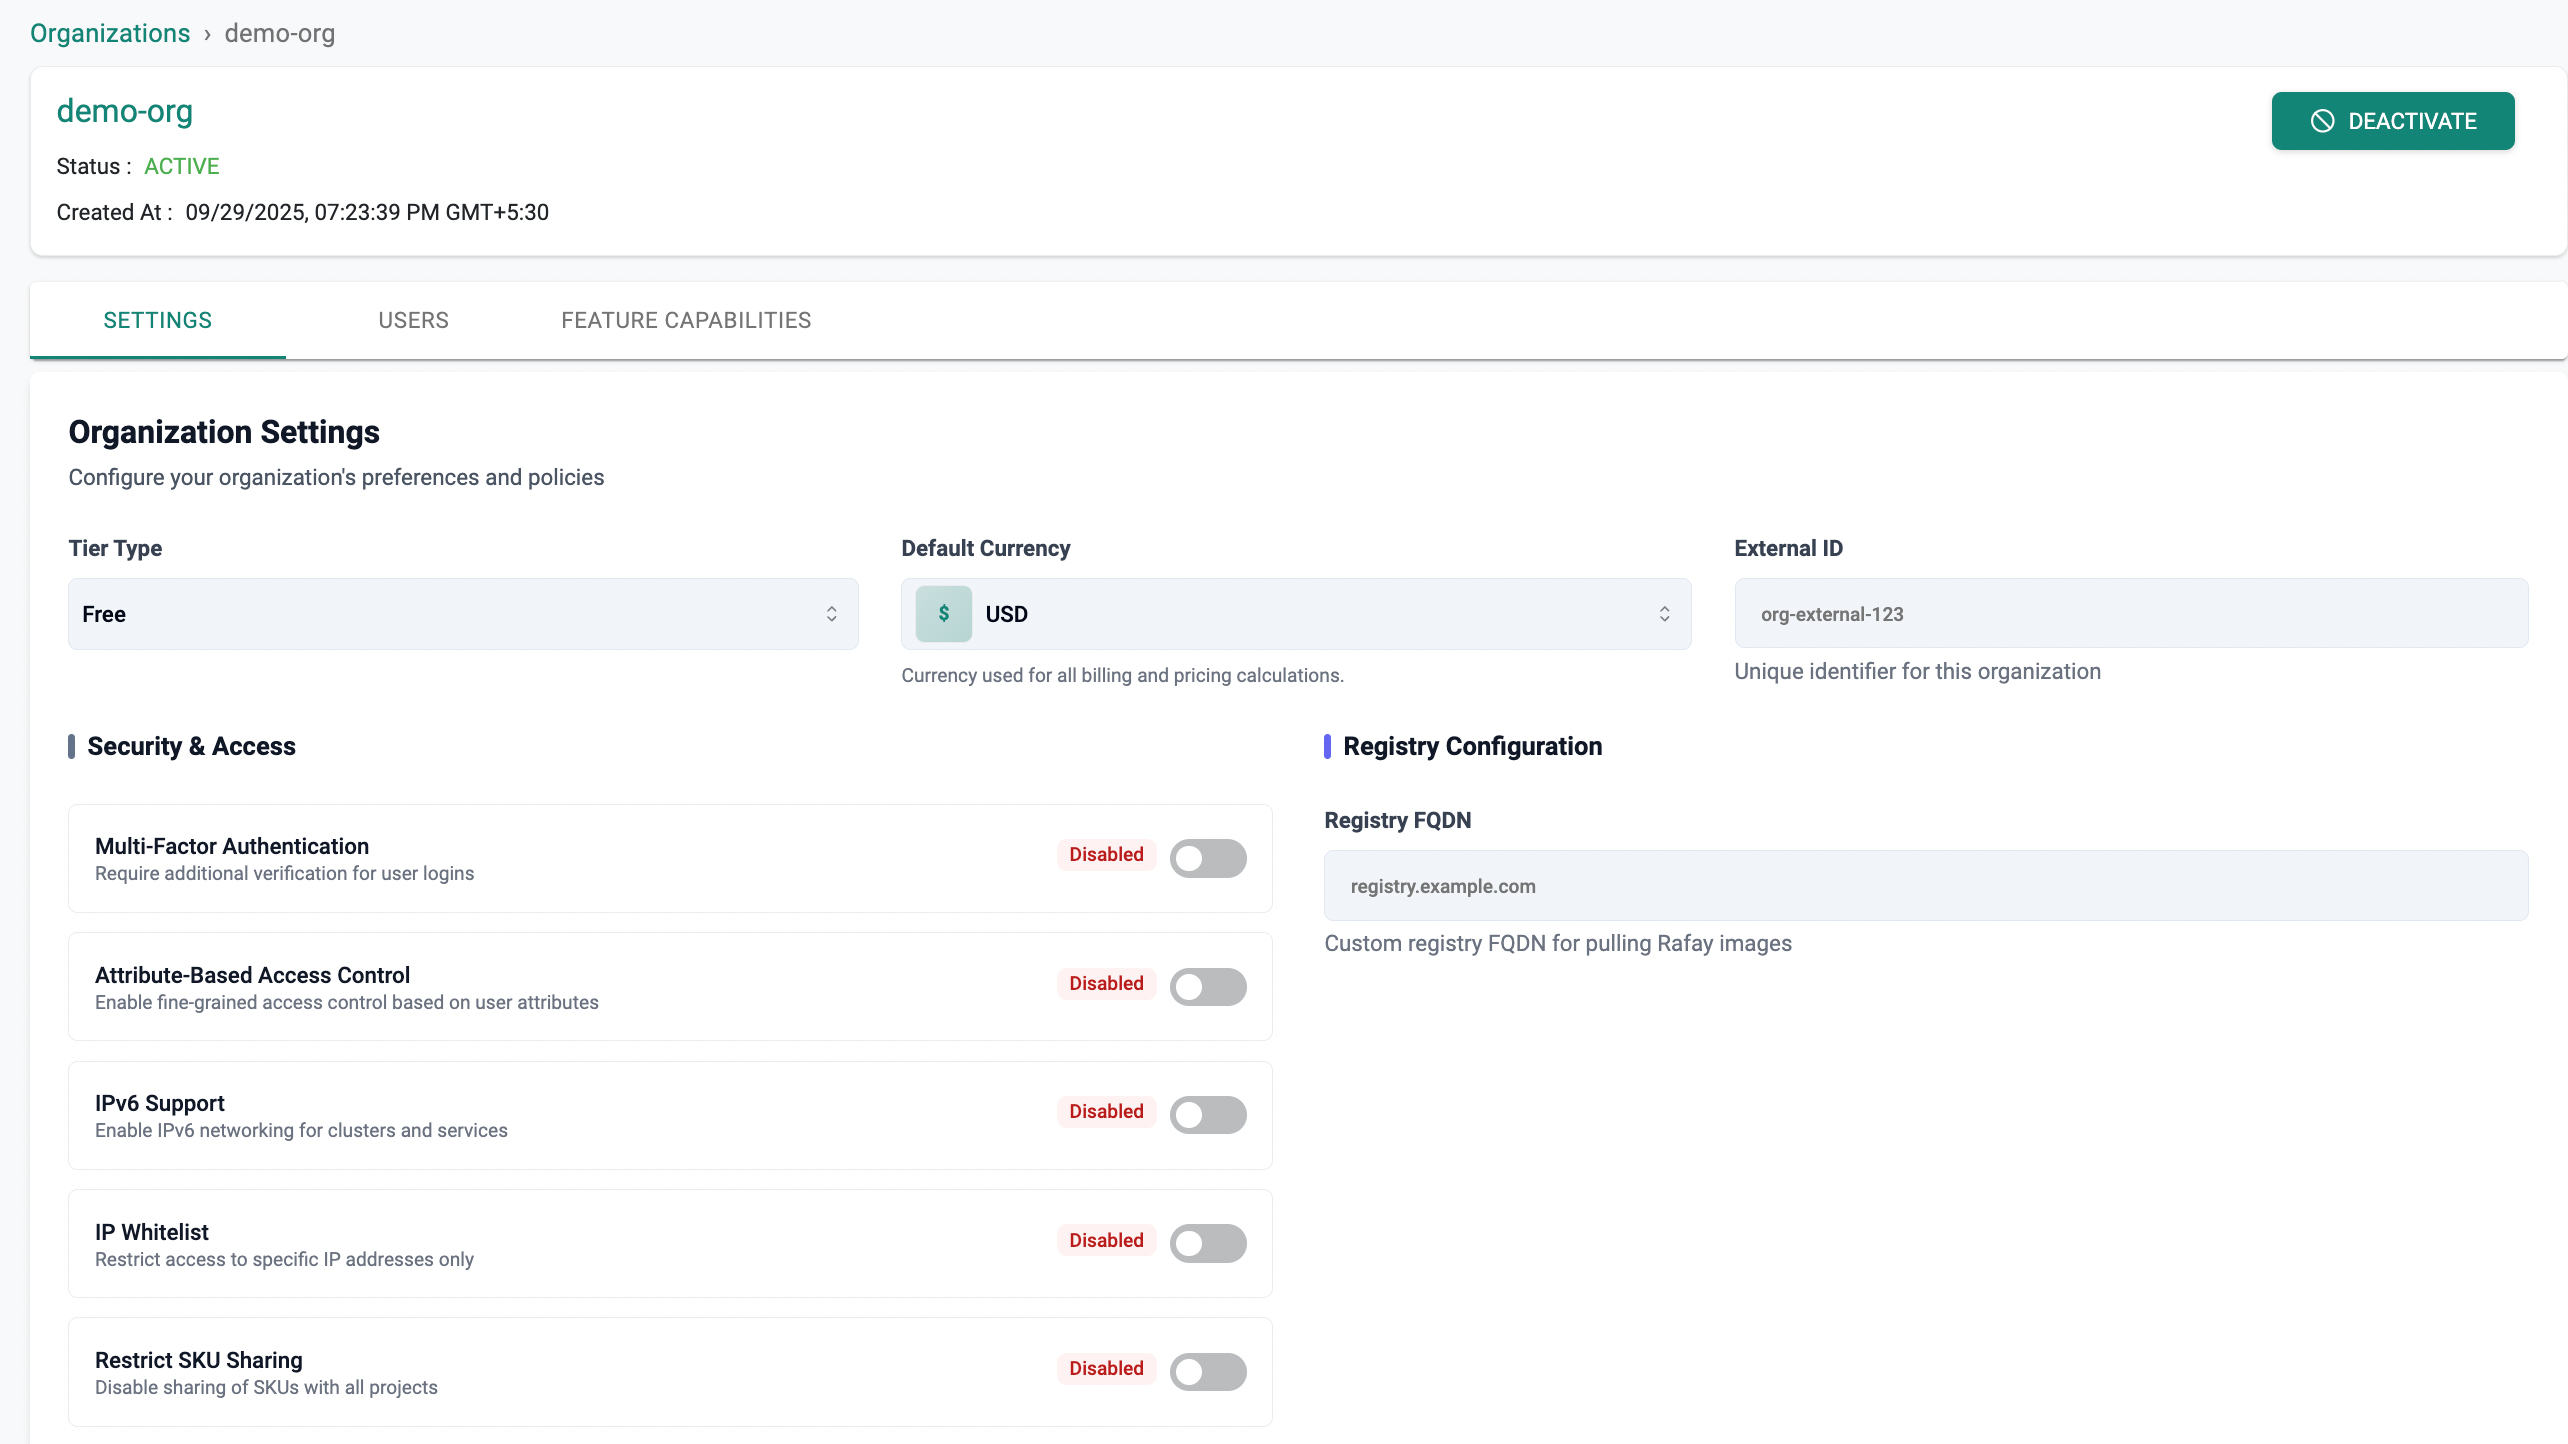
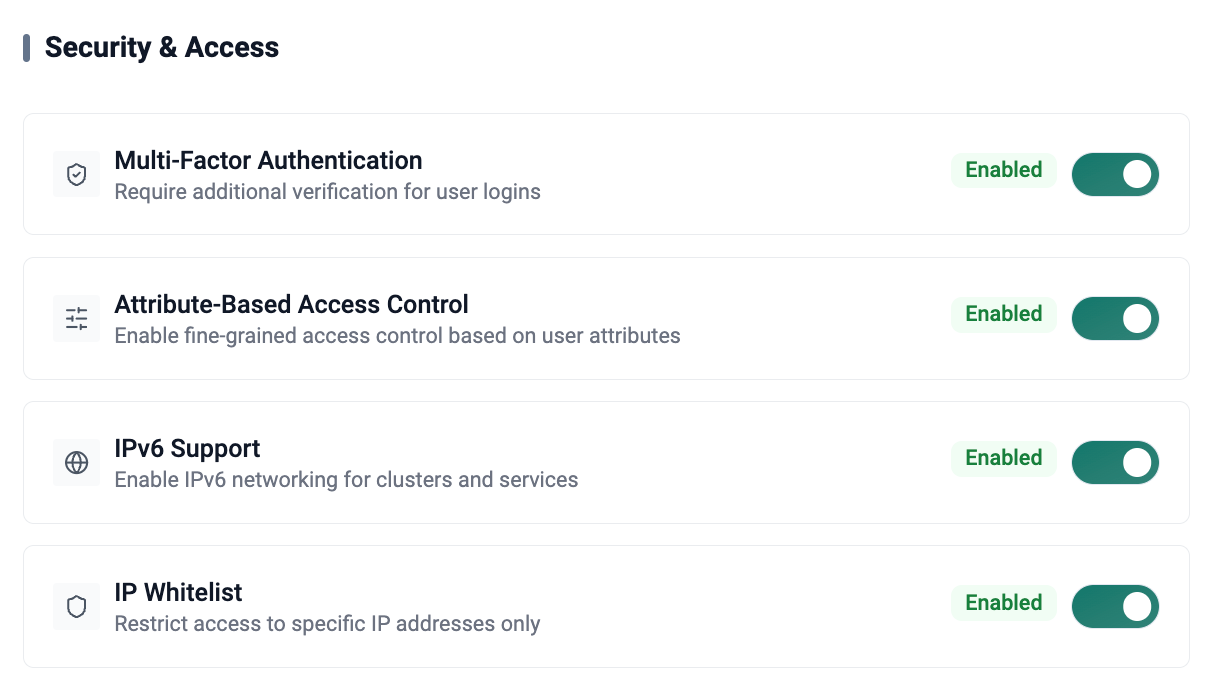
Security & Access
- Multi-Factor Authentication (MFA): Require users to provide an additional verification step during login (e.g., OTP, authenticator app) for enhanced security.
- Attribute-Based Access Control (ABAC): Enable fine-grained access control based on user attributes (e.g., department, role, project). Helps enforce security policies dynamically.
- IPv6 Support: Allow IPv6 networking for clusters and services. Useful for modern networking requirements and dual-stack environments.
- IP Whitelist: Restrict access to specific IP addresses or ranges. Only whitelisted IPs can access the organization’s resources.
PaaS Settings
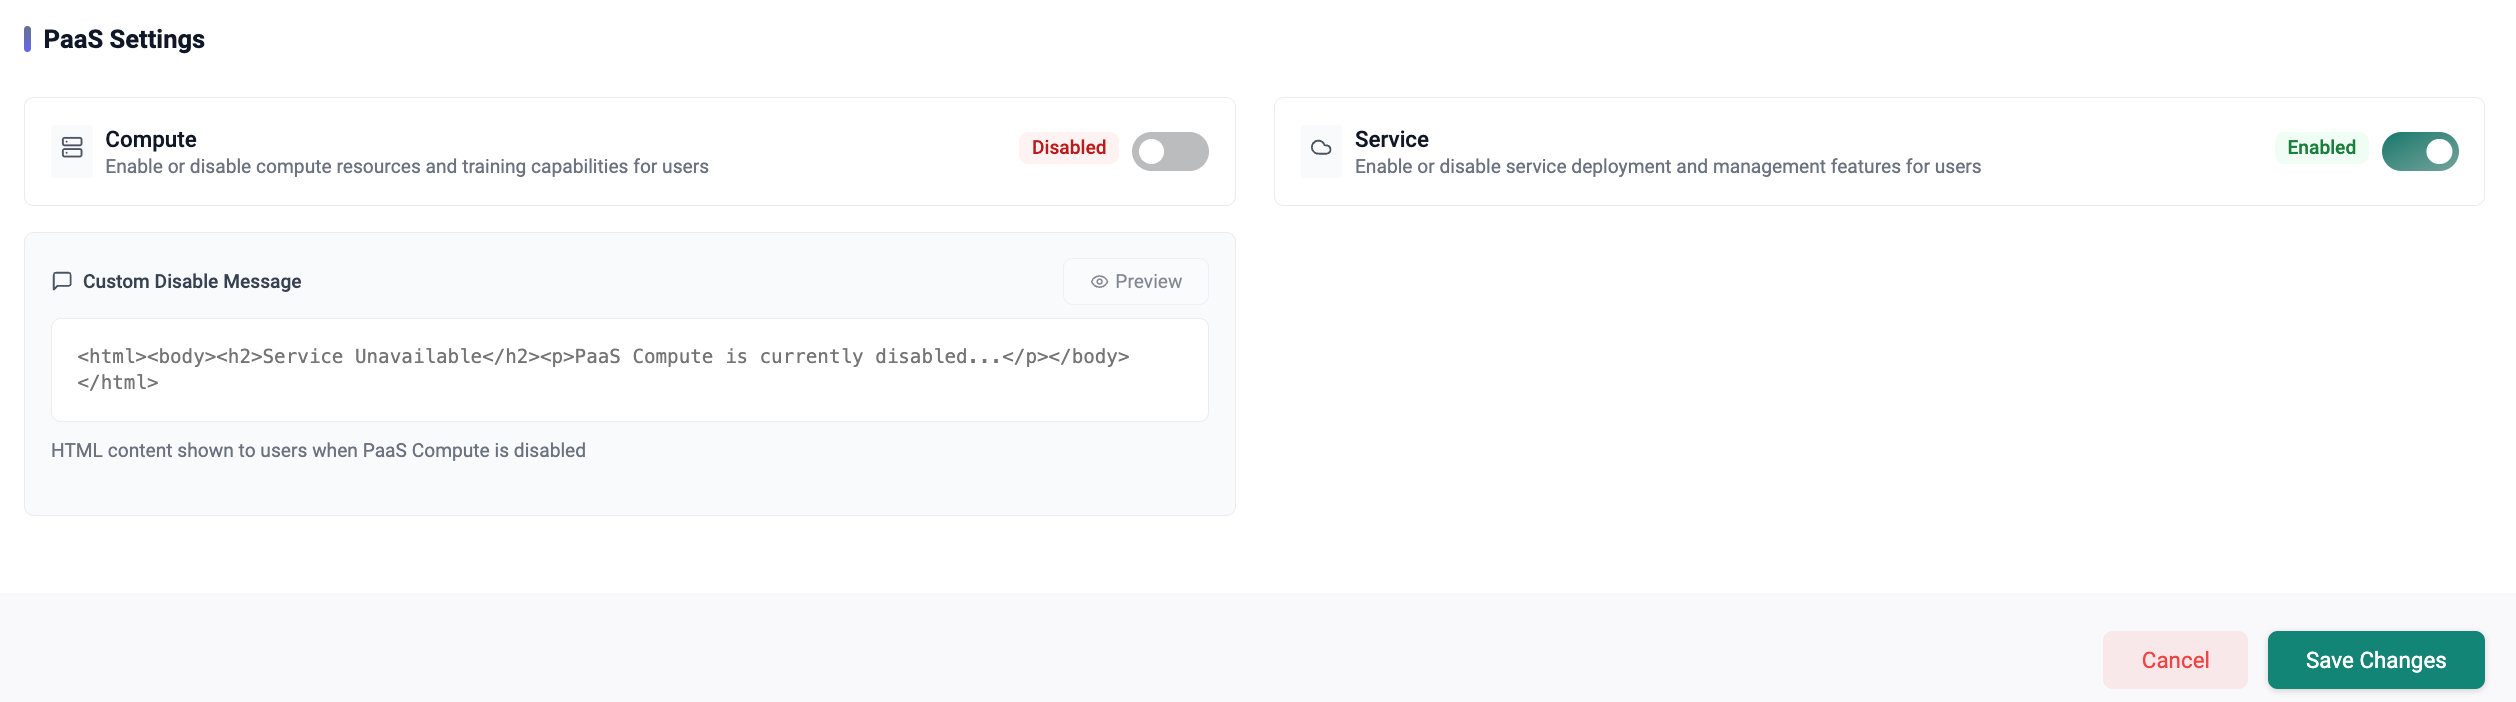
The PaaS Settings section allows administrators to manage provisioning control for compute and service instances. When disabled, instance creation is blocked and a custom message is shown to users.
Compute
- Enable or disable compute resources and training capabilities
- Custom Disable Message: Administrators can add an HTML script that is displayed to users when compute provisioning is disabled
- Preview: View how the custom message will appear to users
Service
- Enable or disable service deployment and management features
- Custom Disable Message: Administrators can add an HTML script that is displayed to users when service provisioning is disabled
- Preview: View how the custom message will appear to users
Example Custom Disable Message
<html>
  <body>
    <h2>Service Unavailable</h2>
    <p>PaaS Compute provisioning is currently disabled for your organization due to exceeded resource or quota limits.</p>
    <p>Please contact your administrator or support team for more information.</p>
  </body>
</html>
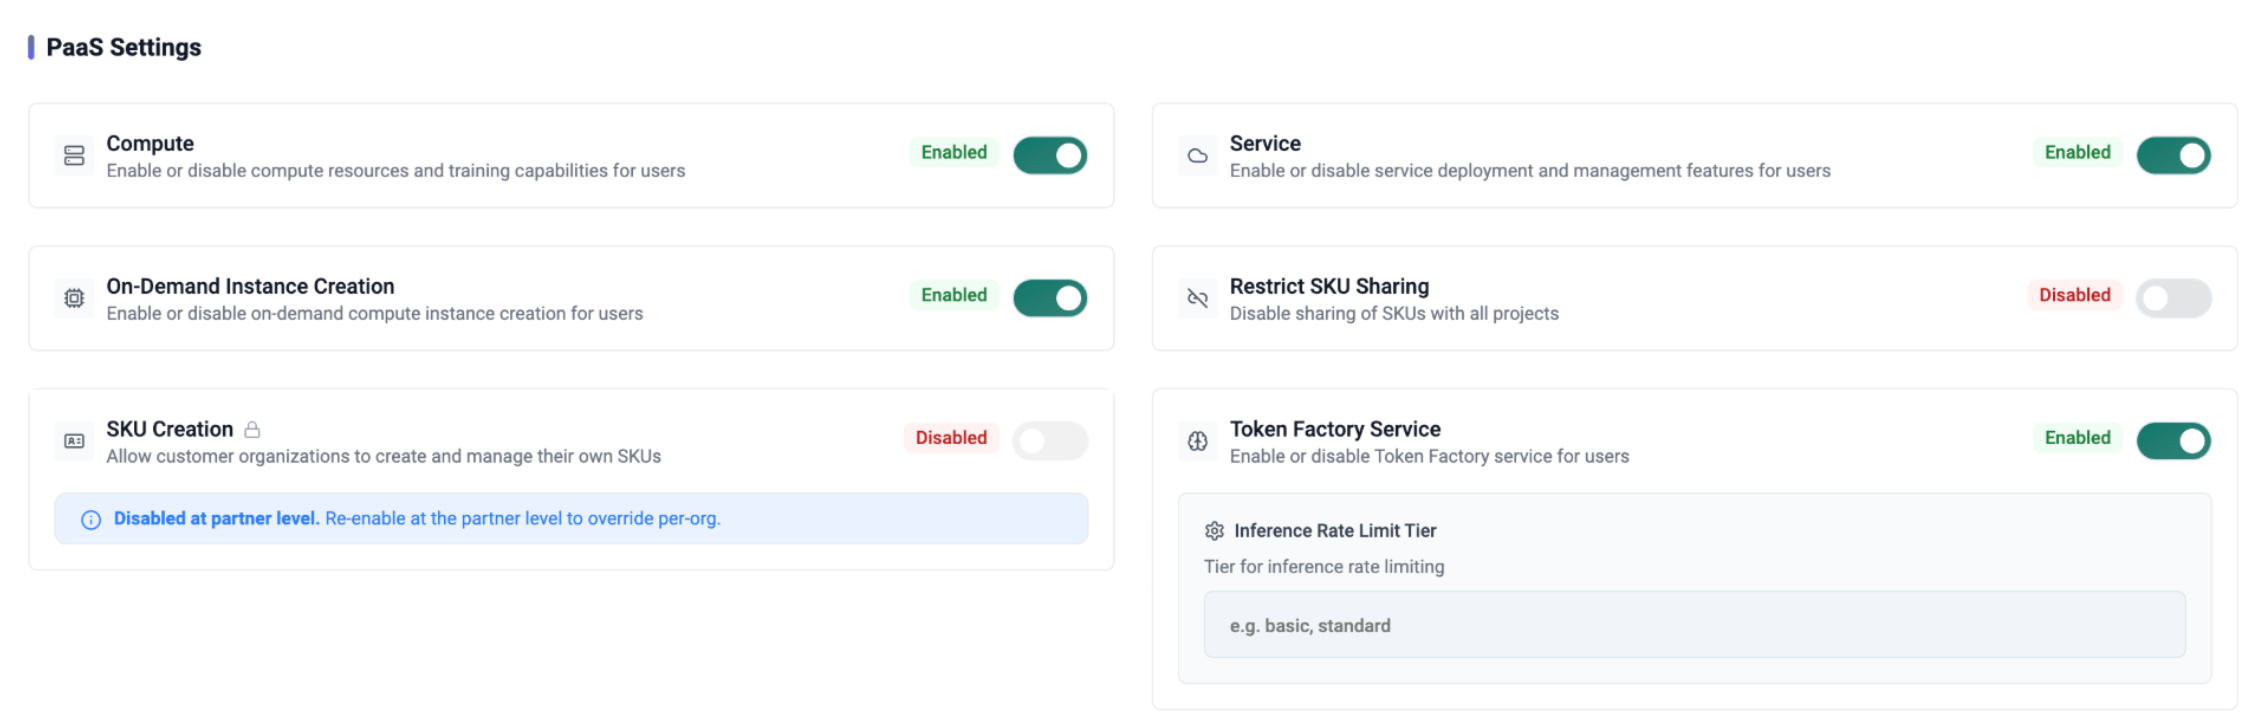
On-Demand Instance Creation
- Enable or disable on-demand compute instance creation for users
- When disabled, users can create only instances that match an active GPU reservation, preventing on-demand GPU usage outside reserved capacity
SKU Creation
- Enable or disable to allow customer organizations to create and manage their own SKUs
- When disabled at the partner level, the organization-level toggle is locked and cannot be enabled
- A notification message is displayed indicating that SKU Creation must be re-enabled at the partner level before it can be overridden for the organization
Restrict SKU Sharing
- Controls how SKUs (resource bundles or packages) are shared across projects within an organization
- The toggle is off by default, meaning SKU sharing is enabled and shared SKUs are automatically available to all projects
- When enabled, automatic sharing is disabled, and Org Admins can manually control project access to specific SKUs
Token Factory Service
- Enable or disable access to GenAI and Token Factory capabilities for users
- When disabled, users cannot access GenAI resources such as model deployments, inference endpoints, and token usage features
- Inference Rate Limit Tier: This field is displayed only when the Token Factory Service toggle is enabled. Specifies the inference rate limit tier assigned to the organization. Example:
basic,standard,gold- Tiers themselves are defined on the model deployment's Rate Limiting → Tier Based page. This field only assigns one of those tiers to the organization.
- When a tier is assigned here, it overrides the model deployment's organization level default rate limit for this org.
- Tiers are defined per model deployment, so the tier name assigned here is looked up independently on each deployment. This org may get the assigned tier's limits on one deployment and fall back to a completely different deployment's own settings on another.
- If Tier Based is disabled on a given deployment, the tier assigned here has no effect on that deployment. Only that deployment's Organization, User, and API Key limits (if enabled) apply.
- If left blank, the org uses the model deployment's organization level default rate limit (if enabled).
- API Key and User limits, when enabled on a deployment, still take precedence over whichever of Organization or Tier Based applies there.
- Inference Rate Limit Tier: This field is displayed only when the Token Factory Service toggle is enabled. Specifies the inference rate limit tier assigned to the organization. Example:
Example
Suppose a model deployment defines:
- Organization (default) limit:
1000max tokens per minute - Tier Based limits:
gold=10000max tokens per minute,bronze=100max tokens per minute
| Organization | Inference Rate Limit Tier (this field) | Rate limit applied |
|---|---|---|
| Org A | gold |
10000 tokens per minute. The tier overrides the deployment's organization default. |
| Org B | bronze |
100 tokens per minute. The tier overrides the default even though it is lower. |
| Org C | (blank) | 1000 tokens per minute. No tier is assigned, so the organization default applies. |
See Model Deployments → Rate Limiting → Tier Based for the full precedence rules across API Key, User, Organization, and Tier limits.
Plugin Settings
- LLM Guardrails: Enable or disable guardrails for LLM interactions and responses

Click Save Changes
Users can verify the custom registry configuration and workload images, as demonstrated in the examples below.
Verify Custom Registry Configuration
Below is an example where Custom Org is configured to use the custom registry FQDN demouser1.registry.net. This will check the bootstrap YAML file to ensure that all specified Rafay service images are correctly listed and sourced from the appropriate user registry, verifying that the deployment configuration is accurate and ready for execution.
cat ~/Downloads/customorg-cluster-1-bootstrap.yaml | grep 'image:'
image: demouser1.registry.net/rafay/rafay-relay-agent-redhat:master-84
image: demouser1.registry.net/rafay/busybox:1.33
image: demouser1.registry.net/rafay/cluster-controller:master-32
image: demouser1.registry.net/rafay/rafay-connector:master-89
Verify Rafay Workloads from Custom Registry
For example, as part of the initial cluster provisioning with a minimal blueprint, the provisioning and blueprint synchronization are successful.
In this example, the organization has a custom registry configured as demouser1.registry.net. All Rafay addons are pulled from this configured custom registry.
To verify the images, run the following command:
kubectl get pods -n rafay-system -o jsonpath="{..image}" | tr -s '[[:space:]]' '\n' | sort | uniq -c
demouser1.registry.net/rafay/busybox:1.33
demouser1.registry.net/rafay/cluster-controller:master-32
demouser1.registry.net/rafay/edge-client:main-34
demouser1.registry.net/rafay/rafay-connector:master-89
demouser1.registry.net/rafay/rafay-relay-agent:master-83
PaaS Settings
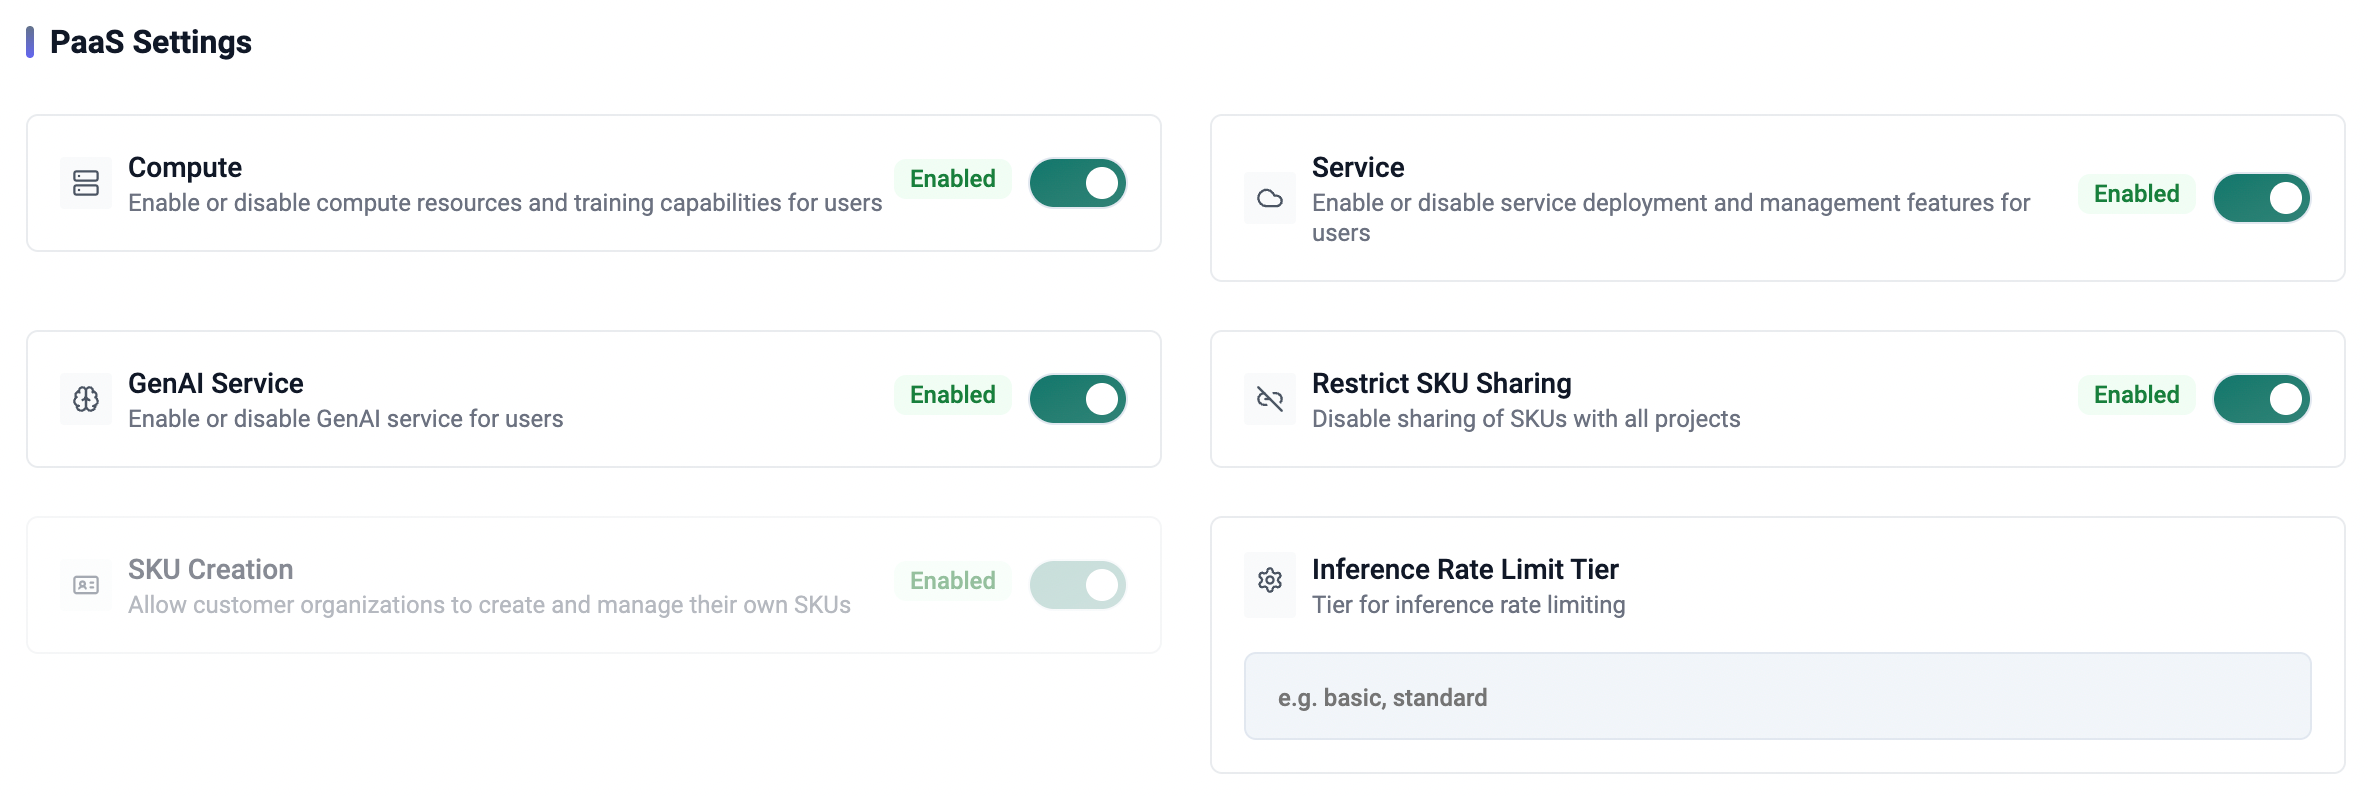
The PaaS Settings section allows administrators to manage provisioning control for compute and service instances. When disabled, instance creation is blocked and a custom message is shown to users.
Compute
- Toggle: Enable or disable compute resources and training capabilities.
- Custom Disable Message: Administrators can add an HTML script that is displayed to users when compute provisioning is disabled.
- Preview: View how the custom message will appear to users.
Service
- Toggle: Enable or disable service deployment and management features.
- Custom Disable Message: Administrators can add an HTML script that is displayed to users when service provisioning is disabled.
- Preview: View how the custom message will appear to users.
Example Custom Disable Message
<html>
  <body>
    <h2>Service Unavailable</h2>
    <p>PaaS Compute provisioning is currently disabled for your organization due to exceeded resource or quota limits.</p>
    <p>Please contact your administrator or support team for more information.</p>
  </body>
</html>
GenAI Service
Controls whether Generative AI capabilities are available for the organization.
- When enabled, allows access to model deployments and inference operations.
- Enables interaction with configured AI models for tasks such as text generation.
- Works with rate limiting settings (such as Inference Rate Limit Tier) to manage usage.
- When disabled, GenAI features and access to model deployments are not available.
Restrict SKU Sharing
Controls how SKUs (resource bundles or packages) are shared across projects within an organization.
- The toggle is off by default, meaning SKU sharing is enabled, and all shared SKUs are automatically available to every project.
- When the toggle is turned on, automatic sharing is disabled, and Org Admins can manually select which projects can access specific SKUs.
- This is an organization-level setting that defines whether SKU availability is global (shared with all projects) or restricted (project-specific).
Inference Rate Limit Tier
Enhanced Inference Rate Limit Tier support is available from release v3.1-39 onwards.
Specifies the rate limit tier assigned to the organization for inference usage.
- A tier (for example,
basic,standard,premium) represents a predefined set of limits such as requests and tokens per minute. - Tiers are configured in model deployments with specific rate limits.
- A single tier can be assigned to an organization.
- The assigned tier determines the limits applied to the organization.
- Overrides the default organization-level rate limits when specified.
- If no tier is assigned, the default rate limits (if enabled) are applied.
- Click Save Changes
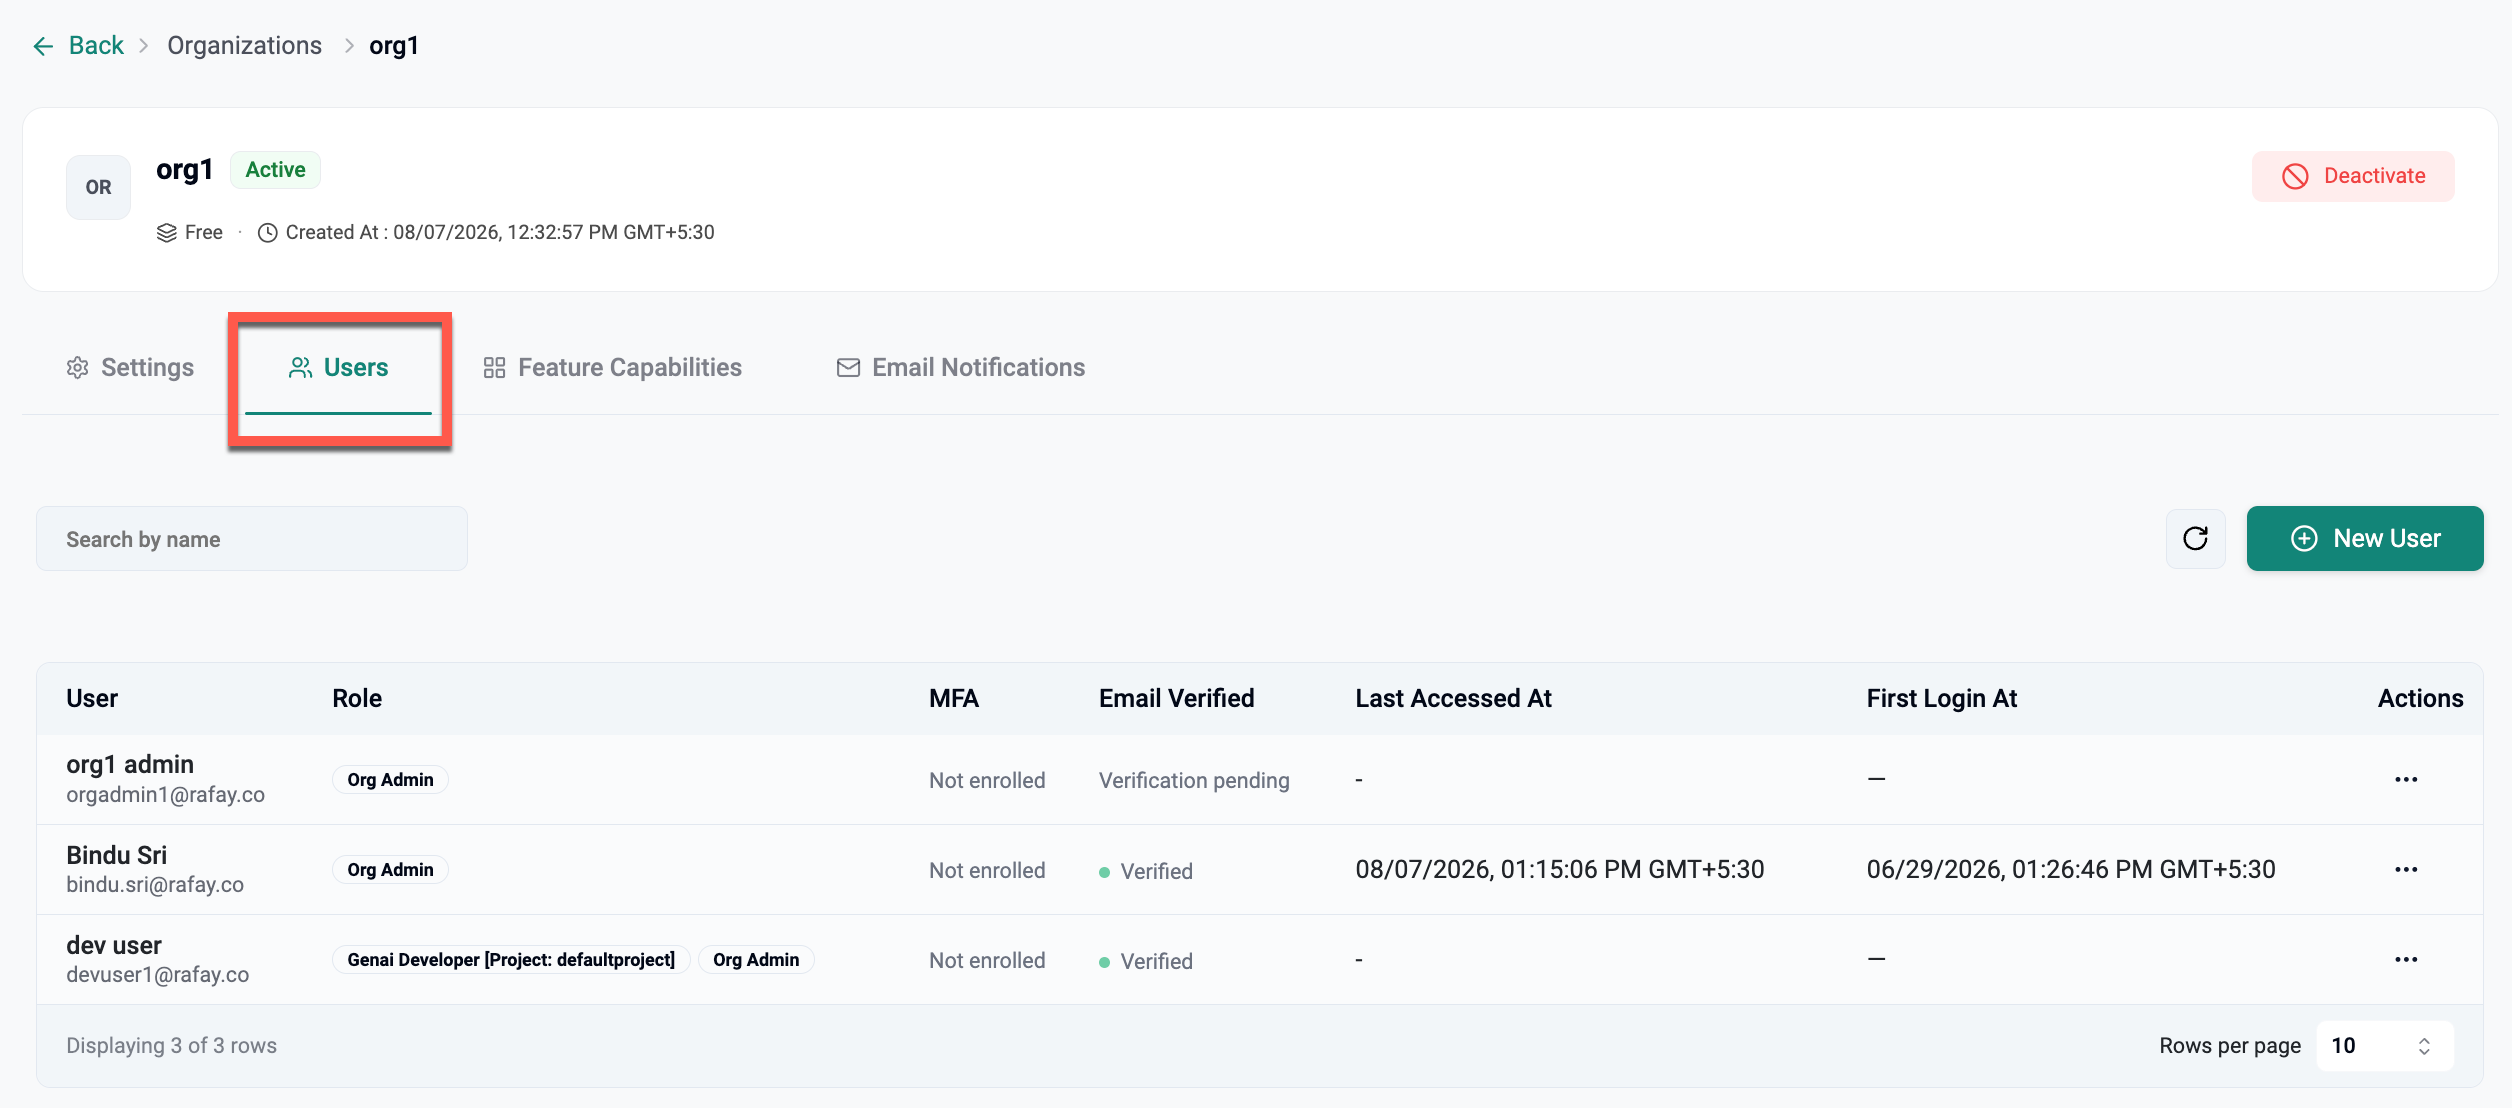
Users
Add Users to an organization or view the existing user details of a specific organization
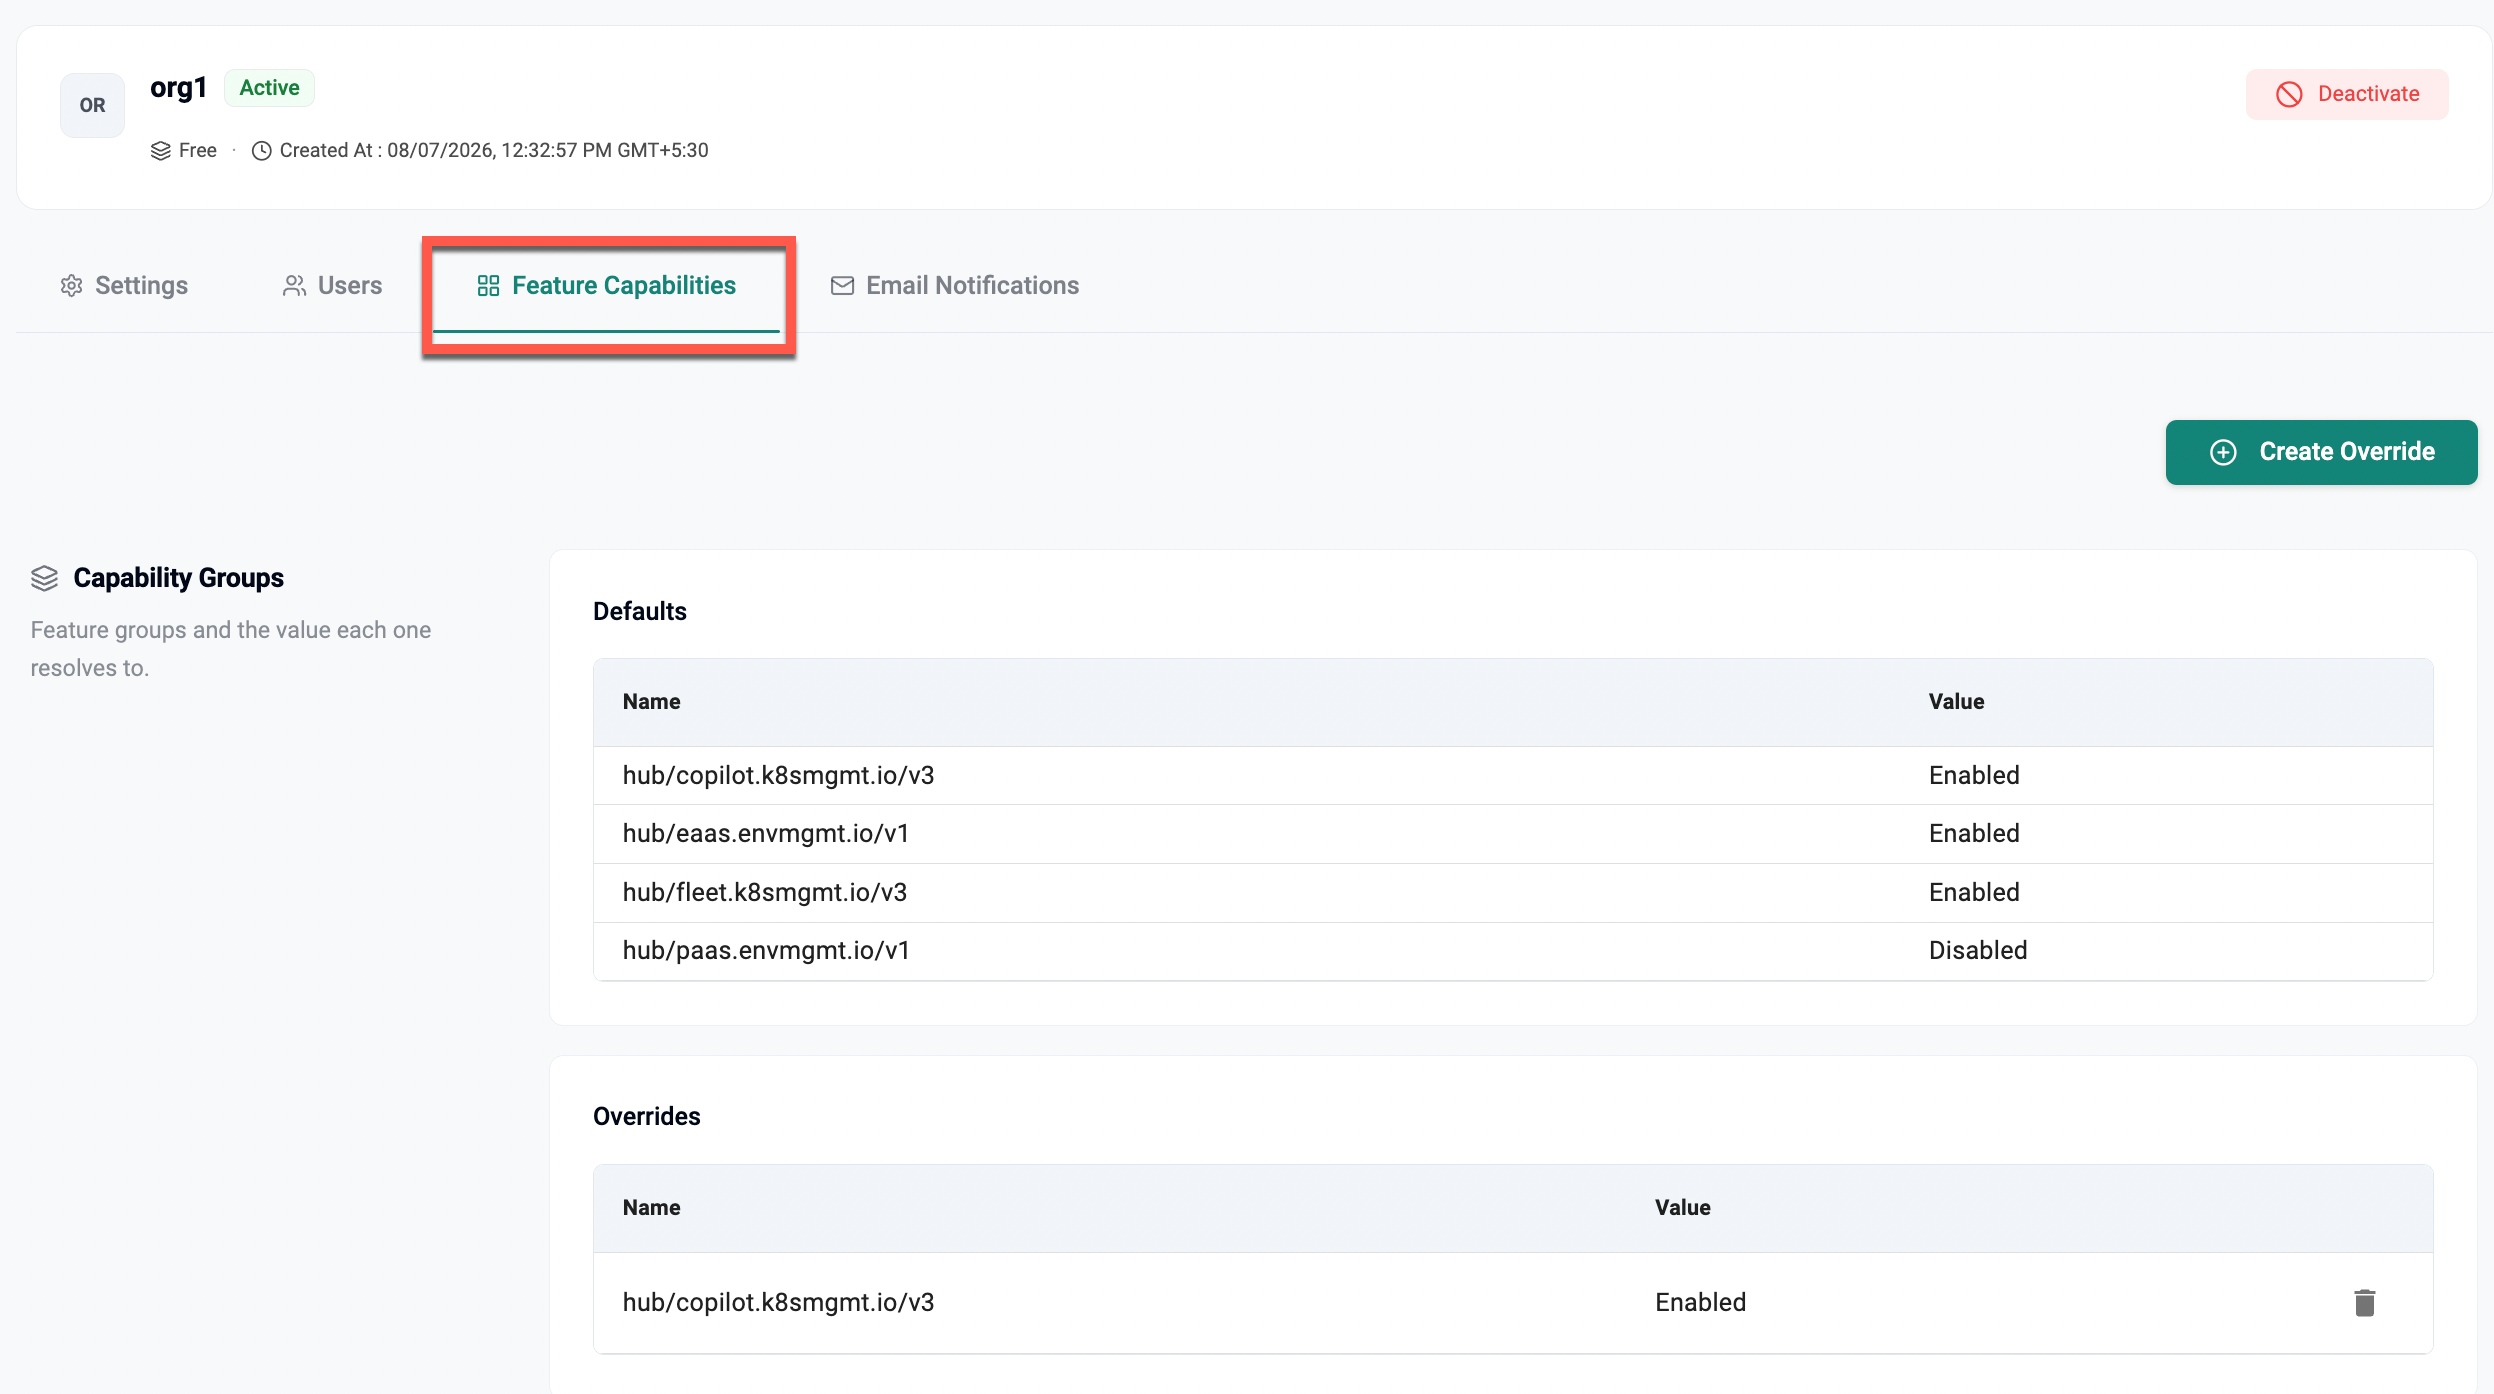
Feature Capabilities
At the org level, default capability options (enable/disable) can be set. Enable/disable Overrides are available and these override the default capability option
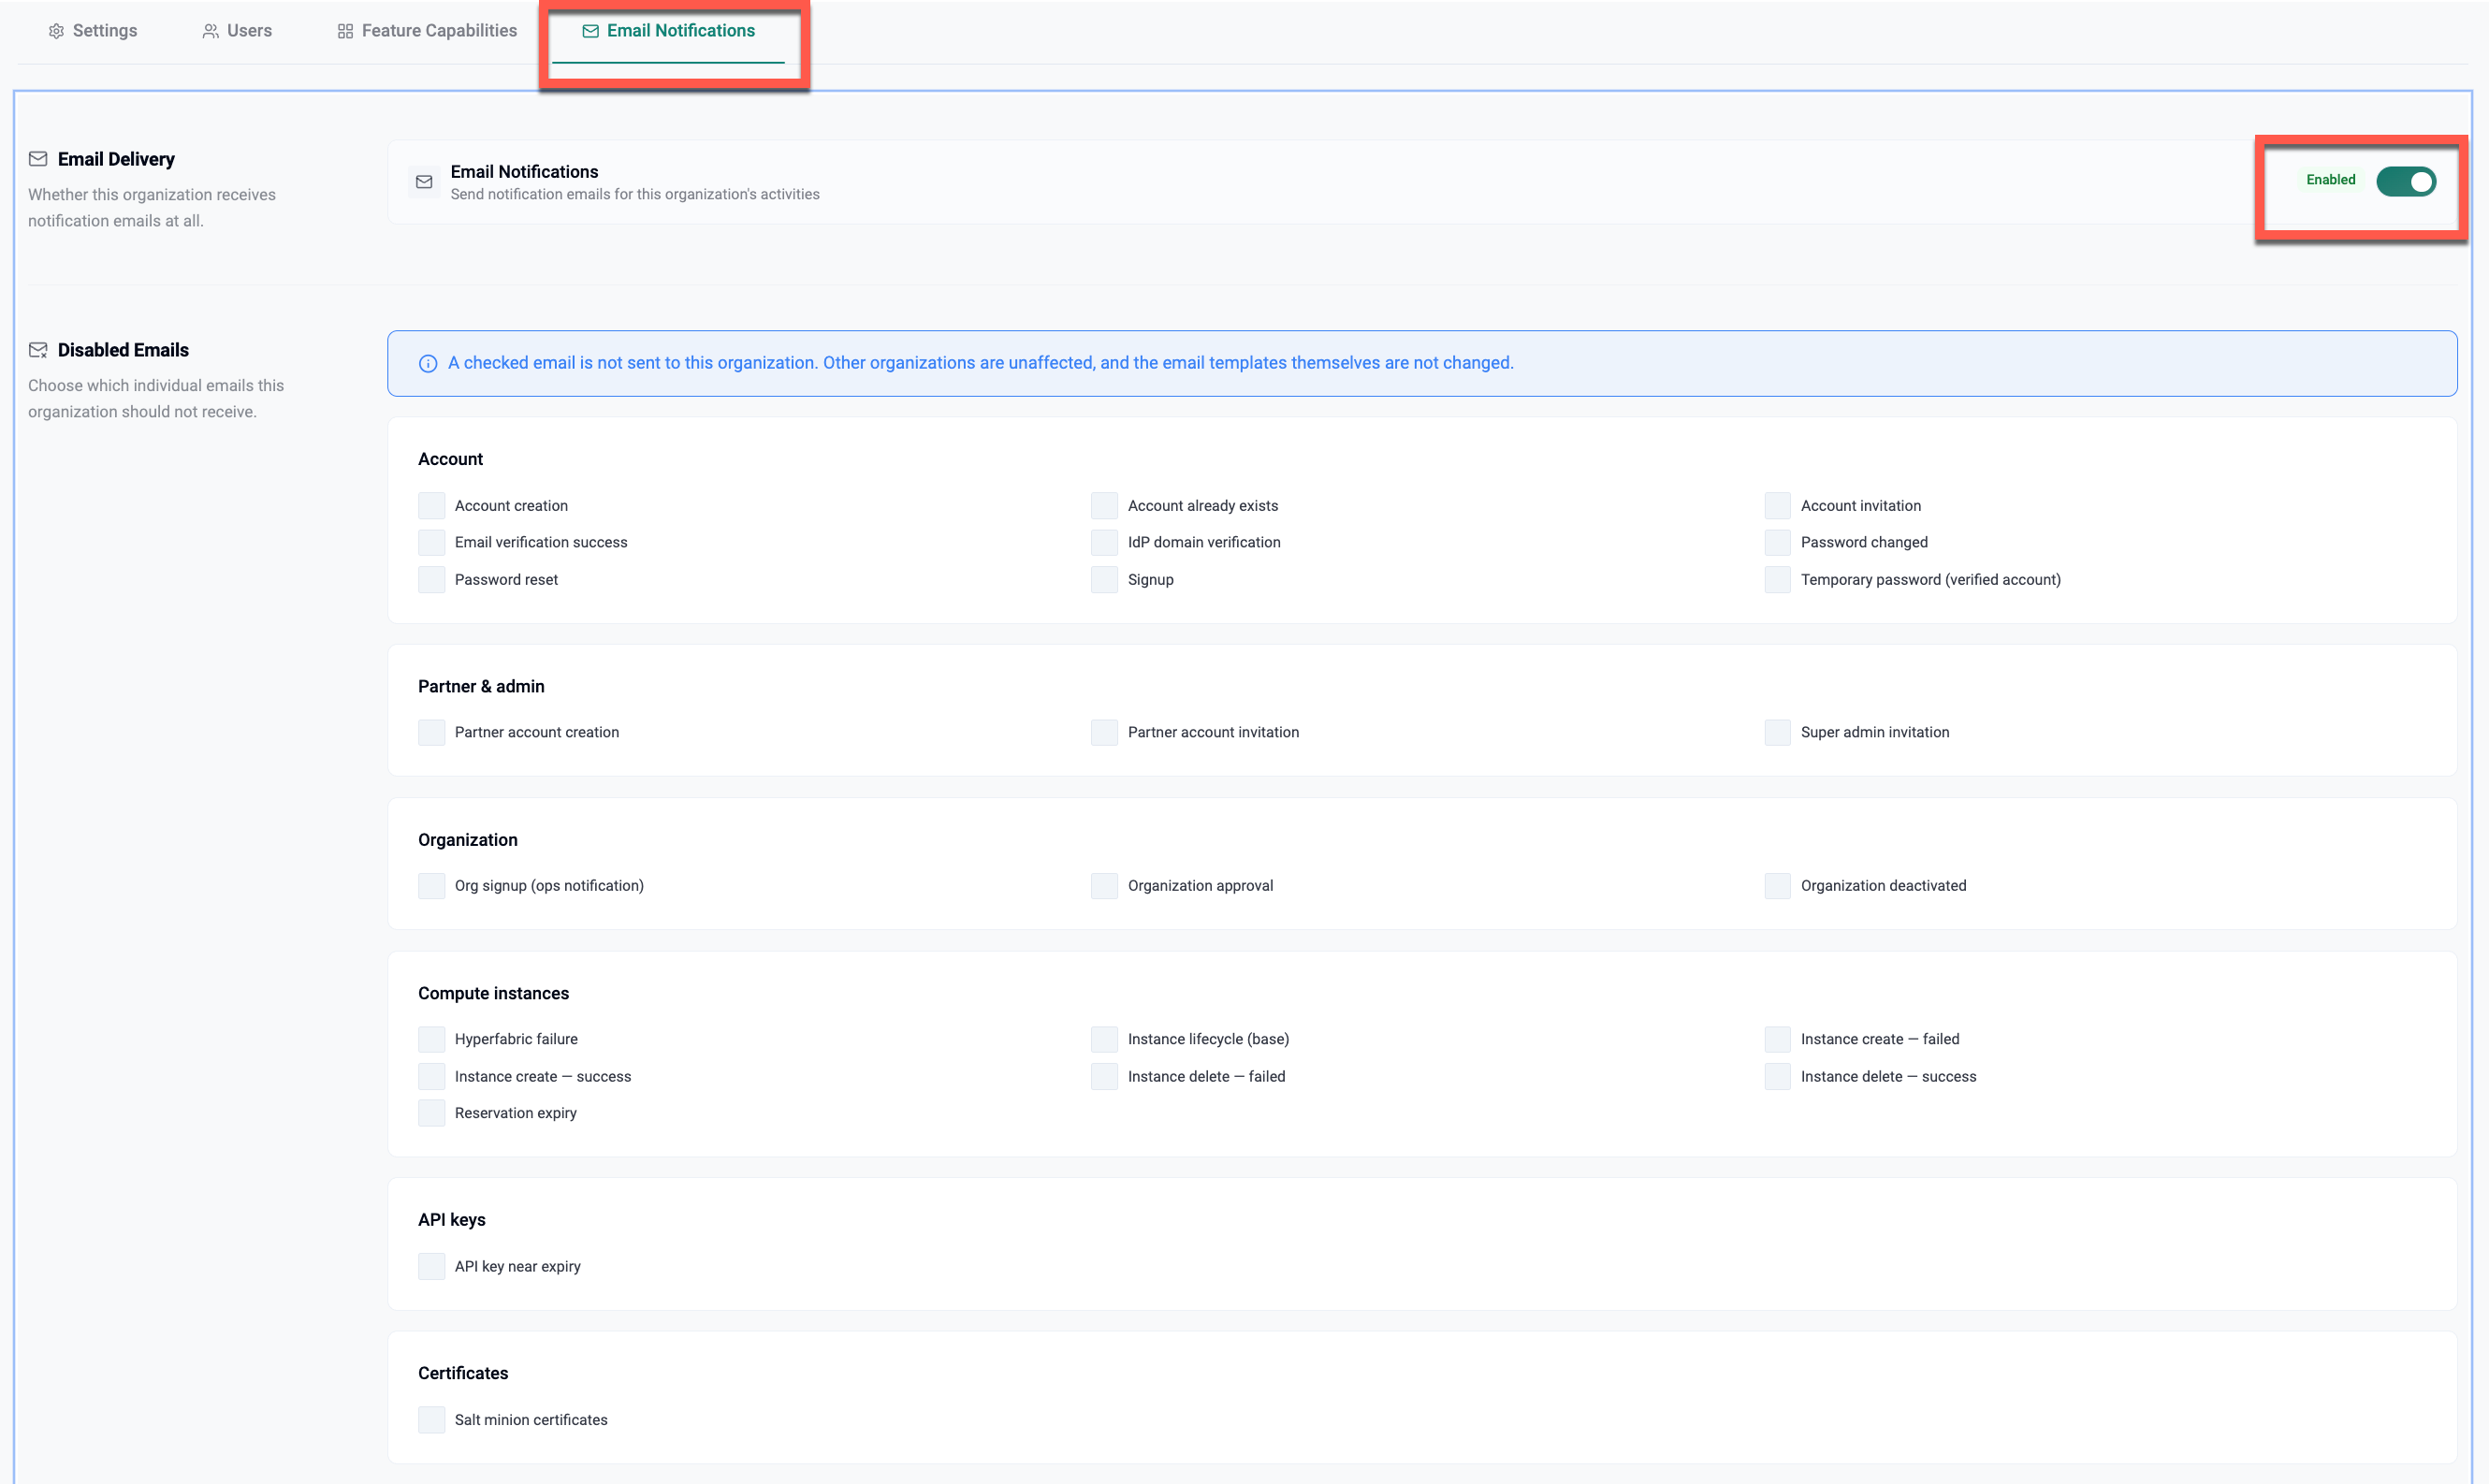
Email Notifications
Per-org email notification control is available from release v3.1-40 Patch onwards.
The Email Notifications tab lets a Partner Admin control, on a per-organization basis, which notification emails the tenants (users) under that organization receive. This is useful when a specific customer org should be exempted from Rafay's notification emails, for example an internal test/demo org, an org piloting the platform without needing account and lifecycle emails, or an org that has asked not to receive certain notification types, all without impacting any other organization.
- Email Delivery: A single toggle to enable or disable all notification emails for the organization's tenants. Use this when the tenants under the org should not receive any Rafay notification emails at all.
- Disabled Emails: For more fine-grained control, select individual email types to exclude while everything else keeps flowing normally. A checked email is not sent to the tenants under this organization; all other email types continue to be delivered to them. This is useful when only specific notifications, such as password-related emails or compute instance alerts, should be suppressed for the org's tenants, without turning off notifications entirely. Email types are grouped by category:
- Account: Account creation, Account already exists, Account invitation, Email verification success, IdP domain verification, Password changed, Password reset, Signup, Temporary password (verified account)
- Partner & admin: Partner account creation, Partner account invitation, Super admin invitation
- Organization: Org signup (ops notification), Organization approval, Organization deactivated
- Compute instances: Hyperfabric failure, Instance lifecycle (base), Instance create — failed, Instance create — success, Instance delete — failed, Instance delete — success, Reservation expiry
- API keys: API key near expiry
- Certificates: Salt minion certificates
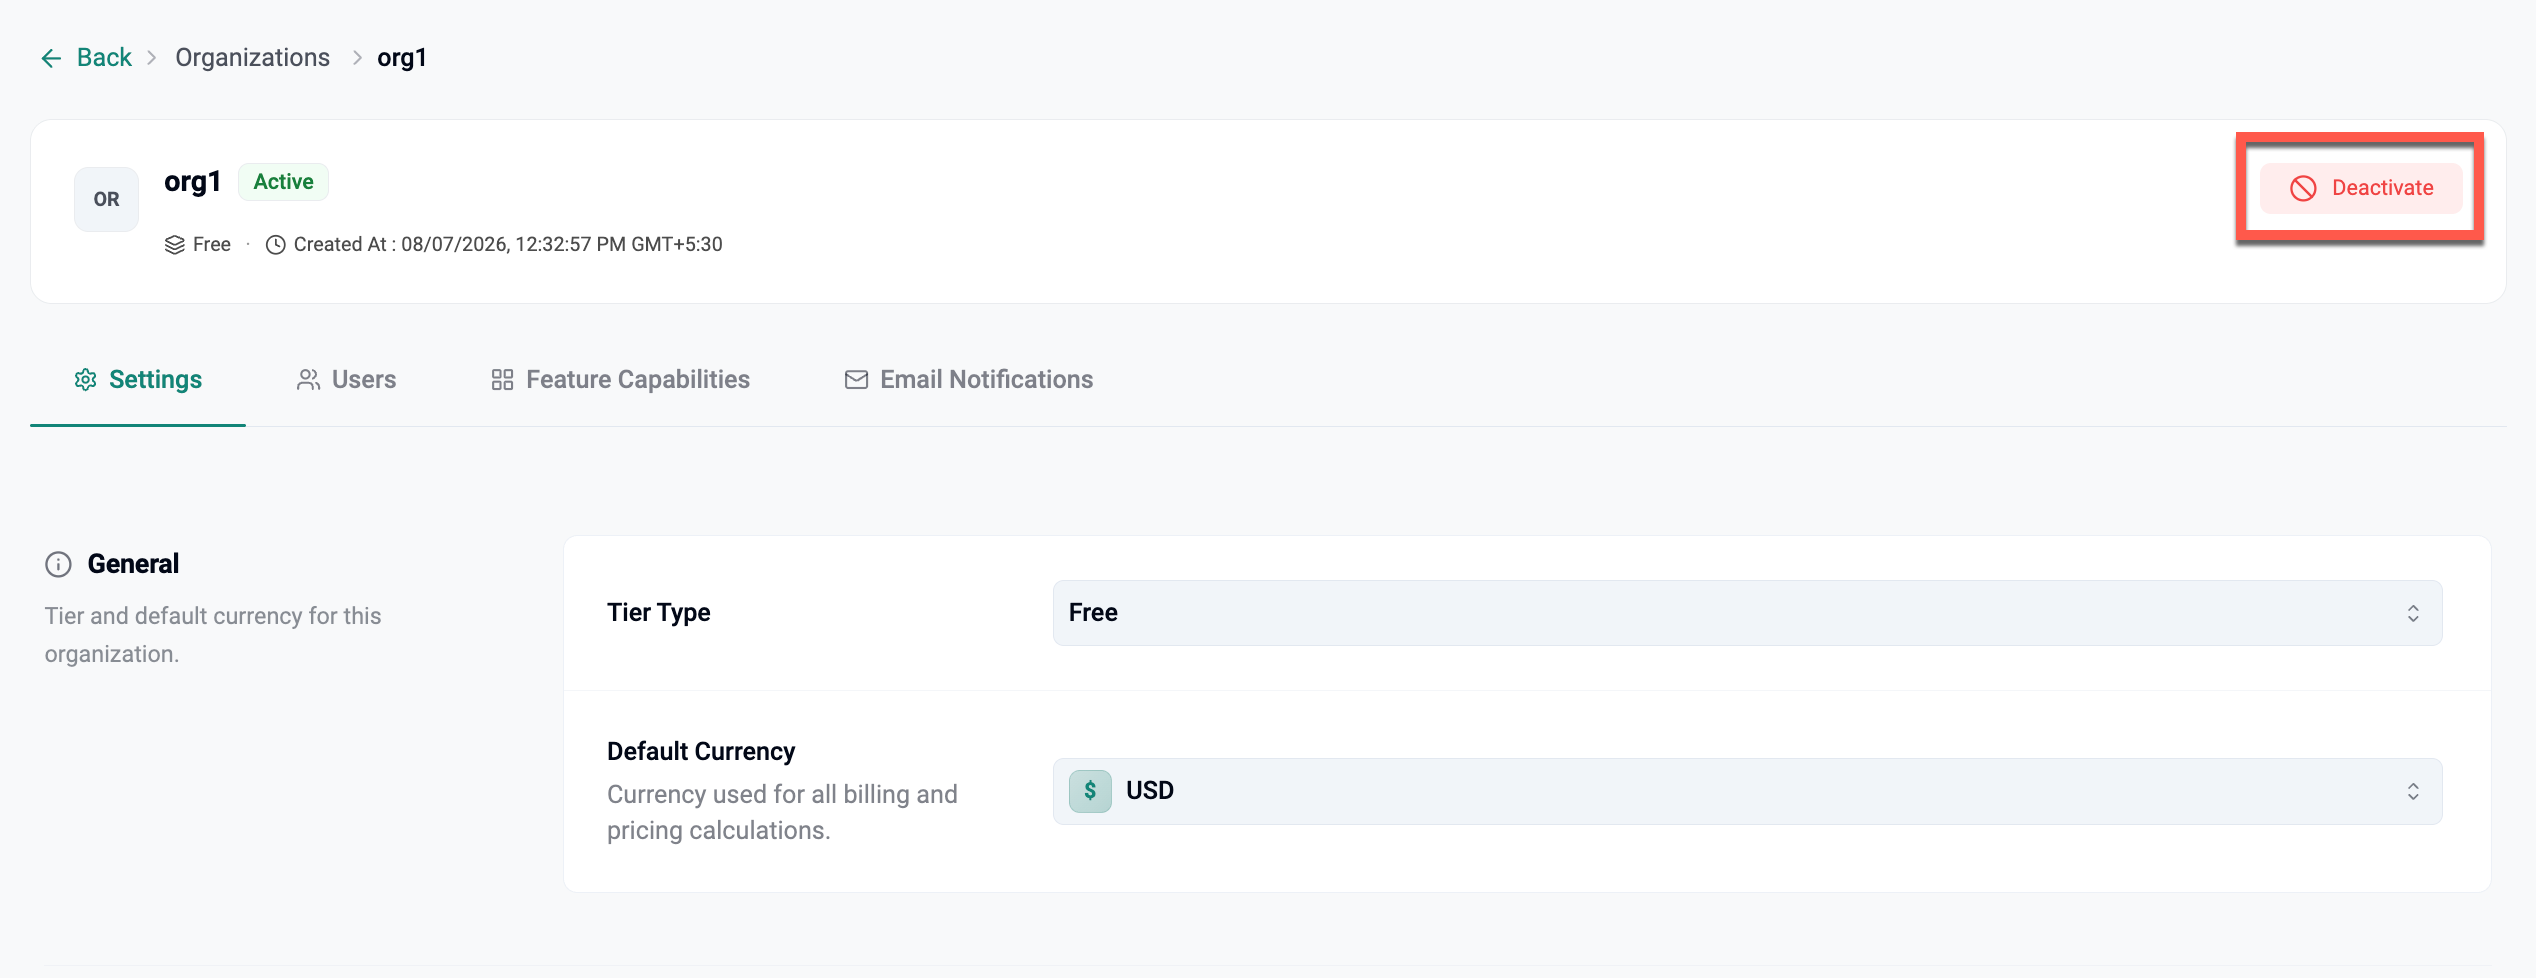
Deactivate Org
Click Deactivate button to deactivate the organization. This blocks all the users within this organization from accessing it. A good example for this action is when an end customer is delinquent on their payments.
Note: Only the Approved organization can be deactivated
- Click Save Changes
Delete Org
Existing Organizations can be deleted permanently if required. Note that this is a destructive, non-reversible action.
Users
As a best practice, configure at least two Partner Admin users for the Operations Console. This helps prevent losing administrative access if one administrator is unavailable or unable to access their account.
Add User
A Partner Admin can invite another user to the Operations Console.
Navigation: Operations Console > Users
- Click Users.
- Click New User.
- In the Create user dialog, enter the following details:
- First name
- Last name
- Work email
- Phone (optional)
- Click Create user.
The invited user receives an activation email. After verifying the email address and setting a password, the user can sign in to the Operations Console.
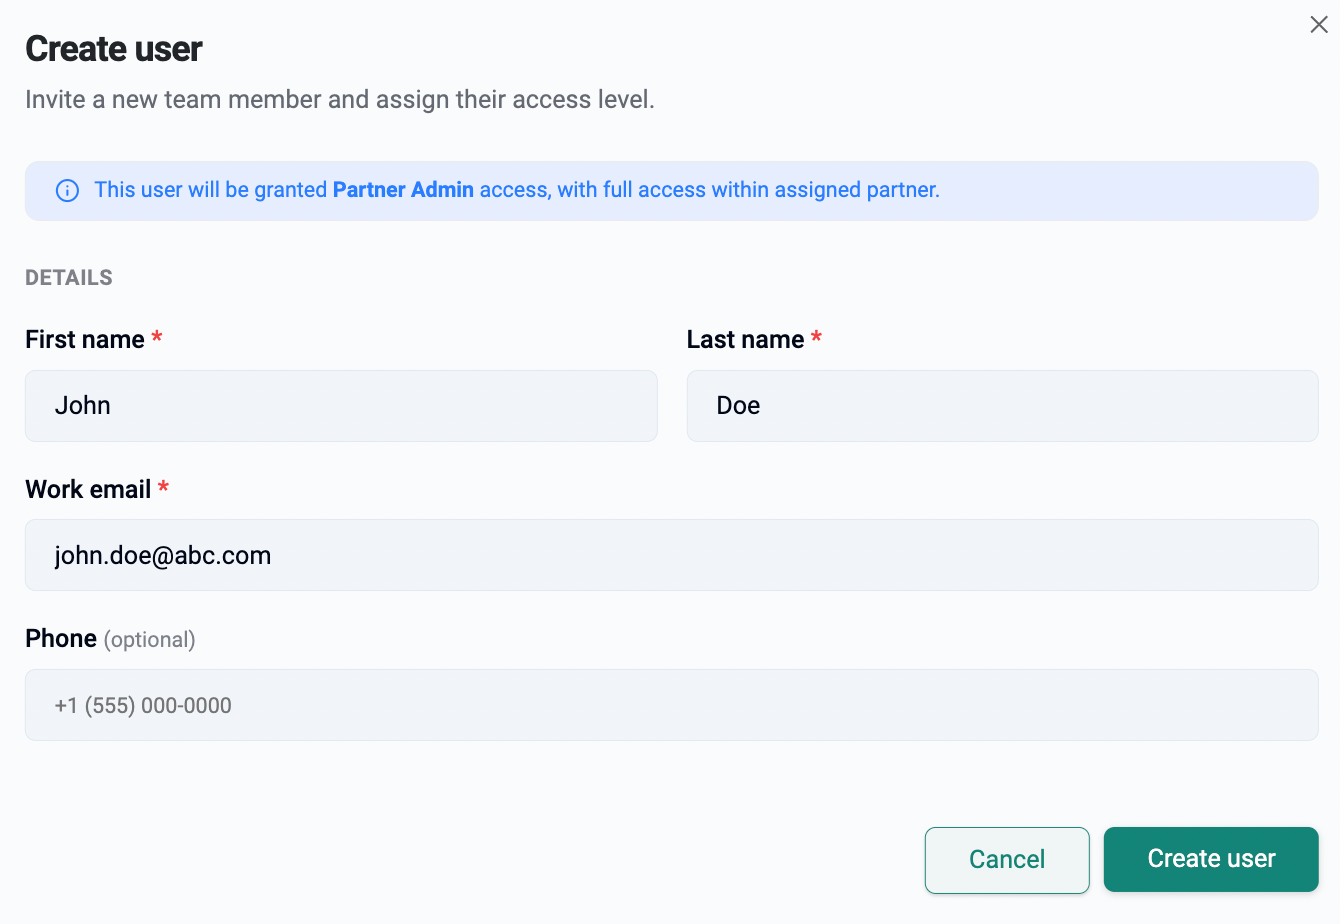
Note: Users created from this page are automatically granted Partner Admin access within the assigned partner.
When inviting a user, email verification is required. Users with unverified email addresses must verify their email address before they can access the Operations Console.
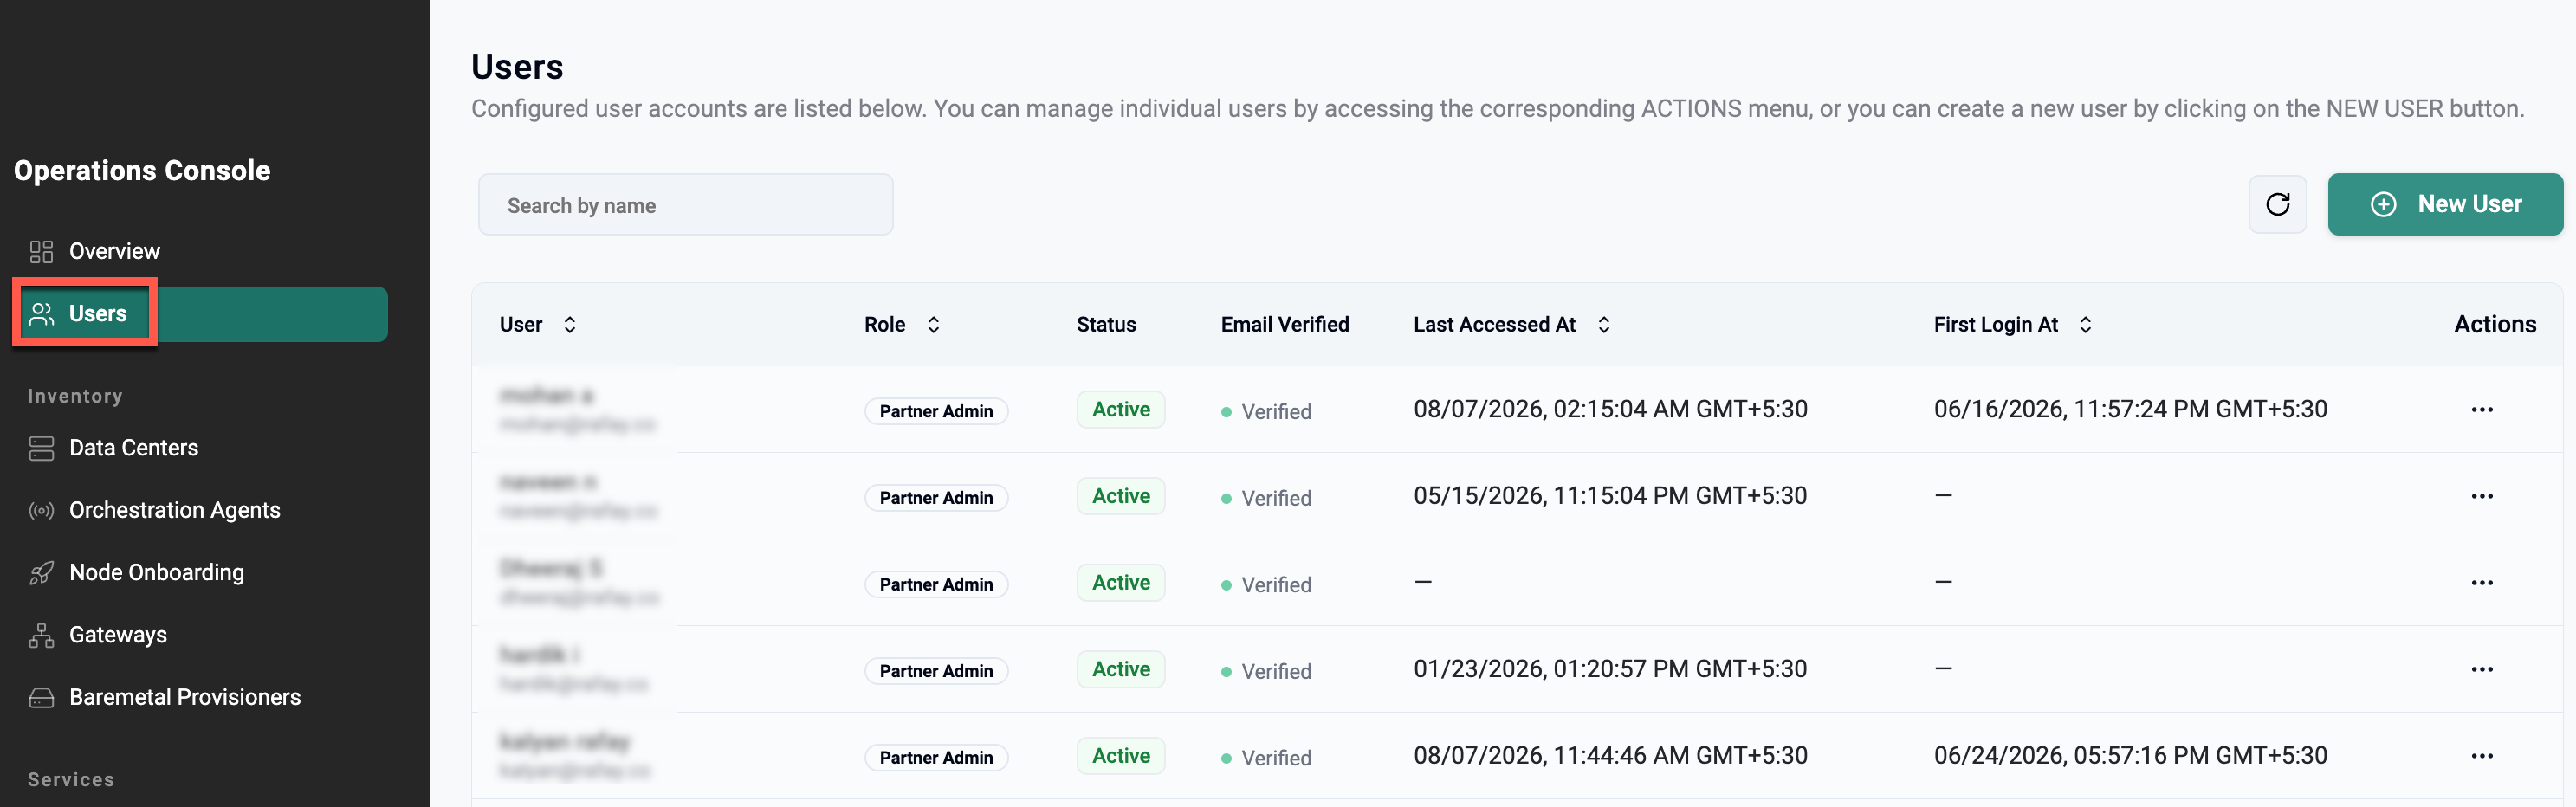
View User
To view all users configured to access the Operations Console, click on "Users". This will present you with list of users, their status etc.
Deactivate User
User access to the Operations Console can be temporarily suspended by deactivating the user.
- Click on Actions for the specific user
- Select "Deactivate" from the action dropdown
Follow the same steps to reactivate the deactivated user.
Delete User
Users can be permanently deleted from the Operations Console. Once performed, they will no longer be able to access the console.
- Click on Actions for the specific user
- Select "Delete" from the dropdown actions
Audit Logs
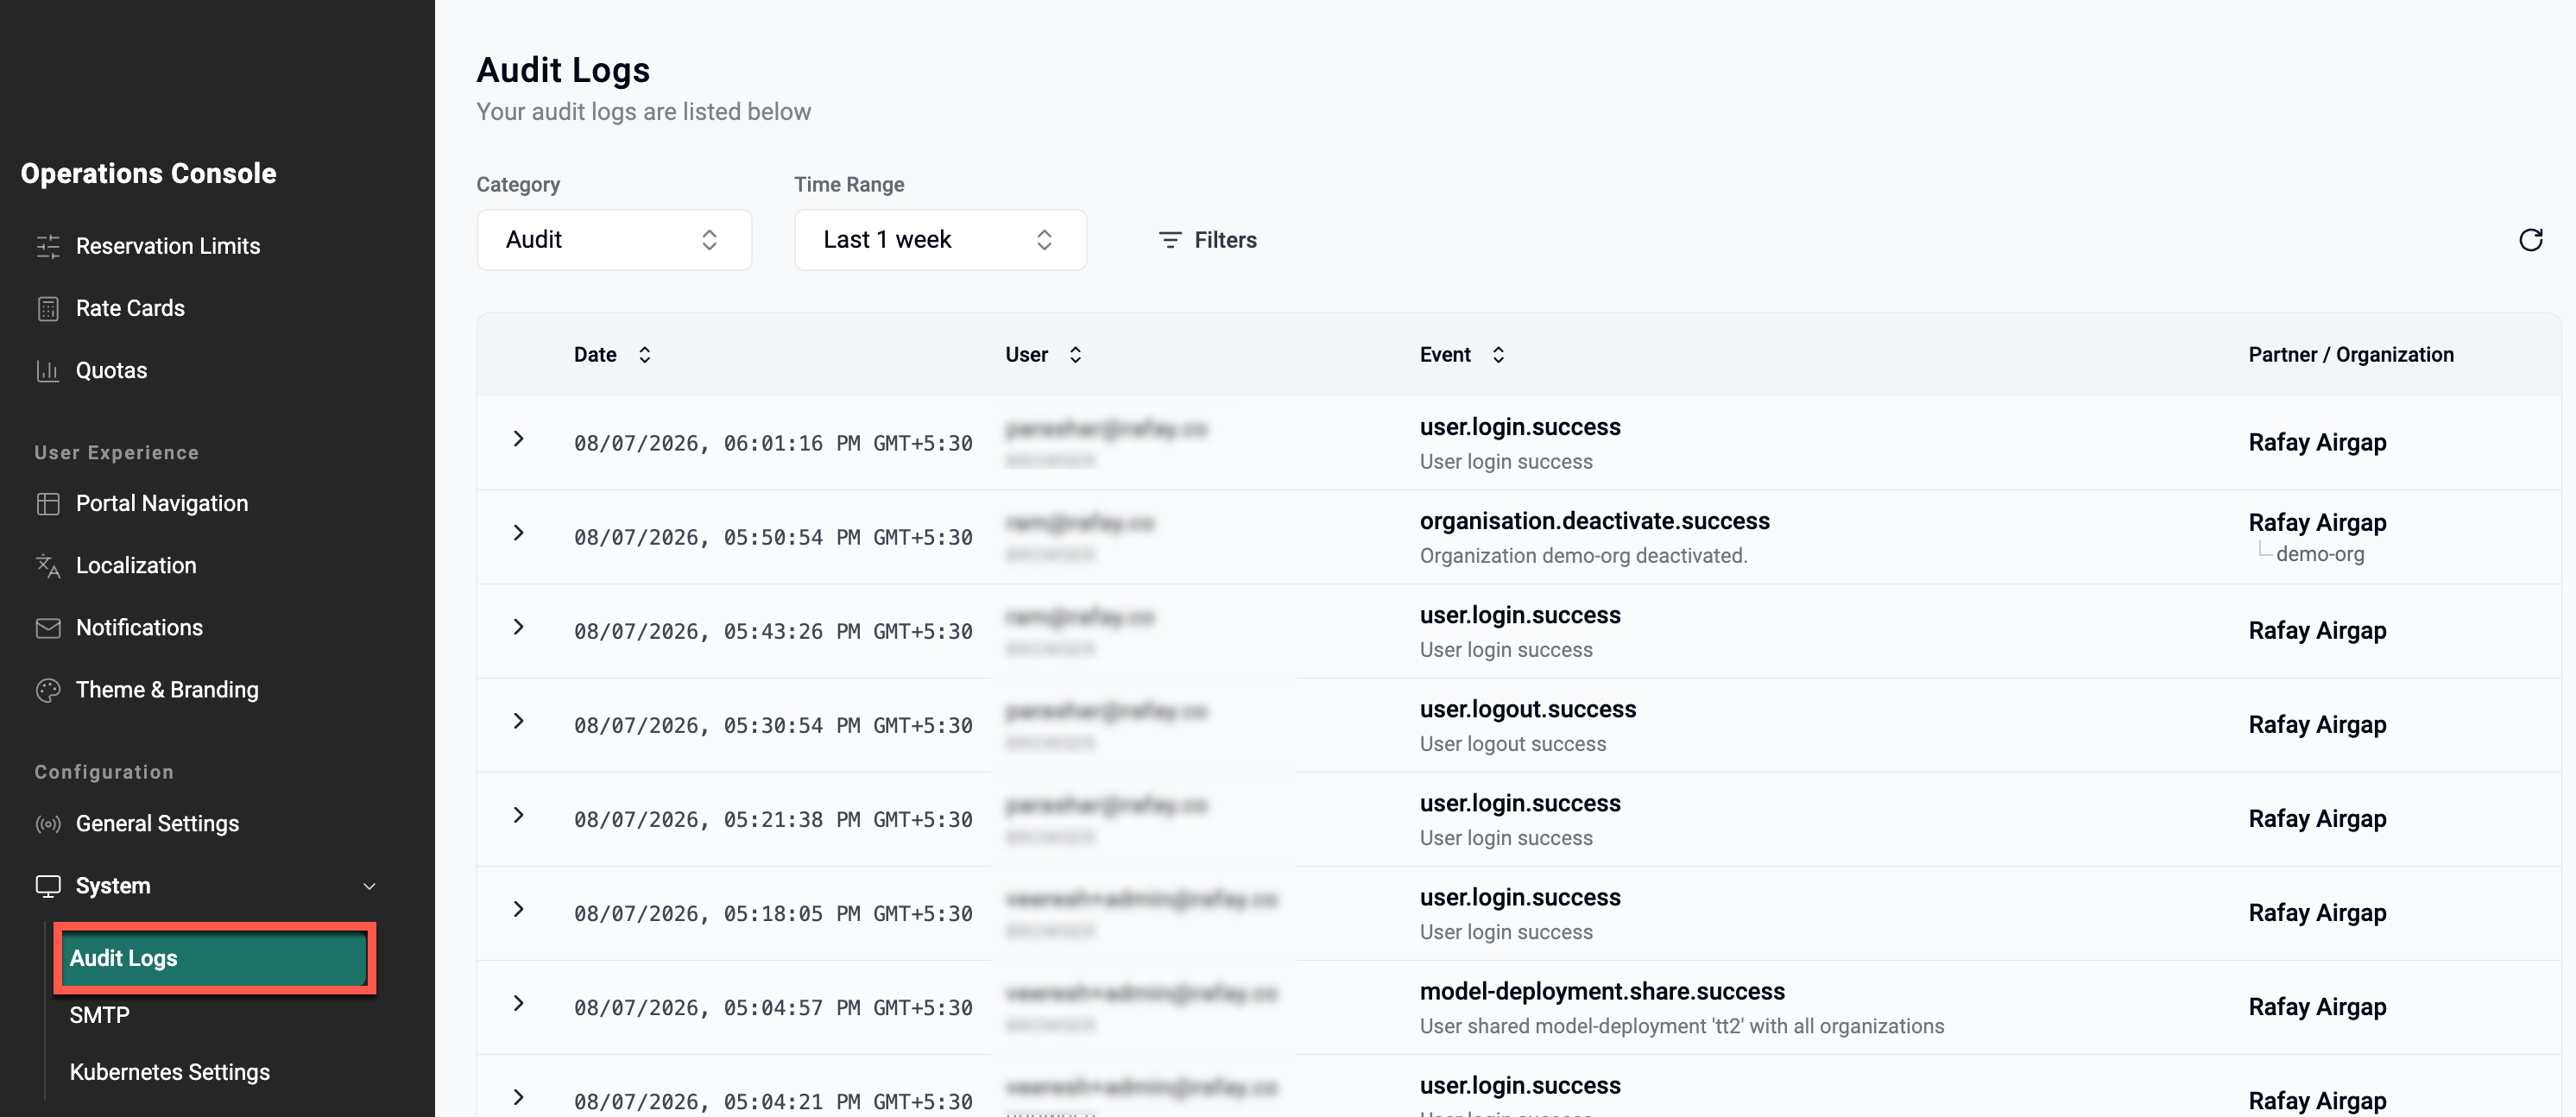
An audit trail is available for activity performed by users on the Operations Console. Click on Audit Logs to view the logs in a reverse chronological format.