Splunk Otel Collector
Although the Kubernetes Management Operator on managed clusters provides integrated monitoring and visibility capabilities, organizations may have standardized on Splunk for their application log aggregation and/or cluster monitoring .
Splunk Otel Collector for Kubernetes provides a way to import and search your Kubernetes logging and metrics data into Splunk. This recipe describes how customers can standardize the configuration, deployment and lifecycle management of the Splunk Otel Collector across their fleet of clusters.
What Will You Do
In this exercise,
- You will create a customized "splunk-otel-collector" addon using the Splunk distribution from OpenTelemetry Collector.
- You will use the addon in a custom cluster blueprint
- You will then apply this cluster blueprint to a managed cluster
Important
This recipe describes the steps to create and use a custom cluster blueprint using the Web Console. The entire workflow can also be fully automated and embedded into an automation pipeline.
Assumptions
- You have already provisioned or imported one or more Kubernetes clusters using the controller.
- You have access to a Splunk instance (Enterprise or Cloud)
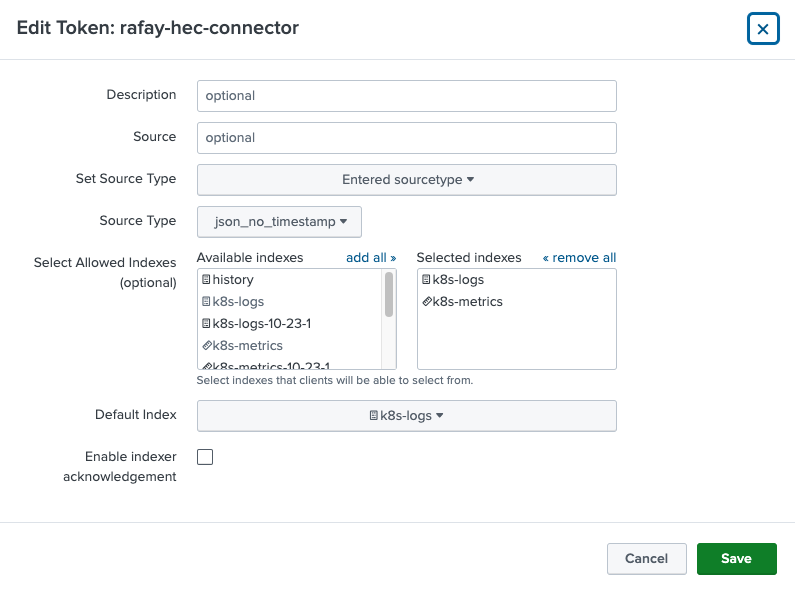
Splunk Indexes
We will be using two (2) Splunk Indexes:
- k8s-logs (for logs)
- k8s-metrics (for metrics)
Instructions to create Splunk Indexes
Splunk HEC
A valid HEC aka HTTP Event Collector token is required for Splunk Connect to send metrics and logs to your Splunk Instance. Instructions to setup a HTTP Event Collector in Splunk.
Important
The Source Type for the HEC should be "json_no_timestamp"
Step 1: Download Helm Chart
Download the latest helm chart for Splunk Otel Collector from the official repository. In this example, we will be using v0.86.1 of the chart (filename: splunk-otel-collector-0.86.1.tgz).
wget https://github.com/signalfx/splunk-otel-collector-chart/releases/download/splunk-otel-collector-0.86.1/splunk-otel-collector-0.86.1.tgz
Step 2: Customize Values
The Splunk Otel Collector Helm chart comes with a very complex values.yaml file with support for a large number of scenarios.
We will be customizing the default with our own override "values.yaml".
- Copy the details below into a file named "splunk-otel-collector-values.yaml".
- Replace the Splunk HEC settings with your Splunk server's values
################################################################################
# clusterName is a REQUIRED. It can be set to an arbitrary value that identifies
# your K8s cluster. The value will be associated with every trace, metric and
# log as "k8s.cluster.name" attribute.
################################################################################

clusterName: {{{ .global.Rafay.ClusterName }}}

################################################################################
# Splunk Cloud / Splunk Enterprise configuration.
################################################################################

# Specify `endpoint` and `token` in order to send data to Splunk Cloud or Splunk
# Enterprise.
splunkPlatform:
  # Required for Splunk Enterprise/Cloud. URL to a Splunk instance to send data
  # to. e.g. "http://X.X.X.X:8088/services/collector/event". Setting this parameter
  # enables Splunk Platform as a destination. Use the /services/collector/event
  # endpoint for proper extraction of fields.
  endpoint: "https://prd-p-f8lv2.splunkcloud.com:8088"
  # Required for Splunk Enterprise/Cloud (if `endpoint` is specified). Splunk
  # Alternatively the token can be provided as a secret.
  # Refer to https://github.com/signalfx/splunk-otel-collector-chart/blob/main/docs/advanced-configuration.md#provide-tokens-as-a-secret
  # HTTP Event Collector token.
  token: "my-hec-token"

  # Name of the Splunk event type index targeted. Required when ingesting logs to Splunk Platform.
  index: "k8s-logs"
  # Name of the Splunk metric type index targeted. Required when ingesting metrics to Splunk Platform.
  metricsIndex: "k8s-metrics"
  # Name of the Splunk event type index targeted. Required when ingesting traces to Splunk Platform.
  tracesIndex: ""
  # Optional. Default value for `source` field.
  source: "kubernetes"
  # Optional. Default value for `sourcetype` field. For container logs, it will
  # be container name.
  sourcetype: ""
  # Maximum HTTP connections to use simultaneously when sending data.
  maxConnections: 200
  # Whether to disable gzip compression over HTTP. Defaults to true.
  disableCompression: true
  # HTTP timeout when sending data. Defaults to 10s.
  timeout: 10s
  # Idle connection timeout. defaults to 10s
  idleConnTimeout: 10s
  # Whether to skip checking the certificate of the HEC endpoint when sending
  # data over HTTPS.
  insecureSkipVerify: true
  # The PEM-format CA certificate for this client.
  # Alternatively the clientCert, clientKey and caFile can be provided as a secret.
  # Refer to https://github.com/signalfx/splunk-otel-collector-chart/blob/main/docs/advanced-configuration.md#provide-tokens-as-a-secret
  # NOTE: The content of the certificate itself should be used here, not the
  #       file path. The certificate will be stored as a secret in kubernetes.
  clientCert: ""
  # The private key for this client.
  # NOTE: The content of the key itself should be used here, not the file path.
  #       The key will be stored as a secret in kubernetes.
  clientKey: ""
  # The PEM-format CA certificate file.
  # NOTE: The content of the file itself should be used here, not the file path.
  #       The file will be stored as a secret in kubernetes.
  caFile: ""

  # Options to disable or enable particular telemetry data types that will be sent to
  # Splunk Platform. Only logs collection is enabled by default.
  logsEnabled: true
  # If you enable metrics collection, make sure that `metricsIndex` is provided as well.
  metricsEnabled: true

################################################################################
# Logs collection engine:
# - `fluentd`: deploy a fluentd sidecar that will collect logs and send them to
#   otel-collector agent for further processing.
# - `otel`: utilize native OpenTelemetry log collection.
#
# `fluentd` will be deprecated soon, so it's recommended to use `otel` instead.
################################################################################

logsEngine: otel

################################################################################
# Cloud provider, if any, the collector is running on. Leave empty for none/other.
# - "aws" (Amazon Web Services)
# - "gcp" (Google Cloud Platform)
# - "azure" (Microsoft Azure)
################################################################################

cloudProvider: "aws"

################################################################################
# Kubernetes distribution being run. Leave empty for other.
# - "aks" (Azure Kubernetes Service)
# - "eks" (Amazon Elastic Kubernetes Service)
# - "eks/fargate" (Amazon Elastic Kubernetes Service with Fargate profiles )
# - "gke" (Google Kubernetes Engine / Standard mode)
# - "gke/autopilot" (Google Kubernetes Engine / Autopilot mode)
# - "openshift" (RedHat OpenShift)
################################################################################

distribution: "eks"
Step 3: Create Addon
- Login into the Web Console and navigate to your Project as an Org Admin or Infrastructure Admin
- Under Infrastructure, select "Namespaces" and create a new namespace called "splunk-otel-collector. Place the namespace on the cluster. Publish the namespace.
- Select "Addons" and "Create" a new Addon called "splunk-otel-collector"
- Ensure that you select "Helm 3" for type and select the namespace as "splunk-otel-collector"
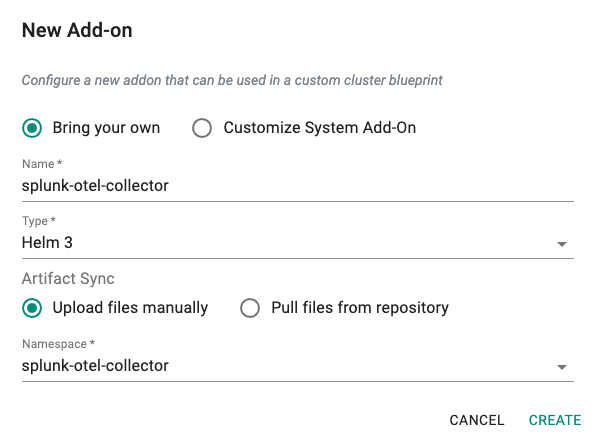
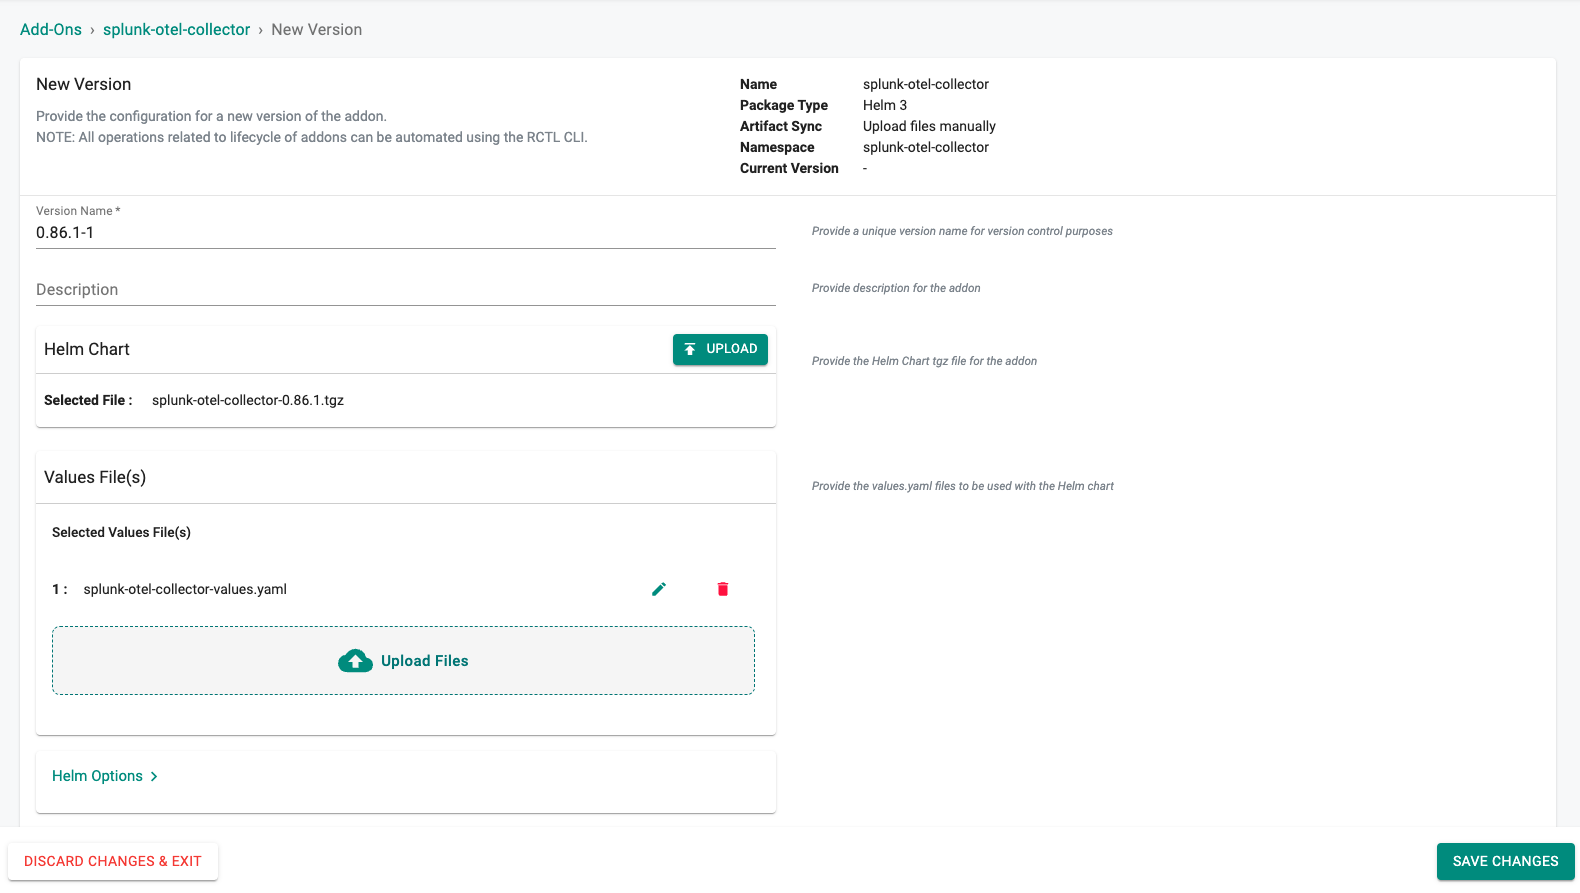
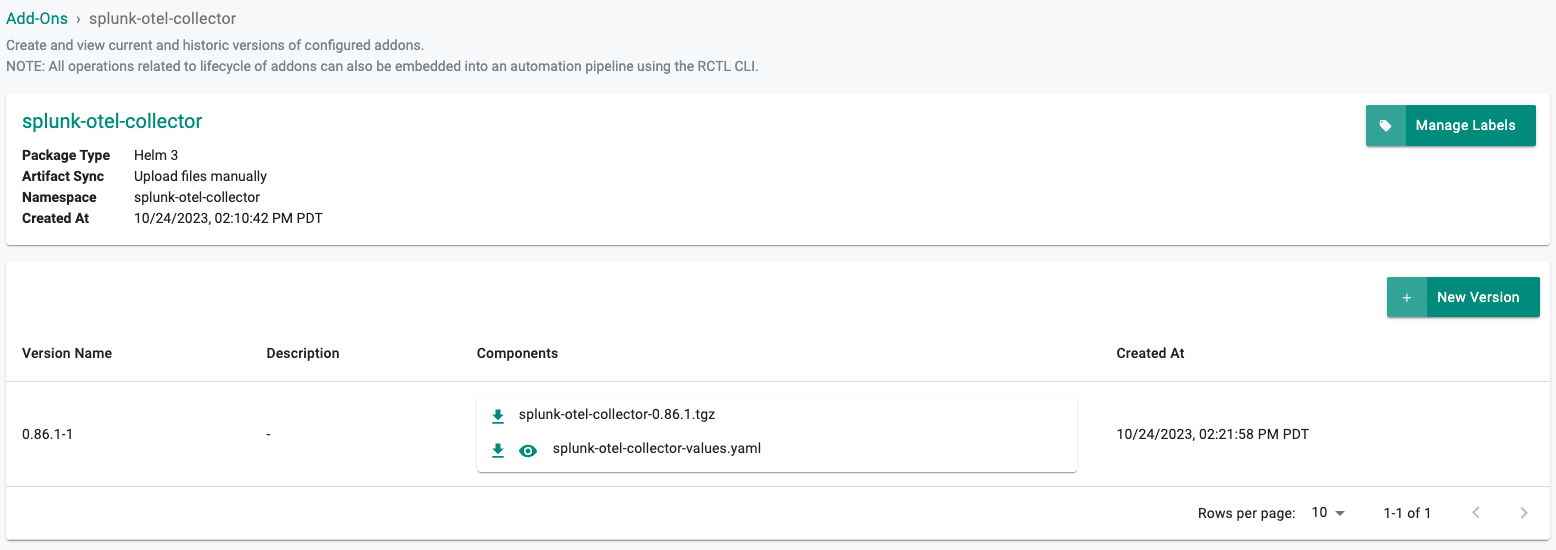
- Select "New Version" and set the Version Name to "0.86.1-1", upload the splunk otel collector helm chart and the custom values file "splunk-otel-collector-values.yaml", and click on "SAVE CHANGES"
Step 4: Create Blueprint
Now, we are ready to assemble a custom cluster blueprint using the newly created Splunk Otel Collector addon. We can add additional addons to the blueprint at the same time.
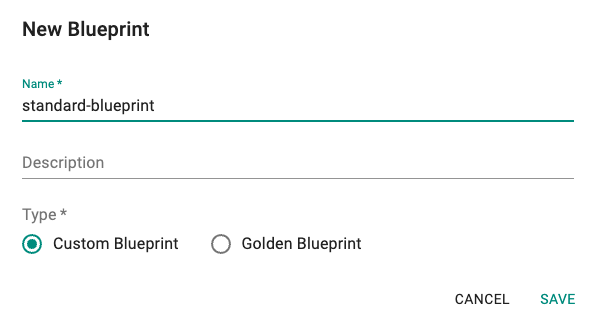
- Under Infrastructure, select "Blueprints"
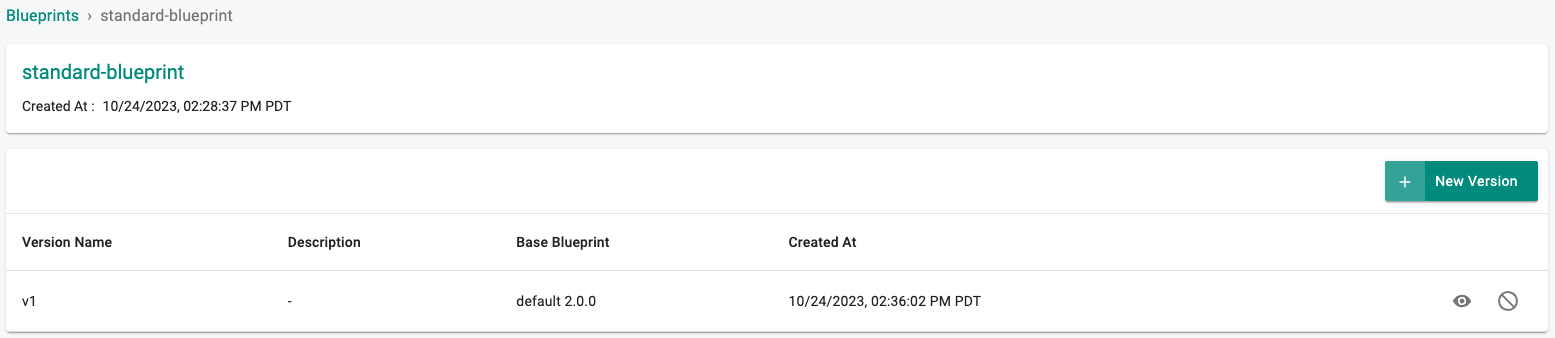
- Create a new blueprint and give it a name such as "standard-blueprint"
- Click on "SAVE"
- Enter "v1" for the "Version Name" (e.g. v1)
- Click on "Configure Add-Ons"
- Add the "splunk-otel-collector" Add-On
- DeSelect the "Local Storage", and "Ingress Controller" managed system add-on
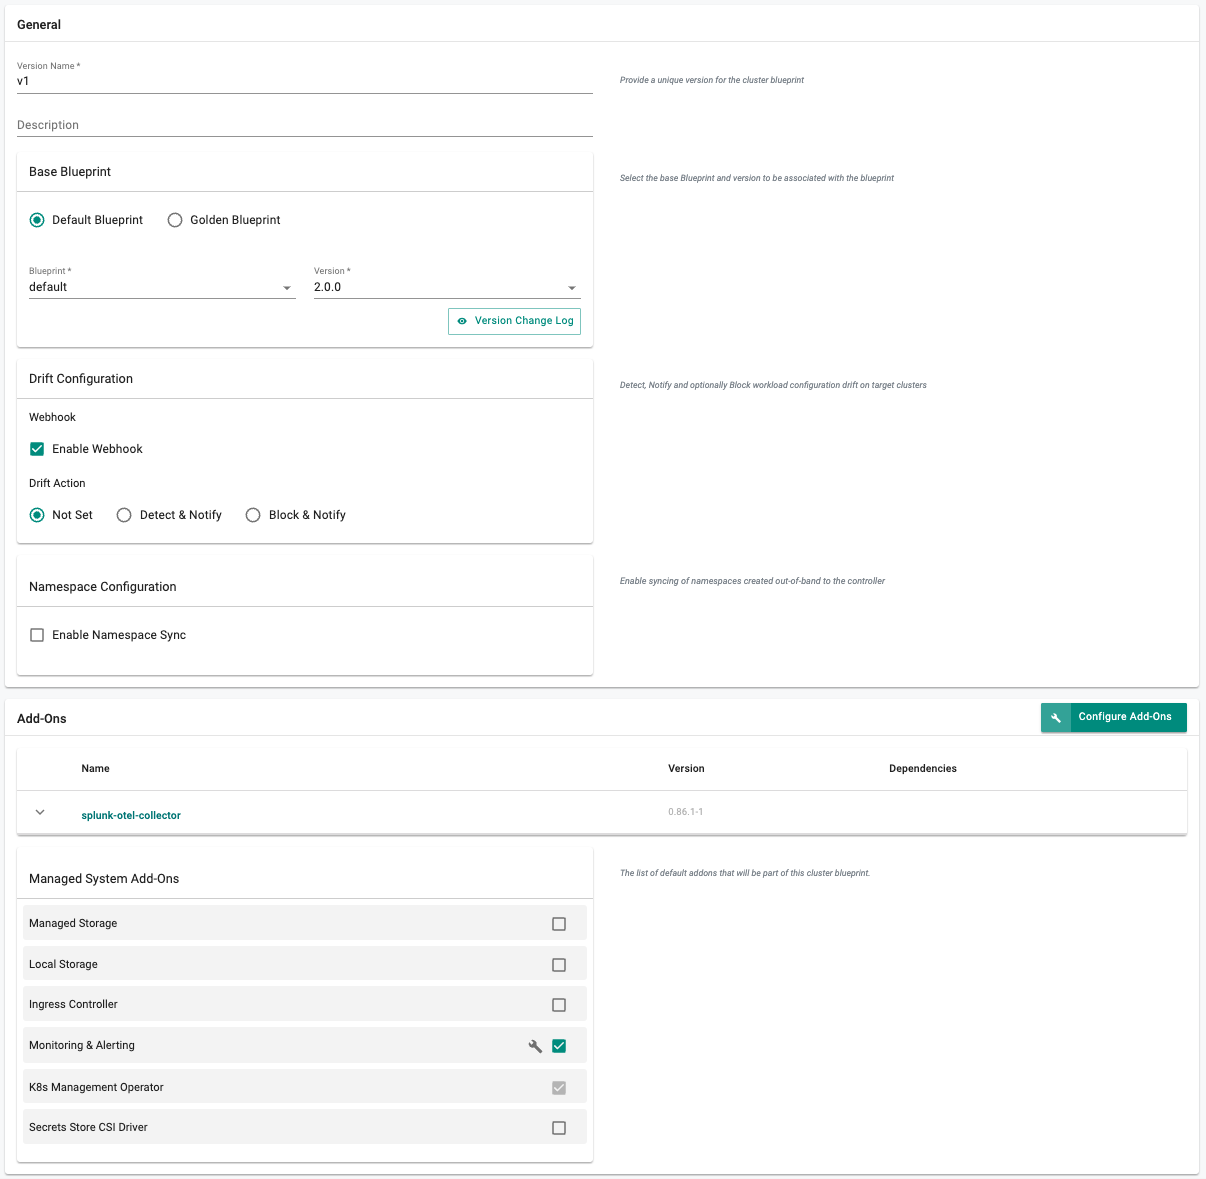
- Click on "SAVE CHANGES"
Step 5: Apply Blueprint
Now, we are ready to apply this custom blueprint to a cluster.
- Select Infrastructure -> Clusters
- Click on the gear icon on the far right of the cluster
- Update blueprint and select the new blueprint and version

- Click on "Save and Publish".
This will start the deployment of the addons configured in the "standard-blueprint" blueprint to the targeted cluster. The blueprint sync process can take a few minutes. Once complete, the cluster will display the current cluster blueprint details and whether the sync was successful or not.

Step 6: Verify Blueprint
Users can optionally verify whether the required resources for the custom blueprint were created on the cluster. Click on the Kubectl button on the cluster to open a virtual terminal
First, we will verify if the "splunk-otel-collector" namespace has been created
kubectl get ns splunk-otel-collector

NAME                    STATUS   AGE
splunk-otel-collector   Active   23h
Next, we will verify that the required pods were created in the "splunk-otel-collector" namespace. You should see something like the example below.
kubectl get pod -n splunk-otel-collector

NAME                                                          READY   STATUS    RESTARTS   AGE
splunk-otel-collector-agent-74s78                             1/1     Running   0          4m49s
splunk-otel-collector-agent-l6czn                             1/1     Running   0          4m49s
splunk-otel-collector-k8s-cluster-receiver-59bfdff5dd-rcmkh   1/1     Running   0          4m49s
Step 7: View Data in Splunk
Now, we will access our Splunk instance to view the logs and metrics data collected from the cluster. Shown below is an illustrative example of the summary view of all your application logs collected by splunk-connect from your Splunk server.

And below is another illustrative example for the logs dashboard powered by the logs collected by splunk-otel-collector running on our K8s cluster. We can use the search "index=k8s-logs".
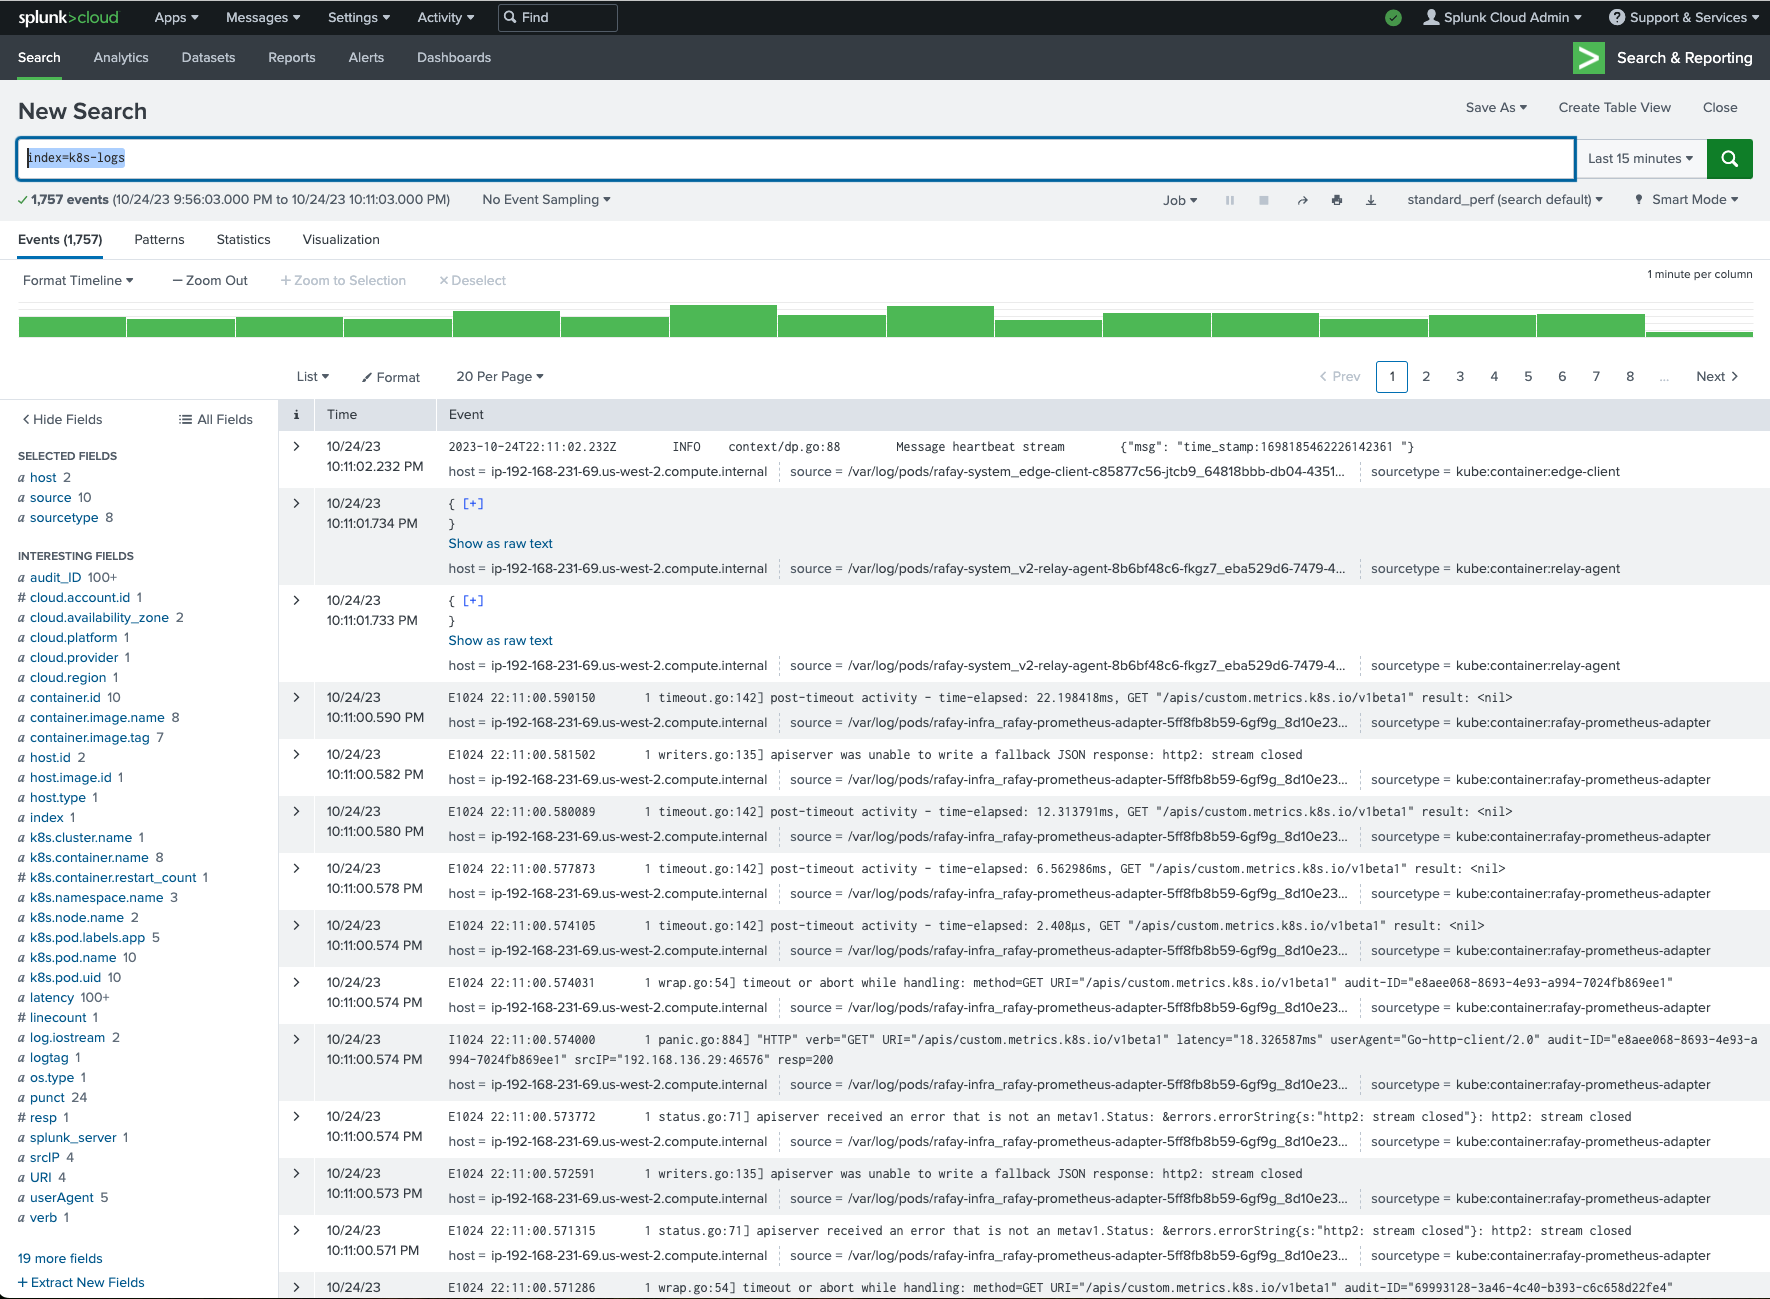
To view which metrics are available you can use the search "| mcatalog values(metric_name) WHERE index=k8s-metrics".
Recap
Congratulations! You have successfully created a custom cluster blueprint with the "splunk-otel-collector" addon and applied it to a cluster. You can now use this blueprint on as many clusters as you require.