Kubecost
Kubecost provides real-time cost visibility and insights by uncovering patterns that create overspending on infrastructure to help teams prioritize where to focus optimization efforts. By identifying root causes for negative patterns, customers using Kubecost save 30-50% or more of their Kubernetes cloud infrastructure costs.
Today, Kubecost empowers more than 2,000 teams across companies of all sizes to monitor and reduce costs, while balancing cost, performance, and reliability. Kubecost is tightly integrated with the open source cloud native ecosystem and built for engineers and developers first, making it easy to drive adoption within your organization.
This recipe describes how customers can standardize the configuration, deployment and lifecycle management of the Open Source version of Kubecost across their fleet of clusters.
What Will You Do
In this exercise,
- You will create a customized "kubecost" add-on using Kubecost's "official Helm chart"
- You will use the add-on in a custom cluster blueprint
- You will then apply this cluster blueprint to a managed cluster
Assumptions
- You have already provisioned or imported one or more Kubernetes clusters using the controller.
Step 1: Download RCTL
The RCTL CLI allows you to programmatically interact with the controller enabling users to construct sophisticated automation workflows.
- Login into your Org
- Navigate to "My Tools" to download both the RCTL CLI and the "CLI Config" file
- Initialize RCTL using the step-by-step instructions
- Ensure you update your OS's Path environment variable for RCTL
Step 2: Clone Git Repo
Declarative specs for this recipe are available in a Git repository
- Clone the Git repository to your laptop using the command below.
git clone https://github.com/RafaySystems/getstarted.git
- Once complete, you should see a folder called "kubecost" which contains the specs needed for this guide.
Step 3: Create Repository
In this step, you will create a repository in your project so that the controller can retrieve the Helm charts automatically.
- Open Terminal (on macOS/Linux) or Command Prompt (Windows) and navigate to the folder where you forked the Git repository
- Navigate to the folder "
/getstarted/kubecost/repository"
The "kubecost-repository.yaml" file contains the declarative specification for the repository. In this case, the specification is of type "Helm Repository" and the "endpoint" is pointing to the Kubecost Github repository that includes the Kubecost Helm chart.
apiVersion: config.rafay.dev/v2
kind: Repository
metadata:
  name: kubecost-repo
spec:
  repositoryType: HelmRepository
  endpoint:  https://kubecost.github.io/cost-analyzer/
  credentialType: CredentialTypeNotSet
Type the command below
rctl create repository -f kubecost-repository.yaml
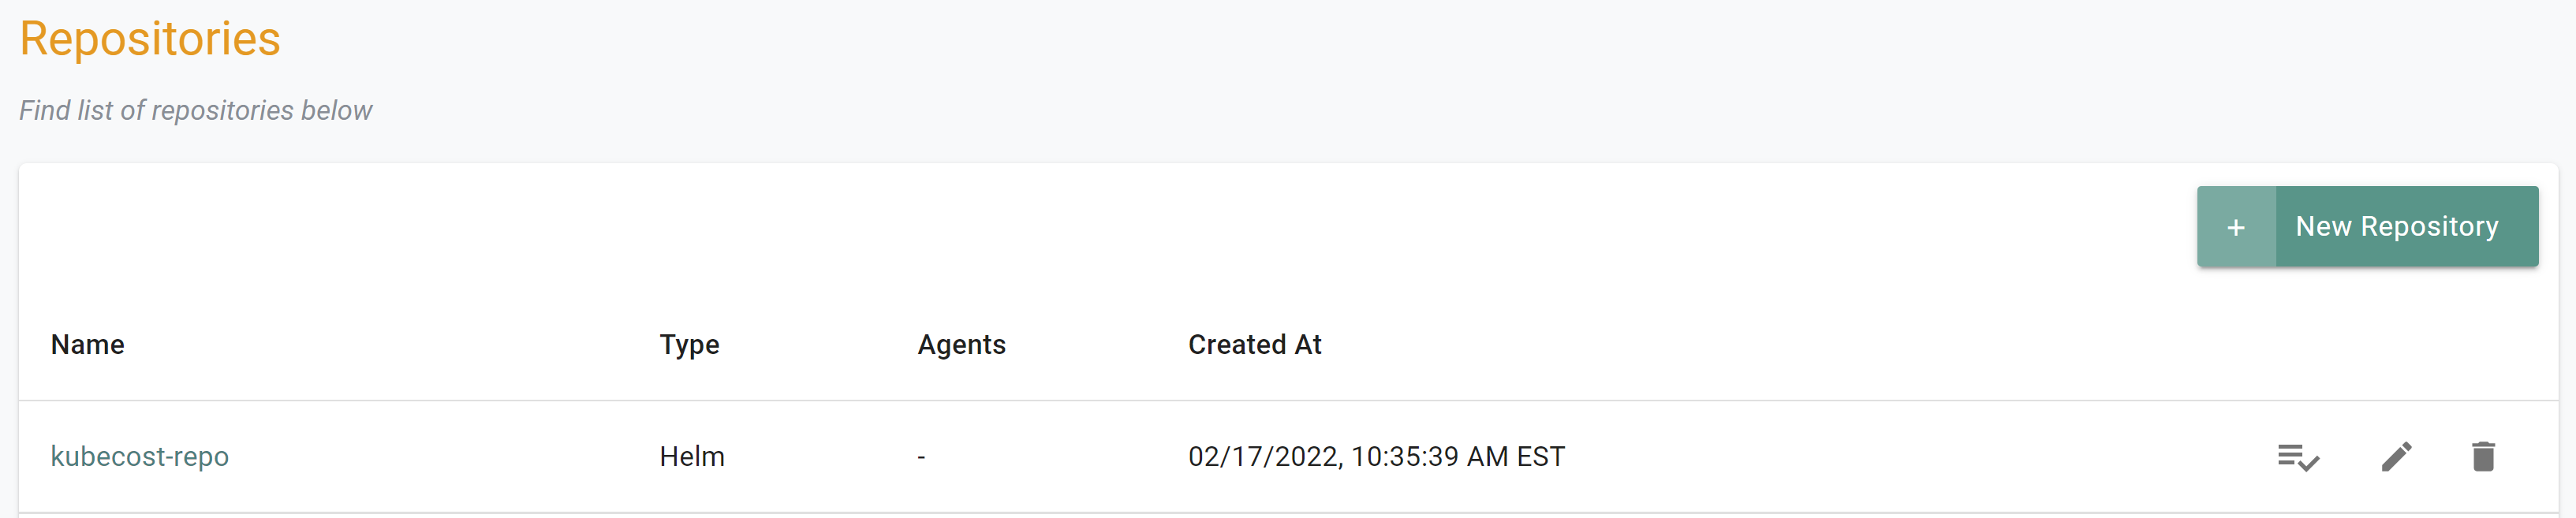
If you did not encounter any errors, you can optionally verify if everything was created correctly on the controller.
- Navigate to the "defaultproject" project in your Org
- Select Integrations -> Repositories
- You should see an repository called "kubecost-repo"
Step 4: Create Namespace
In this step, you will create a namespace for the Kubecost addon. The "kubecost-namespace.yaml" file contains the declarative specification
Update the below line with the name of the cluster being used
- value:
kind: ManagedNamespace
apiVersion: config.rafay.dev/v2
metadata:
  name: kubecost
  description: namespace for kubecost
  labels:
  annotations:
spec:
  type: RafayWizard
  resourceQuota:
  placement:
    placementType: ClusterSpecific
    clusterLabels:
    - key: rafay.dev/clusterName
      value: <cluster-name>
- Open Terminal (on macOS/Linux) or Command Prompt (Windows) and navigate to the folder where you forked the Git repository
- Navigate to the folder "
/getstarted/kubecost/namespace" - Type the below commands
rctl create namespace -f kubecost-namespace.yaml
rctl publish namespace kubecost
If you did not encounter any errors, you can optionally verify if everything was created correctly on the controller.
- Navigate to the "defaultproject" project in your Org
- Select Infrastructure -> Namespaces
- You should see an namesapce called "kubecost"

Step 5: Customize Values
The Kubecost Helm chart comes with a very detailed values.yaml file with support for a large number of scenarios. We will be customizing the defaults with our own override "kubecost-values.yaml"
- Navigate to the folder "
/getstarted/kubecost/addon" - Replace the "kubecostToken" value with your Kubecost token.
Note
Reference on how to get the Kubecost token can be found here
## Custom values for kubecost
reporting:
  valuesReporting: false
## Change to your kubecost token below. Instructions on how to obtain the token can be found here https://www.kubecost.com/install#show-instructions
kubecostToken: "XXX"
Step 6: Create Addon
In this step, you will create a custom addon for Kubecost. The "kubecost-addon.yaml" file contains the declarative specification
The following items may need to be updated/customized if you made changes to these or used alternate names.
- project: defaultproject
- namespace: kubecost
- repository_ref: kubecost-repo
kind: AddonVersion
metadata:
  name: v1
  project: defaultproject
spec:
  addon: kubecost-addon
  namespace: kubecost
  template:
    type: Helm3
    valuesFile: kubecost-values.yaml
    repository_ref: kubecost-repo
    repo_artifact_meta:
      helm:
       chartName: cost-analyzer
- Open Terminal (on macOS/Linux) or Command Prompt (Windows) and navigate to the folder where you forked the Git repository
- Navigate to the folder "
/getstarted/kubecost/addon" - Type the command below
rctl create addon version -f kubecost-addon.yaml
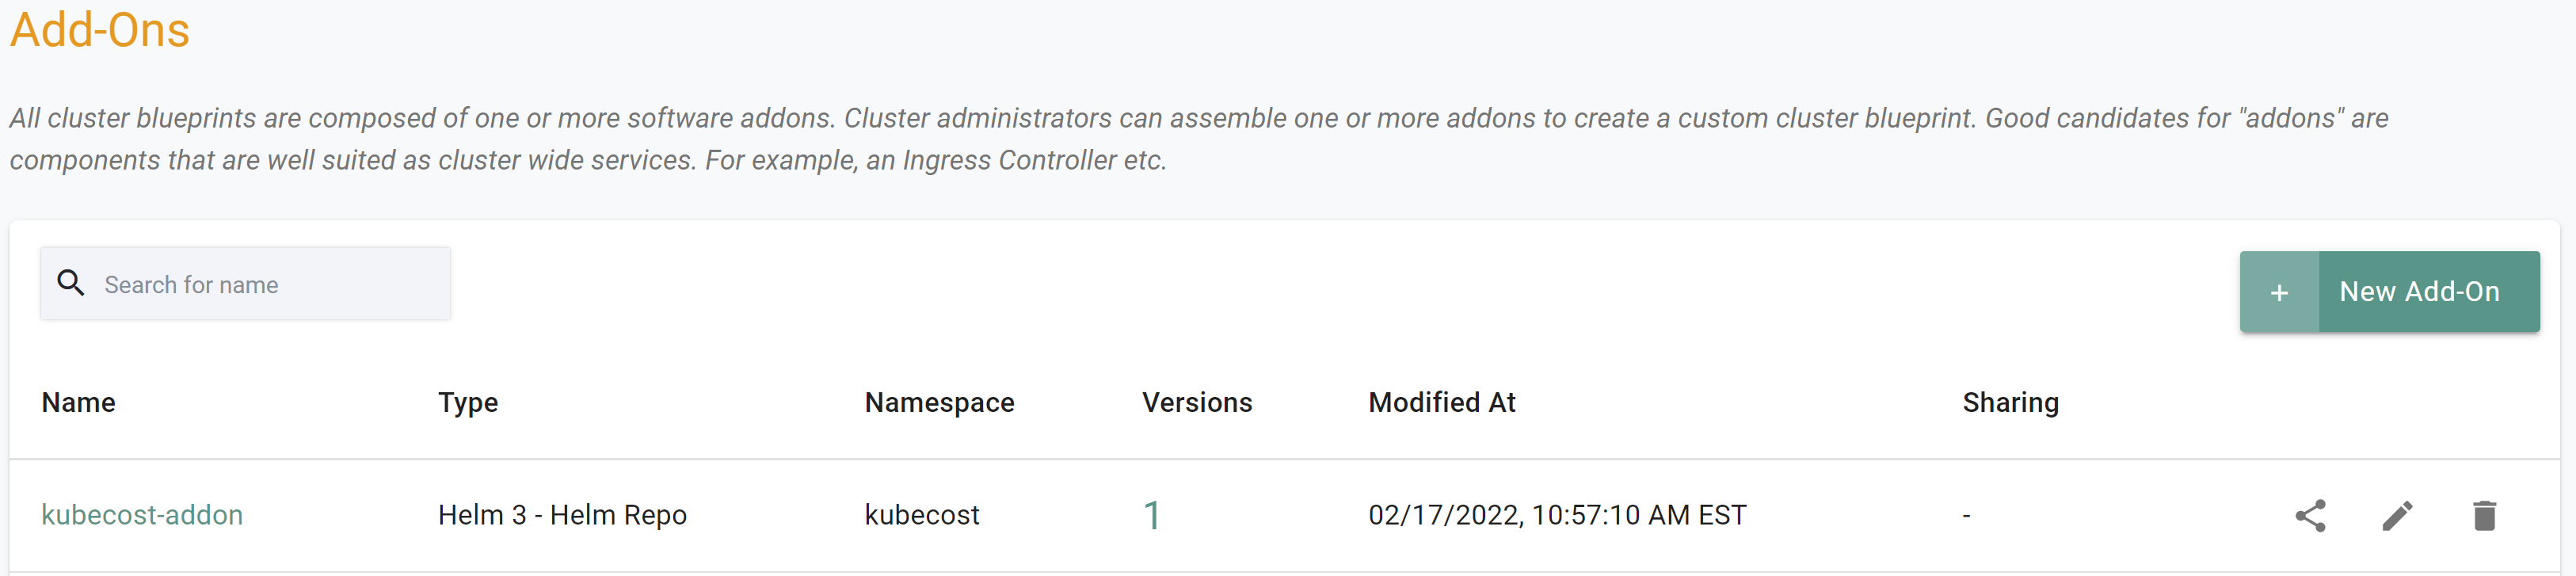
If you did not encounter any errors, you can optionally verify if everything was created correctly on the controller.
- Navigate to the "defaultproject" project in your Org
- Select Infrastructure -> Addons
- You should see an addon called "kubecost-addon"
Step 7: Create Blueprint
In this step, you will create a custom cluster blueprint with the Kubecost addon. The "kubecost-blueprint.yaml" file contains the declarative specification.
- Open Terminal (on macOS/Linux) or Command Prompt (Windows) and navigate to the folder where you forked the Git repository
- Navigate to the folder "
/getstarted/kubecost/blueprint"
The following items may need to be updated/customized if you made changes to these or used alternate names.
- project: "defaultproject"
kind: Blueprint
metadata:
  # blueprint name
  name: kubecost-blueprint
  #project name
  project: defaultproject
- Type the command below
rctl create blueprint -f kubecost-blueprint.yaml
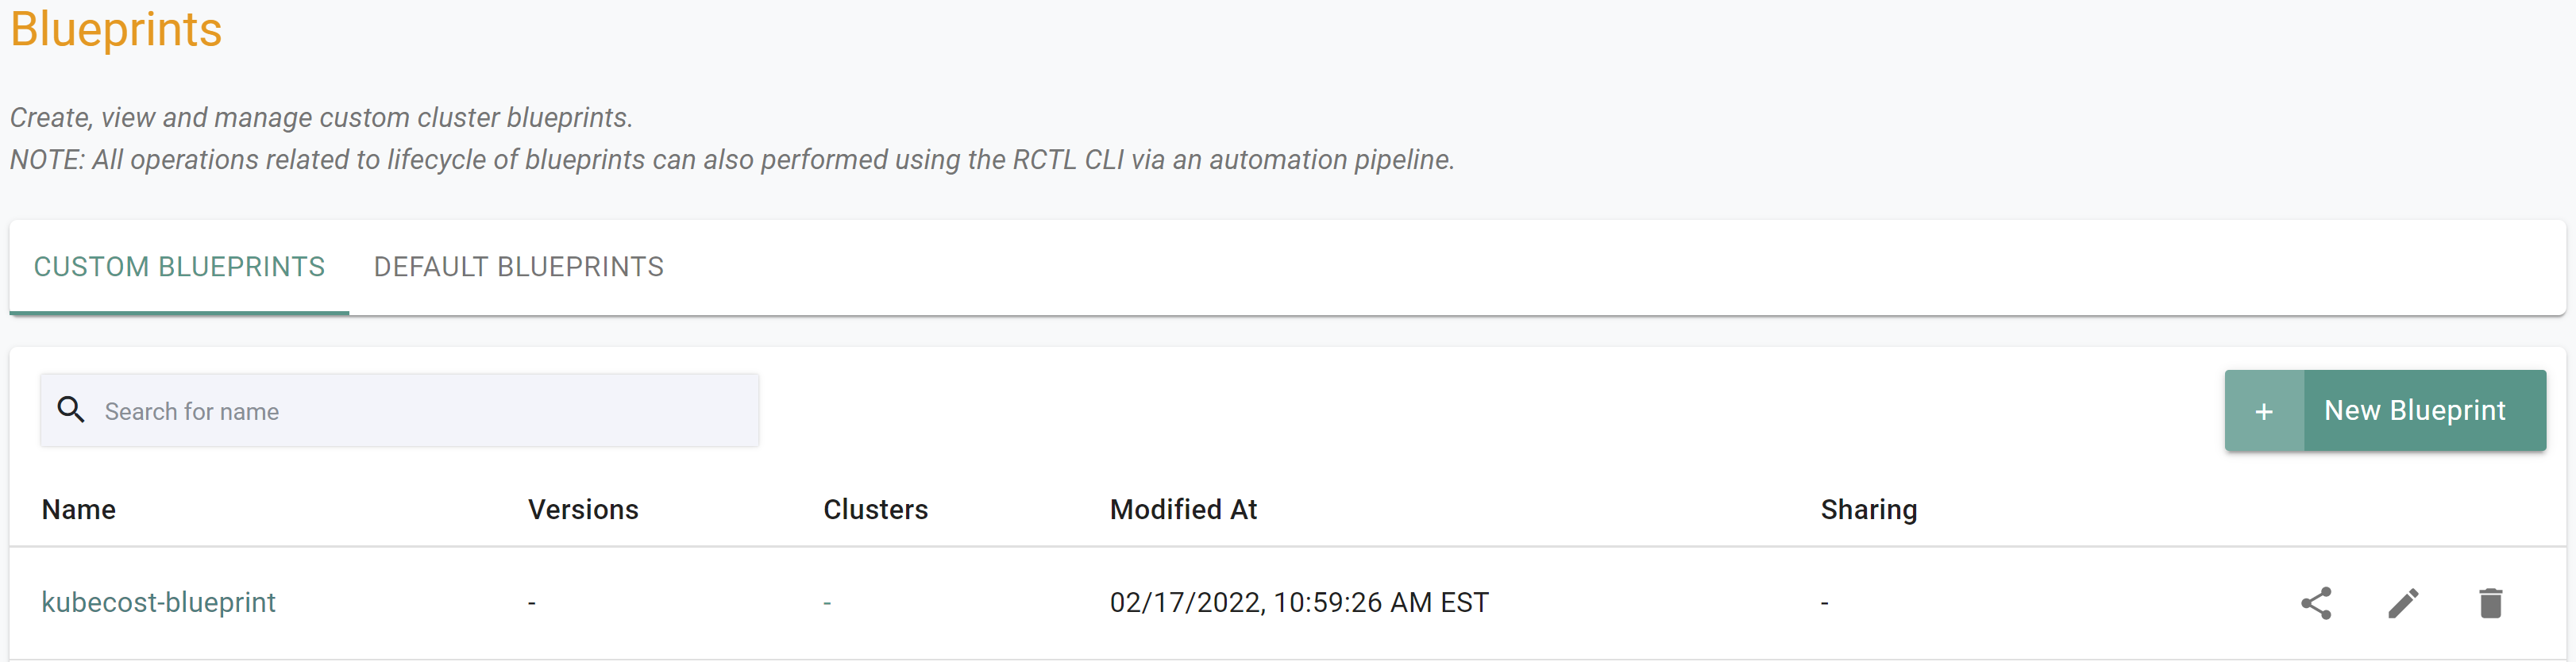
If you did not encounter any errors, you can optionally verify if everything was created correctly on the controller.
- Navigate to the "defaultproject" project in your Org
- Select Infrastructure -> Blueprint
- You should see an blueprint called "kubecost-blueprint
New Version
Although we have a custom blueprint, we have not provided any details on what it comprises. In this step, you will create and add a new version to the custom blueprint. The YAML below is a declarative spec for the new version.
The following items may need to be updated/customized if you made changes to these or used alternate names.
- project: "defaultproject"
- blueprint: "kubecost-blueprint"
- name: "kubecost-addon"
- version: "v1"
kind: BlueprintVersion
metadata:
  name: v1
  project: defaultproject
  description: Kubecost Blueprint
spec:
  blueprint: kubecost-blueprint
  baseSystemBlueprint: minimal
  baseSystemBlueprintVersion: ""
  addons:
    - name: kubecost-addon
      version: v1
  # cluster-scoped or namespace-scoped
  pspScope: cluster-scoped
  rafayIngress: true
  rafayMonitoringAndAlerting: false
  # BlockAndNotify or DetectAndNotify
  driftAction: BlockAndNotify
- Type the command below to add a new version
rctl create blueprint version -f kubecost-blueprint-v1.yaml
If you did not encounter any errors, you can optionally verify if everything was created correctly on the controller.
- Navigate to the "defaultproject" project in your Org
- Select Infrastructure -> Blueprint
- Click on the "kubecost-blueprint" custom cluster blueprint

Step 8: Apply Blueprint
Now, we are ready to apply this custom blueprint to a cluster.
- Type the command below to update the blueprint on the cluster. Be sure to update the cluster name in the command
rctl update cluster <cluster-name> -blueprint kubecost-blueprint
This will start the deployment of the add-ons configured in the Kubecost blueprint to the targeted cluster. The blueprint sync process can take a few minutes. Once complete, the cluster will display the current cluster blueprint details and whether the sync was successful or not.
Step 9: Verify Deployment
Users can optionally verify whether the correct resources have been created on the cluster. Click on the Kubectl button on the cluster to open a virtual terminal
Next, we will verify the pods in the "kubecost" namespace. You should see something like the example below.
kubectl get pod -n kubecost

NAME                                                 READY   STATUS    RESTARTS   AGE
kubecost-addon-cost-analyzer-7649c4547c-m8wjn        3/3     Running   0          18m
kubecost-addon-grafana-7d64dd69b4-kl49s              3/3     Running   0          18m
kubecost-addon-kube-state-metrics-5c778bb8cd-zpvq9   1/1     Running   0          18m
kubecost-addon-prometheus-node-exporter-qfvcd        1/1     Running   0          18m
kubecost-addon-prometheus-server-74b957d5f5-htwmc    2/2     Running   0          18m
Step 10: Enable Port-Forward
In order to access the Kubecost interface, we will need to enable access to the frontend application using port-forward. To do this, we will download and use the Kubeconfig with the KubeCTL CLI
kubectl port-forward --namespace kubecost deployment/kubecost-addon-cost-analyzer 9090

Forwarding from 127.0.0.1:9090 -> 9090
Forwarding from [::1]:9090 -> 9090
Handling connection for 9090
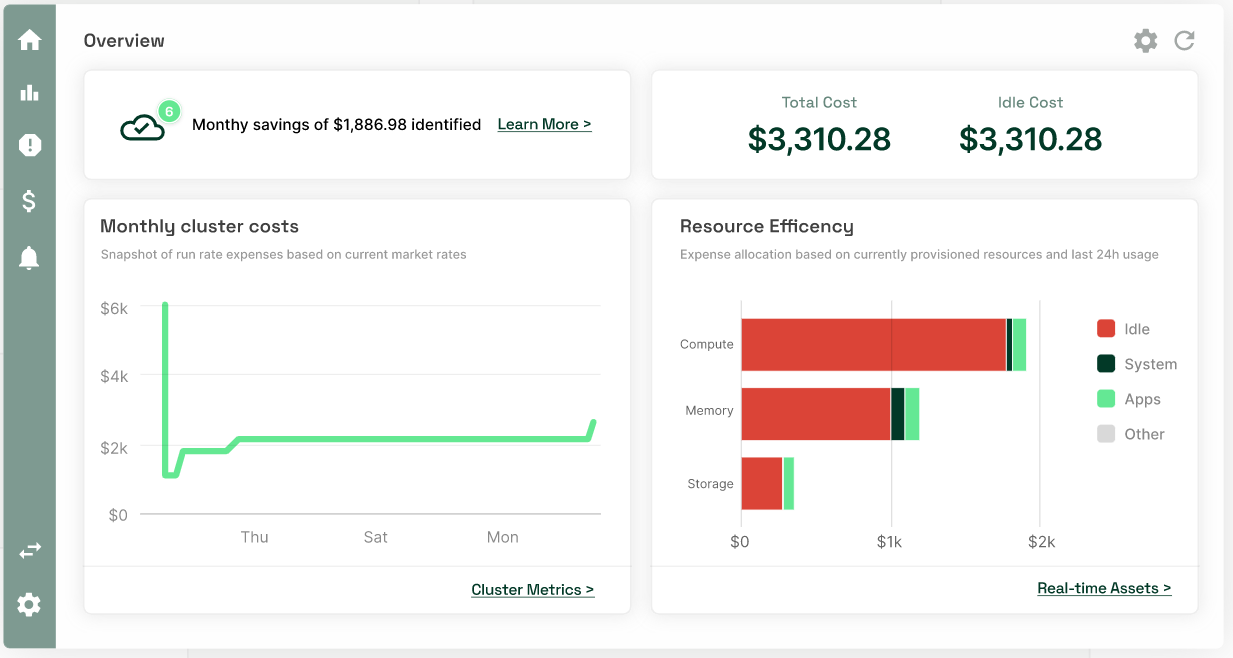
Step 11: View Data
You can now access the Kubecost interface by visiting the following link. http://localhost:9090

Recap
Congratulations! You have successfully created a custom cluster blueprint with the "kubecost" add-on and applied to a cluster. You can now use this blueprint on as many clusters as you require.