Provisioning
The following sequence diagram describes the high-level steps carried out in a sequence during the provisioning process. Customers can optionally automate the entire sequence using the RCTL CLI or REST APIs or their automation tools.
sequenceDiagram
    participant rafay as Rafay
    participant admin as Admin
    participant dc as Datacenter <br> (Edge)

    note over rafay, dc: Upstream Kuberbetes Cluster Provisioning

    admin ->>rafay: Create Cluster
    admin ->>rafay: Download installer & installer
    admin ->>dc: Upload installer & credentials
    dc-->>dc: Run Installer
    dc->>rafay: Register with Rafay
    dc->>rafay: Installer Downloads <br>Software Packages <br> from Rafay Container Registry
    dc-->>dc: Installer Deploys <br> k8s software packages
    dc->>rafay: Kubernetes Cluster Checks In <br> (Managed by Rafay)
Detailed steps carried out in a sequence during the provisioning process
sequenceDiagram
    participant User
    participant Node
    participant RafayController

    User->>RafayController: Download Conjurer binary from Rafay Controller
    User->>Node: Run conjurer binary on the node
    Node->>RafayController: Outbound connection on 443 Port
    Node->>Node: As part of Conjurer run, Prechecks will be done
    note over Node: Conjurer Hard Prechecks
    rect rgba(255,255,204,.6)
    Node-->>Node: Check for Unsupported Operating System
    Node-->>Node: Verify DNS Port Availability
    Node-->>Node: Test Connectivity to Controller
    Node-->>Node: Ensure Communication with NTP Server
    Node-->>Node: Check for Time Skew
    Node-->>Node: Verify Previous Kubernetes Installation
    Node-->>Node: Validate Hostname
    Node-->>Node: Firewalls check(fapolicyd, firewalld) only for linux
    Node-->>Node: Check Nameserver Rotation Option
end
    Node-->>RafayController: Node discovered

    note over Node, RafayController: If auto-approve configured
    RafayController-->>Node: Automatically approve node
    Node-->>RafayController: Meta information retrieval

    note over RafayController, Node: If not auto-approved
    User->>RafayController: Manually approve node
    RafayController-->>Node: Node approved

    note over Node, User: User configured roles determine actions
    User->>Node: Execute role-specific instructions

    note over Node, RafayController: Single node provisioning steps
    note over Node:  Node instructions sent by the Controller.
    rect rgba(255,255,204,.6)
        Node->>Node: Pull and install binaries (Kubernetes and other required binaries for the node)
        Node->>Node:Install and bring up Consul and etcd
        Node->>Node: Execute kubeadm init
        Node->>Node: Install CNI
        Node->>Node: Untaint the node
        Node->>Node: Install certificate generation component

        Node->>Node: Apply Rafay operator
    end
    RafayController-->>Node: Wait for all pods to be up
    RafayController-->>RafayController: Mark cluster as READY
Demo Video
Watch a video of provisioning of a "Multi Master" upstream Kubernetes cluster on "CentOS" with only storage for persistent volumes.
STEP 1: Select Cluster Configuration
Review the supported cluster configurations and select your desired cluster configuration. This will determine the number of nodes you need to prepare to initiate cluster provisioning.
| Type | Number of Initial Nodes |
|---|---|
| Converged, Single Master | 1 Nodes (1 Master/Worker) |
| Dedicated, Single Master | 2 Nodes (1 Master + 1 Worker) |
| Converged, Multi Master | 3 Nodes (3 Masters + 1 Worker) |
| Dedicated, Multi Master | 4 Nodes (3 Masters + 1 Worker) |
STEP 2: Prepare Nodes
Create VMs or bare metal instances compatible with the infrastructure requirements. Ensure that you have SSH access to all the instances/VMs
Important
Ensure you have the exact number of nodes for initial provisioning as per the cluster configuration from the previous step. Additional worker nodes can be added once the cluster is successfully provisioned.
Preparing RHEL 8.7 Nodes
For environments using Red Hat Enterprise Linux (RHEL) 8.7, ensure the required packages are pre-installed to avoid dependency issues during cluster provisioning. By staging the base OS with all required dependencies, the provisioning process can skip YUM-based package downloads, improving speed and reliability.
- Run the following command on each node:
sudo yum update -y && sudo yum install -y \
bzip2 psmisc unzip file lvm2 openssl iscsi-initiator-utils device-mapper-multipath cryptsetup \
curl wget libcgroup checkpolicy container-selinux socat chrony ebtables conntrack \
ca-certificates iptables at bzip2 tc iproute-tc pciutils python36 --allowerasing --nobest && \
systemctl enable chronyd && systemctl start chronyd
This installs all required dependencies and starts the chronyd service for time synchronization. The flags --allowerasing and --nobest help resolve potential package version conflicts on RHEL 8.7.
- After installing the required packages, proceed with the provisioning step using the
--forceflag:
conjurer install --force
💡 Info The
--forceflag helps bypass subscription-related errors if the instance is not attached to a valid Red Hat subscription. Ensure the packages are manually staged as shown above before using this option.
STEP 3: Create a Cluster
- Login into the Console
- Navigate to the project where you would like the cluster provisioned.
- Click New Cluster
- Select Create a New Cluster and click Continue
- Select the Environment Data center / Edge
- Select Package Type "Linux Installer"
- Select Kubernetes Distribution "Upstream Kubernetes"
- Enter the Cluster Name and click Continue
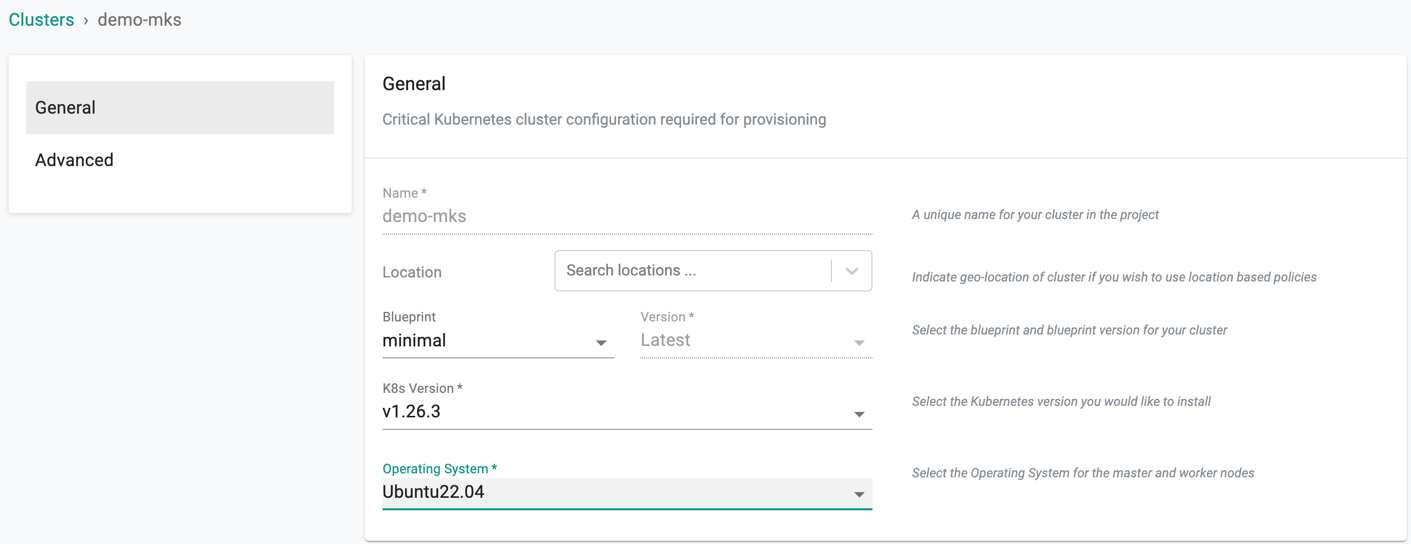
General
All the defaults are automatically selected and presented. Several options are available for customization.
Location
- Specify a location for the cluster (for multi-cluster workflows)
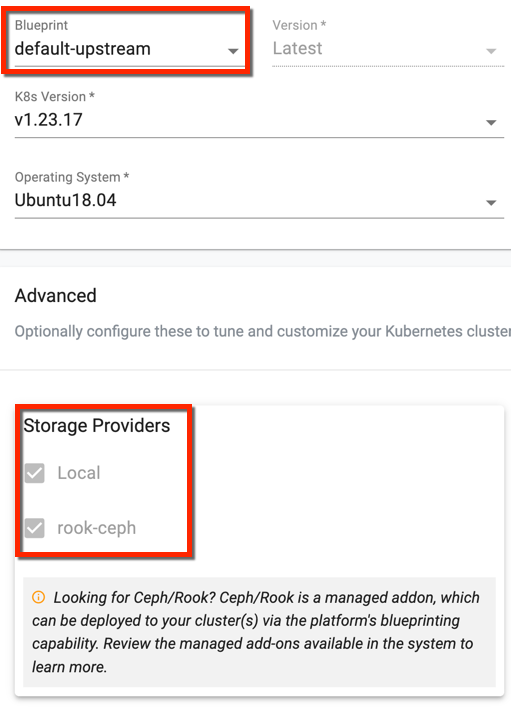
Blueprint
- Select cluster blueprint and version. Users can select the default-upstream blueprint based on the requirement. To use the default-upstream blueprint, a storage node is mandatory
Note: On Day 1 operation, you can select any blueprint other than default-upstream if storage node is not available
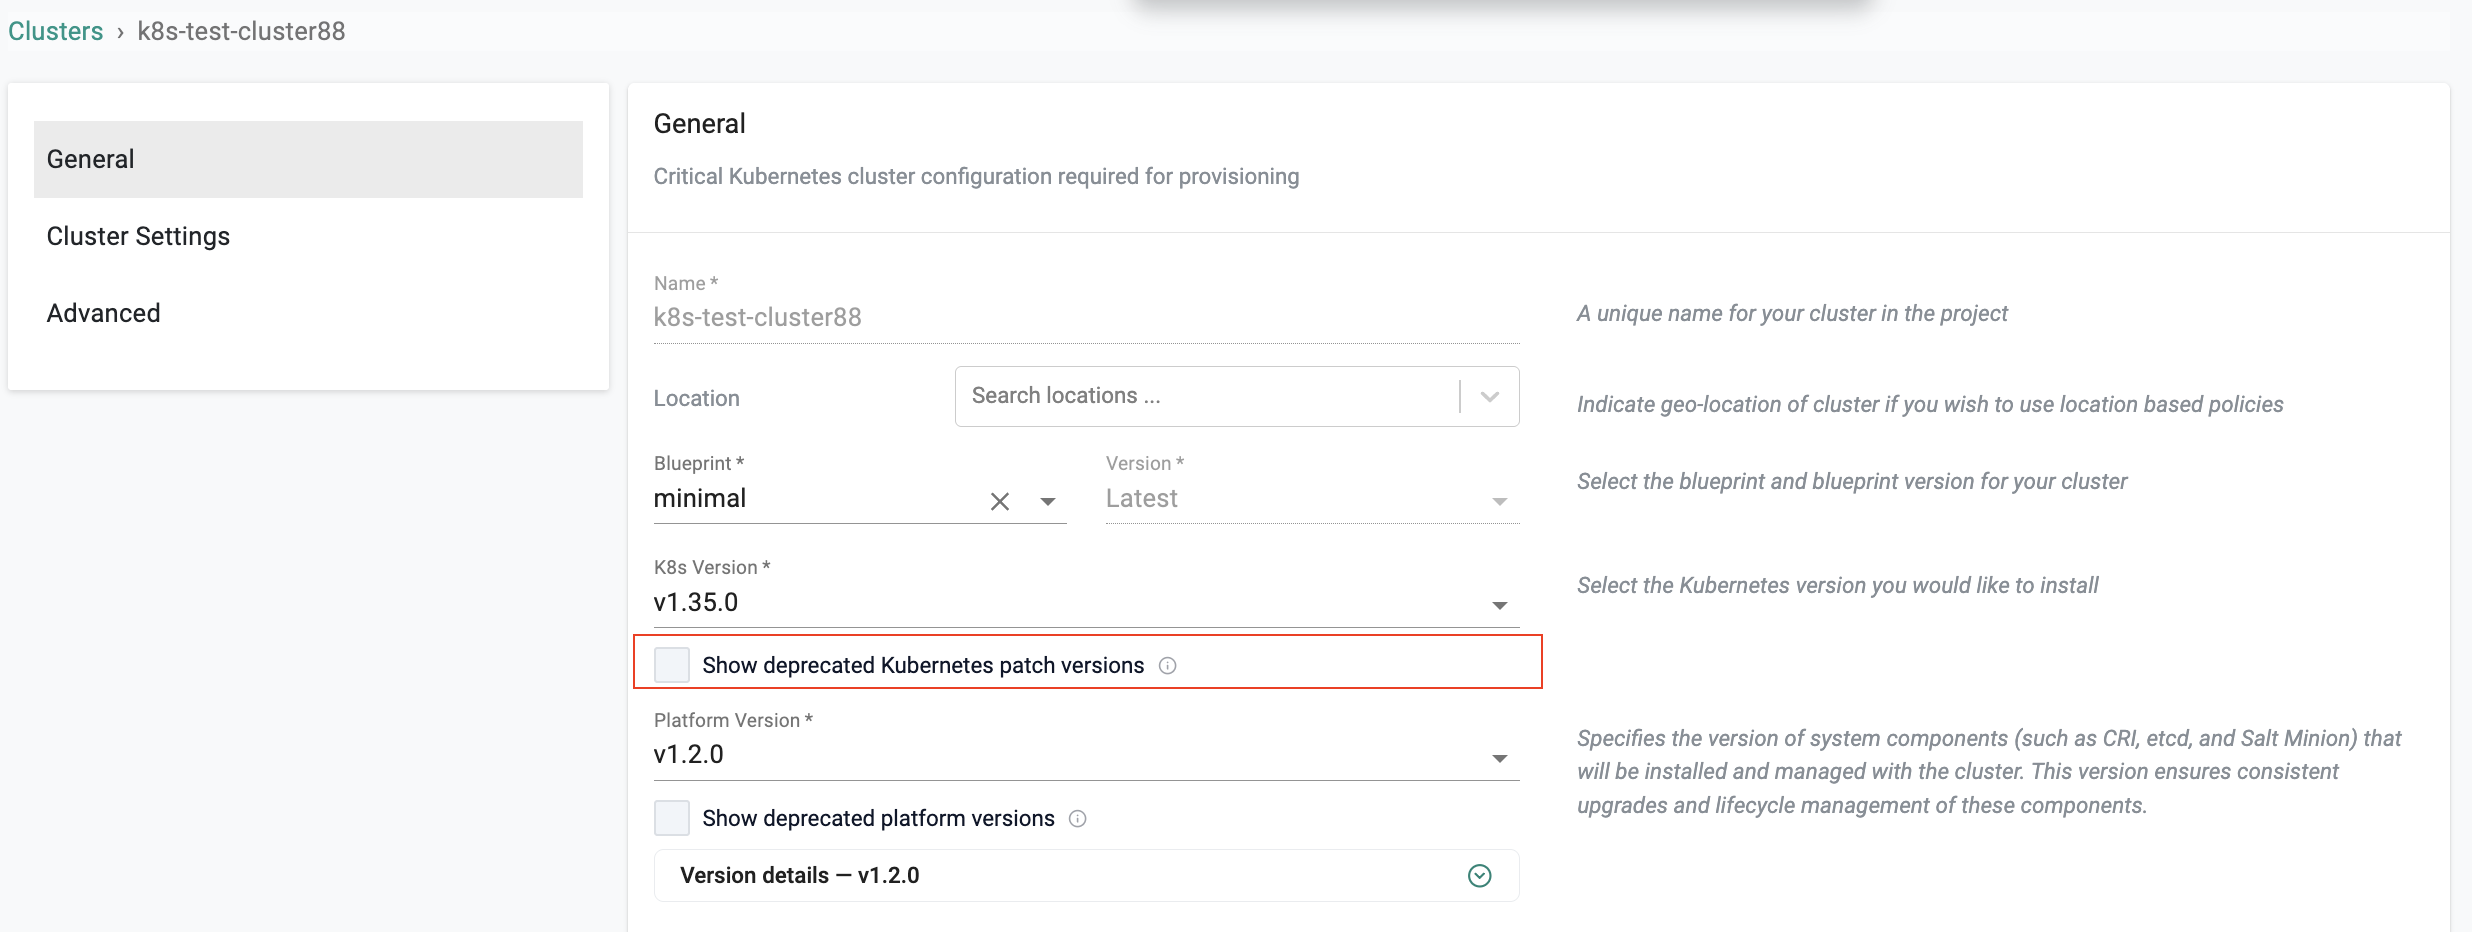
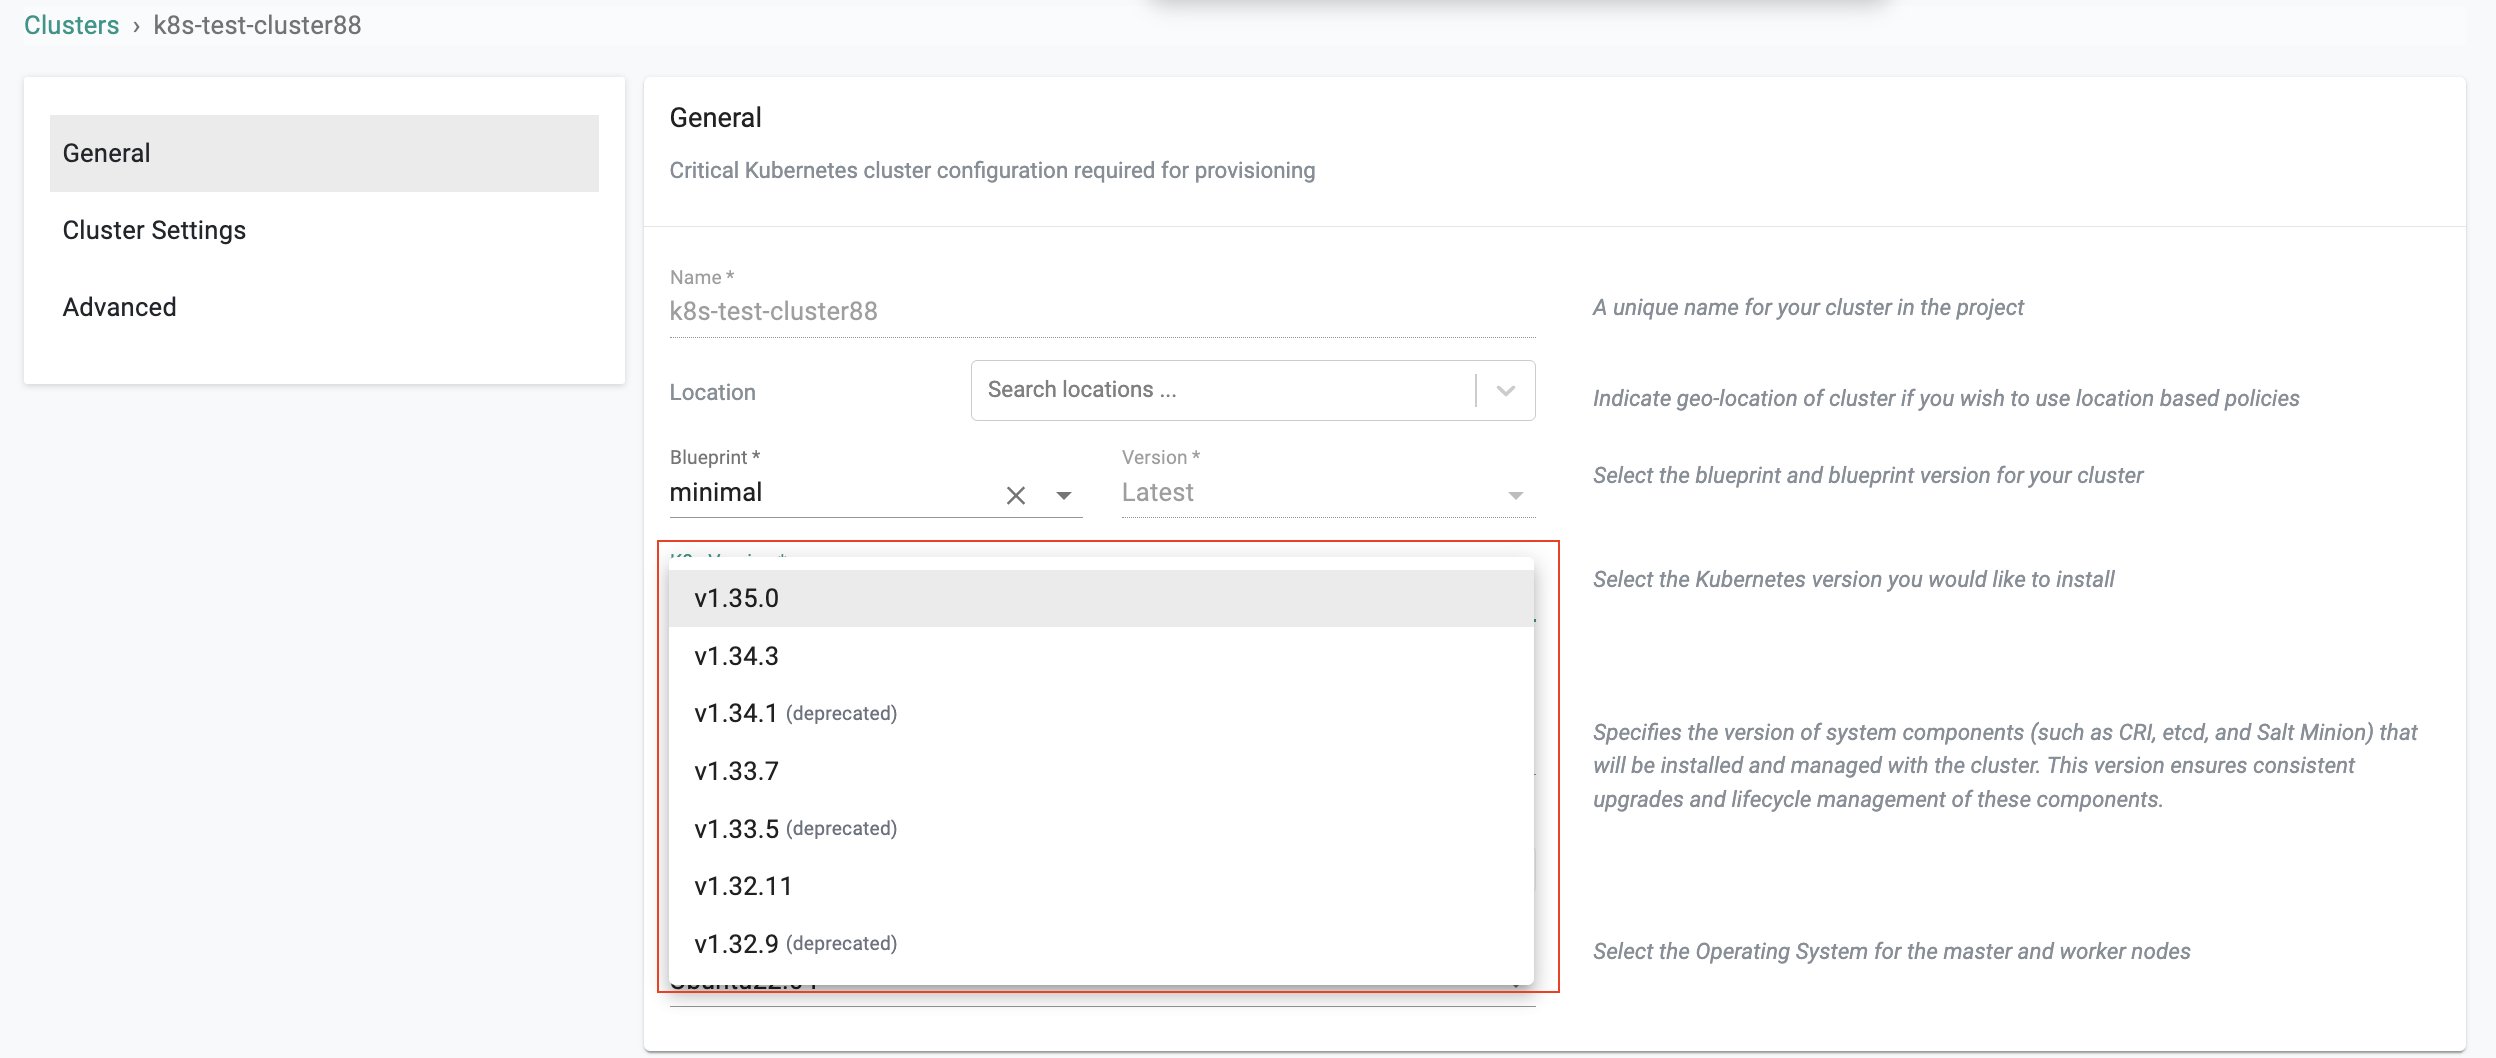
Kubernetes Version
- Select the Kubernetes version required to deploy. For arm worker nodes, the supported k8s version is always 1.20 onwards and the supported Operating System is Ubuntu
- On upgrading k8s version to v1.26, containerd version is upgraded to 1.6.10
- By default, only the latest patch versions are shown. Click Show deprecated Kubernetes patch versions below the version field to choose from older patch versions.
Platform Version
Defines the version of core components CRI, Orchestration Proxy, ETCD, Cluster utils, and Orchestration Agent that are installed and managed with the cluster.
- Active versions: v1.2.0, v1.1.0. Click Show deprecated platform versions to use older versions.
- The default for MKS clusters is v1.1.0
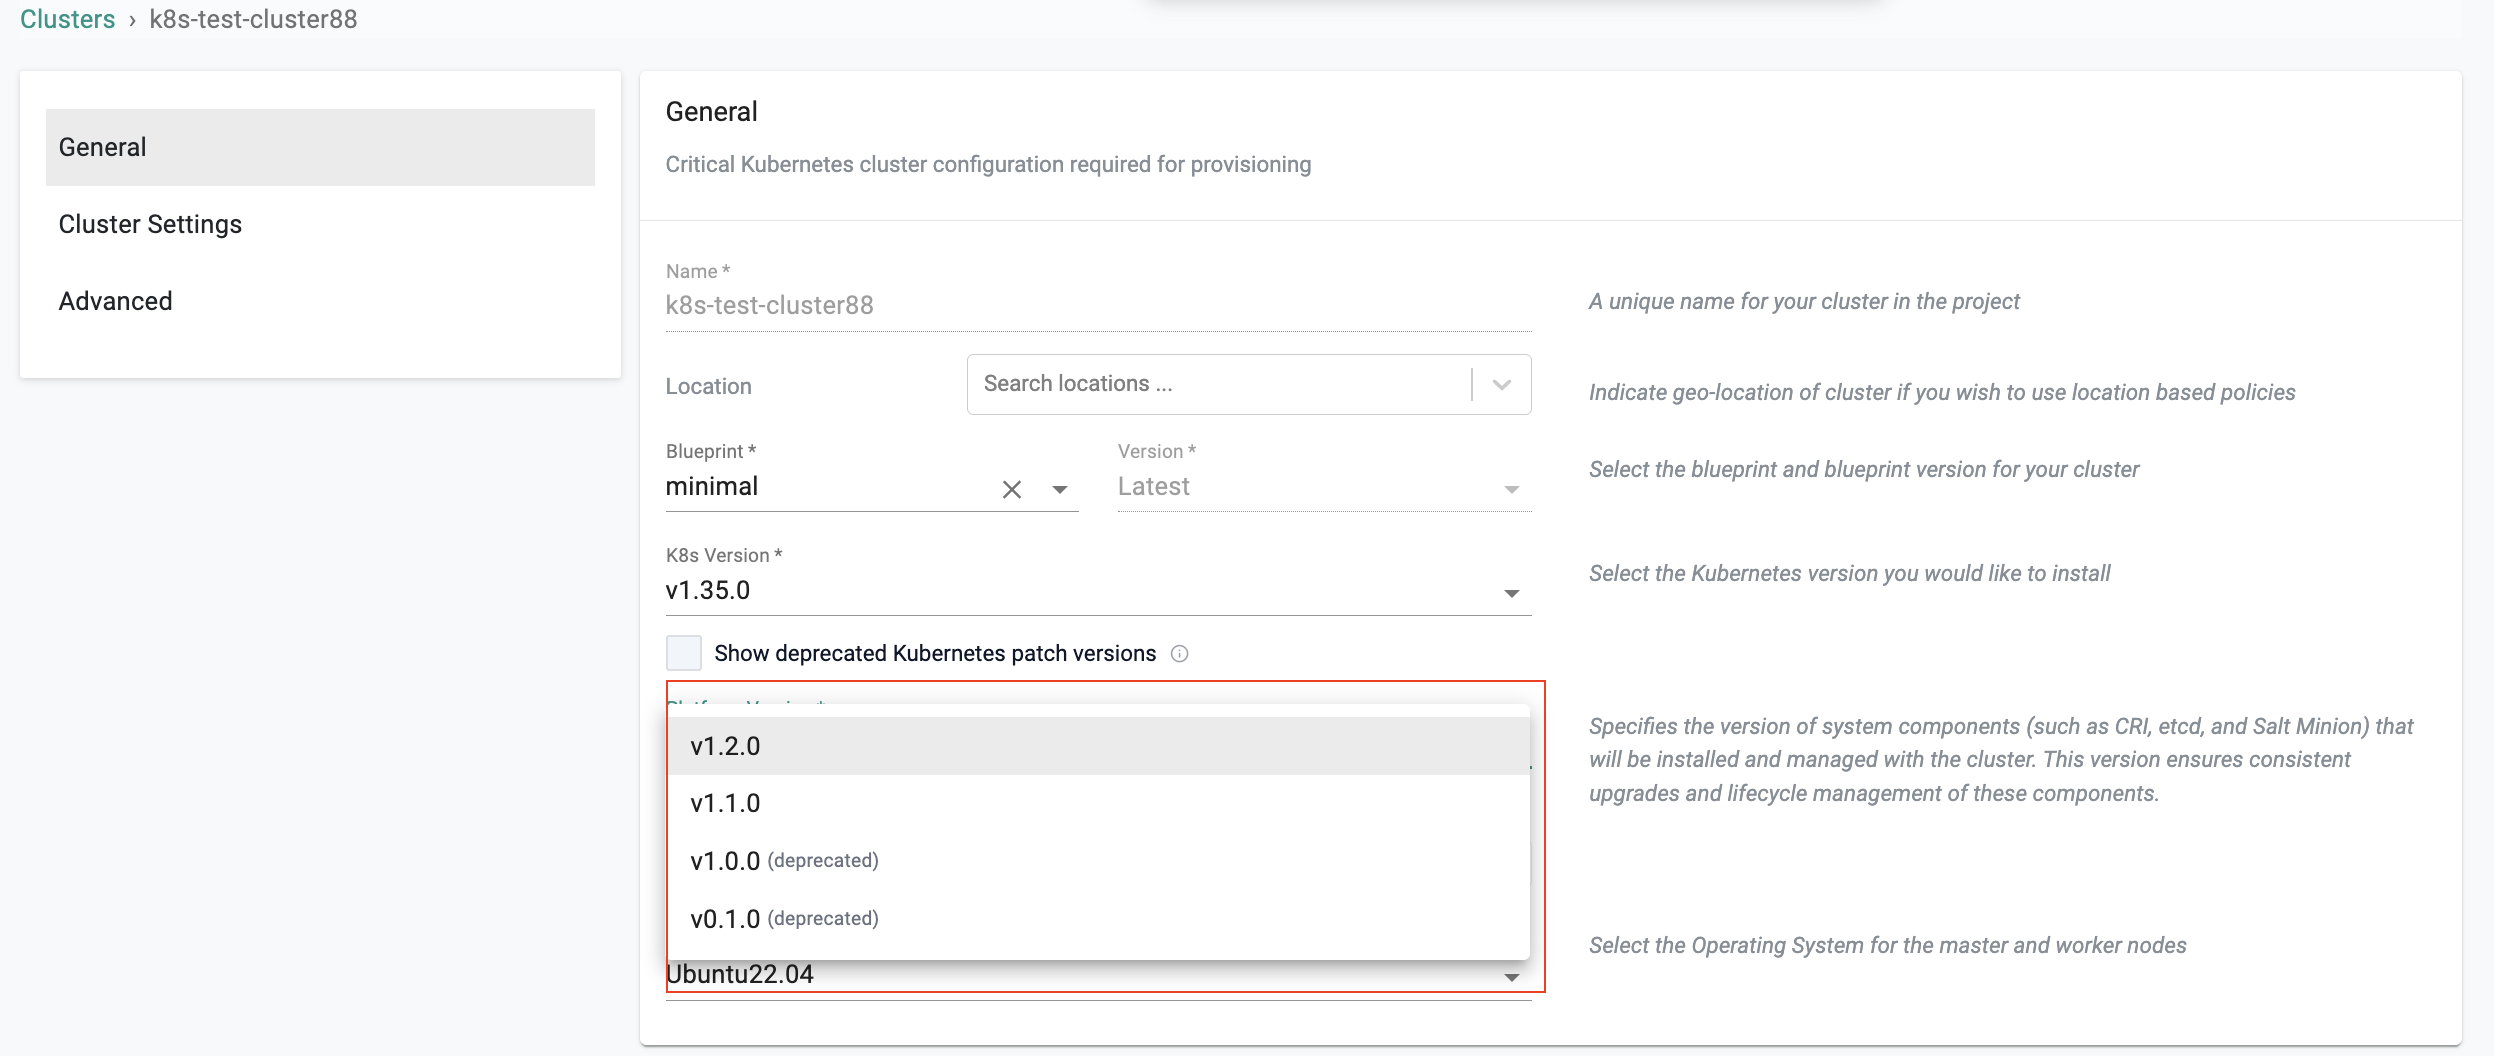
Refer to the Platform Version documentation for more details. For the platform version support matrix and component versions, see Supported Environments.
Note
The same deprecated version options apply when upgrading clusters.
Operating System
- Select the OS and Version you used for the nodes
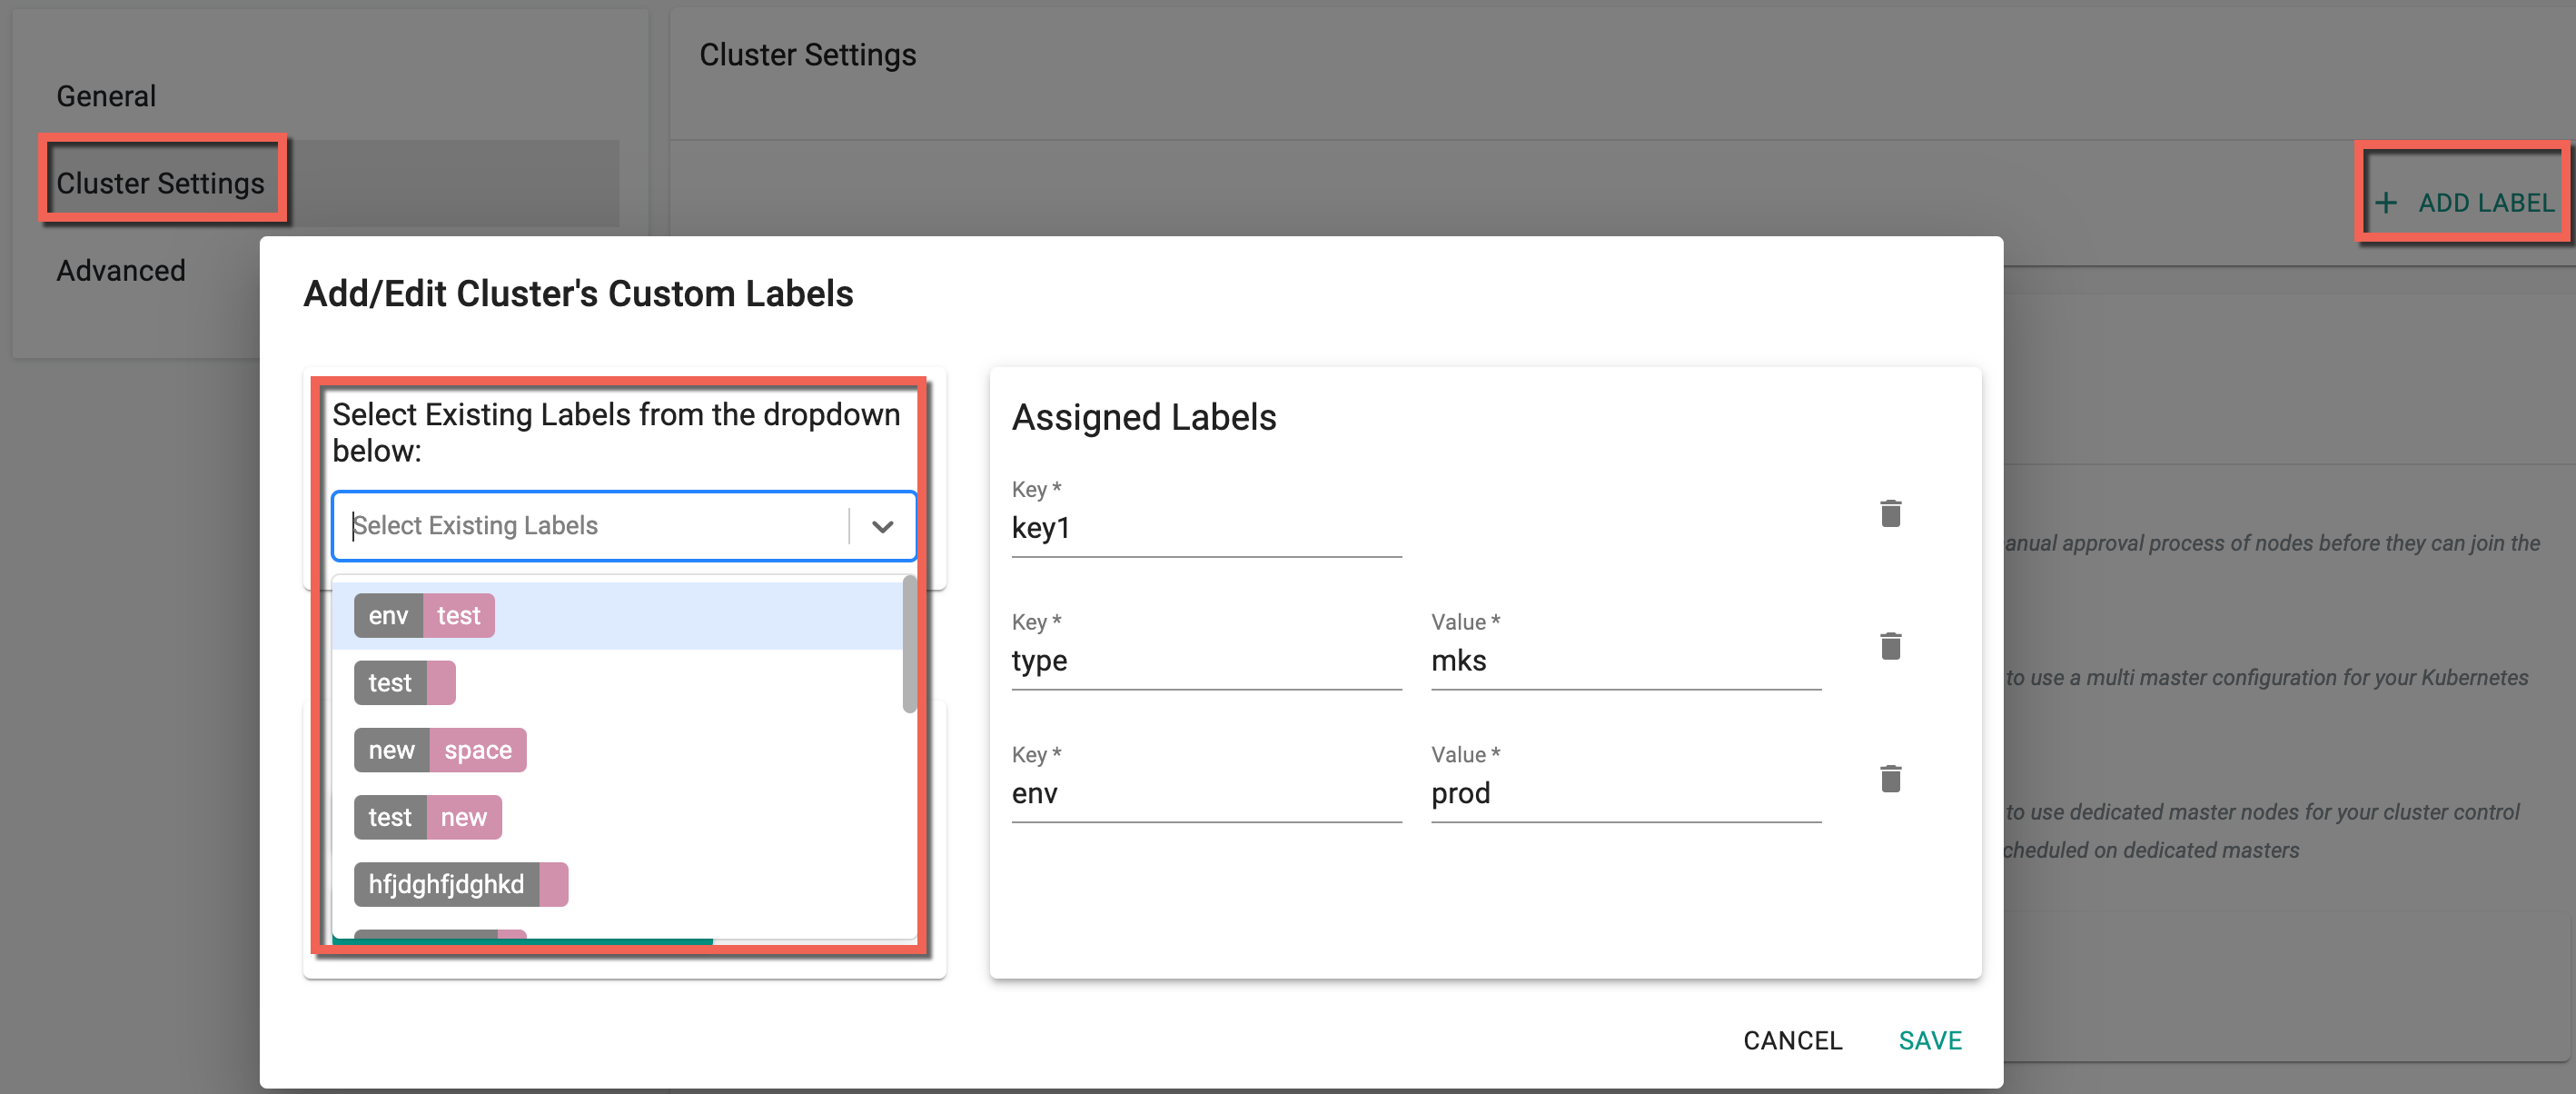
Cluster Settings
Cluster Settings allow configuration of Cluster Labels, Cluster Annotations, Kubelet Configuration, and Control Plane Overrides during cluster provisioning.
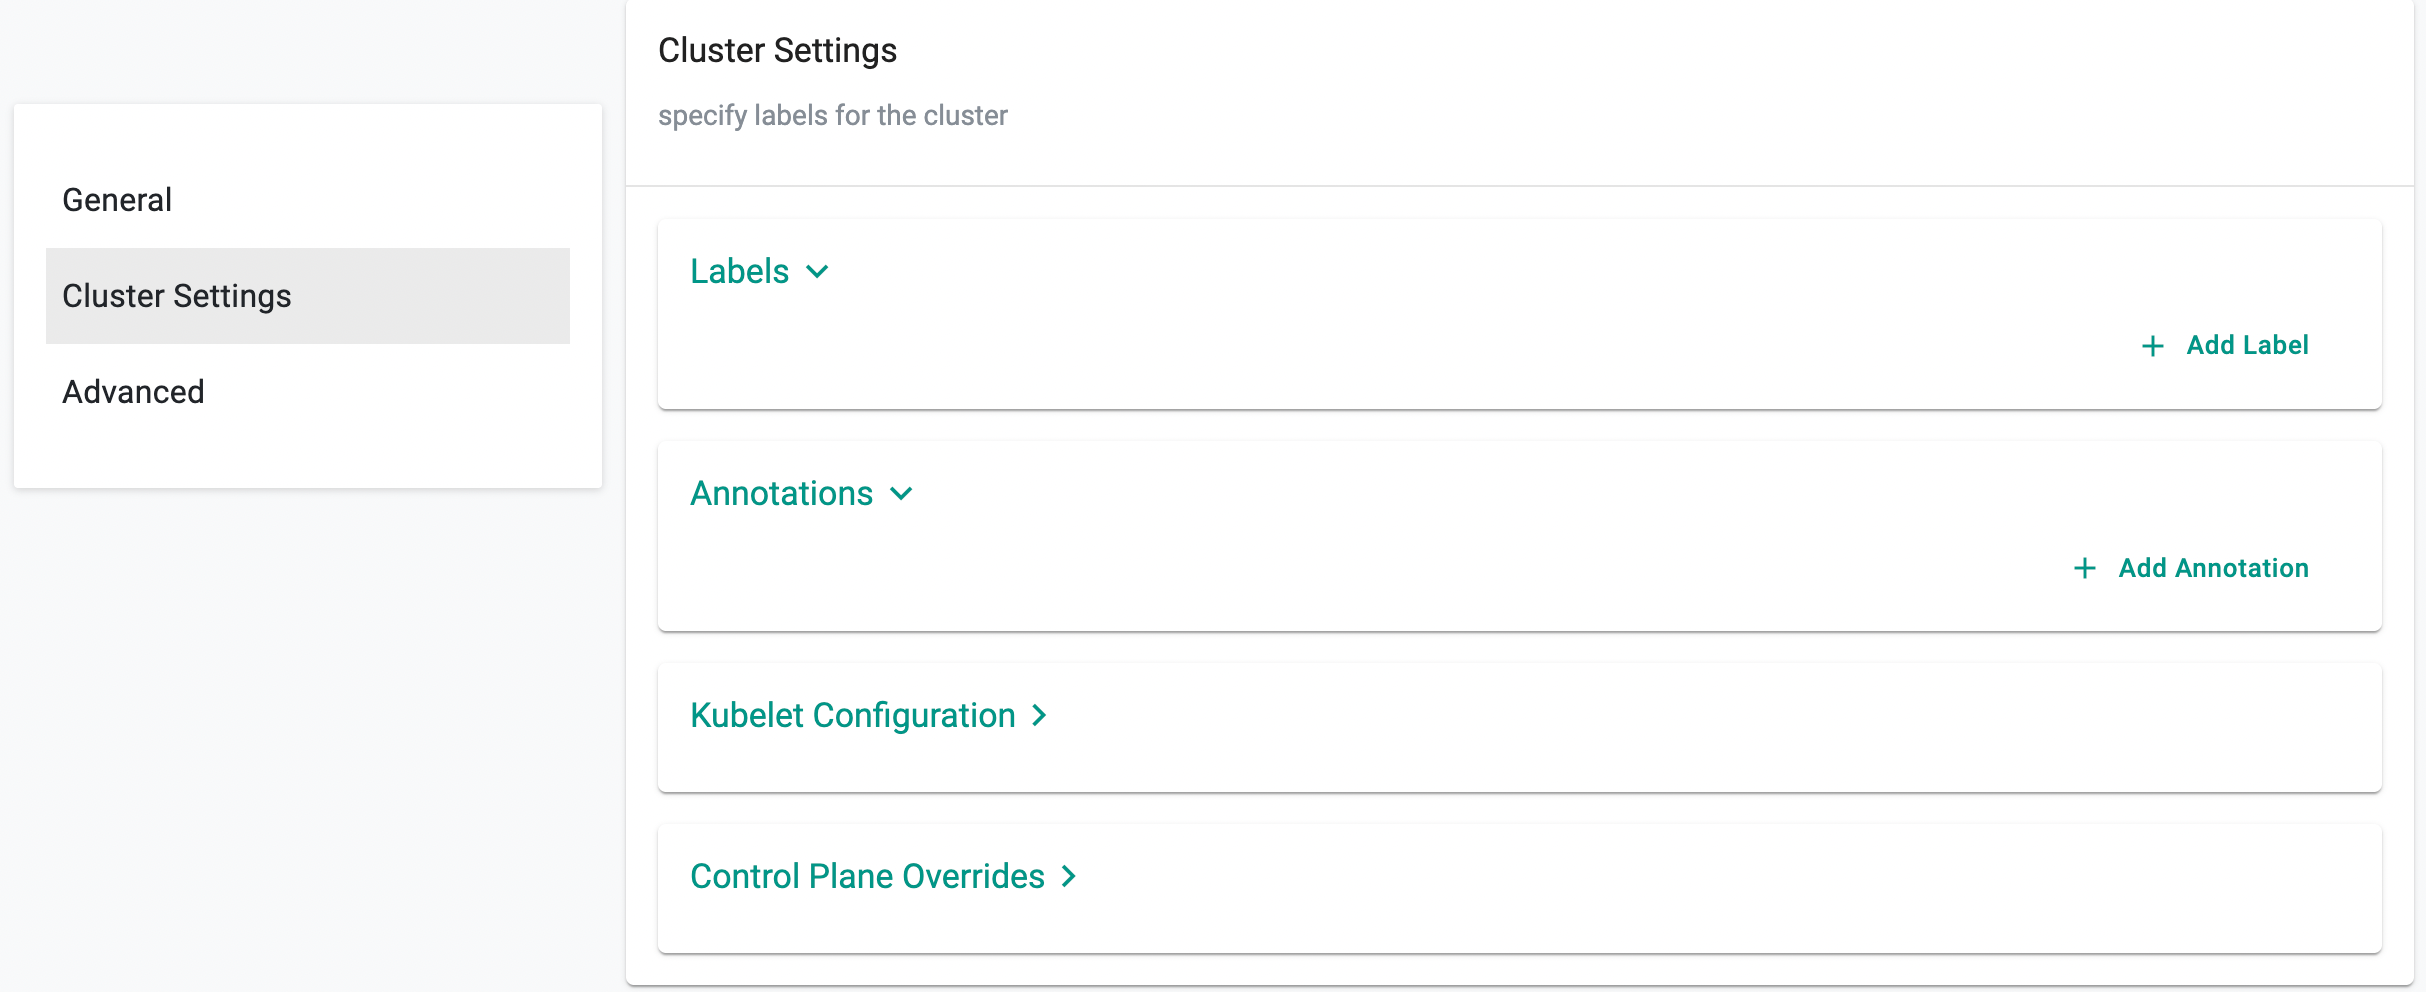
- Include either
Key-Value Labelsor simplyKey-Only Labels. Existing labels can also be selected from the drop-down.
- Add
Key-Value Annotationsto attach metadata to the cluster.
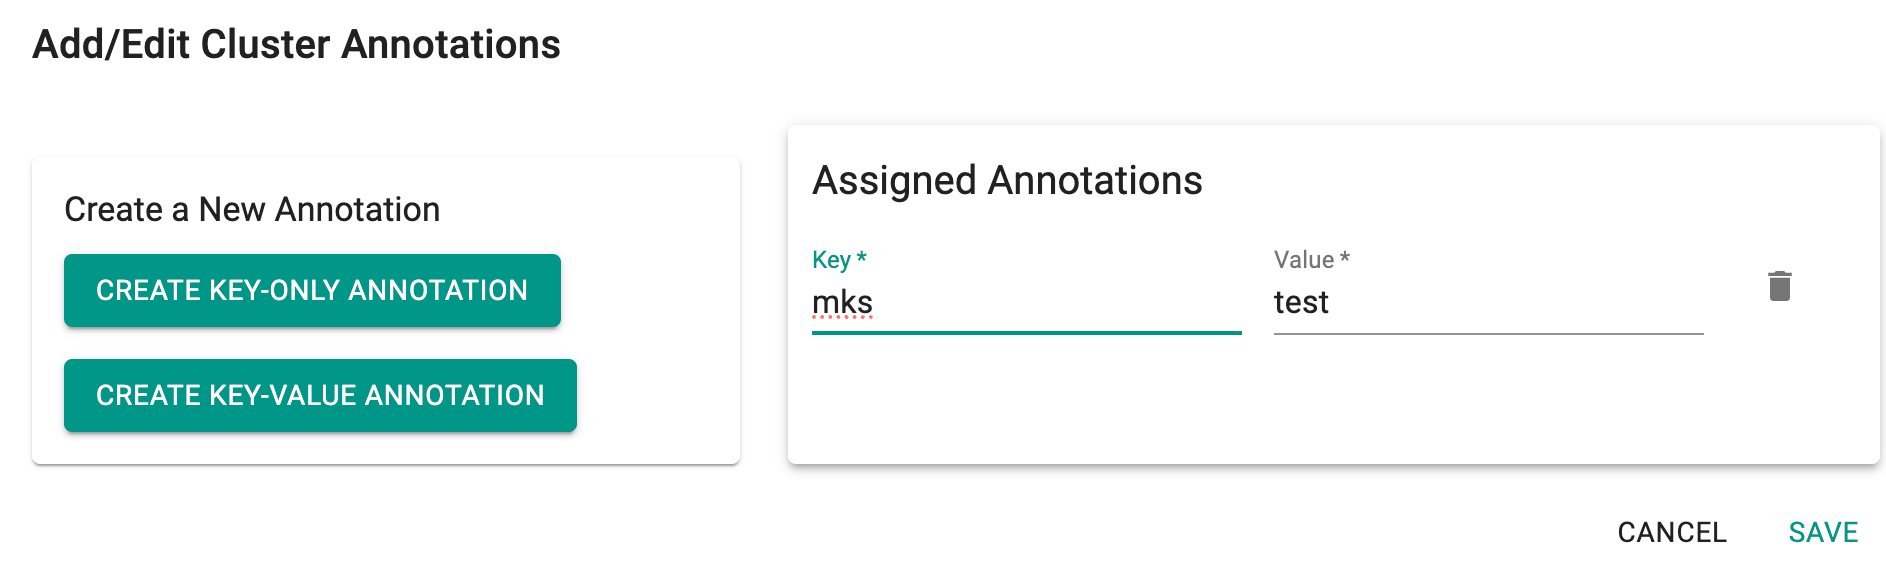
Note: Annotations can be configured at both the cluster level and node level during cluster creation and through Day 2 operations. Configuration is supported via the UI, Terraform, RCTL, and APIs. Cluster-level annotations are applied to all nodes. When node-level annotations are also defined, the annotations are merged. If the same key exists at both levels, the node-level annotation value takes precedence.
For detailed information about Kubelet configuration and Control Plane Overrides, including key-value arguments, structured YAML overrides, and Day 2 updates, refer to Kubernetes Component Configuration.
Advanced
Integrated Storage
- Users can set the storage provider details along with the cluster creation process only when selecting a blueprint other than default-upstream. This is because no storage providers are integrated to those blueprint options.
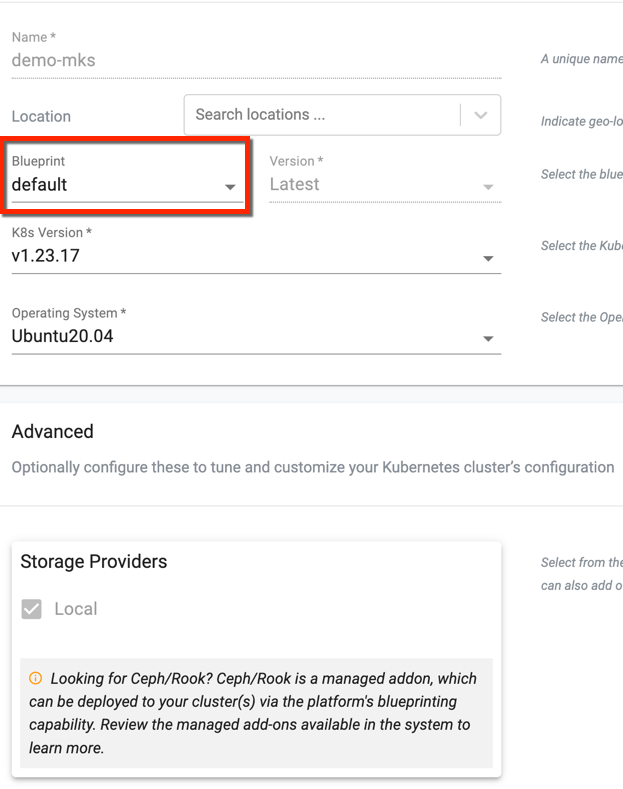
-
The Managed Storage is available as an add-on with the blueprint default-upstream, thus the users are not allowed to edit or change the default storage class rook-ceph at the time of cluster creation/provision.
- To provision a HA Cluster using rook-ceph, it is recommended to have a minimum of three (3) storage nodes
- To provision a non-HA Cluster using rook-cpeh, it is recommended to have a minimum of one (1) storage node
Important
Raw disk partitions are only supported when using the rook-ceph managed add-on for the default-upstream blueprint versions from 1.12 to 1.15. Disk encryption is disabled in these versions to support raw disk partitions.
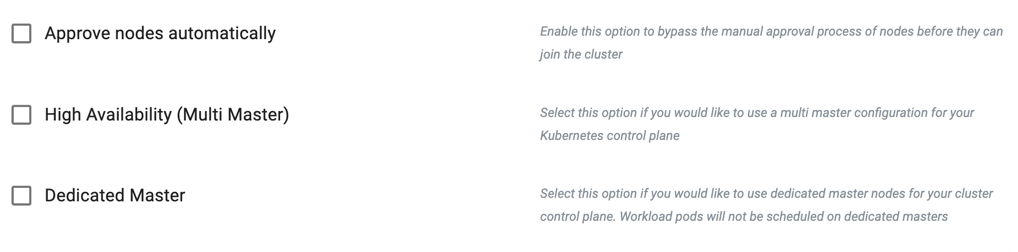
Security
By default, as a security precaution, nodes need to be approved before joining a cluster. Auto Approval of nodes is available, and this can help streamline the cluster provisioning and expansion workflows.
- Enable Approve Nodes Automatically if you do not require an approval gate for nodes to join the cluster
Kubernetes Masters
- To provision a HA cluster using rook-ceph storage, enable the High Availability (Multi Master)
- Select Dedicated Master if k8s masters to be tainted not to allow workload pods
Installer Certificate TTL
Optionally, users can set the validity period for the Installer Certificates by specifying the number of days. By default, the expiry is set to 365 days.

For more information, refer to the TTL Certificate page.
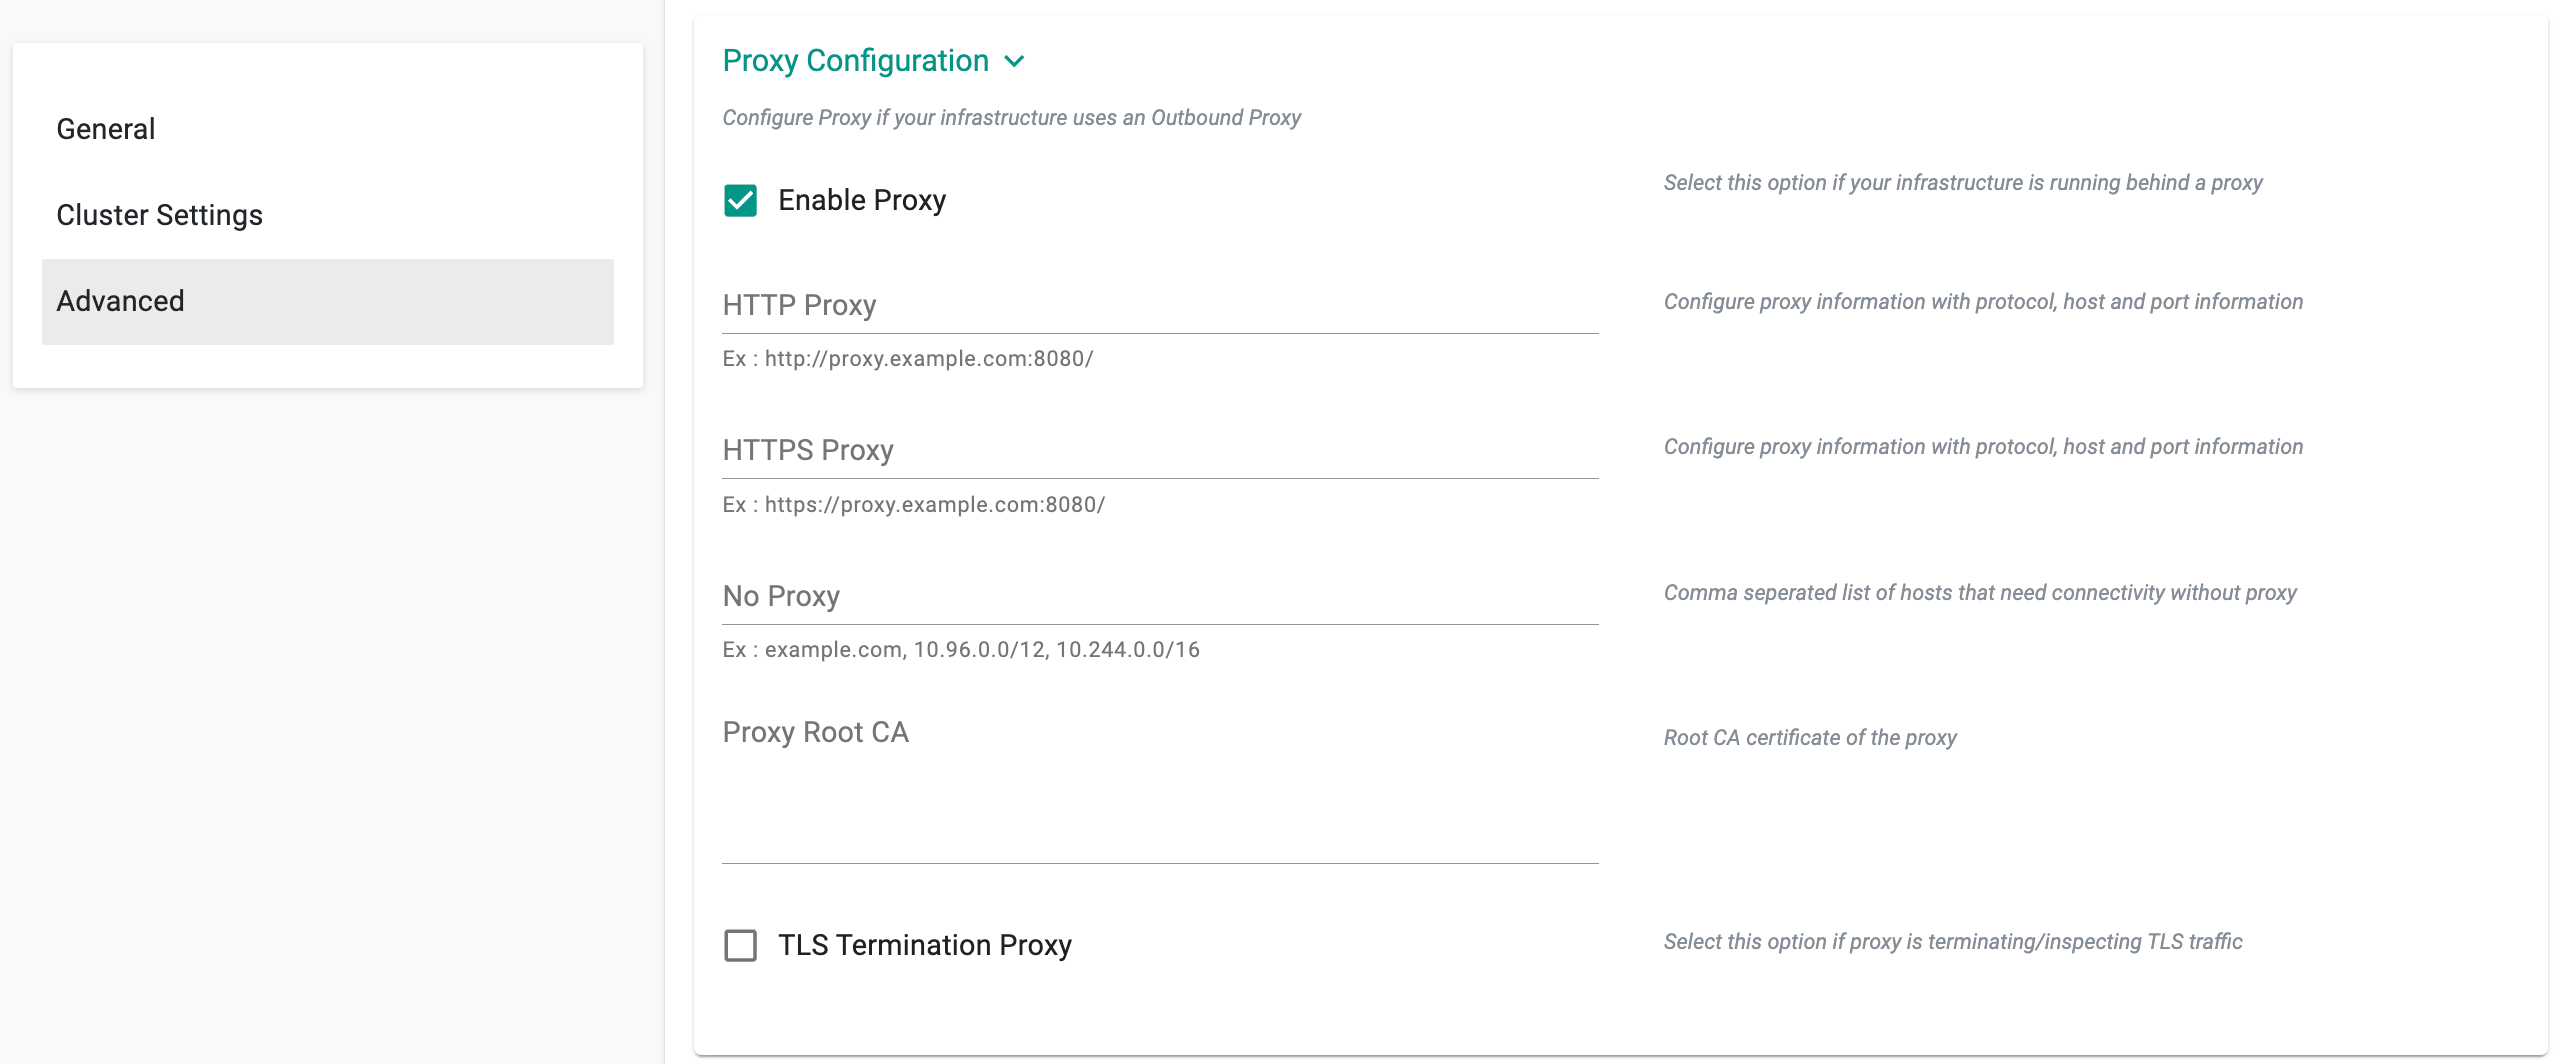
HTTP Proxy
-
Select Enable Proxy if the infrastructure being used to provision the cluster is behind a forward proxy.
-
Configure the http proxy with the proxy information (ex: http://proxy.example.com:8080)
- Configure the https proxy with the proxy information (ex: http://proxy.example.com:8080)
- Configure No Proxy with Comma separated list of hosts that need connectivity without proxy
- Configure the Root CA certificate of the proxy if the proxy is terminating non MTLS traffic
- Enable" TLS Termination Proxy" if the proxy is terminating non MTLS traffic and cannot provide the Root CA certificate of the proxy.
Important
Proxy configuration cannot be changed once the cluster is created
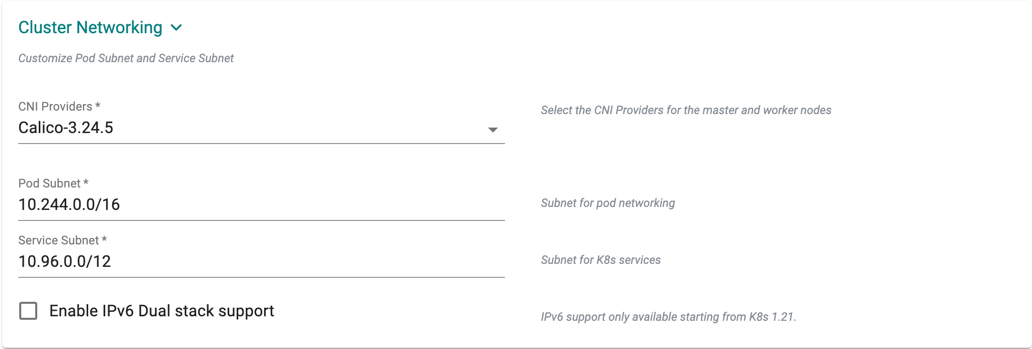
Cluster Networking
- Default subnet used for pod networking is "10.244.0.0/16"
- Default subnet used for k8s services is "10.96.0.0/12"
If you want to customize the subnets used for Pod Networking and K8s Services:
- Select CNI Providers from the drop-down, either Calico or Cilium or CNI-via-Blueprint. For more details on CNI via Blueprint, refer to CNI Providers
For Cilium:
- Windows, RHEL 7 and CentOS 7 are not supported
- Linux kernel must be greater than or equal to 4.19.57
Note: To provision a windows worker node, it is mandatory to already have a Linux master node (Control Plane).
Refer Add Worker Nodes for more information on adding a window worker node to the upstream cluster
- Configure the "Pod Subnet" with the subnet that you want to use
- Configure the "Service Subnet" with the subnet that you want to use
Important
Cluster Networking cannot be changed once the cluster is created
- Click Continue
STEP 4: Installer and Credentials
Copy and run the commands that includes the credentials and passphrase.
Note
The option you choose is the one you will use in the subsequent steps.
Linux Architecture
Prepare Nodes
- Select Linux AMD64 (X86-64) for the system using 64bit processor developed by Intel/AMD
-
Select Linux ARM64 for the system using 64bit processor developed by ARM
- Review the Node Installation Instructions section in the Console
Preflight Checks
It is strongly recommended to perform automated preflight tests on every node to ensure that it has "compatible" hardware, software, and configuration. View the detailed list of preflight checks.
- Copy and run the command in Terminal
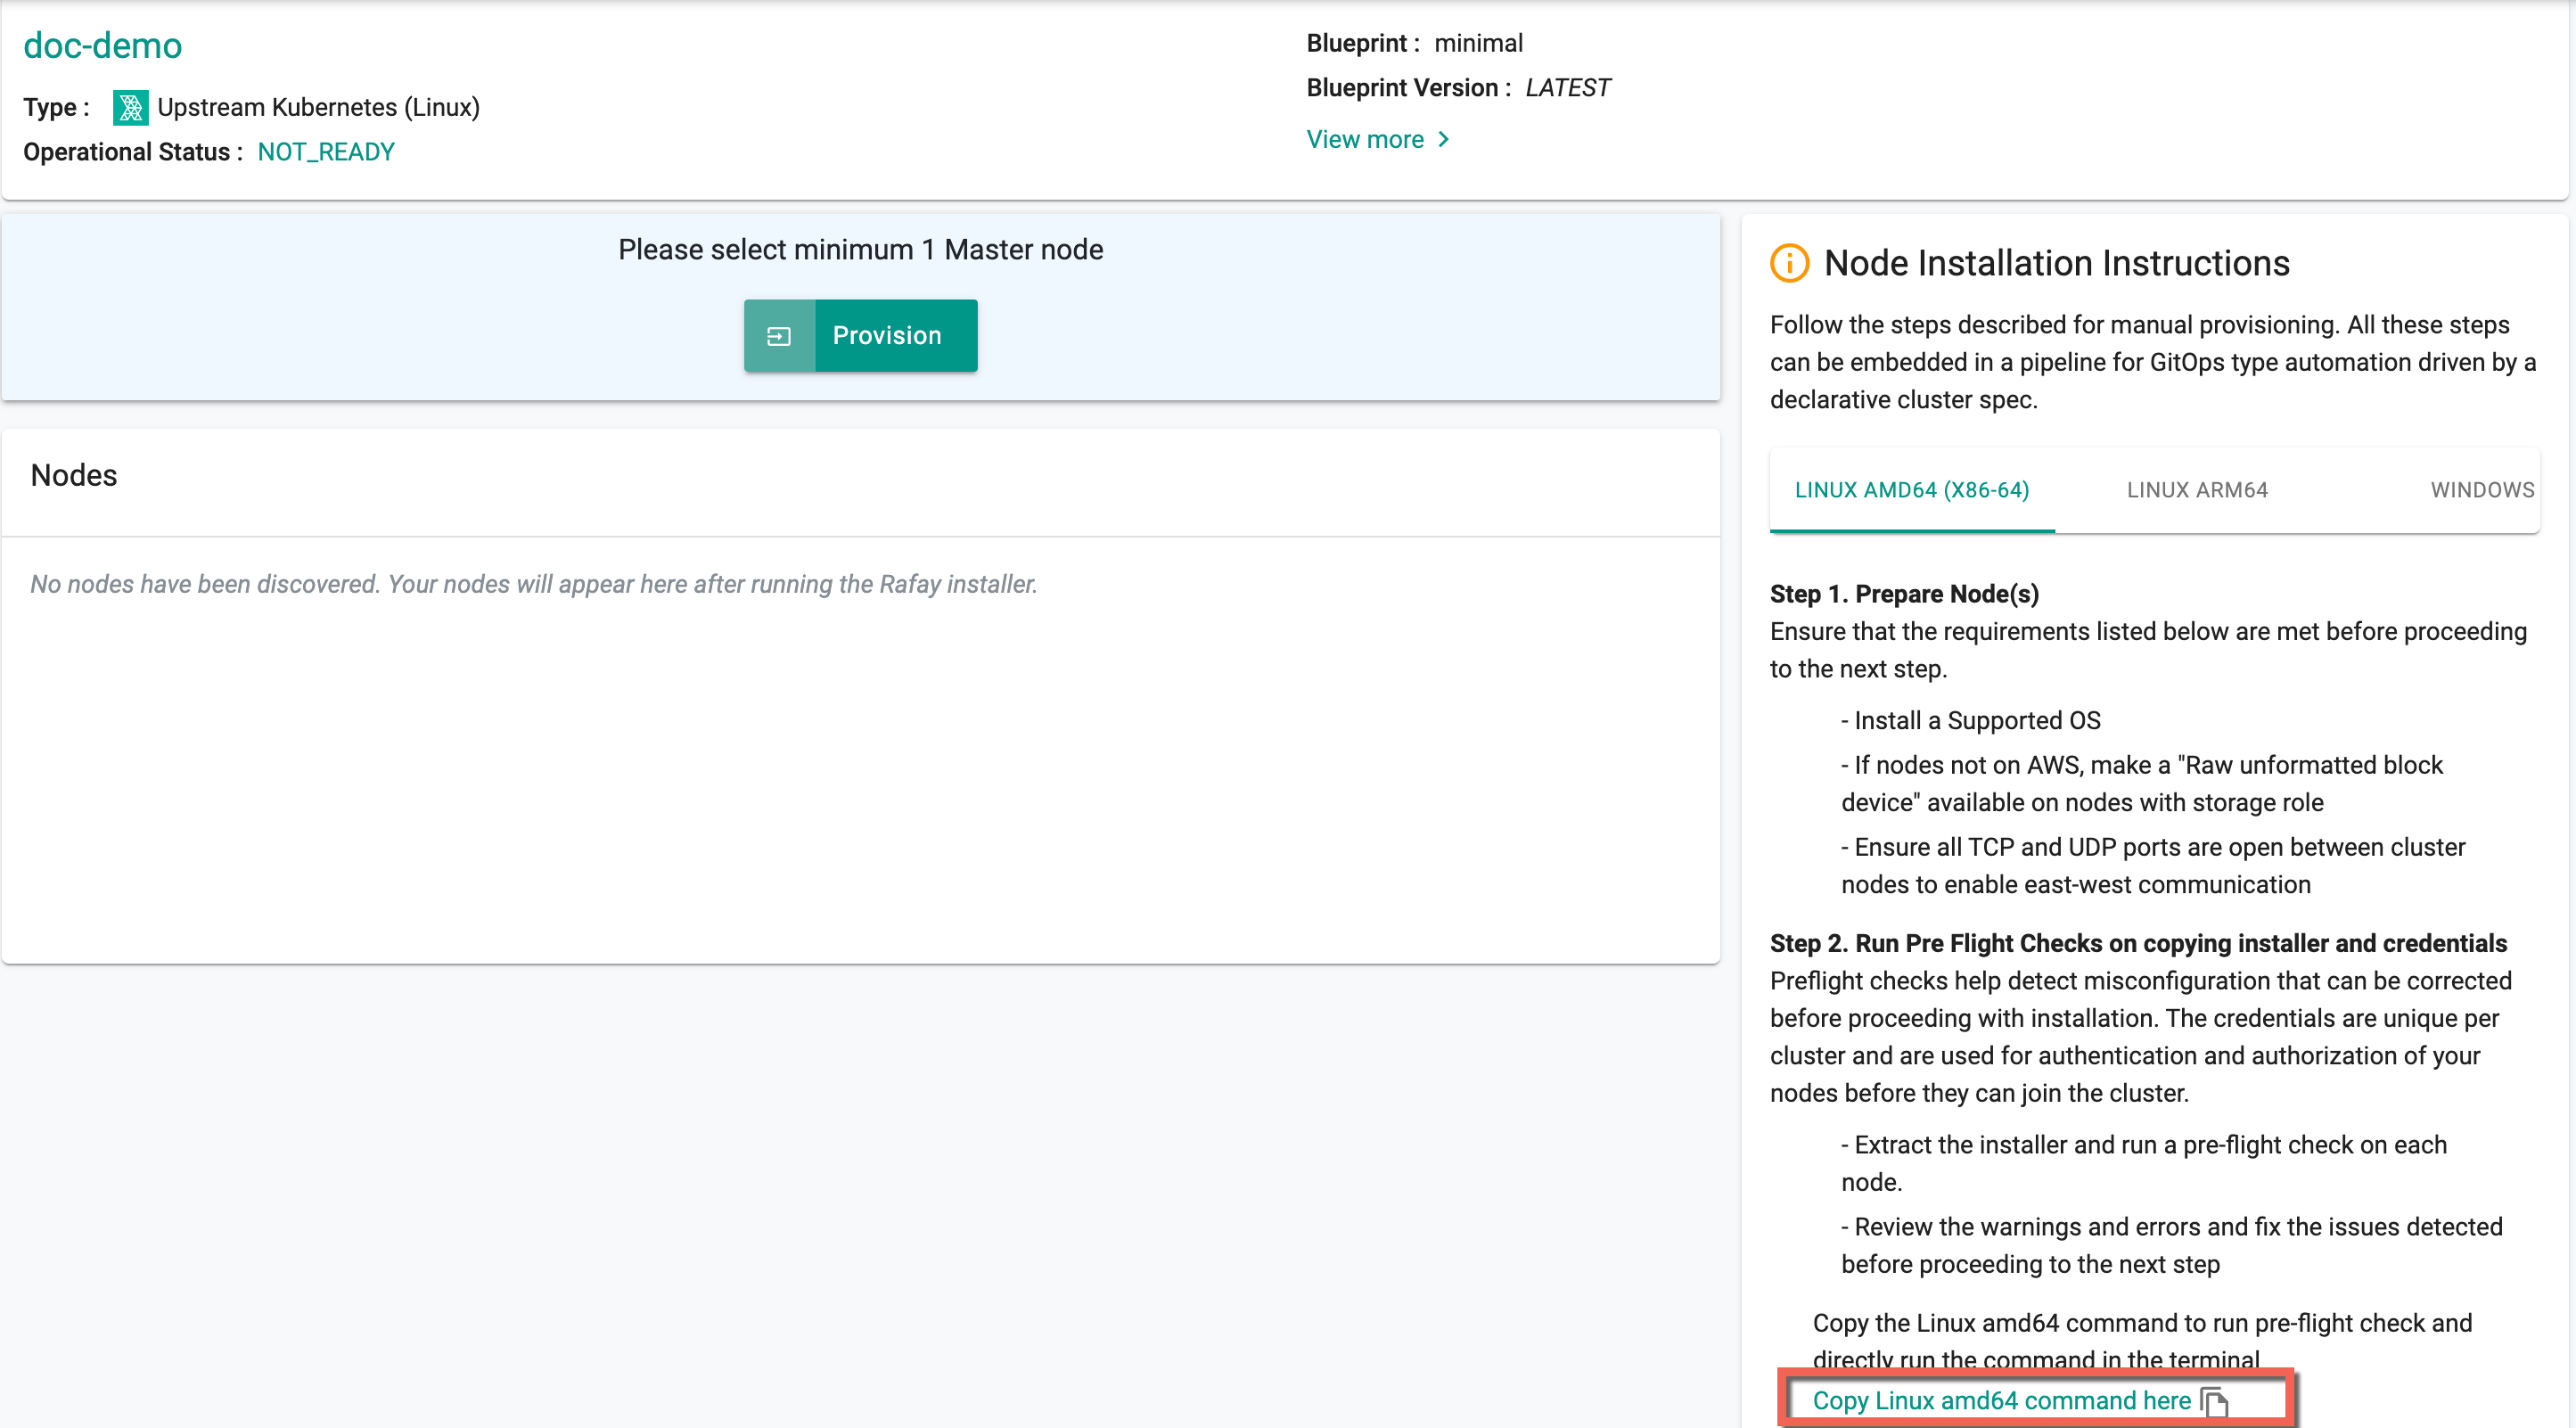
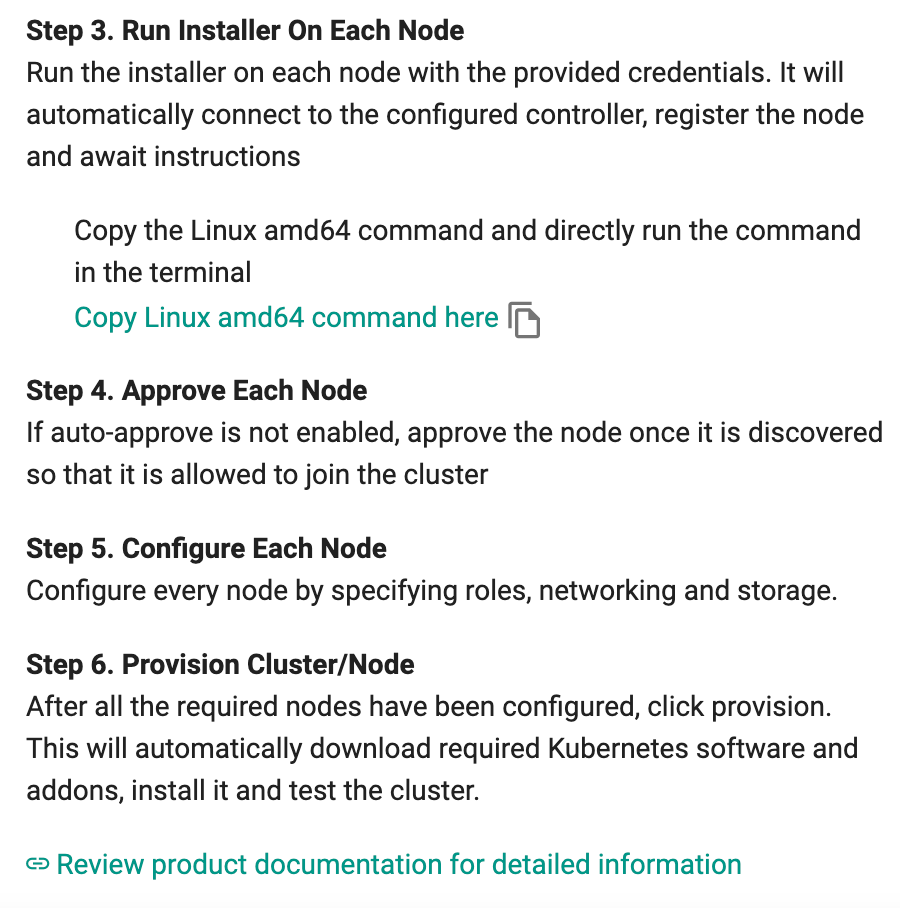
Run Installer
- Copy the command for Linux AMD 64 or Linux ARM 64
- Open Terminal and run the command in Terminal. This command includes the contents of the credentials.pem and passphrase.txt files.
Important
Firewall Configuration for Inter Node Communication: Ensure that the host firewall is configured to allow inter node communication in multi node setup so that pod's can reach to the api server.
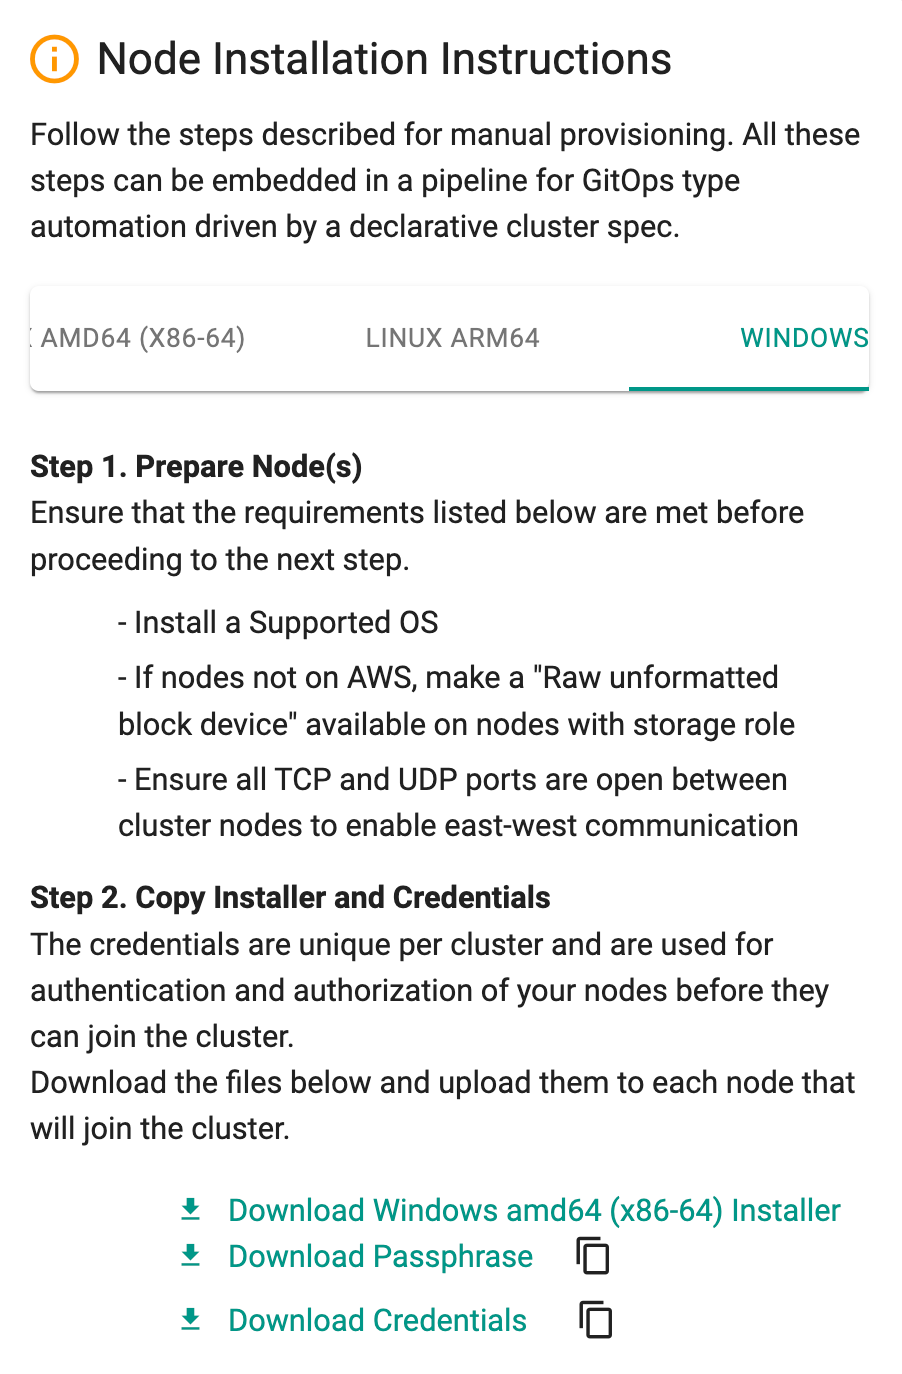
Windows Architecture
Prepare Nodes
Select Windows for the system using windows processor developed by Intel/AMD
To download Conjurer, the credentials, and the passphrase, you can either:
- Manually download the files, or
- Run a command that includes the credentials and passphrase.
- Review the Node Installation Instructions section on the Console
- Download the cluster bootstrap binary (i.e. Installer)
- Download the cluster activation secrets, i.e., Passphrase and Credential files
- SCP the three (3) files to the nodes you created in the previous step
An illustrative example is provided below. This assumes that you have the three downloaded files in the current working directory. The three files will be securely uploaded to the “/tmp” folder on the instance.
$ scp -i <keypairfile.pem> * ubuntu@<Node's External IP Address>:/tmp
- Review the Node Installation Instructions section in the Console
- Copy the command and Open Terminal
- Paste and run the command in Terminal
Preflight Checks
It is strongly recommended to perform automated preflight tests on every node to ensure that it has "compatible" hardware, software, and configuration. View the detailed list of preflight checks.
Copy and run the command in terminal
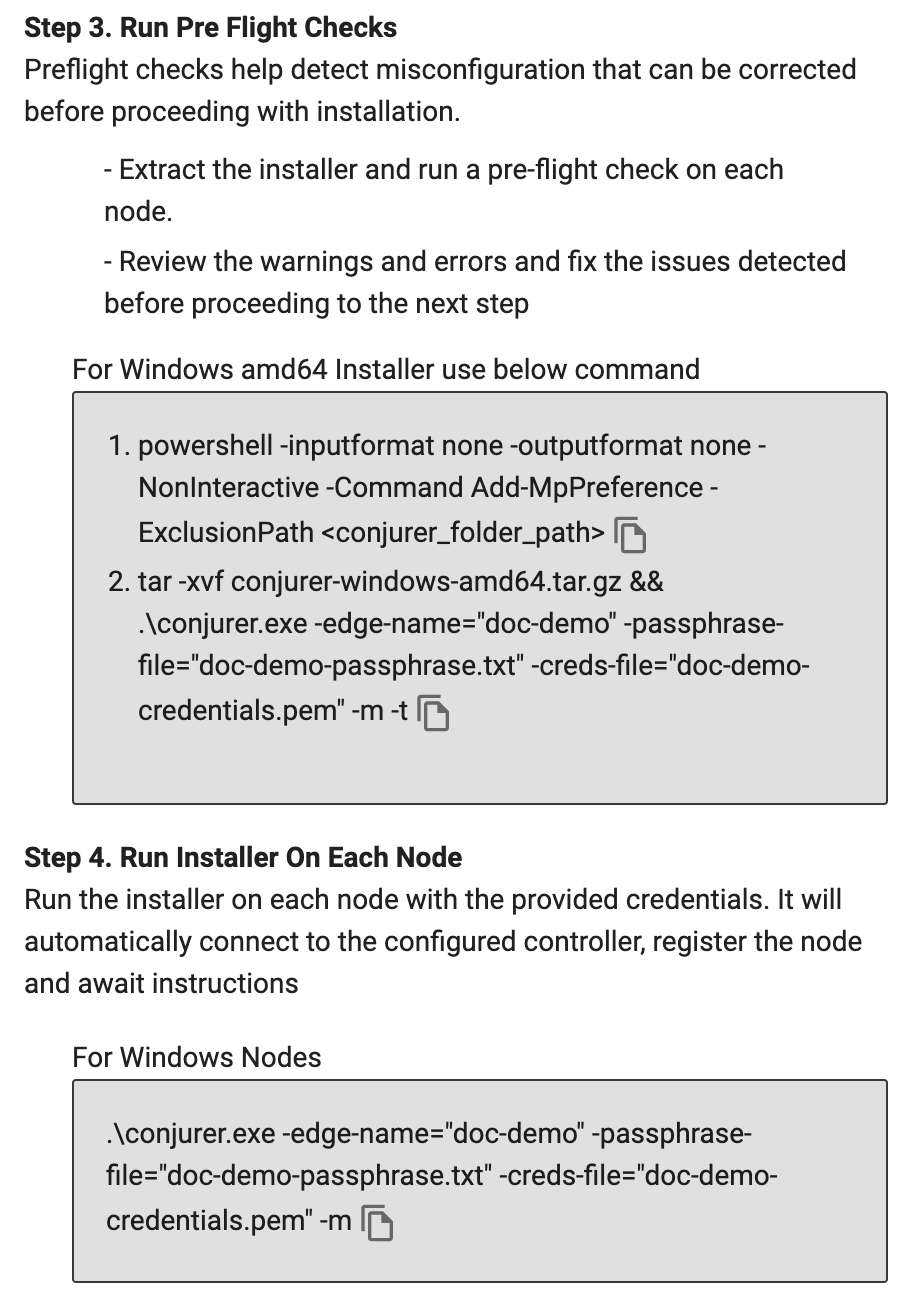
Run Installer
- Copy the command for Windows
- Open Terminal and run the command in Terminal
An illustrative example is provided below:
sudo ./conjurer -edge-name="onpremcluster" -passphrase-file="onpremcluster-passphrase.txt" -creds-file="onpremcluster.pem -t

[+]  Initiating edge node install

[+] Provisioning node
      [+] Step 1. Installing node-agent
      [+] Step 2. Setting hostname to node-72djl2g-192-168-0-20-onpremcluster
      [+] Step 3. Installing credentials on node
      [+] Step 4. Configuring node-agent
      [+] Step 5. Starting node-agent

[+] Successfully provisioned node
ℹ️ What is 'Conjurer'?
Conjurer is a cluster installer and bootstrap tool developed and maintained by Rafay. It is a proprietary tool, not open source. Conjurer connects and registers nodes with the Rafay Controller by internally bringing up the Salt Minion and Chisel, enabling the connectivity required to provision Kubernetes nodes. It validates node readiness by checking system prerequisites such as storage, DNS, and file system configuration, using activation secrets to access the necessary Controller information and authentication credentials for registration. Once the node passes validation, the node gets registered in the Rafay Controller. This connection allows the node to be used in provisioning Kubernetes clusters and cluster lifecycle management.
Important
- For ARM nodes, only worker nodes are supported
- For Windows nodes, after successfully running the Conjurer binary on a Windows node, reboot the node for changes to take effect
Step 5: Salt Minion coexists with customer's salt minion
Conjurer binary has introduced a multi-minion option that allows installing Rafay salt-minion, which can run along with other salt-minion(s), already installed on the node by the customer.
ℹ️ About Salt/Minion
Salt is an open-source automation and infrastructure management tool used to provision Kubernetes clusters on bare metal or virtual machines (VMs). It is released under the Apache 2.0 license and developed by VMware. Salt operates on a master-minion architecture, where the minion runs on the customer's node, and the master runs on the controller. The master orchestrates workflows and sends commands, which are executed by the minion on the node. Salt is leveraged for automating and managing tasks across multiple nodes, including provisioning Kubernetes clusters and handling other infrastructure management tasks.
Conjurer brings up the Salt minion on the node, enabling communication between the node and the Rafay Controller. Once the Salt minion is active, the node can receive orchestrated workflows and Kubernetes provisioning tasks from the controller, leveraging Salt’s automation capabilities to manage the node and its tasks.
- Install multi-minion: Use
-m(compatible with the pre-existing salt minions) along with the run conjurer command as shown in the below example to install the multi-minion:
sudo ./conjurer -m -edge-name="onpremcluster" -passphrase-file="onpremcluster-passphrase.txt" -creds-file="onpremcluster.pem -t
- Uninstall multi-minion: Use
-m -das shown in the below example to remove salt-minion software from the customer node and not delete the pre-existed salt-minion’s default configuration or logs.
sudo ./conjurer -m -d -edge-name="onpremcluster" -passphrase-file="onpremcluster-passphrase.txt" -creds-file="onpremcluster.pem -t
Once the run conjurer step is complete, the node will show up on the Web Console with the status as DISCOVERED.
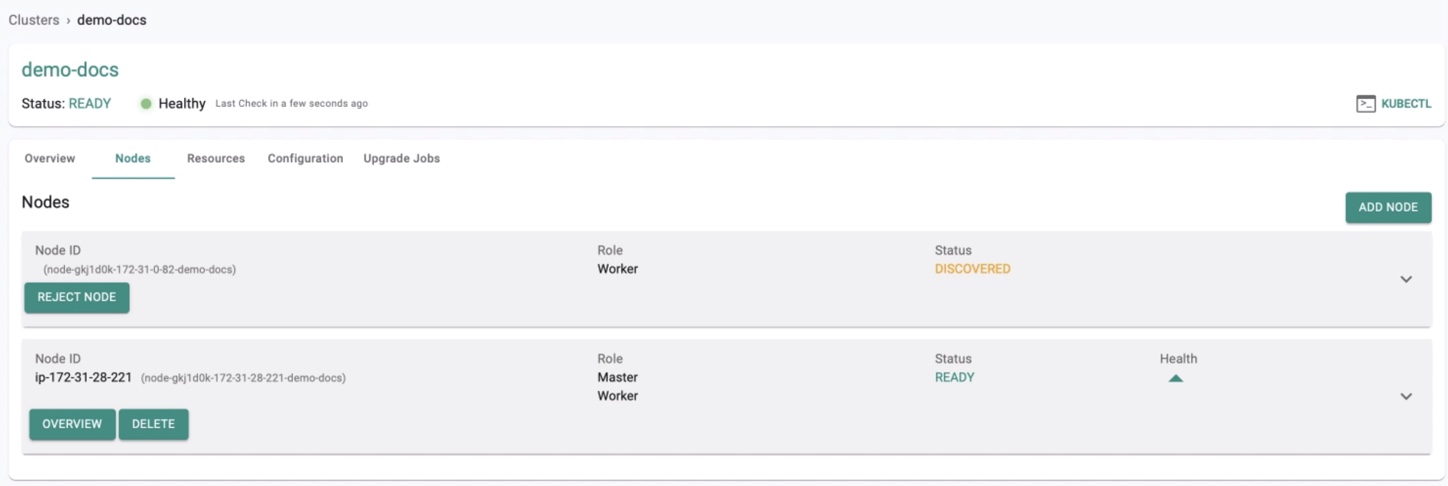
STEP 6: Approve Node
This is an optional approval step that acts as a security control to ensure that administrators can inspect and approve a node before it can become part of the cluster.
- Click Approve button to approve the node to this cluster
- In a few seconds, you will see the status of the node being updated to “Approved" in the Web Console
- Once approved the status changes to APPROVED. The node is automatically probed and all information about the node is presented to the administrator on the Web Console.
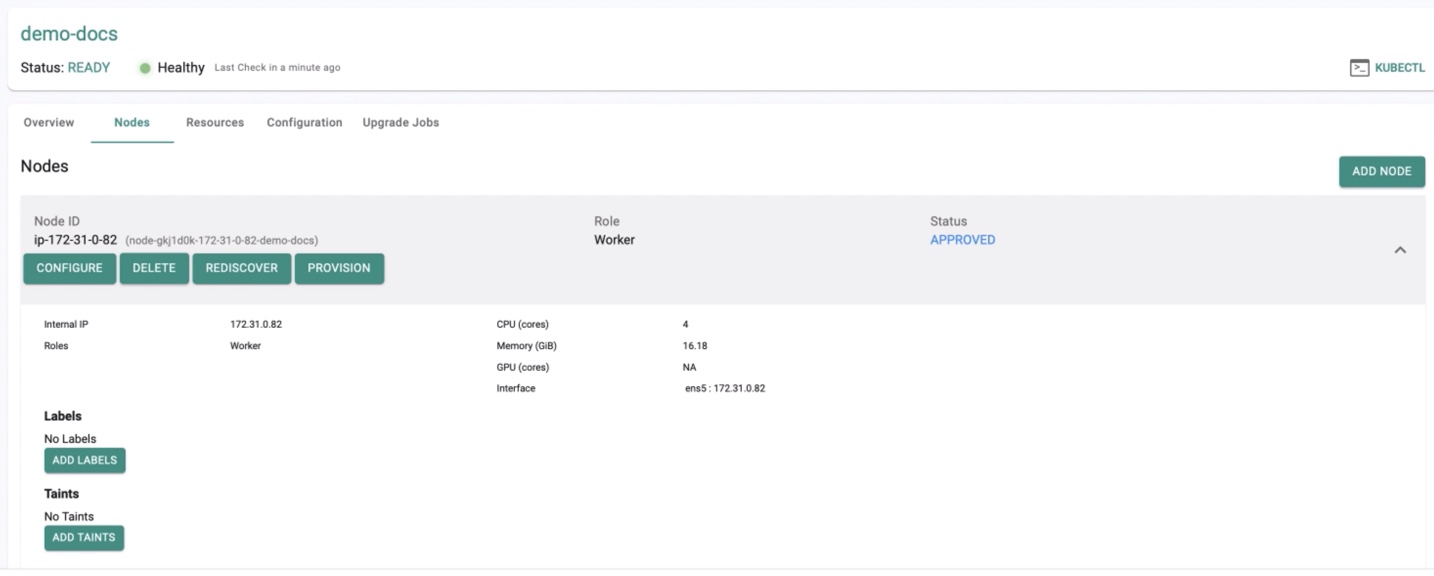
STEP 7: Configure Node
This is a mandatory configuration step that allows the infrastructure administrator to specify the “role” for the node.
Important
Without the configuration step, cluster provisioning cannot be initiated.
- Select the cluster and click the Nodes tab
- Click Configure
- If the node is meant to be a k8s master, select the "master" role
- If the node is meant to handle storage, select the storage location from the automatically detected list
- Select the network interface that will be used for cluster networking from the automatically detected list of interfaces
- Click Save
STEP 8: Provisioning
All the necessary configurations are provided, and the Controller can start provisioning Kubernetes with all required software add-ons. These will be automatically provisioned and configured to operationalize the cluster.
- Click Provision. A message appears to confirm the provisioning process with a note "It can take 5-10 mins for the provision to complete"
- Click Yes to proceed, and the status changes to Provisioning

Important
- The end-to-end provisioning process can take time and is dependent on the number of nodes you are provisioning and the Internet bandwidth available to your nodes to download the necessary software
- During cluster provisioning, the local private IP of nodes is injected as the first entity in the resolv.conf file. Avoid overriding this configuration, as consul relies on it for DNS resolution and serves as a load balancer across all control plane nodes
Below is an example of an upstream cluster with windows worker node
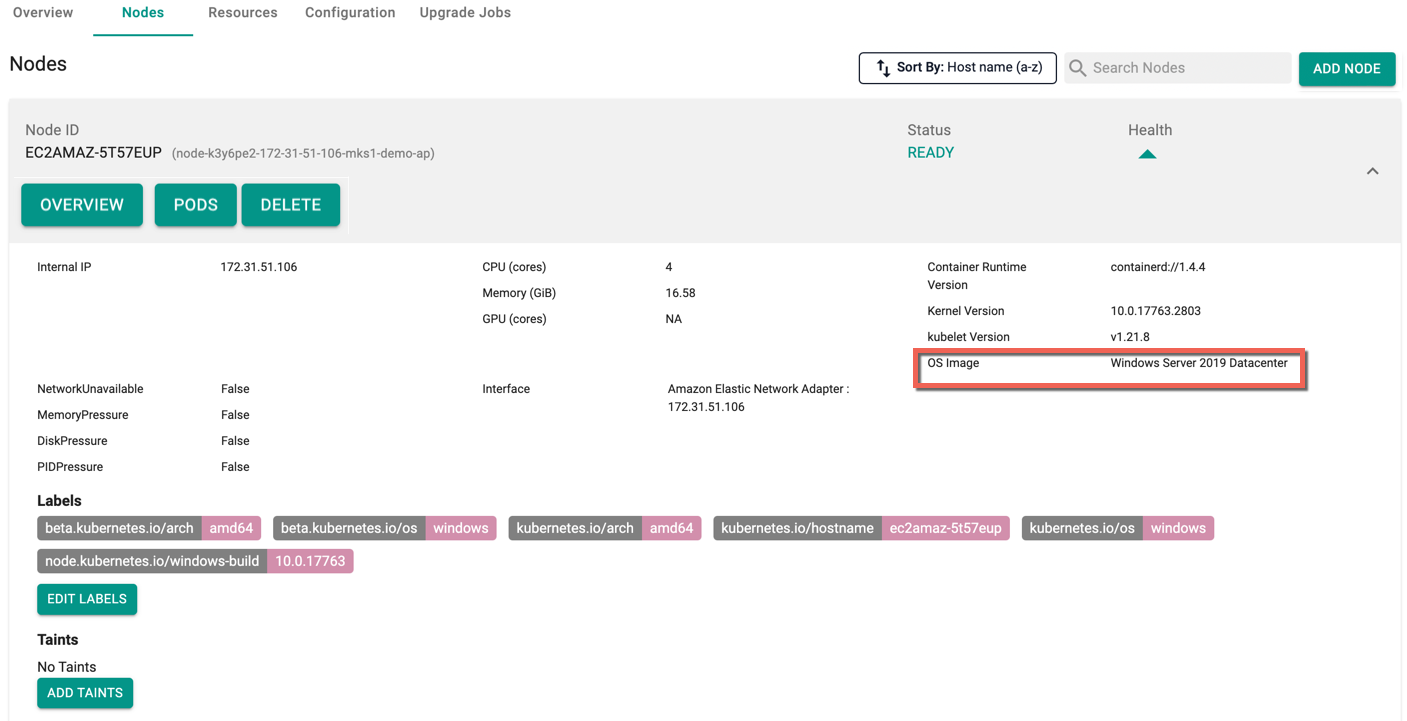
The Search Nodes box allows users to quickly filter the list of nodes by entering keywords or names, while the Sort By dropdown allows users to organize nodes based on attributes, such as sorting by Host name in ascending order (A-Z). These features improve efficiency in locating and managing nodes.
Note: In the event of insufficient RAM during MKS cluster provisioning, the system dynamically allocates disk space to compensate for the memory shortage. While this process addresses the memory deficit, it's important to note that automatic swap off is disabled to exclusively utilize the available memory, without engaging disk-based swap.
Provisioning Successful
Once all the steps are complete and if the provision process was successful, you should see details about the cluster on the Web Console.
To view the cost details of this cluster, click on the available cost link. This will navigate you to the Cost Explorer page, where you can access detailed cost information for this specific cluster.
Download the cluster configuration formatted for GitOps System Sync, either from the console, using the RCTL CLI, or programmatically through the REST APIs.

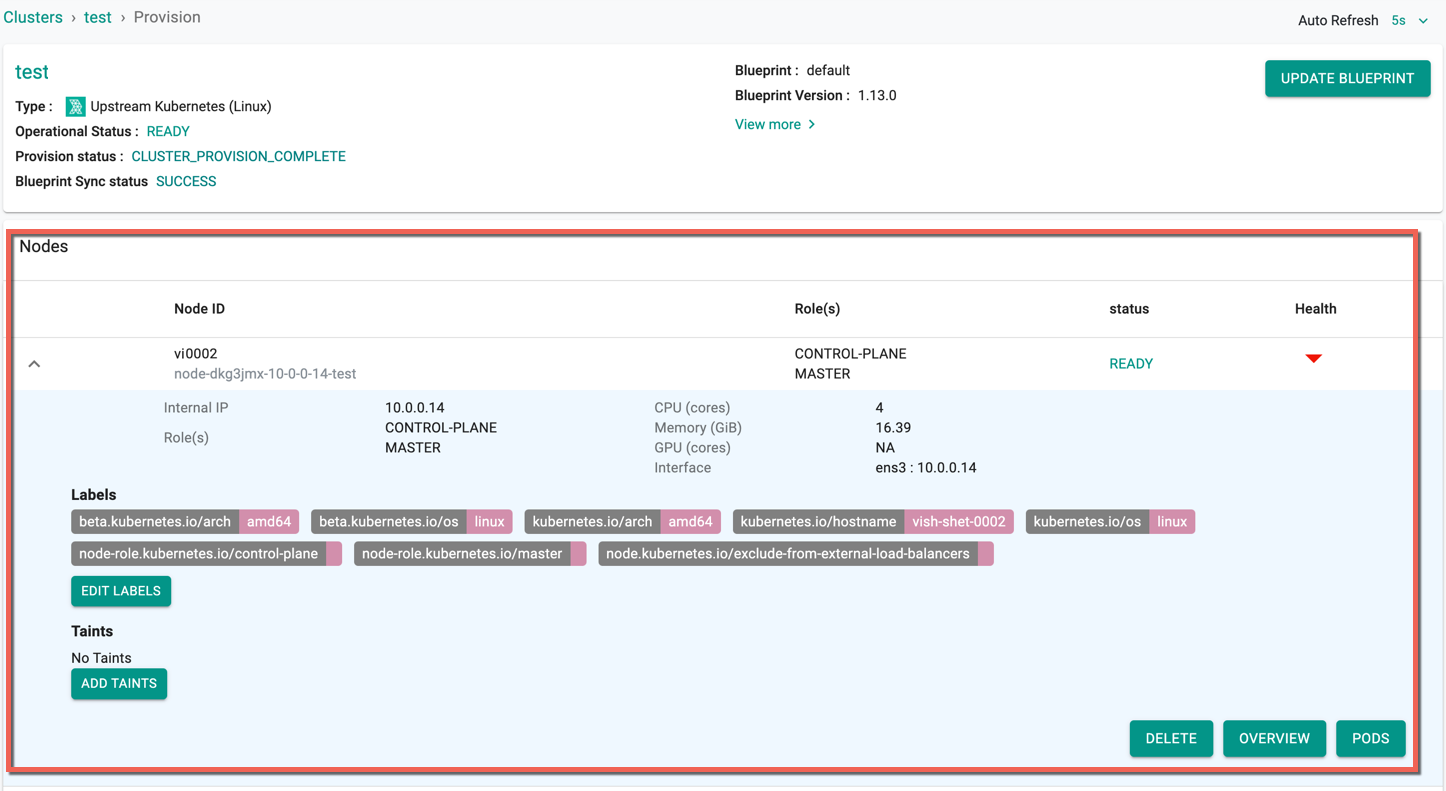
On successful upstream cluster provision, users can view the detailed operations and workflow of the cluster by clicking the Operation Status Ready icon. The screen shows all the stages that occurred during cluster deployment
![]()
Users can view the Nodes status and health in this page.
If you encounter any provisioning or upgrade issues, check our Troubleshooting Guide.
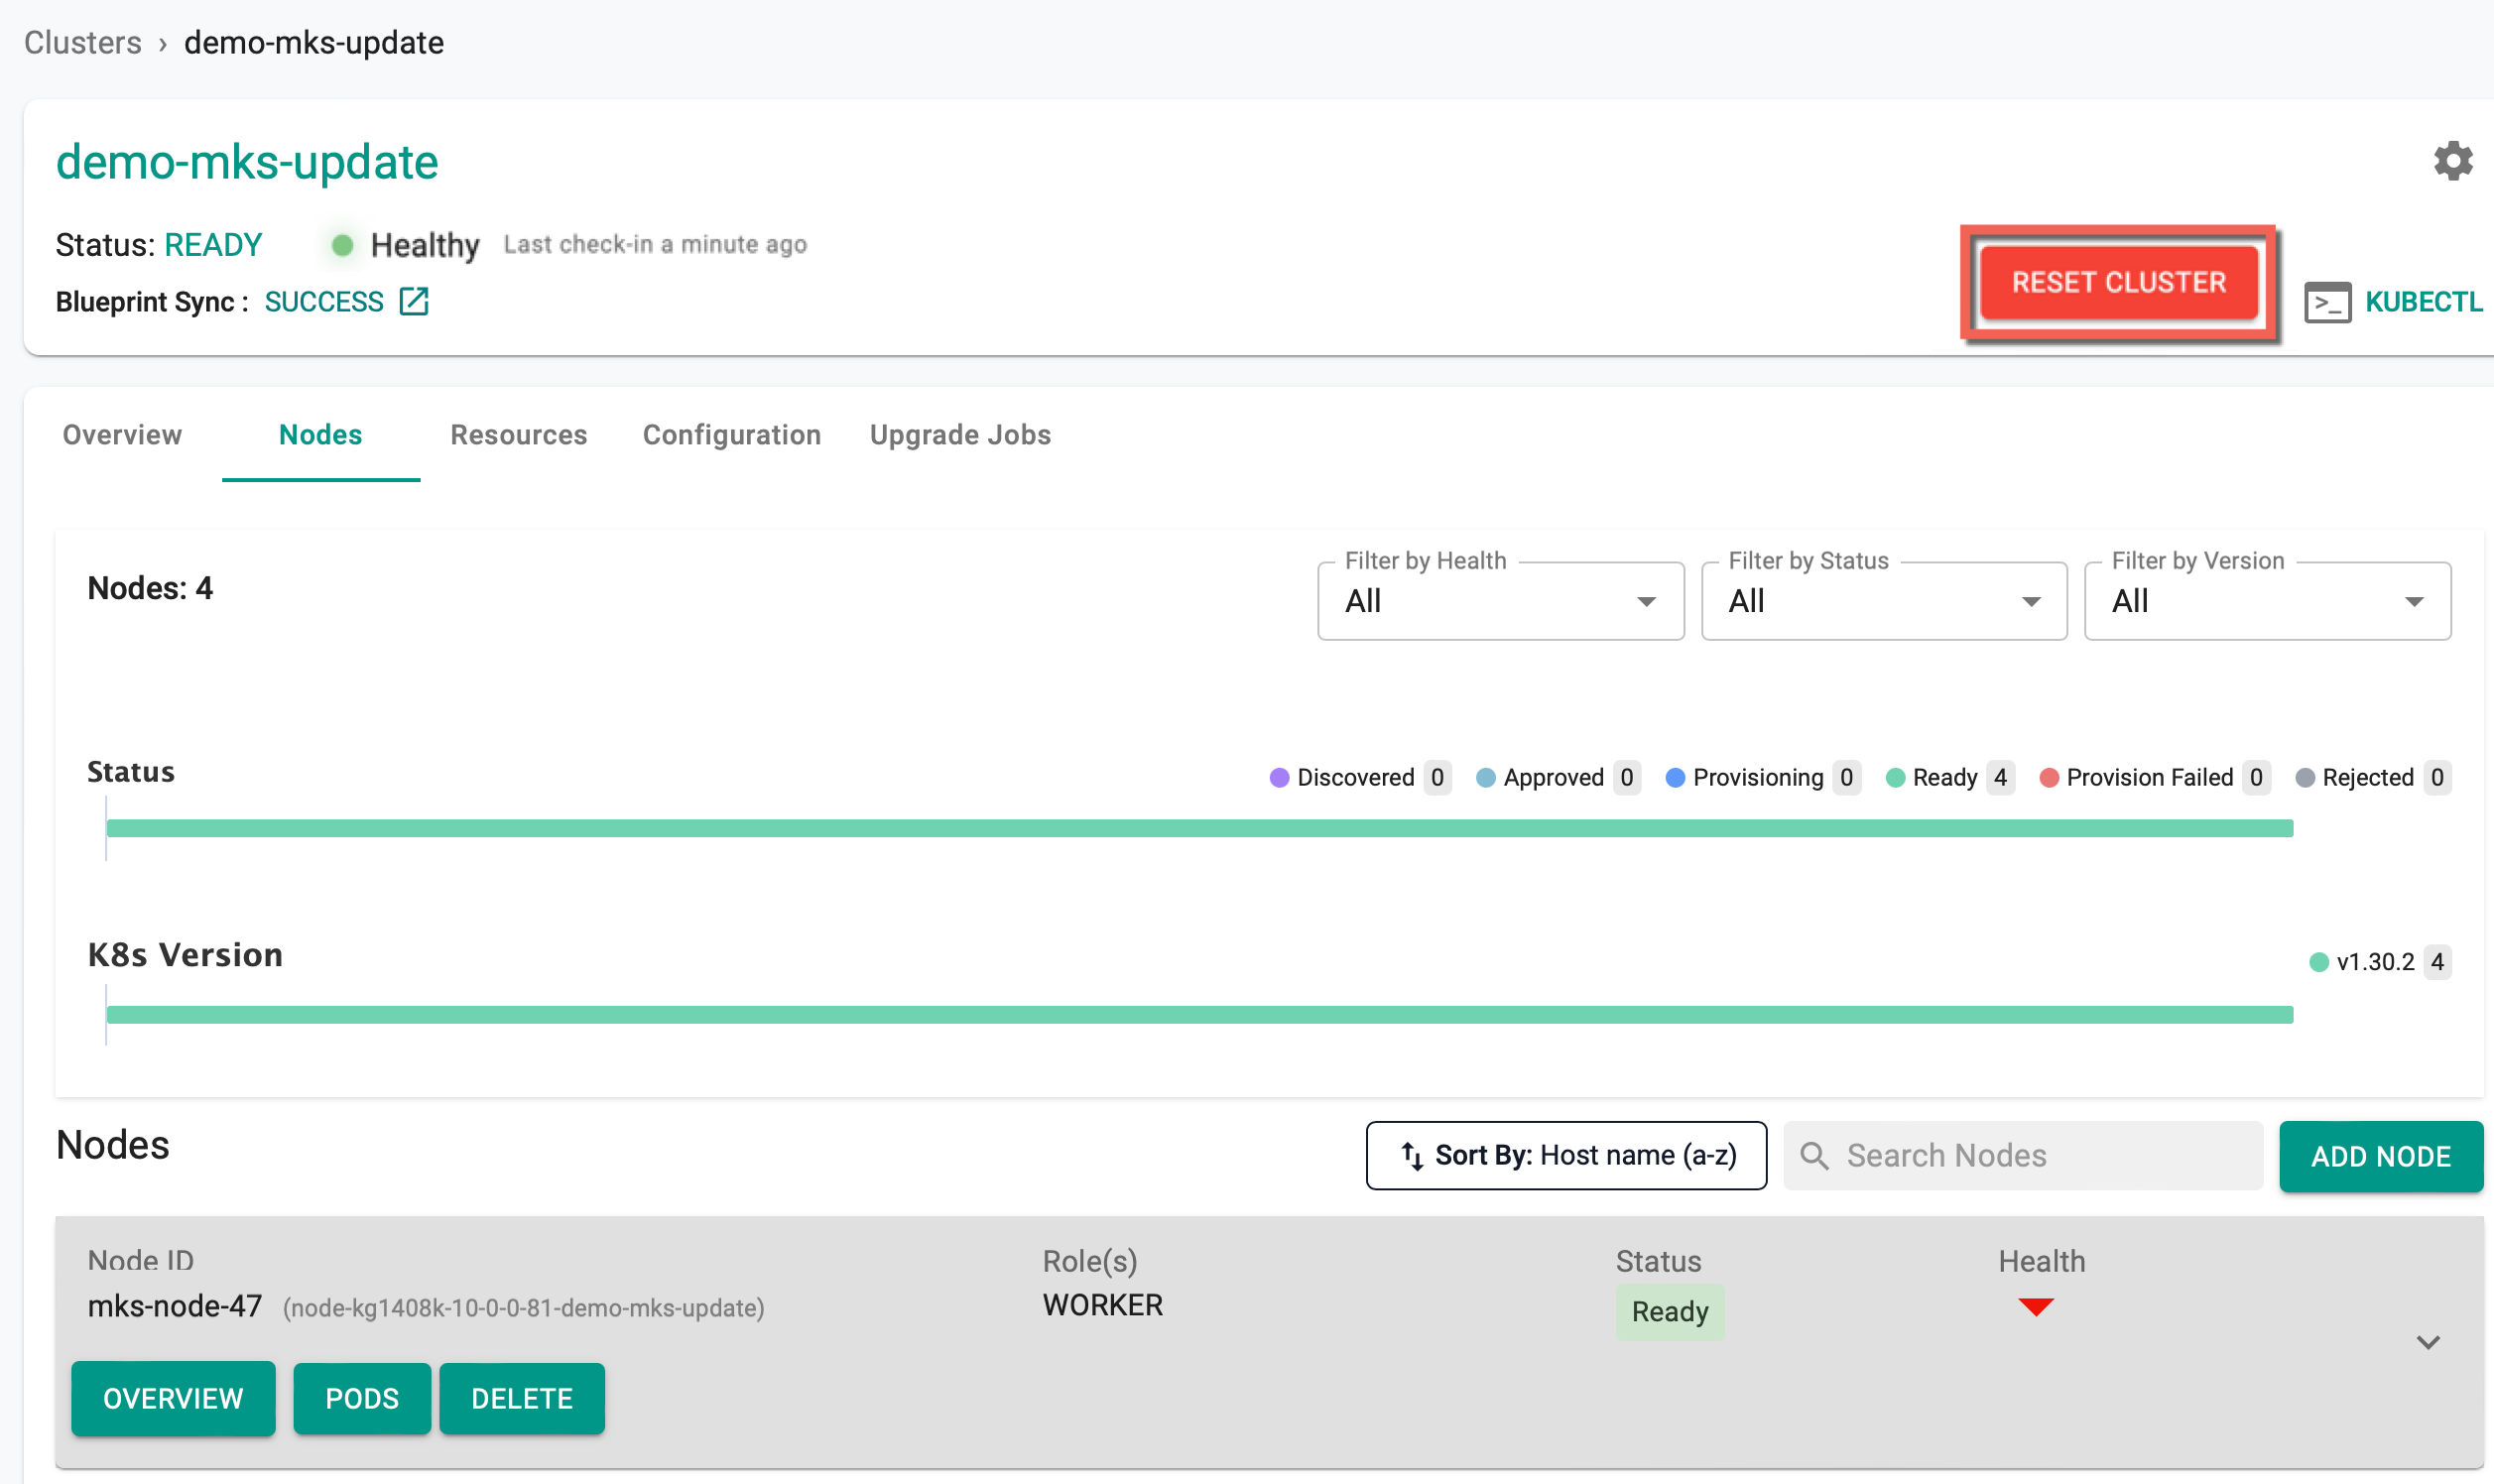
Reset Cluster
Post-provisioning, users are allowed to RESET the upstream cluster to reuse the same cluster object in the console while a master node is reinstalled/re-provisioned.
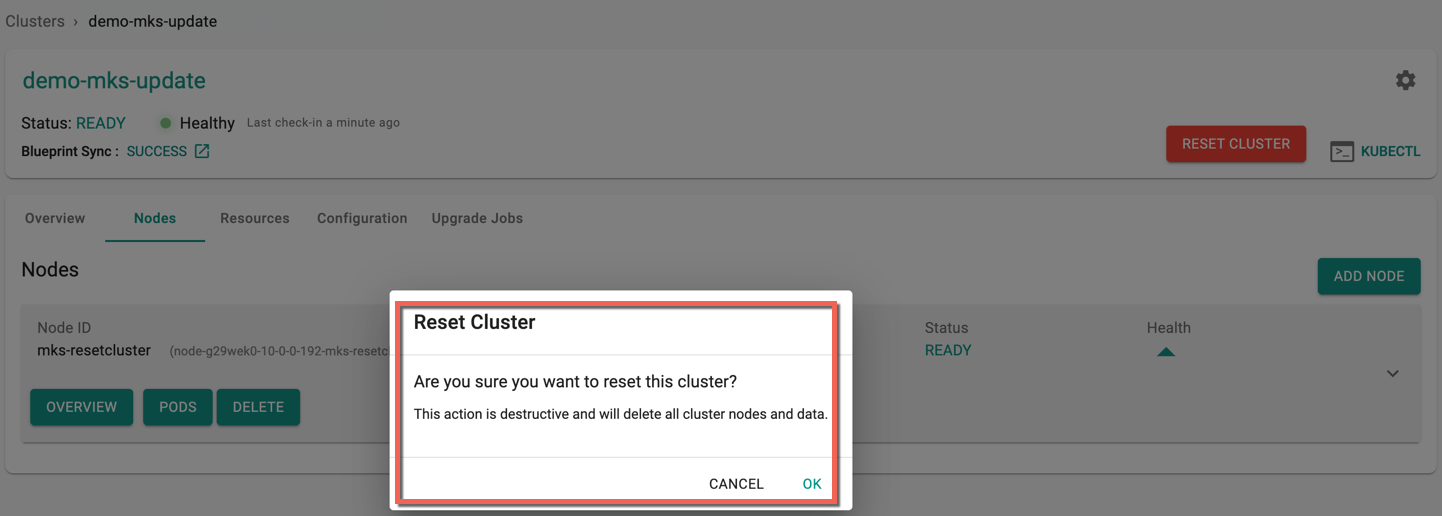
- Click Reset Cluster
The below message appears to confirm the deletion
- Click OK to proceed with the node deletion
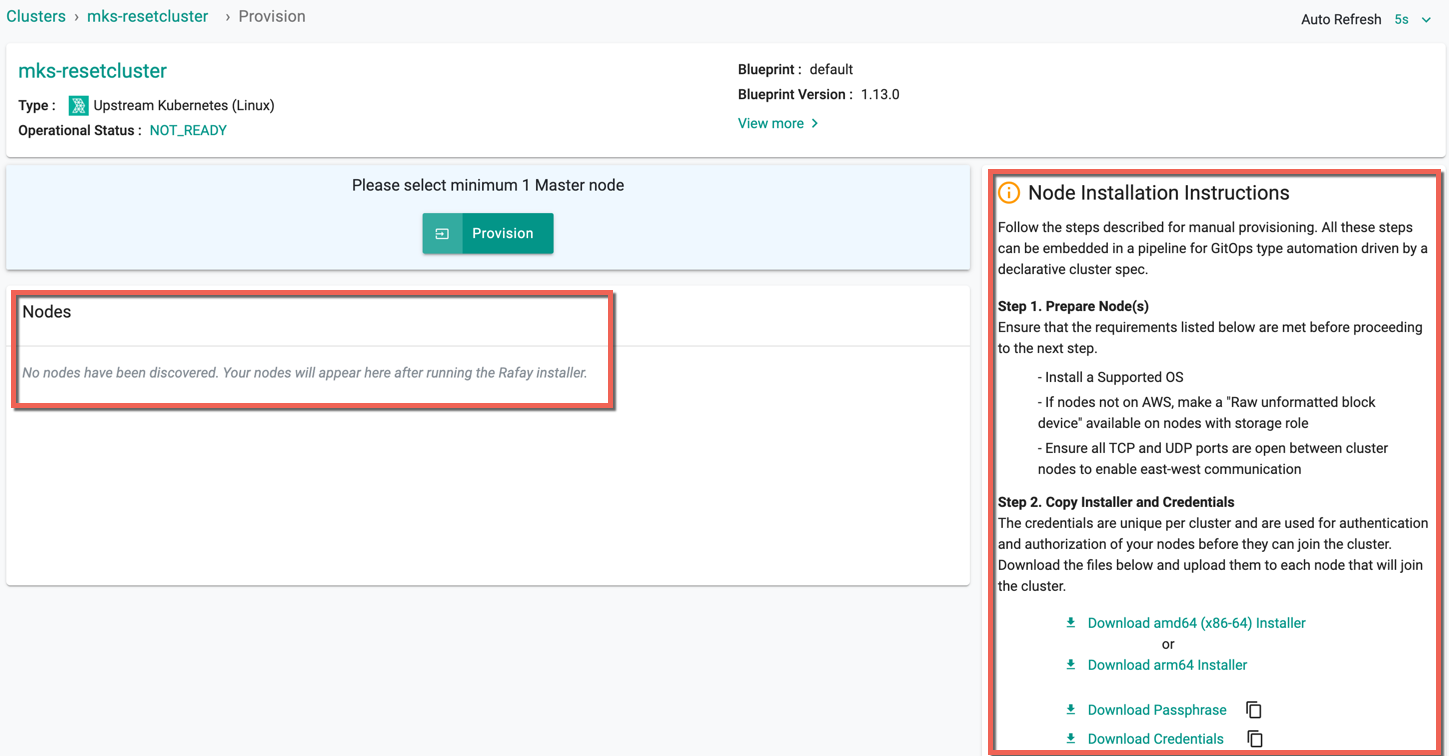
On successful cluster reset, nodes are deleted and you will see the below screen with no nodes
- To discover new nodes with the same cluster objects and provision an upstream cluster, repeat the same steps from Step 4: Download Conjurer and Secrets
Important
The 'Reset Cluster' option is only visible if the user enables the reset flag; otherwise, it does not appear.
Troubleshooting
Once the "minion/node agent" is installed on the node by conjurer successfully and is registered with the controller, it establishes a "long running" web socket with the controller providing "continuous updates" to the controller about progress and status. This information is then presented to authorized administrators via the Console for insights. Optionally, administrators can also view the logs generated by the minion/node agent for detailed visibility.
tail -f /opt/rafay/salt/var/log/salt/minion
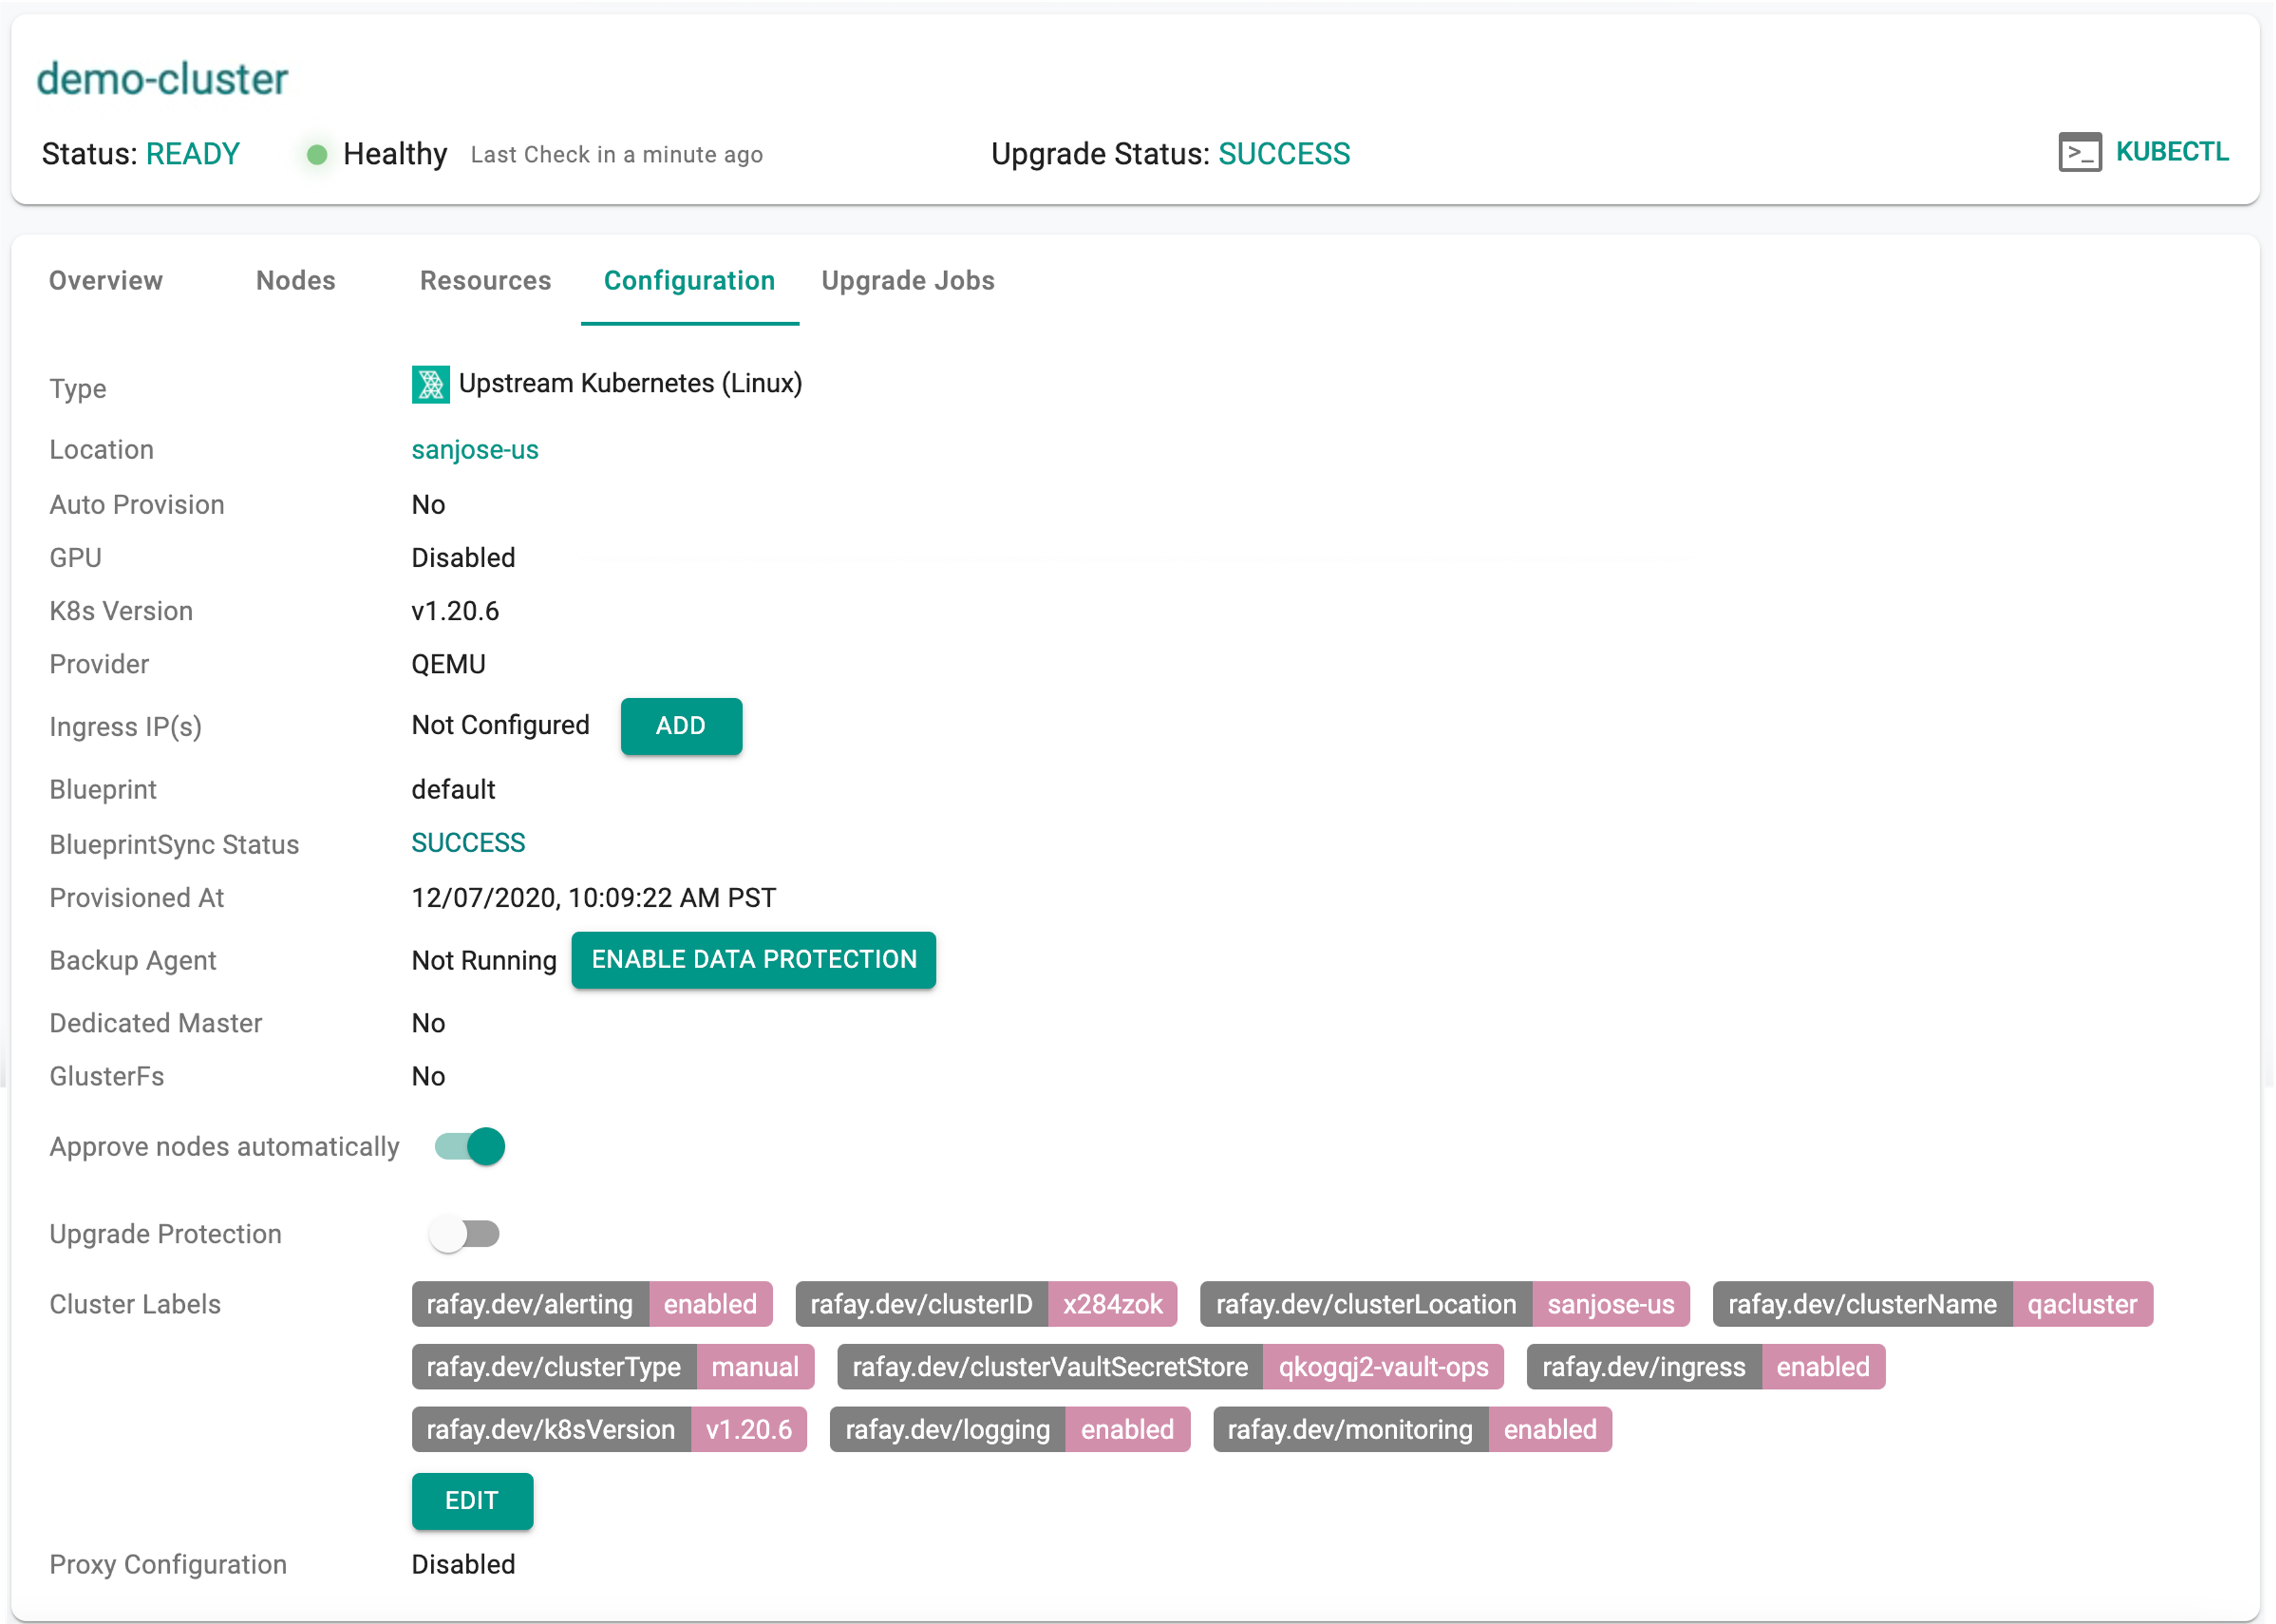
View Cluster Configuration
Administrators can view the provisioned cluster's configuration by clicking on the cluster and selecting the "Configuration" tab.