Configure
In this part, you will
- Create a secret inside AWS Secrets Manger.
- Create an IAM Role for Service Accounts (IRSA) so that pods have the necessary get and describe permissions to access the secret.
Step 1: Create Secret
- Login into the AWS Console.
- Select the AWS Secrets Manager Service and create a new secret.
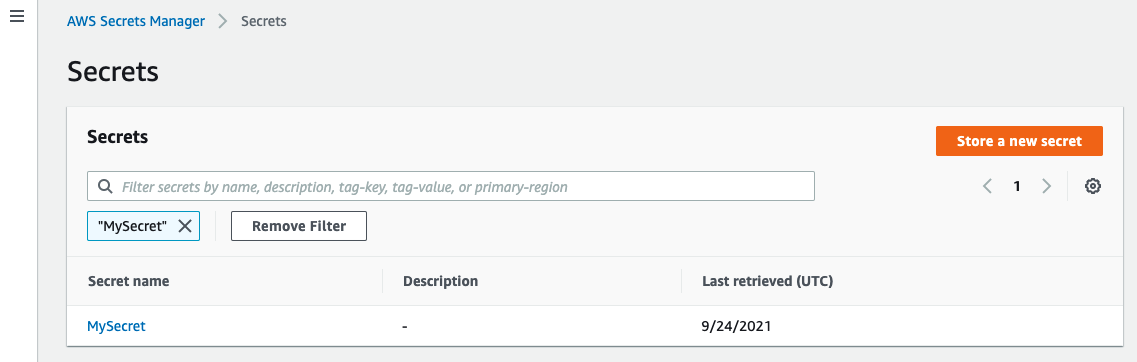
In the example below, we have created a secret called "MySecret" in the "us-west-1" AWS region.
You could also create a secret using the AWS CLI.
REGION=us-west-1
CLUSTERNAME=aws-sm-demo

aws --region "$REGION" secretsmanager  create-secret --name MySecret --secret-string '{"username":"rafay", "password":"Rafay$2021"}'
Step 2: IRSA
In this step, you will create an IRSA so that the Nginx pods on the EKS cluster will have the necessary permissions to pull the secret created in Step 1. In AWS, it is a recommended best practice to use IAM roles for service accounts (IRSA) to access AWS services outside the EKS cluster because of the following benefits:
| Benefit | Description |
|---|---|
| Least Privilege | No longer need to provide extended permissions to the node IAM role so that pods on that node can call AWS APIs. You can scope IAM permissions to a service account, and only pods that use that service account have access to those permissions. This feature also eliminates the need for third-party solutions such as kiam or kube2iam. |
| Credential Isolation | A container can only retrieve credentials for the IAM role that is associated with the service account to which it belongs. A container never has access to credentials that are intended for another container that belongs to another pod. |
| Auditability | Access and event logging is available through CloudTrail to help ensure retrospective auditing. |
Create Namespace
We will deploy the Secrets Store CSI Driver and ASCP addon to the "kube-system" namespace. In addition we will deploy our Nginx application to the nginx namespace.
- Click on Infrastructure -> Namespaces.
- Click on the "+ New Namespace" button to create a new namespace.
- Enter "nginx" in the "Name" section
- For "Type" Select "Wizard" from the dropdown
- In the Pod Security Policy section, enter "rafay-privileged-psp"
- Click the "SAVE" button
- Click "Save & Go To Placement"
- Set "Placement Policy" to "Specific Clusters"
- Select your cluster you want the namespace in
- Click the "Save And Go To Publish" button
- Click the "Publish" button
Create IRSA
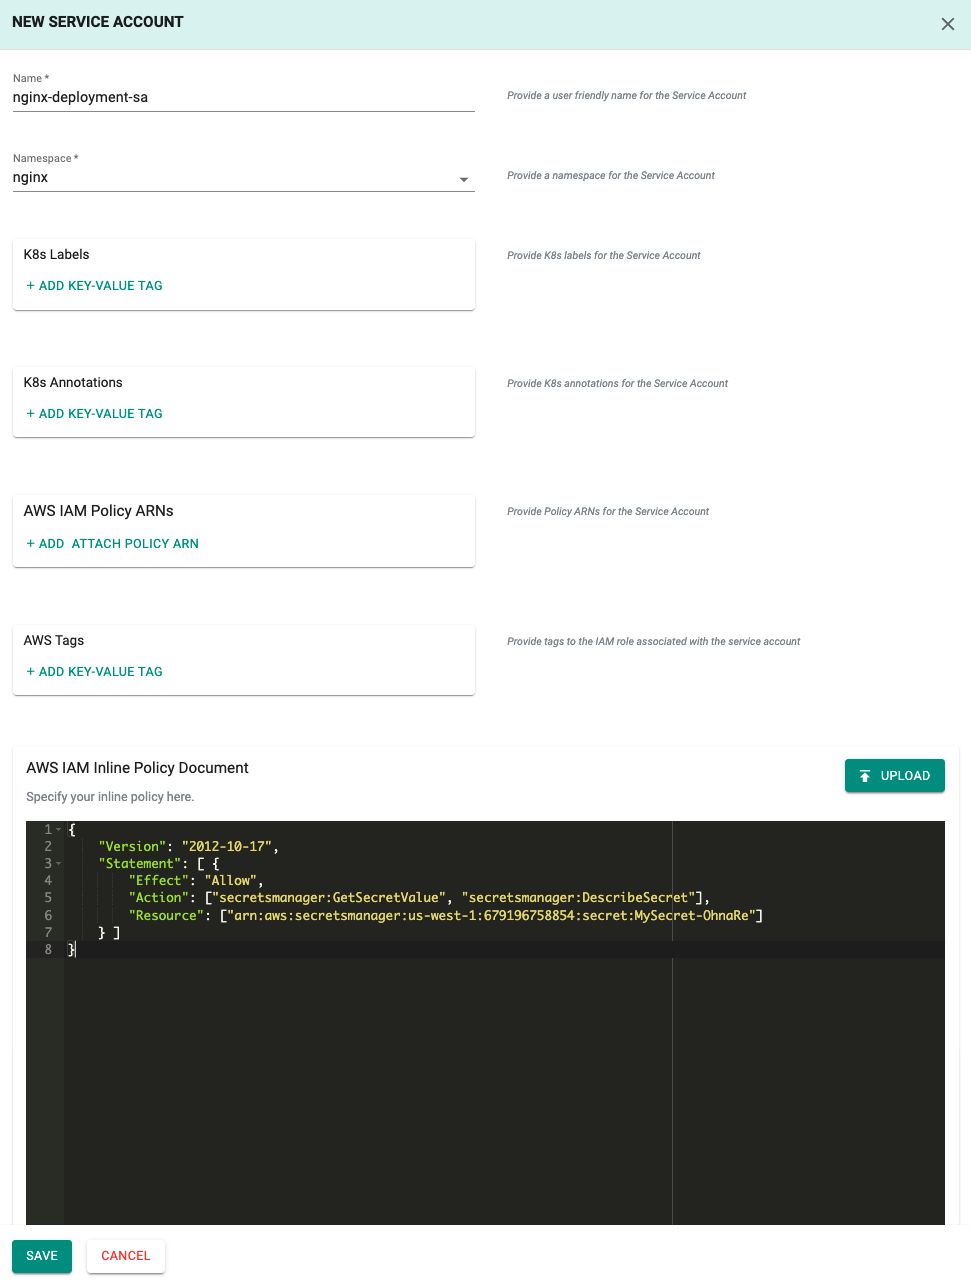
To create the IRSA we will define a policy that will allow AWS get and describe actions to the secret resource. The AWS secret's ARN will need to be applied to the policy and configured in the Console.
- We will use the following policy. Change the highlighted line to the ARN of your secret. We will supply the policy during the IAM Service Account creation.
{
    "Version": "2012-10-17",
    "Statement": [ {
        "Effect": "Allow",
        "Action": ["secretsmanager:GetSecretValue", "secretsmanager:DescribeSecret"],
        "Resource": ["arn:aws:secretsmanager:us-west-1:123456789:secret:MySecret-OhnaRe"]
    } ]
}
- Click on Infrastructure -> Clusters
- Click on the cluster tile we will be adding the IRSA to
- Click on the "IAM Service Accounts" tab
- Click on "NEW IAM SERVICE ACCOUNT"
- Enter a name, select the namespace, and supply the policy created above. Policies can be supplied as an ARN if created previously, uploaded as an IAM Inline Policy Document, or supplied as input.
- Select "SAVE"
Verify IRSA
Creation of the IRSA can take a few minutes. You can verify the status of the IRSA by doing the following:
- Click on the "IAM Service Accounts" tab for the cluster.

You can also verify that the k8s service account was created in the EKS cluster in the "nginx" namespace.
- Click on the Zero Trust Kubectl Shell on the web console for the cluster where the IRSA was created and run the following kubectl command.
kubectl get sa -n nginx

NAME                  SECRETS   AGE
default               1         4h1m
nginx-deployment-sa   1         39s
As you can see in this example, the "nginx-deployment-sa" service account was successfully created in the "nginx" namespace.
Next Steps
You are now ready to move on to the next part of the recipe where you will create a workload and access the secrets.