Cluster Import Wizard
The steps described below capture the steps needed to import a cluster manually using the Web Console. Watch a video showcasing the Import of an existing Amazon EKS Cluster into the Controller.
Important
Existing clusters may already have an Ingress Controller deployed. We strongly recommend that users create a "custom" cluster blueprint with the managed Ingress Controller addon disabled before importing the cluster into the controller.
Requirements
- Kubernetes v1.20 on higher.
- Users are recommended to use the Minimal Blueprint (selected by default) first to ensure there are no collisions between existing software on the cluster and the managed add-ons from the cluster blueprints.
Start Import
- In the Web Console, click on New Cluster
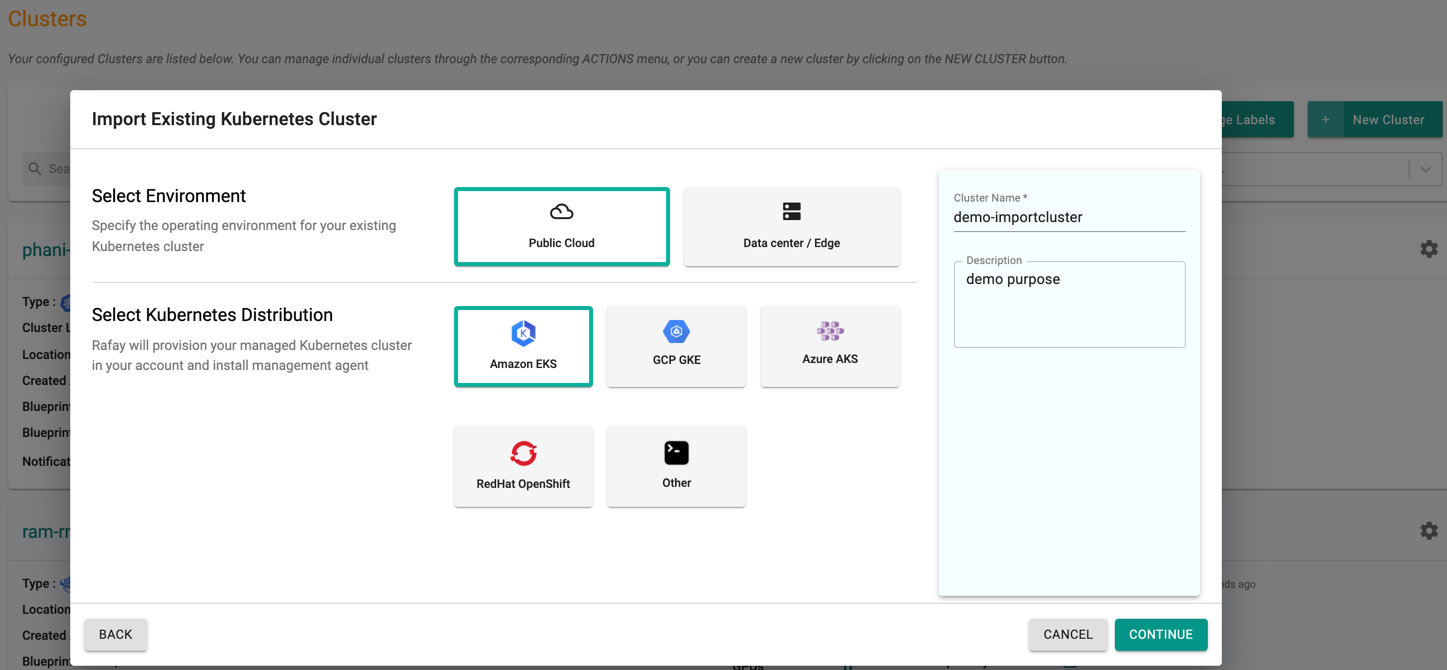
- Select "Import Existing Kubernetes Cluster" and click Continue
- Select "Environment" based on where the cluster is provisioned
- Select "Kubernetes Distribution"
- Give it a name and click on "Continue"
Below illustration shows an example of importing an existing EKS cluster.
Provide Cluster Details
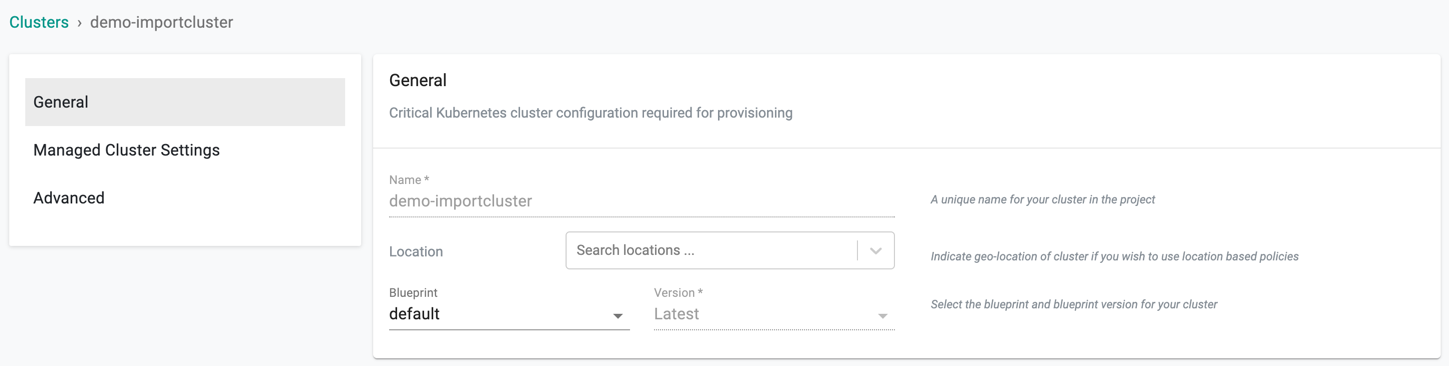
In the wizard on the Web Console,
- Select a location for the cluster from the dropdown
- Select the blueprint from the drop-down (the default blueprint will be used if nothing is specified)
- If a custom blueprint is selected select the version for the blueprint
Takeover Management
Important
Users can now import existing Amazon EKS and Azure AKS Clusters and convert them to managed either during the "import" process or after the import is completed. This action allows the controller to takeover the lifecycle management of the imported EKS cluster. For more information, refer to Convert to Managed
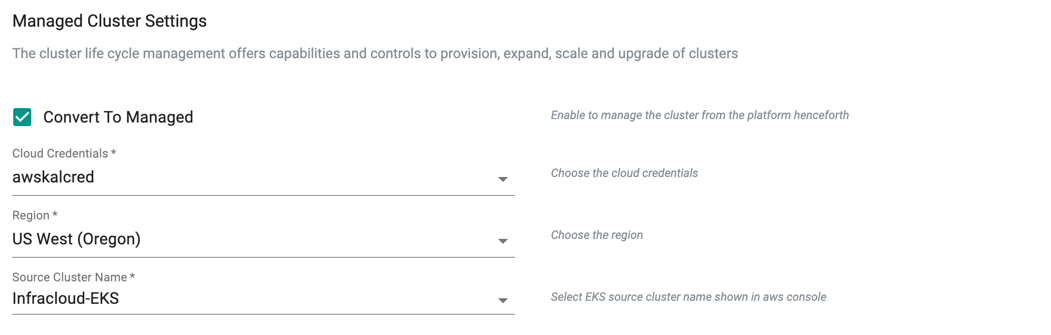
During the EKS cluster import process, users can optionally convert the EKS cluster to a managed cluster. Once complete, the controller will present the same settings/configuration options as an EKS cluster provisioned by the controller.
- Select the Convert to Managed checkbox from the Managed Cluster Settings and pick the required cloud credential from the drop-down
- Select the required region from the drop-down
- The clusters available in the selected regions are listed in the drop-down. Select a source cluster
Advanced Settings
Proxy Configuration
Note
Required only if the cluster is running behind a forward proxy
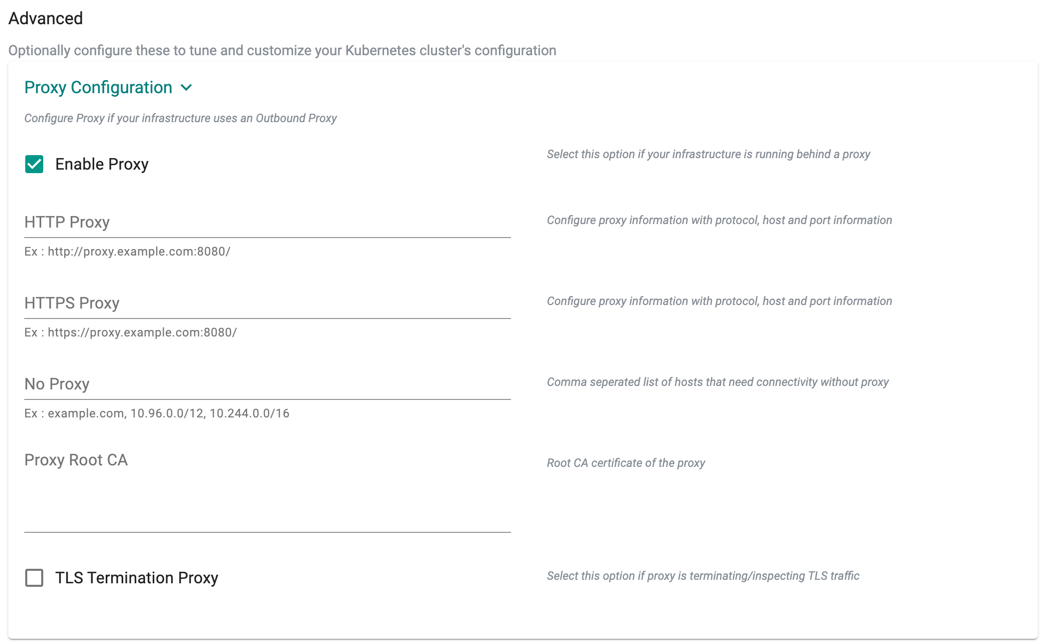
Proxy Configuration
- Select "Enable Proxy" if the cluster is behind a forward proxy.
- Configure the http proxy with the proxy information (ex: http://proxy.example.com:8080)
- Configure the https proxy with the proxy information (ex: http://proxy.example.com:8080)
- Configure No Proxy with Comma separated list of hosts that need connectivity without proxy. Kubernetes Service IP (from the default namespace) has to be included.
- Configure the Root CA certificate of the proxy if proxy is terminating non MTLS traffic
- Enable "TLS Termination Proxy" if proxy is terminating non MTLS traffic and it is not possible to provide the Root CA certificate of the proxy.
System Components Placement
Users can configure the kubernetes tolerations and nodeSelector in the advanced settings. Tolerations allow the Kubernetes scheduler to schedule pods with matching taints. The imported clusters might contain the taints and labels set during the cluster creation, hence the users must add the corresponding taints and node selectors.
If nodes without taints exists in the cluster, use NodeSelectors to ensure the pods are scheduled to the desired nodes. These tolerations and nodeSelector are configured at the cluster level and are applied to the managed addons and core components. All the pods that are part of managed addons and components contain tolerations and nodeSelector in its YAML spec.
System Components Placement allows to add tolerations and nodeSelector
- Click Add Toleration to add one or more tolerations at cluster level

- Create one or more Key-Effect Toleration and Key-Value-Effect-Toleration
- Click Save
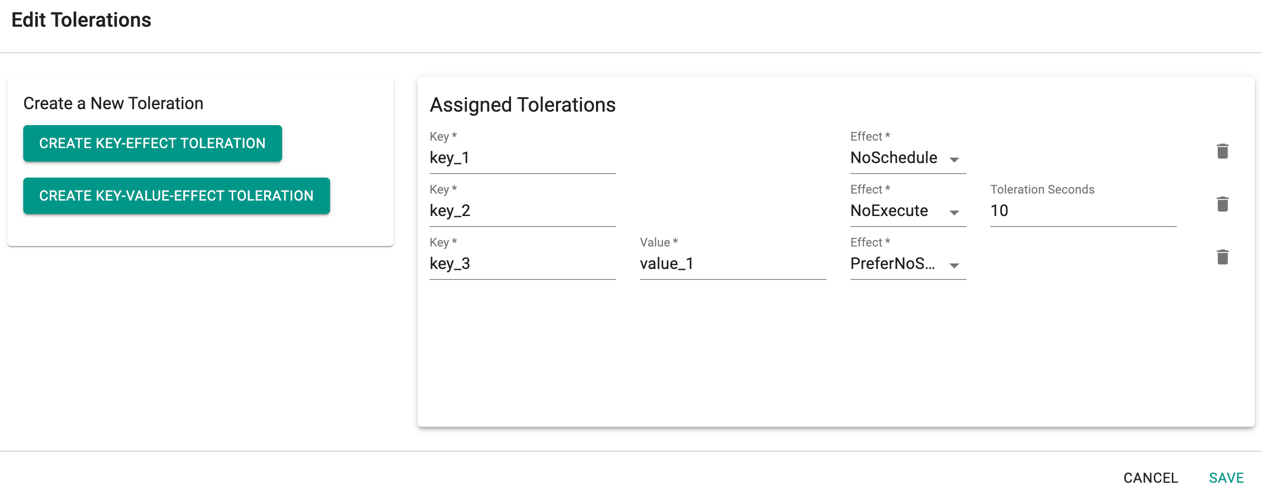
You can view the list of tolerations created as shown in the below example

Important
Managed Add-ons and core components will be placed in Nodes with matching taints. If none of the node has taints, all the add-ons and core components will be split to all the available nodes
- Click Add Key-Value Node Selector to add one or more node selectors
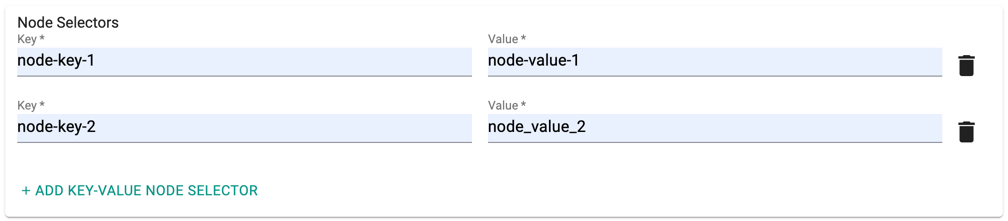
Important
The labels that are passed as part of the nodegroup level are matched using the Nodegroup Key Value pairs
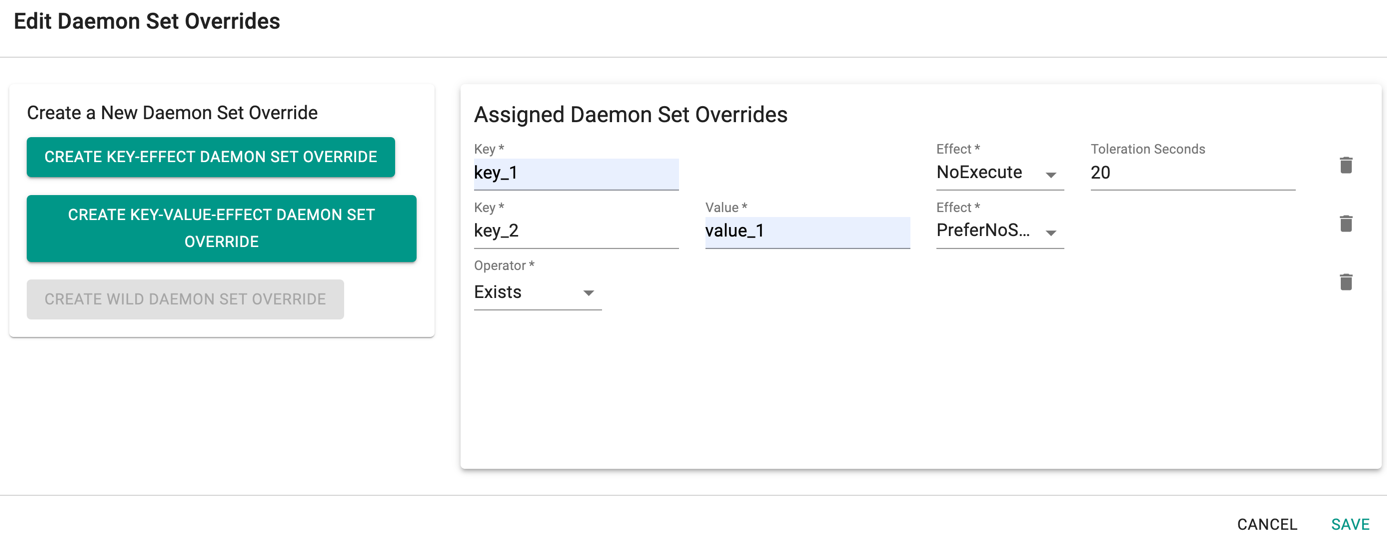
- Enabling the Daemon Set Overrides allows the users to add additional tolerations for the Rafay daemon sets to match the taints available in the nodes.

Recommendation
Use the tolerations in daemon set overrides, ensuring that daemon sets are run on every nodegroup
- Click Add Daemon Set Override to create one or more Key-effect(s) and Key-value(s). If the daemon sets are matching the toleration along with the taints already available, all the daemon sets gets deployed on the nodes
Important
Illustrative examples of declarative cluster specifications enabled with taints and tolerations for system components are available in this Git repository
Register Cluster
You will now be presented with a cluster registration step where the user has to deploy a uniquely generated Bootstrap YAML file to their cluster using "KubeCTL"
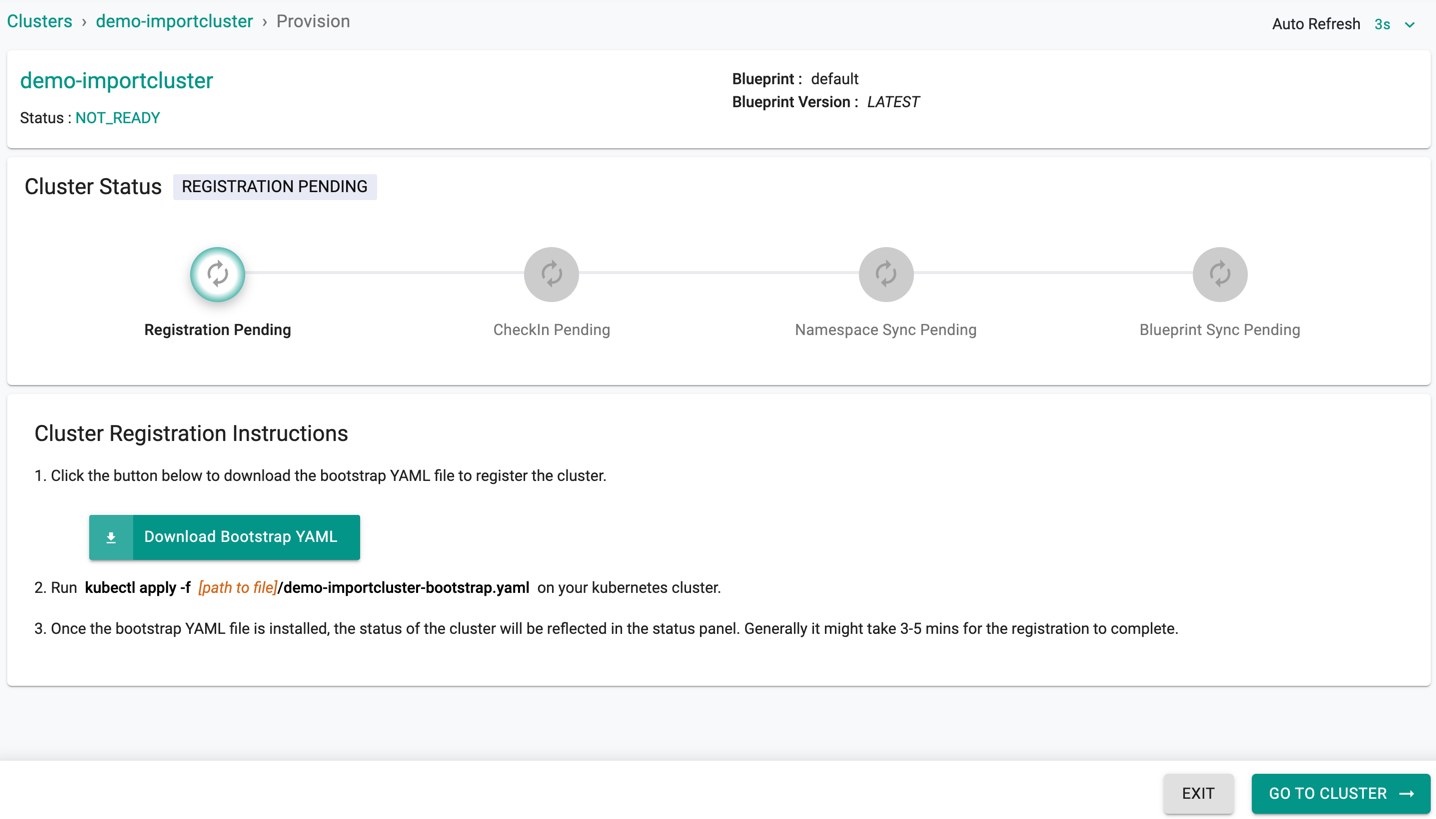
This process initiates the registration process of the imported cluster with the Controller, deploys all the required software components for the k8s operator, and configured cluster blueprint
- Download the YAML file generated for the cluster
- You can deploy the YAML file to your clusters to initiate the import process either using "kubectl" or "helm"
Kubectl
Replace the name of the yaml file with the downloaded bootstrap file.
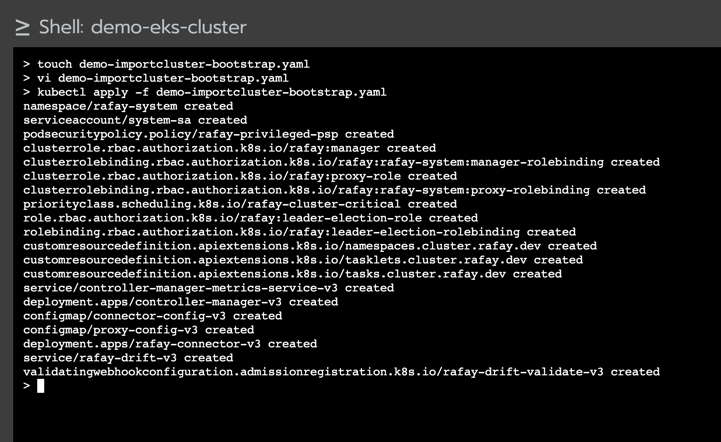
kubectl apply -f desktop-bootstrap.yaml
Important
- You must have cluster-admin privilege to import the cluster into the controller
- Refer Step 2: Import Cluster for more details
If successful, you should see output similar to the image below
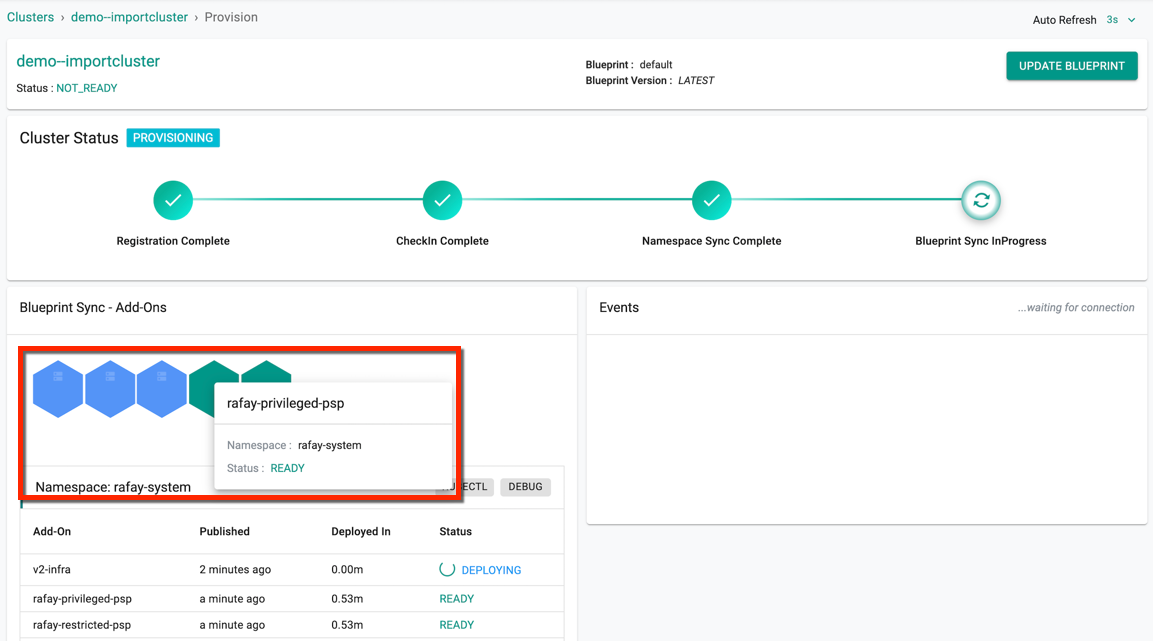
Once registration begins, and the k8s operator and cluster blueprint add-on components are successfully deployed,
- The cluster will check in with the controller
- The namespaces will be synchronized
-
Finally, the configured blueprint will be applied to the imported cluster
-
Blue indicates the deployment in progress
- Green indicates the Deployment successful
-
Red Indicated the failed schedules
-
Hover over the colored indication to view the name of the associated Add-ons, Namespace, and Status
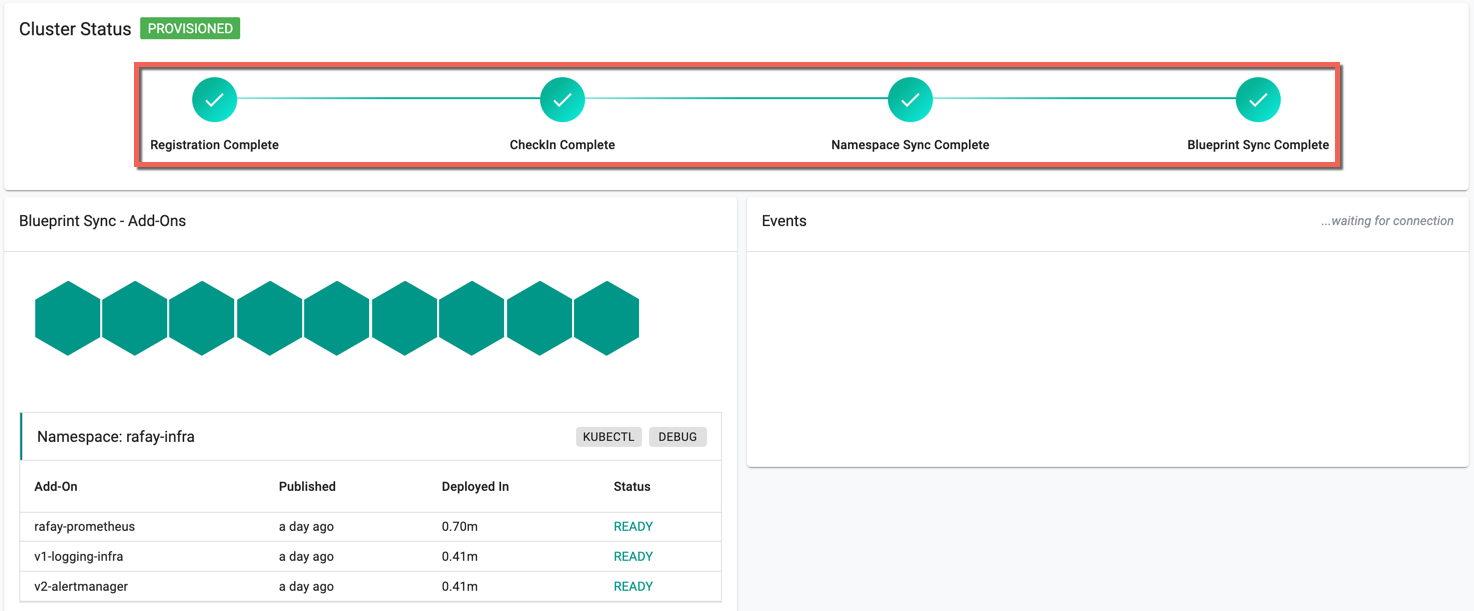
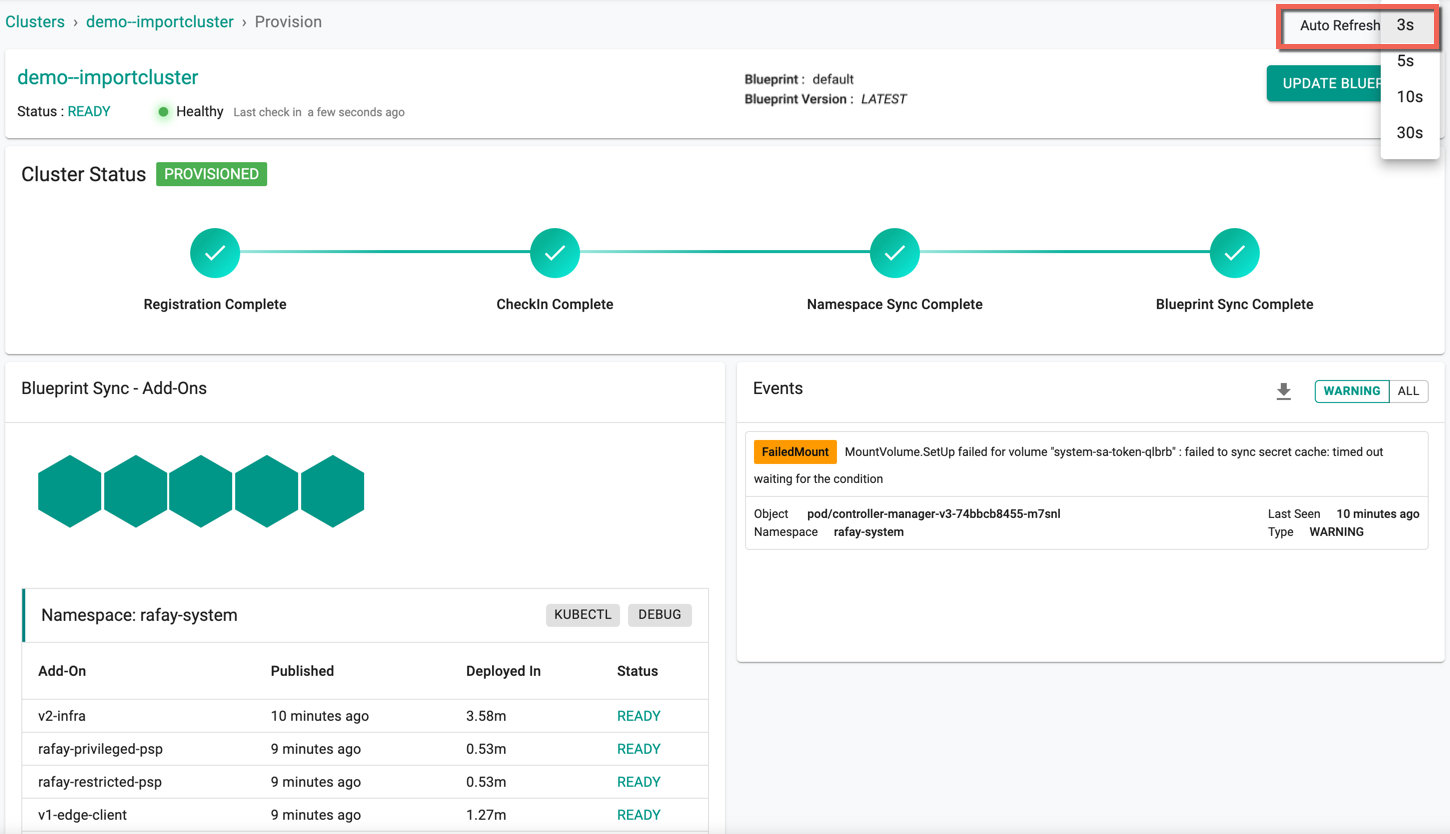
The below cluster status indicates the successful provisioning. The page gets refreshed as per the seconds set in the Auto Refresh
Helm
Ensure you have the following installed:
- Helm CLI
- yq CLI
Step 1
Add the Rafay helm repo to your CLI
helm repo add rafay-helm-charts https://rafaysystems.github.io/rafay-helm-charts/
Step 2
Option 1: Extract custom values from bootstrap.yaml file
export BOOTSTRAP_FILE=<location of the downloaded bootstrap file>

TOKEN=`cat $BOOTSTRAP_FILE |yq '.data.token | select(document_index == 18)'`
API_ADDR=`cat $BOOTSTRAP_FILE |yq '.data.apiAddr | select(document_index == 18)'`
CONTROL_ADDR=`cat $BOOTSTRAP_FILE |yq '.data.controlAddr| select(document_index == 18)'`
CLUSTER_ID=`cat $BOOTSTRAP_FILE |yq '.data.clusterID| select(document_index == 13)'`
RELAYS=`cat $BOOTSTRAP_FILE |yq '.data.relays| select(document_index == 13)'| sed 's/,/\\\\,/g'`
Option 2: Use Swagger API to download the values.yaml for helm based import
- In the console, select API Docs and navigate to Swagger API screen
- Provide the project id and cluster name for the API endpoint shown below
- Optionally, select the return output file format JSON or YAML. By default, YAML format is applied
- Click Execute
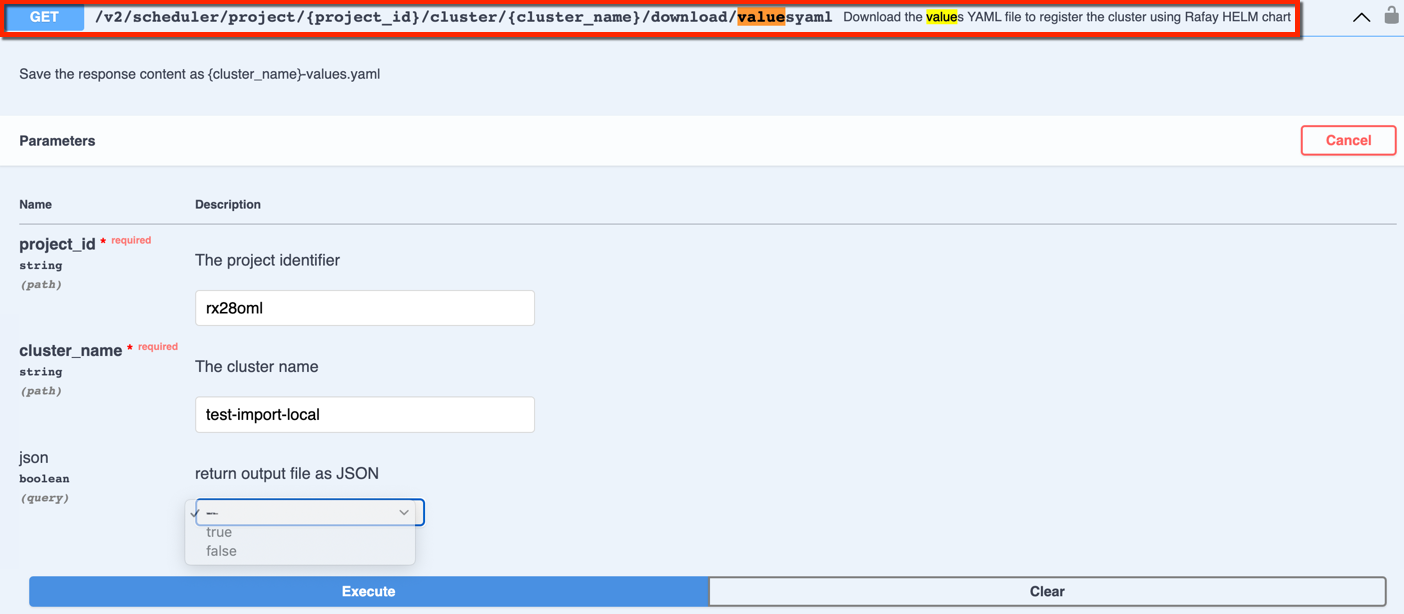
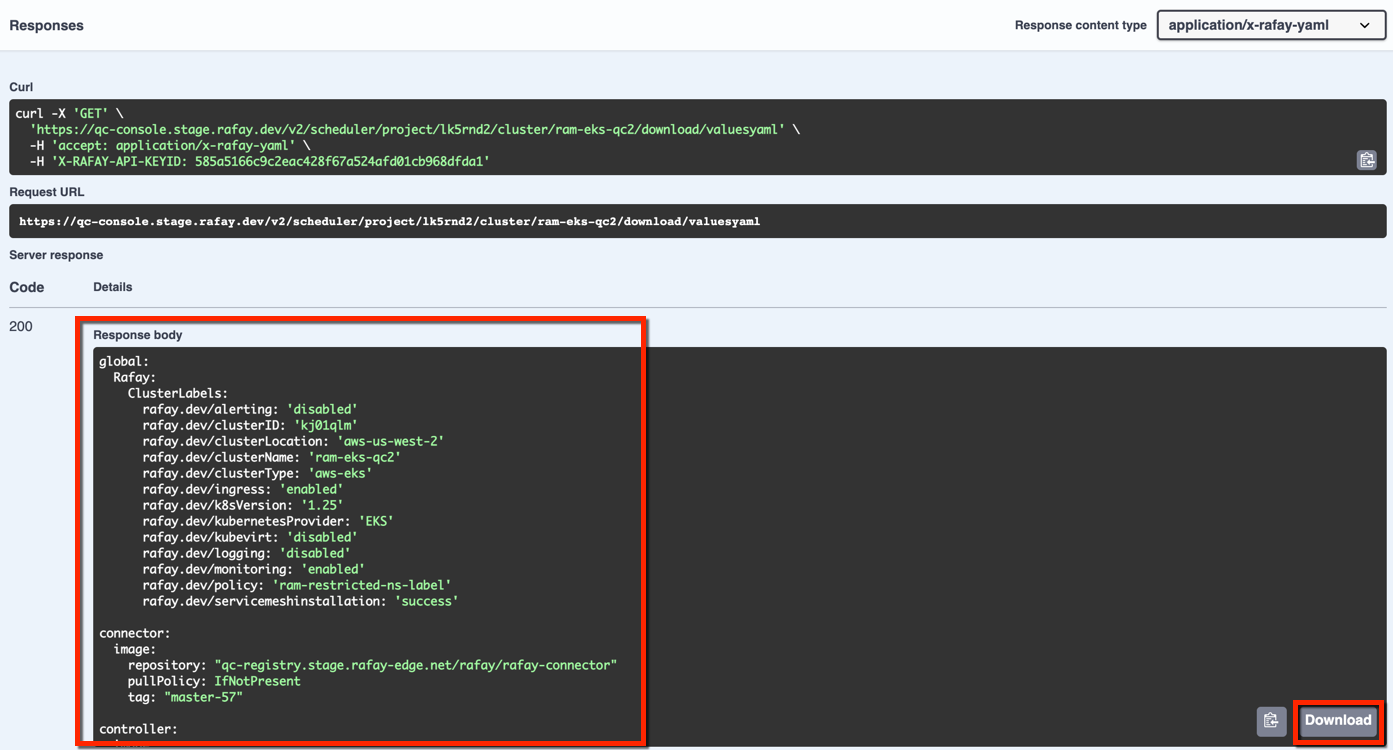
- The response provides a config yaml file for helm based import as shown below. Copy/download the config file and save in your system
Step 3
If Option 1 was used as part of Step 2, use the helm CLI with the custom values
helm install v2-infra rafay-helm-charts/v2-infra --set token=$TOKEN --set api_addr=$API_ADDR --set control_addr=$CONTROL_ADDR --set cluster_id=$CLUSTER_ID --set relays=$RELAYS -n rafay-system --create-namespace
If Option 2 was used as part of Step 2, use the below helm CLI with the values yaml file name
helm install v2-infra rafay-helm-charts/v2-infra --values=<yaml_filename.yaml> -n rafay-system --create-namespace
Explore our blog for deeper insights on Helm-Based Import, available here!
Import Successful
Once all the steps are complete and if the import process was successful, you should see details about the cluster on the Web Console. The imported cluster is now managed by the Controller.
To view the cost details of this cluster, click on the available cost link. This will navigate you to the Cost Explorer page, where you can access detailed cost information for this specific cluster.

On successful import cluster provision, users can view the detailed operations and workflow of the import cluster by clicking the Operation Status Ready icon. The screen shows all the stages that occurred during cluster deployment