Configure Vault
Follow the steps documented below to help establish trust between your centralized HashiCorp Vault server and your controller Managed clusters
Requirements
To enable this integration, ensure that your Vault Server and Kubernetes cluster can interact with each other directly over the network.
HashiCorp Vault uses the Kubernetes Auth method to establish trust with a Kubernetes Cluster. This uses a Kubernetes Service Account Token to authenticate with Vault. This method of authentication allows Vault to introduce a Vault token directly into a Kubernetes Pod providing a very high security posture.
Important
As you can see in the example below, during configuration, Vault requires access to the host IP address of the Kubernetes cluster's API server. As a result, admins cannot use Rafay's Zero Trust Kubectl Proxy Service to configure this because this uses mTLS authentication.
% vault write auth/stage-cluster/config \
    token_reviewer_jwt=@token_reviewer_jwt \
    kubernetes_host=https://35.227.173.45:443 \
    kubernetes_ca_cert=@ca.crt
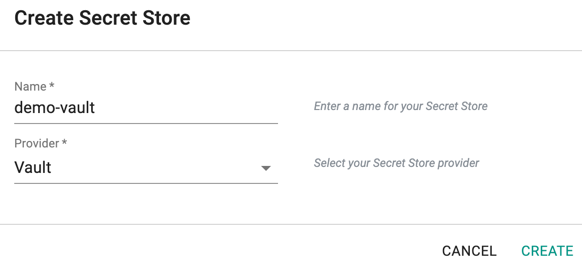
Step 1: Create Secret Store
- Login into the Web Console as a Project Admin.
- Click on Integrations > Secret Stores
- Click on "New Secret Store"
- Provide a Name , select "Vault" from the drop down for Provider
- Click "CREATE" button to create this secret store
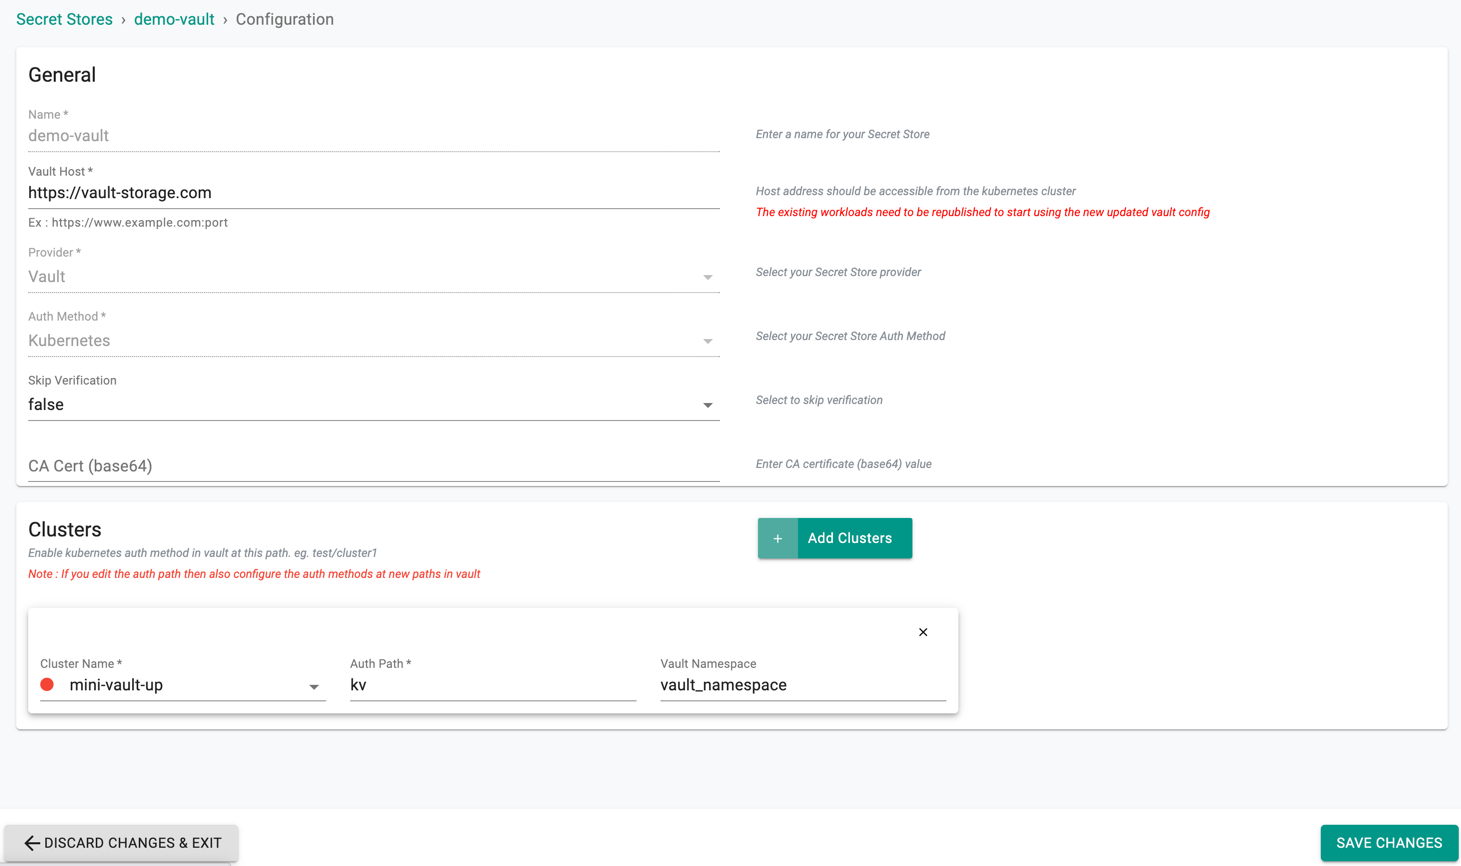
Step 2: Edit Secret Store
In the Edit Secret Store page:
- Provide the Vault Host (FQDN or IP address of the Vault Server)
- Users are allowed to skip the certificate verification by setting true or false from the drop-down. Set true to skip Vault CA Certificate Verification (or) false to provide the CA Certificate for verification, only if the certificate is self-signed
- Provide the CA Cert (base64) when skip verification is set to false and only if certificate is self-signed
- (Optional) Click on Add Clusters to add additional managed Kubernetes cluster to use this secret store
- Click Save Changes to save the secret store settings
Important
It will take ~30 seconds for the Vault integration configuration to be deployed to the managed Kubernetes clusters
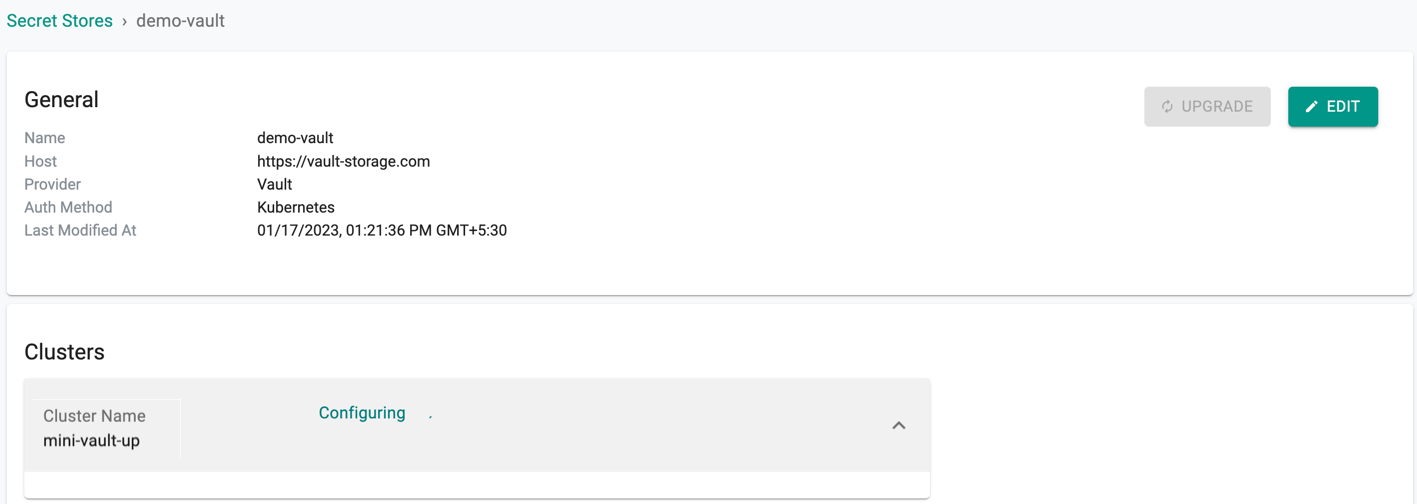
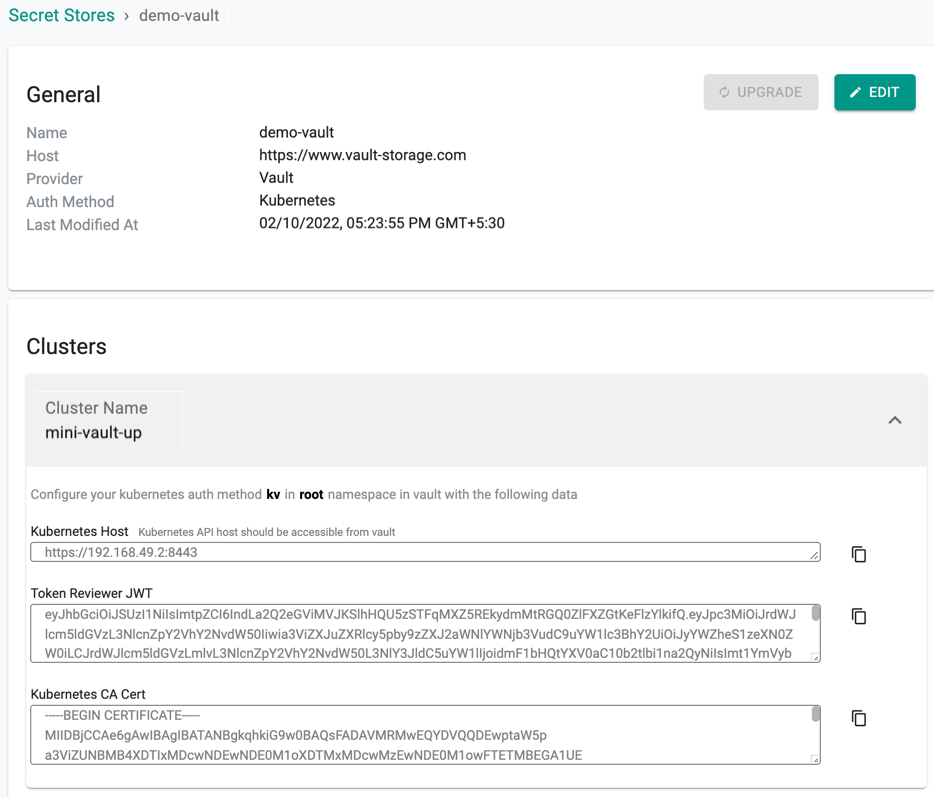
Once the Vault integration configuration is deployed to the clusters, copy the related Vault settings for each of the clusters and complete the configuration in Vault (See Step 3)
- Kubernetes Host
- Token Reviewer JWT
- Kubernetes CA Certificate
Upgrade Secret Store
To upgrade the secret store to the latest version, click the upgrade button available in the Edit page. This will upgrade the secretstore-admission-webhook image to latest version for the all the cluster(s) under that secretstore.
Step 3: Create Auth Path For Clusters
In order for Vault to grant access to the clusters to retrieve secrets, the Kubernetes Auth Method for each of the clusters will need to be created in Vault from the information retrieved in Step 2 above.
This step completes the establishment of "Trust" between the clusters and the central Vault Server. The settings in Vault can be updated using the Vault CLI, UI or API.
Important
The steps described below are typically performed by a Vault Admin.
Follow these steps to perform the update using the Vault CLI.
Enable Auth Method for Path
Enable Kubernetes auth method for the auth path configured in Web console:
vault auth enable -path=<auth_path> kubernetes
Example of successful command output:
% vault auth enable -path=stage-gke-cluster kubernetes
Success! Enabled kubernetes auth method at: stage-gke-cluster/
% vault auth enable -path=stage-gke-cluster kubernetes
Success! Enabled kubernetes auth method at: stage-gke-cluster/
Set Auth Method
Set the auth method with the information we received for the cluster from Step 2
vault write auth/<auth_path>/config \
    kubernetes_host=<from Rafay's Kubernetes Host value> \
    token_reviewer_jwt=<from Rafay's Token Reviewer JWT value> \
    kubernetes_ca_cert=<from Rafay's Kubernetes CA Cert value>
Example of successful command output:
% vault write auth/stage-gke-cluster/config \
    token_reviewer_jwt=@token_reviewer_jwt \
    kubernetes_host=https://35.227.173.45:443 \
    kubernetes_ca_cert=@ca.crt
Success! Data written to: auth/stage-gke-cluster/config
Create Role for Auth Path
Create a Role to the authpath so that applications can retrieve secrets from Vault
vault write auth/<auth_path>/role/<role_name> \
    bound_service_account_names=<service accounts> \
    bound_service_account_namespaces=<namespaces> \
    policies=<access_policy> \
    ttl=<token TTL>
Example of successful command output:
% vault write auth/stage-gke-cluster/role/demo \
    bound_service_account_names=vault-auth-demo,app-developer-sa \
    bound_service_account_namespaces=staging,qa \
    policies=default \
    ttl=1h
Success! Data written to: auth/stage-gke-cluster/role/demo
Create KV Secret Engine
Create a KV secret engine if it has not been already created by the Vault admin. Both KV v1 and v2 are supported. Customers are strongly recommended to use v2 since it has additional functionality such as versioning etc.
KV v1
vault secrets enable -path=<secret_path> kv
Example of successful command output:
% vault secrets enable -path=app-secrets-v1 kv
Success! Enabled the kv secrets engine at: app-secrets-v1/
KV v2
vault secrets enable -path=<secret_path> kv-v2
Example of successful command output:
% vault secrets enable -path=app-secrets-v2 kv-v2
Success! Enabled the kv-v2 secrets engine at: app-secrets-v2/
Create Secrets in KV Secret Path
Create the application secrets in KV secret path
vault kv put <secret_path>/<secret_name> key1=value1 key2=value2
Example of successful command output:
vault kv put app-secrets-v1/elasticsearch es_user=elastic es_password=mypassword
Success! Data written to: app-secrets-v1/elasticsearch
Let's check the secrets
vault kv get app-secrets-v1/elasticsearch
======= Data =======
Key            Value
---            -----
es_password    mypassword
es_user        elastic