Sealed Secrets
Overview
Sealed Secrets lets you store the Kubernetes secrets encrypted. The encrypted secrets can only be decrypted by the controller running in the target cluster.
Sealed Secrets is composed of two parts:
- A cluster-side controller / operator
- A client-side utility: kubeseal
The kubeseal utility uses asymmetric crypto to encrypt secrets that only the controller can decrypt.
These encrypted secrets are encoded in a SealedSecret resource.
What Will You Do
In this exercise,
- You will create a cluster blueprint with "Sealed Secrets" addon
- You will then apply this cluster blueprint to a managed cluster
- Deploy a sample application with a sealed secret leveraging cluster overrides to multiple clusters
Important
This tutorial describes the steps to create and use a Sealed Secrets based blueprint using the Web Console. The entire workflow can also be fully automated and embedded into an automation pipeline.
Assumptions
- You have already provisioned or imported a Kubernetes cluster using the controller
Step 1: Download Kubeseal client
In this example, we will be using SealedSecrets v0.18.0. Follow the below steps to install this release.
To download kubeseal client on Linux:
curl -Lo kubeseal.tar.gz https://github.com/bitnami-labs/sealed-secrets/releases/download/v0.18.0/kubeseal-0.18.0-linux-amd64.tar.gz
tar -xzvf kubeseal.tar.gz
sudo install -m 755 kubeseal /usr/local/bin/kubeseal
To download kubeseal client on Mac:
curl -Lo kubeseal.tar.gz https://github.com/bitnami-labs/sealed-secrets/releases/download/v0.18.0/kubeseal-0.18.0-darwin-amd64.tar.gz
tar -xzvf kubeseal.tar.gz
sudo install -m 755 kubeseal /usr/local/bin/kubeseal
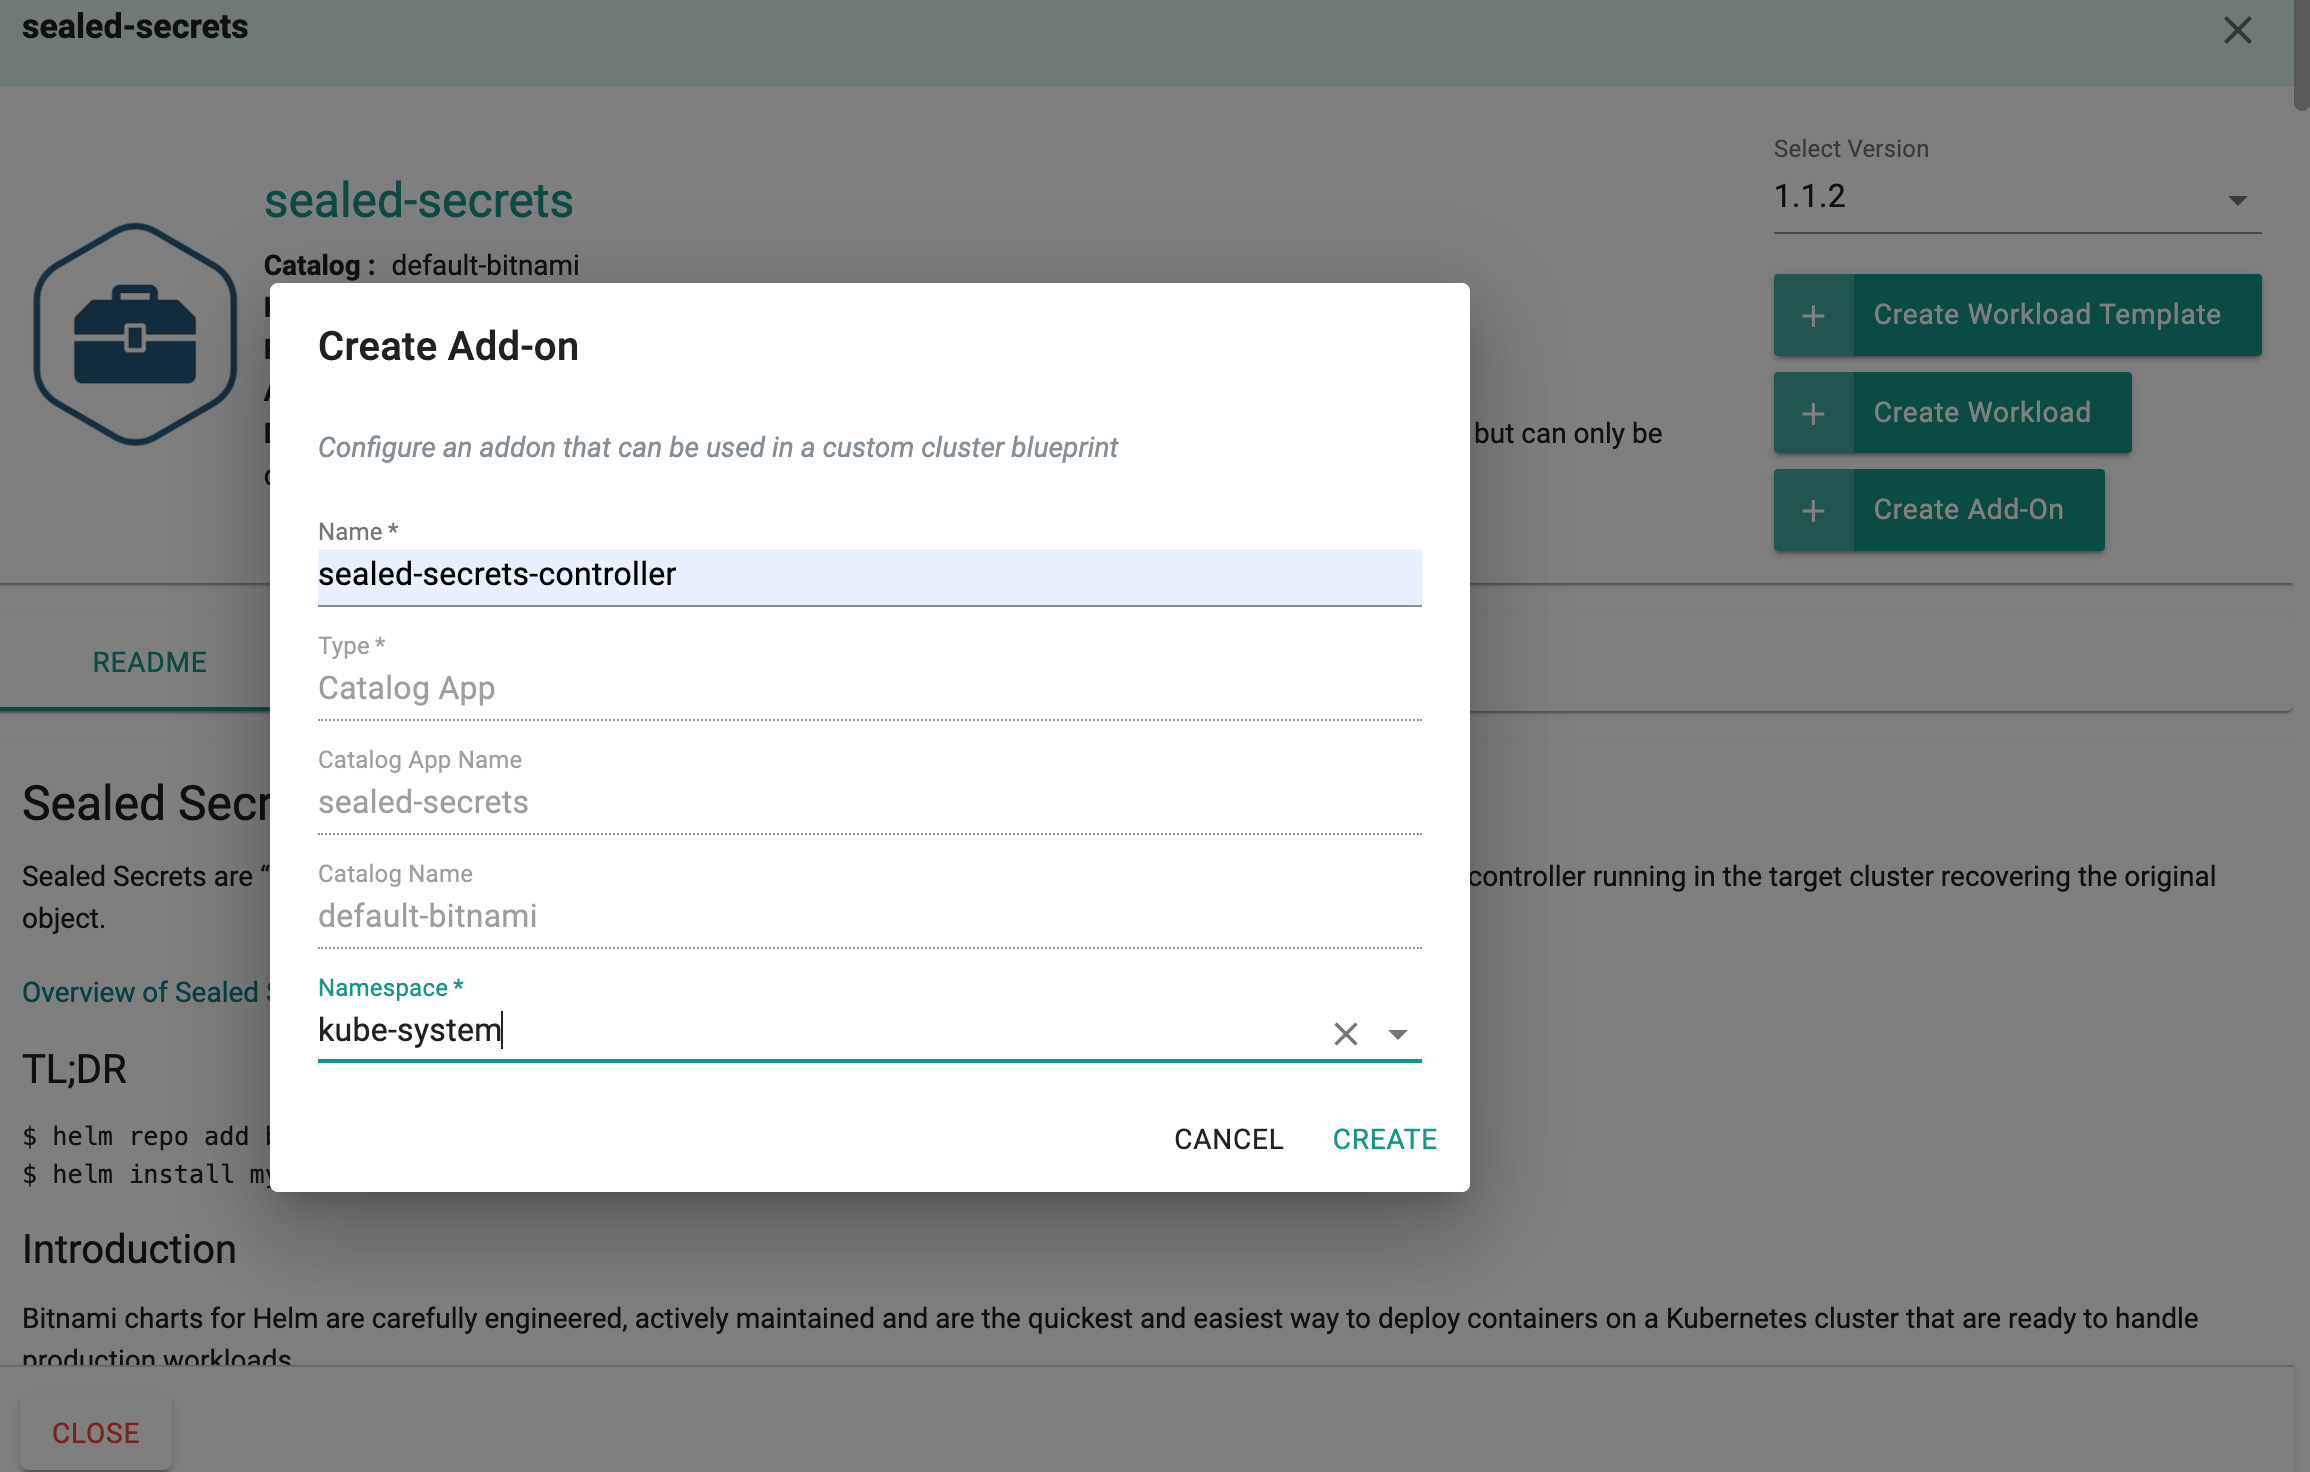
Step 2: Create Addon
- Login into the Web Console and navigate to your Project as an Org Admin or Infrastructure Admin
- Under Infrastructure, select "Namespaces" and create a new namespace called "kube-system"
- Select "Catalog" and "Search" for "sealed-secrets"
- Select "Selaed-secrets" and click "+ Create Add-on"
- Enter "sealed-secrets-controller" for name and select the namespace as "kube-system"
- Click CREATE to next step
- Enter "v0.18.0" for "Version name"
- Click "SAVE CHANGES"
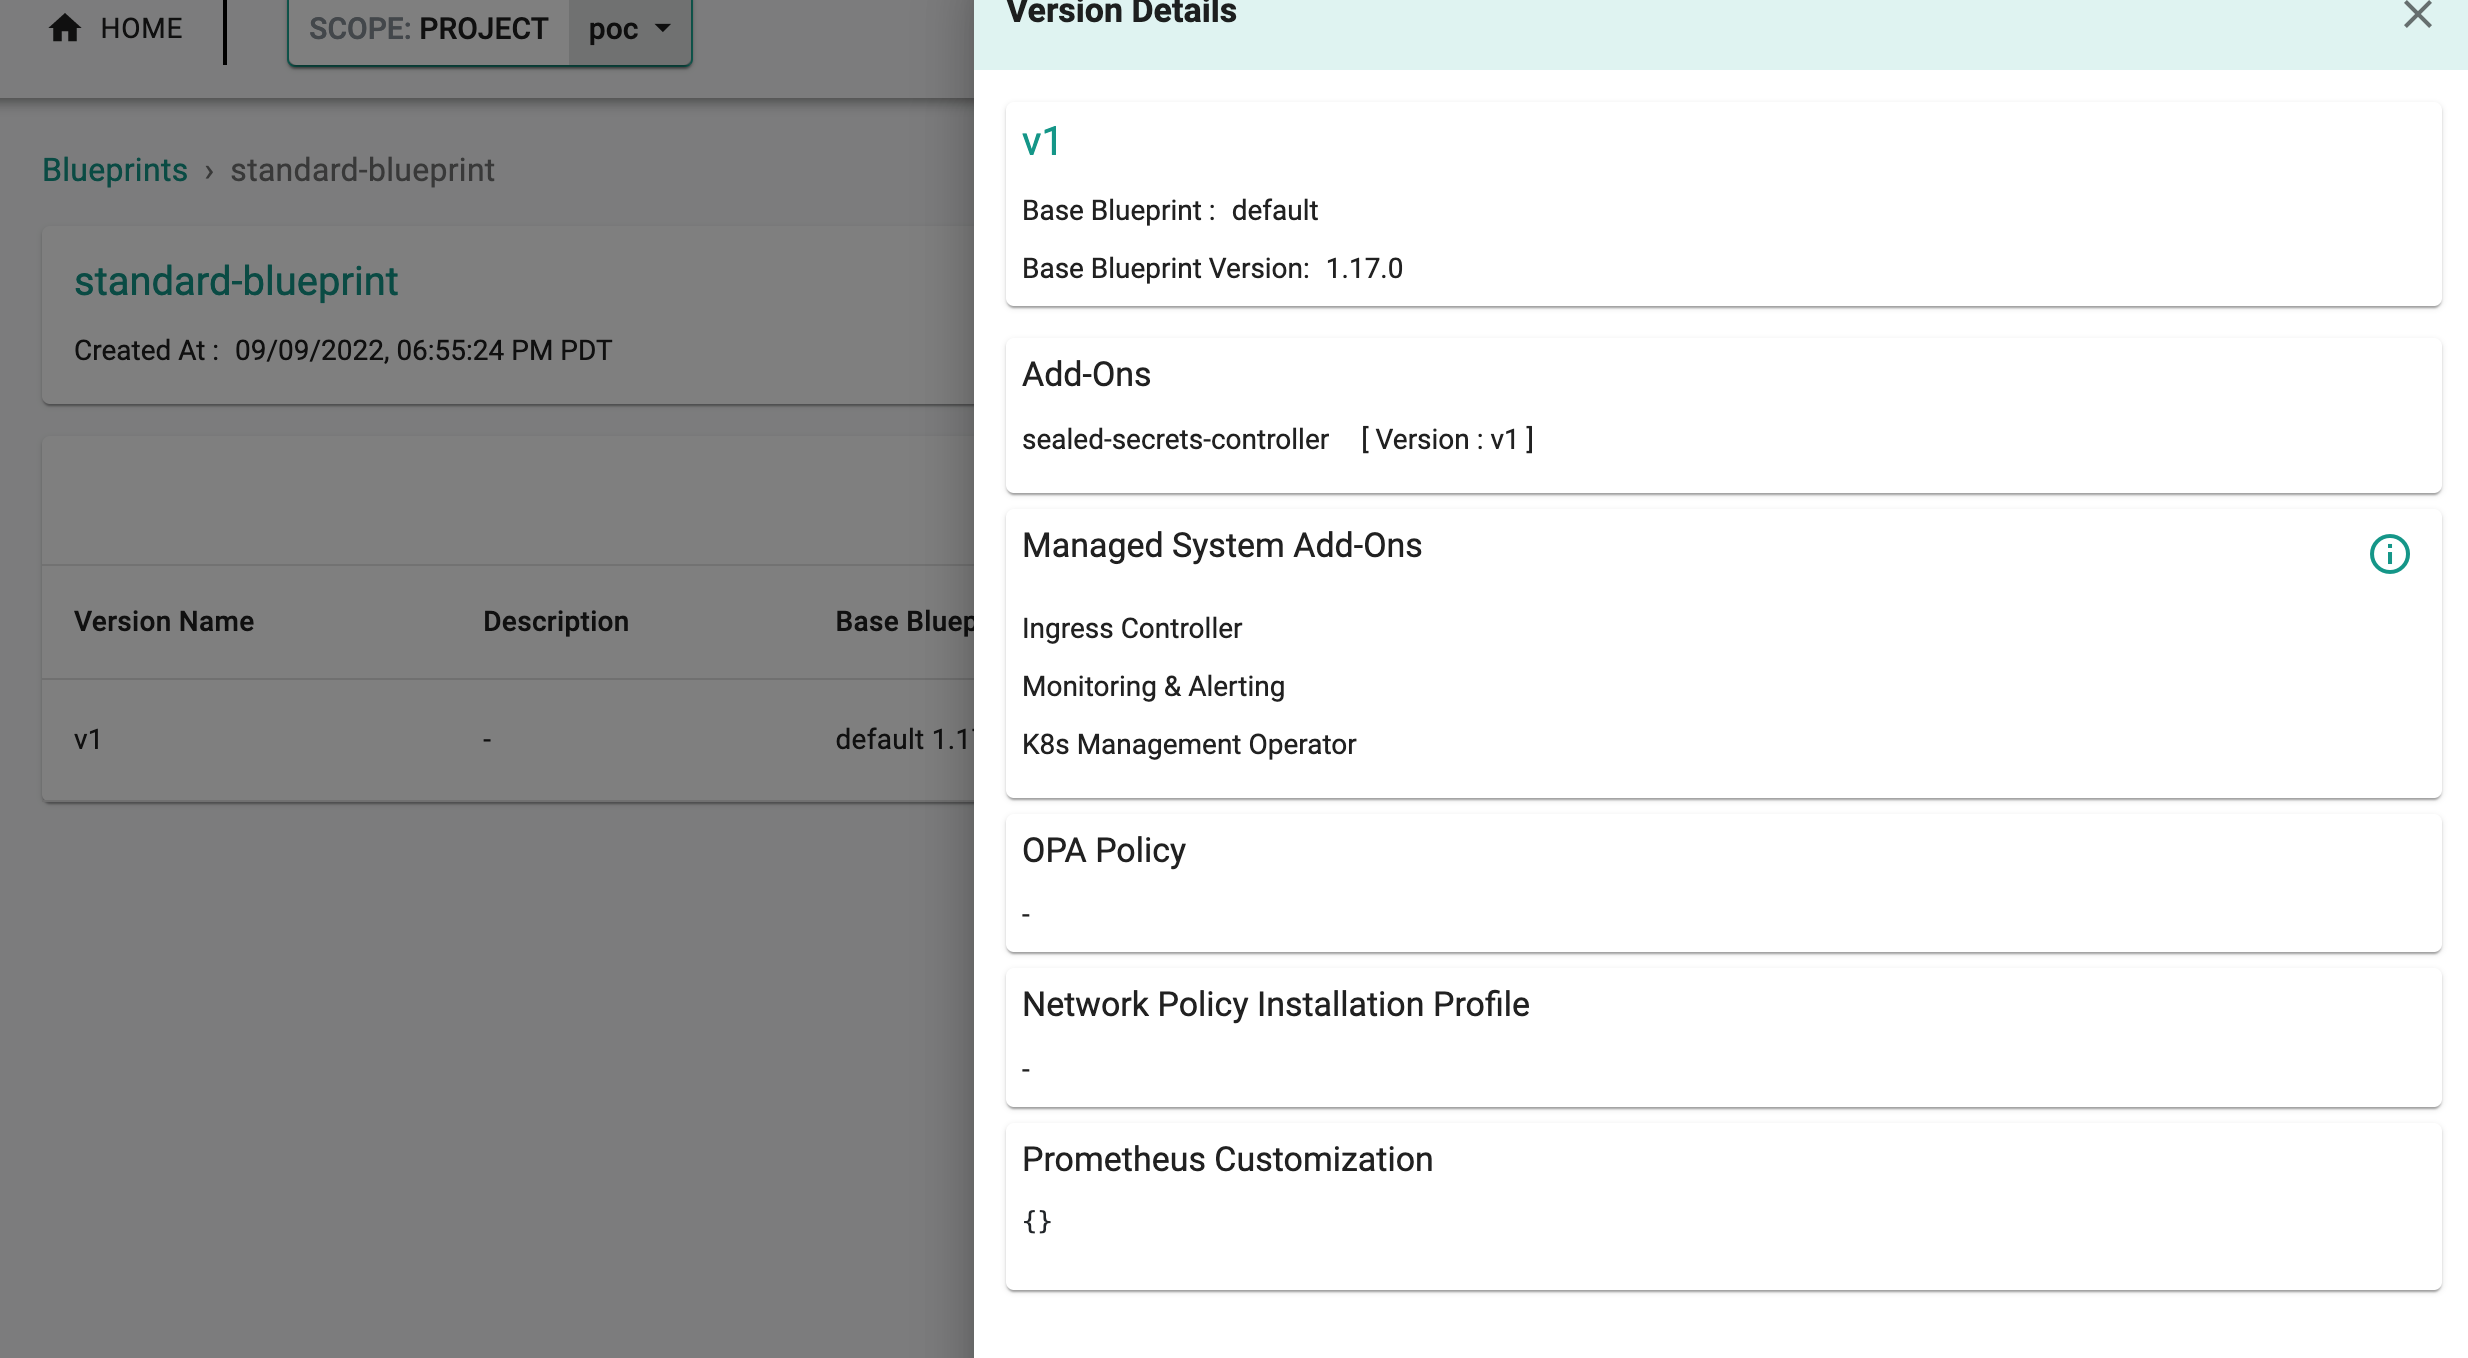
Step 3: Create Blueprint
Now, we are ready to assemble a custom cluster blueprint using this addon.
- Under Infrastructure, select "Blueprints"
- Create a new blueprint and give it a name such as "standard-blueprint"
- Select "New Version" and give it a version name. Ex: v1
- Under Add-Ons, select "ADD MORE" and choose the "sealed-secrets-controller" addon created in Step 2.
- Click "SAVE CHANGES"
Step 4: Apply Blueprint
Now, we are ready to apply this blueprint to a cluster or multiple clusters.
- Click on Options for the target Cluster in the Web Console
- Select "Update Blueprint" and select the "standard-blupeint" blueprint from the dropdown and for the version select "v1" from the dropdown.
- Click on "Save and Publish".
This will start the deployment of the addons configured in the "standard-blueprint" blueprint to the targeted cluster. The blueprint sync process can take a few minutes. Once complete, the cluster will display the current cluster blueprint details and whether the sync was successful or not.
Step 5: Verify Deployment
Users can optionally verify whether the correct resources have been created on the cluster.
- Click on the Kubectl button on the cluster to open a virtual terminal
kubectl get po -n kube-system
NAME                                         READY   STATUS    RESTARTS   AGE
sealed-secrets-controller-6c99898f67-m6jjf   1/1     Running   0          47m
Also make sure sealed secrets key got created as a secret in kube-system namespace.
kubectl get secrets -n kube-system
NAME                                             TYPE                                  DATA   AGE
sealed-secrets-controller-key5lsrr                kubernetes.io/tls                     2      9h
Step 6: Deploy a test application
Step 6.1 Encrypt Secrets using Sealed Secrets
Now that we have the Sealed secrets running in the cluster, we can encrypt the secrets using kubeseal client. To do this, kubeseal client needs access to the cluster to fetch the certificate every time you need to encrypt the secret. In this example we will be using wordpress application to deploy to 2 clusters (demo-cluster-1,demo-cluster-2) by encrypting the secrets required by wordpress using Sealed Secrets.
You can also get the certificate from the cluster and store it in your local disk using the below command:
kubeseal --fetch-cert > sealed-secrets-cert.pem
Lets encrypt the below k8s secrets for wordpress using kubeseal. We will be using the cluster name as the secret name in this example. Replace the highlighted lines below with your cluster name and namespace name where you want to deploy the application into.
apiVersion: v1
kind: Secret
metadata:
  name: demo-cluster-1
  namespace: demo
data:
  mariadb-password: RkV0dXVPR25aVUJGeXFy
  mariadb-replication-password: QUtOZ3R5YWxZSGppamxj
  mariadb-root-password: b29SQ1RTQkxqa09jbE5i
  smtp-password: S1V4aXBwZG9FcFdTaXpt
  wordpress-password: aWNpR3RQVHRubExwdFNI
apiVersion: v1
kind: Secret
metadata:
  name: demo-cluster-2
  namespace: demo
data:
  mariadb-password: V0VRSkJLdFpHRlhIbWxD
  mariadb-replication-password: QllUSnhFWFpwV05sYllp
  mariadb-root-password: Y01iUlBKVmFsdUVWQXJo
  smtp-password: TGNPSkxhREhvT3JBUktj
  wordpress-password: WE9iZFpFR1J0bXNjWURP
Write the above contents to a file called wordpress-secret-demo-cluster-1.yaml and wordpress-secret-demo-cluster-2.yaml respectively. To encrypt the secret, we will use kubeconfig so kubeseal can talk to the cluster to fetch the certificate for encryption. To download kubeconfig, we will use rctl.
To download kubeconfig for demo-cluster-1, use below command:
rctl download kubeconfig --cluster demo-cluster-1 > demo-cluster-1-kubeconfig
To download kubeconfig for demo-cluster-2, use below command:
rctl download kubeconfig --cluster demo-cluster-2 > demo-cluster-2-kubeconfig
Execute the below command to encrypt the secret for cluster demo-cluster-1.
export KUBECONFIG=demo-cluster-1-kubeconfig
kubeseal < wordpress-secret-demo-cluster-1.yaml -o yaml > wordpress-secret-demo-cluster-1-sealed-secret.yaml
export KUBECONFIG=demo-cluster-2-kubeconfig
kubeseal < wordpress-secret-demo-cluster-2.yaml -o yaml > wordpress-secret-demo-cluster-2-sealed-secret.yaml
Note
By default kubeseal gives json output. You can specify the yaml output format using "-o yaml" to kubeseal.
Your encrypted secret will look like this:
apiVersion: bitnami.com/v1alpha1
kind: SealedSecret
metadata:
  creationTimestamp: null
  name: demo-cluster-1
  namespace: demo
spec:
  encryptedData:
    mariadb-password: AgANN3aEyVcBiSqFuGvdZUXXXLGFO2QL...
    mariadb-replication-password: AgCXm+JLt3ZGcuZ+NVSDL...
    mariadb-root-password: AgCOK968jCS9ilMRXPmTPJwUABE9...
    smtp-password: AgCYrotCyor2GIGYKLAt8X6XS5bZsXpXHC4...
    wordpress-password: AgB0t4u9ZjnBpuEMlD+NI6A5E3OGY...
  template:
    data: null
    metadata:
      creationTimestamp: null
      name: demo-cluster-1
      namespace: demo
Step 6.2 Create workloads for the sealed secrets
- Navigate to Applications -> Workloads in the Web Console
- Under Infrastructure, select "Namespaces" and create a new namespace called "demo"
- Publish this namespace to clusters "demo-cluster-1" and "demo-cluster-2"
- Select "New Workload" -> "Create New Workload"
- Type "demo-cluster-1-wordpress-secret" for Name and Select "k8s YAML" for the package type
- Select "Upload Manually" for the artifact sync
- Select "demo" for the namespace
- Upload the sealed secret for demo-cluster-1 and publish this workload to cluster "demo-cluster-1"
- Select "New Workload" -> "Create New Workload"
- Type "demo-cluster-2-wordpress-secret" for Name and Select "k8s YAML" for the package type
- Select "Upload Manually" for the artifact sync
- Select "demo" for the namespace
- Upload the sealed secret for demo-cluster-2 and publish this workload to cluster "demo-cluster-2"
Once the Sealed Secret controller unseals this, you will see that Secret got created in the demo namespace.
kubectl get secrets -n demo
NAME                                           TYPE                                  DATA   AGE
demo-cluster-1                                 Opaque                                5      6m
Step 6.3 Prepare custom values file for wordpress so that we can use the secrets created by sealed secrets controller
Below is a custom values file where ".global.Rafay.ClusterName" will be replaced with the cluster name, workload is getting deployed to by the controller. We will be using the cluster-name for the secret name, ingress hostname.
service:
  type: ClusterIP
existingSecret: {{{ .global.Rafay.ClusterName }}}
wordpressBlogName: {{{ .global.Rafay.ClusterName }}} Wordpress!
ingress:
  enabled: true
  hostname: wordpress.{{{ .global.Rafay.ClusterName }}}.demo.gorafay.net
mariadb:
  auth:
    existingSecret: {{{ .global.Rafay.ClusterName }}}
Write the above contents to a file called wordpress-custom-values.yaml.
Step 6.4 Create workload for wordpress
- Select "Catalog" and "Search" for "wordpress"
- Select "wordpress" and click "+ Create Workload"
- Enter "wordpress" for name and select the namespace as "demo"
- Click "CONTINUE" to next step
- Select "Upload Files" for "Values.yaml" and upload "wordpress-custom-values.yaml" created above
- Select "Save And Go To Placement"
- Publish this workload into clusters "demo-cluster-1" and "demo-cluster-2"
Step 6.5 Verify the deployment
Verifying the wordpress deployment on cluster "demo-cluster-1"
kubectl get po -n demo
NAME                         READY   STATUS    RESTARTS   AGE
wordpress-7488799d7b-v2nzr   1/1     Running   0          27m
wordpress-mariadb-0          1/1     Running   0          26m
kubectl get ing -n demo
NAME        CLASS   HOSTS                                       ADDRESS         PORTS   AGE
wordpress   nginx   wordpress.demo-cluster-1.demo.gorafay.net   172.20.249.38   80      27m
Verifying the wordpress deployment on cluster "demo-cluster-2"
kubectl get po -n demo
NAME                         READY   STATUS    RESTARTS   AGE
wordpress-bdd4b48cd-wfpcd   1/1     Running   0          27m
wordpress-mariadb-0          1/1     Running   0          26m
kubectl get ing -n demo
NAME        CLASS   HOSTS                                       ADDRESS         PORTS   AGE
wordpress   nginx   wordpress.demo-cluster-2.demo.gorafay.net   172.20.111.245   80      27m
You will need to setup dns entries for the wordpress hostnames pointing to the clusters on how ingress was exposed. Then you will be able to access the wordpress application using the ingress hostnames.
Note
Sealed secrets has the following scopes:
- strict (default): the secret must be sealed with exactly the same name and namespace. These attributes become part of the encrypted data and thus changing name and/or namespace would lead to "decryption error".
- namespace-wide: you can freely rename the sealed secret within a given namespace.
- cluster-wide: the secret can be unsealed in any namespace and can be given any name.
Recap
Congratulations! You have successfully created a custom cluster blueprint with the "sealed-secret" addon and applied to a cluster.