Part 3: Workload
What Will You Do
In this part of the self-paced exercise, you will deploy a stateless workload to both clusters. The stateless workload will be used to demonstrate the ability to keep an applicaiton available by means of the blue-green upgrade strategy.
Step 1: Deploy Workload
In this step, you will create a stateless workload on the clusters. The workload will be used to show how the blue-green upgrade strategy can be applied with no disruption to the stateless cluster applications.
- Save the below specification file to your computer as "workload-spec.yaml". Note, the highlighted sections in the spec will need to be updated to match your environment.
name: stateless-workload
namespace: default
project: defaultproject
type: NativeYaml
clusters: blue,green
payload: stateless-workload.yaml
- Save the below specification file to your computer as "stateless-workload.yaml".
apiVersion: apps/v1
kind: Deployment
metadata:
  namespace: default
  name: deployment-2048
spec:
  selector:
    matchLabels:
      app.kubernetes.io/name: app-2048
  replicas: 5
  template:
    metadata:
      labels:
        app.kubernetes.io/name: app-2048
    spec:
      containers:
      - image: public.ecr.aws/l6m2t8p7/docker-2048:latest
        imagePullPolicy: Always
        name: app-2048
        ports:
        - containerPort: 80
---
apiVersion: v1
kind: Service
metadata:
  namespace: default
  name: service-2048
spec:
  ports:
    - port: 80
      targetPort: 80
      protocol: TCP
  type: LoadBalancer
  selector:
    app.kubernetes.io/name: app-2048
- Open Terminal (on macOS/Linux) or Command Prompt (Windows) and navigate to the folder where you saved the files
- Execute the following command to provision the cluster from the specification file previously saved
rctl create workload workload-spec.yaml
If there were no errors, you should see a message like below
Workload created successfully
- Login to the web console
- Navigate to your project
- Select Applications -> Workloads
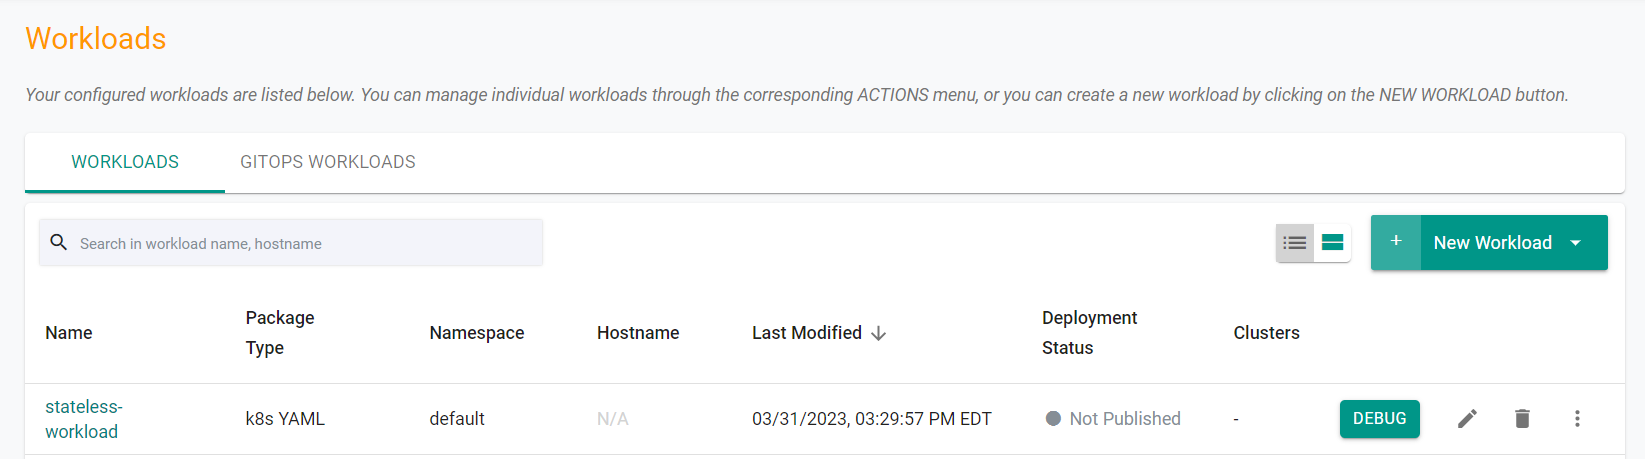
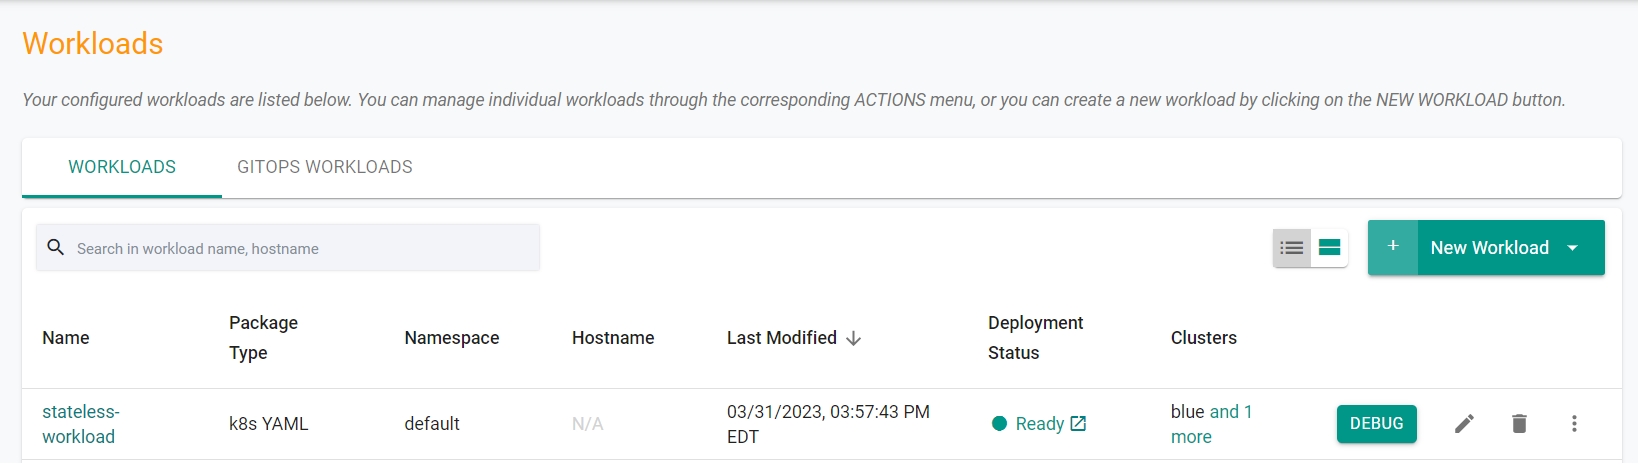
Now, let us publish the newly created workload to the EKS clusters. The workload can be deployed to multiple clusters as per the configured "placement policy". In this case, you are deploying to a single EKS cluster with the name "karpenter-cluster".
rctl publish workload stateless-workload
In the web console, click on Applications -> Workloads. You should see something like the following.
Step 2: Access Blue Workload
In this step, we will access the workload on the blue cluster to ensure it is working.
- Navigate to Infrastructure -> Clusters
- Click on "KUBECTL" in the cluster card of the blue cluster
- Enter the below command
kubectl get services -n default service-2048
- You should see a result like the following showing the inflate deployment with 0 pods running.
NAME           TYPE           CLUSTER-IP       EXTERNAL-IP                                                               PORT(S)        AGE
service-2048   LoadBalancer   10.100.139.203   a359df9b63fc84d3797397f23db718c3-2075536630.us-west-2.elb.amazonaws.com   80:32518/TCP   10s
- Configure your DNS to point to the EXTERNAL-IP
- In your web browser, navigate to the DNS entry previously created
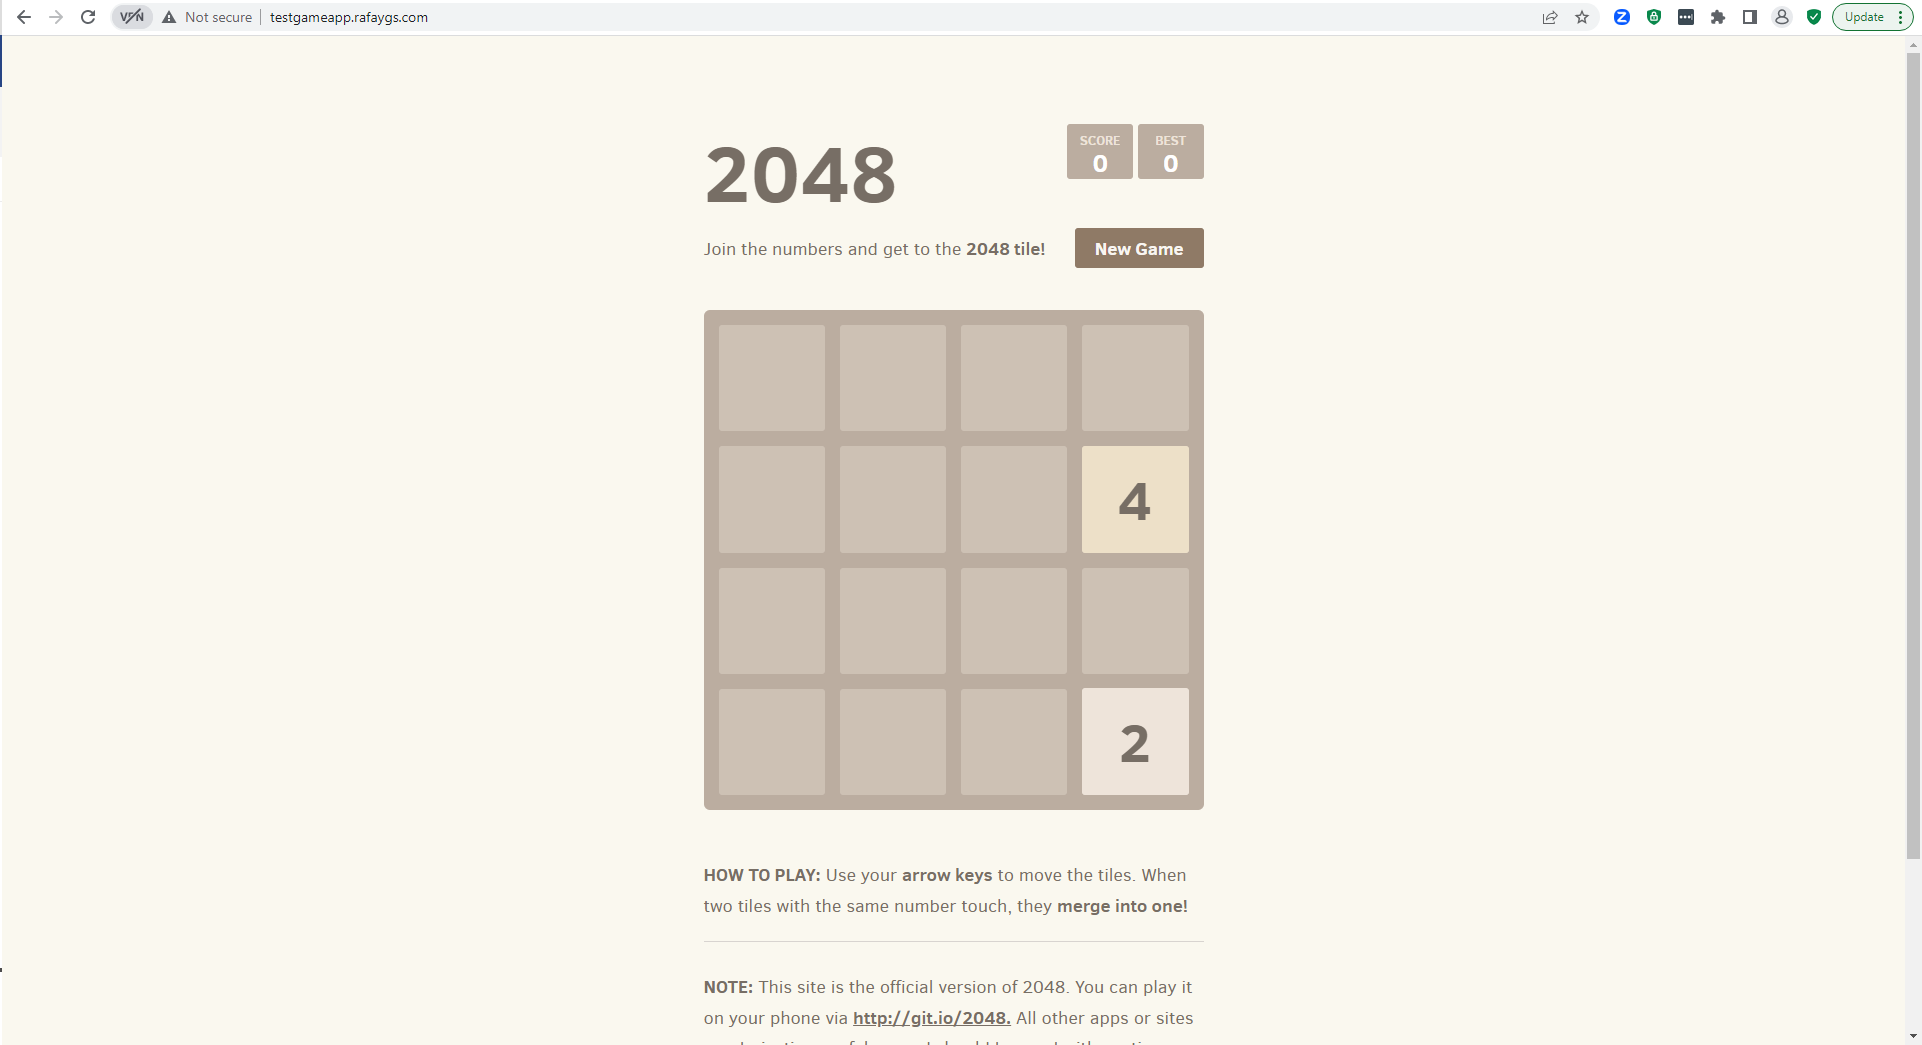
We are currently able to access the stateless workload running on the blue cluster.
Step 3: Access Green Workload
In this step, we will access the workload on the green cluster to ensure it is working.
- Navigate to Infrastructure -> Clusters
- Click on "KUBECTL" in the cluster card of the green cluster
- Enter the below command
kubectl get services -n default service-2048
- You should see a result like the following showing the inflate deployment with 0 pods running.
NAME           TYPE           CLUSTER-IP      EXTERNAL-IP                                                              PORT(S)        AGE
service-2048   LoadBalancer   10.100.22.204   a18c021ac258f4fcfb1950184a832c7a-465706458.us-west-2.elb.amazonaws.com   80:32370/TCP   11m
- In your web browser, navigate to the EXTERNAL-IP
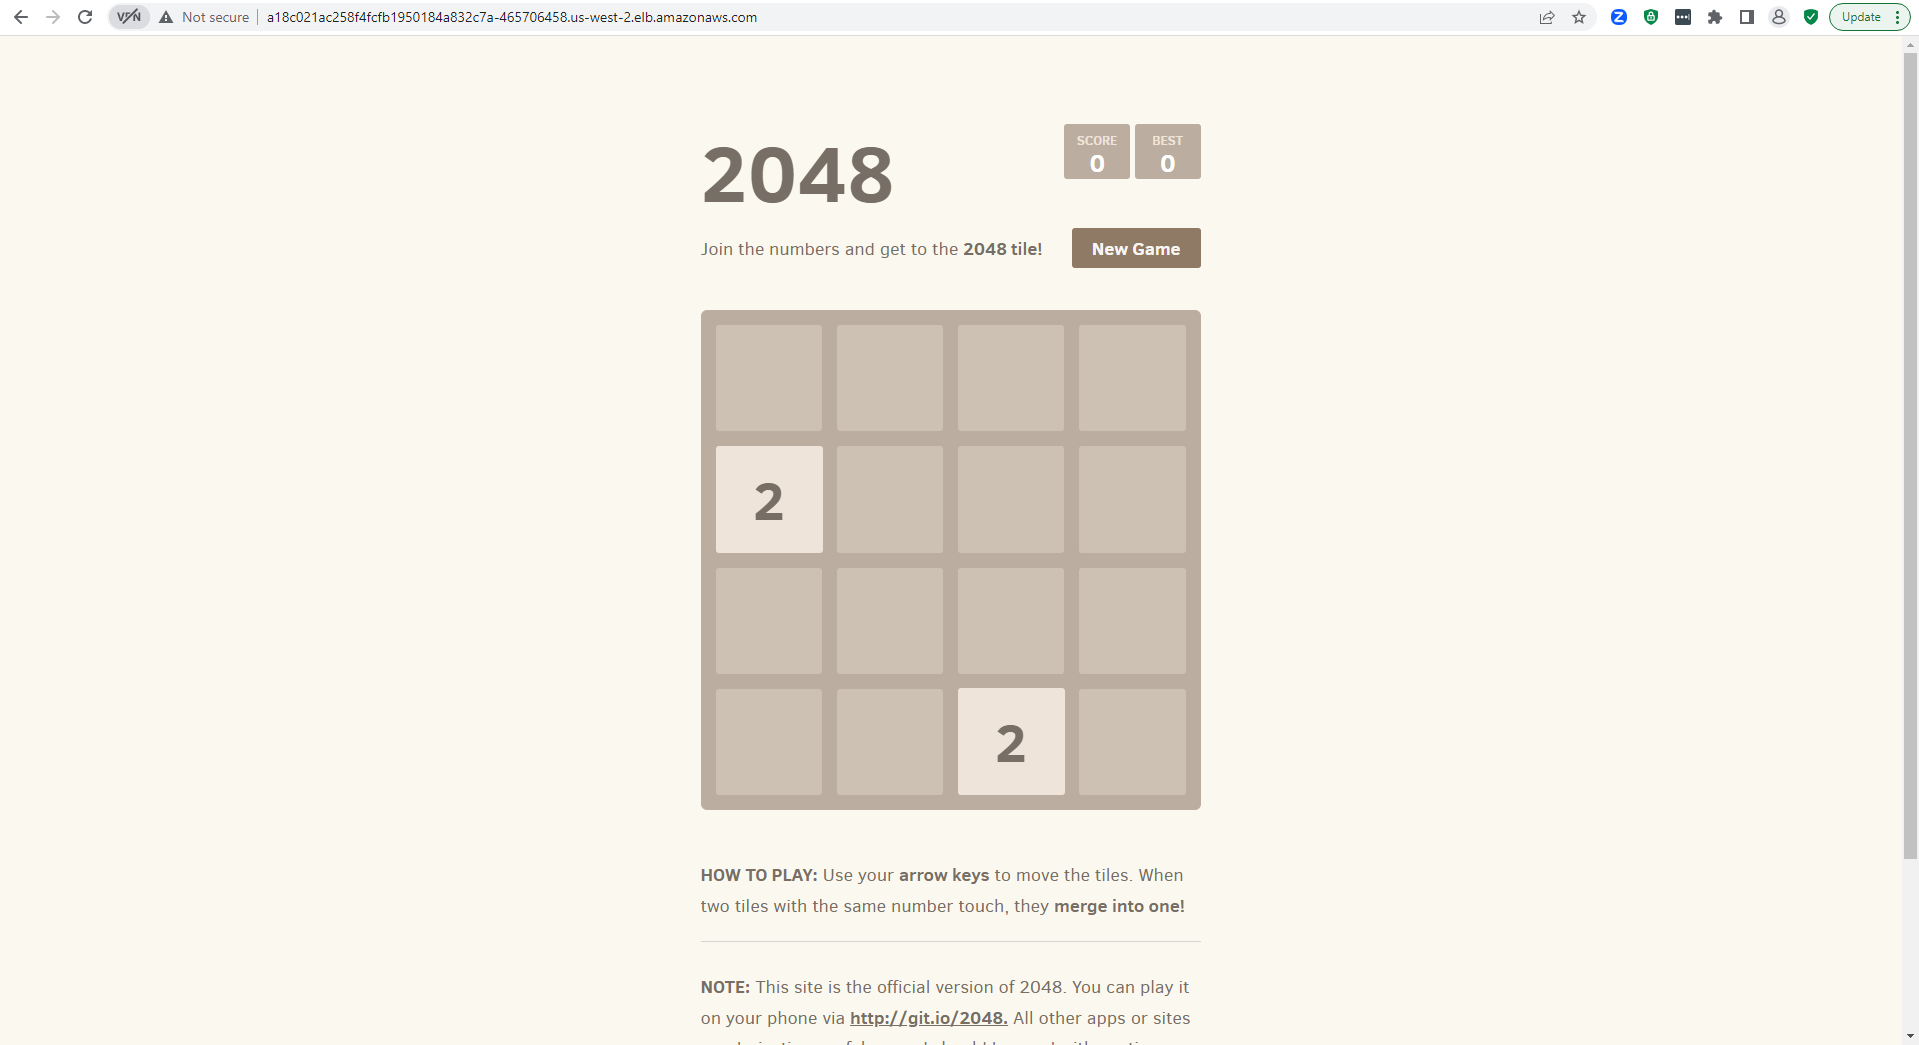
We are currently able to access the stateless workload running on the green cluster.
Step 4: Redirect Traffic
Now that we now that the stateless workload is running on the green cluster with the newer version of kubernetes, we will update our DNS to redirect traffic to the EXTERNAL-IP of the green cluster.
- Configure your DNS to point to the EXTERNAL-IP of the green cluster
- In your web browser, navigate to the DNS entry
We are now accessing the stateless workload running on the green cluster with no disruption to the end user.
Recap
Congratulations! At this point, you have successfuly applied the blue-green upgrade strategy to a cluster running stateless workloads.