Part 2: Provision
What Will You Do
In this part of the self-paced exercise, you will provision an Amazon EKS cluster based on a declarative cluster specification using the minimal blueprint
Step 1: Cluster Spec
- Open Terminal (on macOS/Linux) or Command Prompt (Windows) and navigate to the folder where you forked the Git repository
- Navigate to the folder "
/getstarted/karpenter/cluster"
Note
The cluster spec contains the desired state for our Amazon EKS Cluster which includes the Karpenter controller configuration. Nodes provisioned by Karpenter are provisioned outside of the cluster and are not reconciled with the cluster spec as it is a short term(dynamic) node scaling operation that is managed by the Karpenter controller. Karpenter will manage the node's lifecycle. A node count of all active nodes that have joined the cluster is displayed via the cluster/node dashboard.
Cluster Details
In the cluster spec file, we define a tag with the cluster name that will automatically be applied to the AWS cluster resources during cluster creation. This tag will be used by the Karpenter provisioner to identify associated resources.
cluster-name: karpenter-cluster
The following line must be updated to match the ARN of the previously created instance profile. This can be acheived by updating the ACCOUNT-NUMBER
- arn: "arn:aws:iam::<ACCOUNT-NUMBER>:role/KarpenterNodeRole-Rafay"
- name: "karpenter-cluster"
- project: "defaultproject"
- cloudprovider: "aws-cloud-credential"
- arn: "arn:aws:iam::
:role/KarpenterNodeRole-Rafay" - name: "karpenter-cluster"
- region: "us-west-2"
- cluster-name: karpenter-cluster
- email:
- env:
apiVersion: infra.k8smgmt.io/v3
kind: Cluster
metadata:
  name: karpenter-cluster
  project: defaultproject
spec:
  blueprintConfig:
    name: minimal
  cloudCredentials: aws-cloud-credential
  config:
    addons:
    - name: kube-proxy
      version: latest
    - name: vpc-cni
      version: latest
    - name: coredns
      version: latest
    - configurationValues: |-
        controller:
          tolerations:
            - effect: NoSchedule
              key: nodeInfra
              operator: Exists
      name: aws-ebs-csi-driver
      version: latest
    iam:
      serviceAccounts:
      - attachPolicy:
          Statement:
          - Action:
            - ec2:CreateLaunchTemplate
            - ec2:CreateFleet
            - ec2:RunInstances
            - ec2:CreateTags
            - iam:PassRole
            - iam:CreateInstanceProfile
            - iam:TagInstanceProfile
            - iam:AddRoleToInstanceProfile
            - iam:RemoveRoleFromInstanceProfile
            - iam:DeleteInstanceProfile
            - ec2:DeleteLaunchTemplate
            - ec2:TerminateInstances
            - ec2:DescribeLaunchTemplates
            - ec2:DescribeSpotPriceHistory
            - ec2:DescribeImage
            - ec2:DescribeImages
            - ec2:DescribeInstances
            - ec2:DescribeSecurityGroups
            - ec2:DescribeSubnets
            - ec2:DescribeInstanceTypes
            - ec2:DescribeInstanceTypeOfferings
            - ec2:DescribeAvailabilityZones
            - ssm:GetParameter
            - eks:DescribeCluster
            - pricing:DescribeServices
            - pricing:GetAttributeValues
            - pricing:GetProducts
            - iam:GetInstanceProfile
            Effect: Allow
            Resource: '*'
          Version: "2012-10-17"
        metadata:
          name: karpenter
          namespace: karpenter
      withOIDC: true
    identityMappings:
      arns:
      - arn: "arn:aws:iam::<ACCOUNT-NUMBER>:role/KarpenterNodeRole-Rafay"
        group:
        - system:bootstrappers
        - system:nodes
        username: system:node:{{EC2PrivateDNSName}}
    managedNodeGroups:
    - amiFamily: AmazonLinux2
      desiredCapacity: 1
      instanceType: t3.large
      labels:
        nodes: infra
      maxSize: 2
      minSize: 0
      name: infra-nodegroup
      taints:
      - effect: NoSchedule
        key: nodeInfra
      version: "1.29"
    metadata:
      name: karpenter-cluster
      region: us-west-2
      tags:
        cluster-name: karpenter-cluster
        email: <EMAIL>
        env: <ENV>
      version: "1.29"
    vpc:
      autoAllocateIPv6: false
      cidr: 192.168.0.0/16
      clusterEndpoints:
        privateAccess: true
        publicAccess: false
  systemComponentsPlacement:
    nodeSelector:
      node: infra
    tolerations:
    - effect: NoSchedule
      key: nodeInfra
      operator: Exists
  type: aws-eks
Step 2: Provision Cluster
- Type the command below to provision the EKS cluster
rctl apply -f cluster.yaml
If there are no errors, you will be presented with a "Task ID" that you can use to check progress/status. Note that this step requires creation of infrastructure in your AWS account and can take ~30-40 minutes to complete.
[
  {
    "tasksetId": "qkody62",
    "tasksetOperations": [
      {
        "operationName": "ClusterCreation",
        "resourceName": "karpenter-cluster",
        "operationStatus": "PROVISION_TASK_STATUS_INPROGRESS"
      },
      {
        "operationName": "NodegroupCreation",
        "resourceName": "infra-nodegroup",
        "operationStatus": "PROVISION_TASK_STATUS_PENDING"
      },
      {
        "operationName": "BlueprintSync",
        "resourceName": "karpenter-cluster",
        "operationStatus": "PROVISION_TASK_STATUS_PENDING"
      }
    ],
    "tasksetStatus": "PROVISION_TASKSET_STATUS_INPROGRESS",
    "comments": "Configuration is being applied to the cluster"
  }
]
- Navigate to the "defaultproject" project in your Org
- Click on Infrastructure -> Clusters. You should see something like the following

- Click on the cluster name to monitor progress
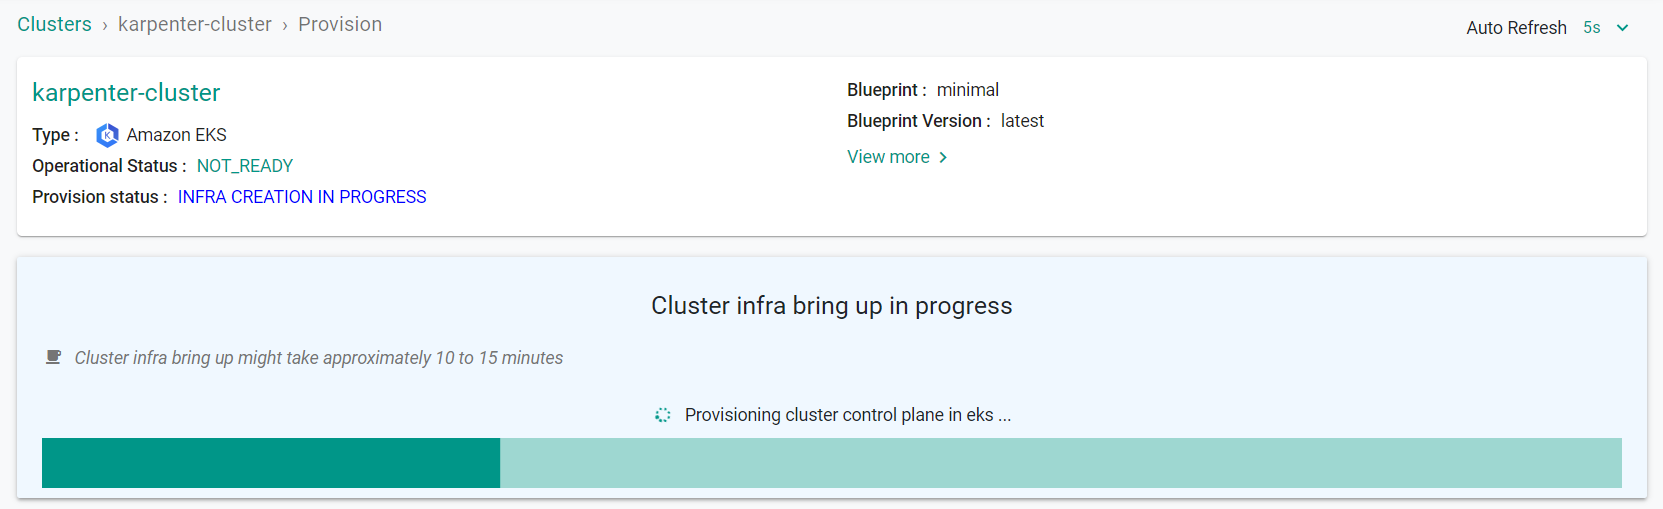
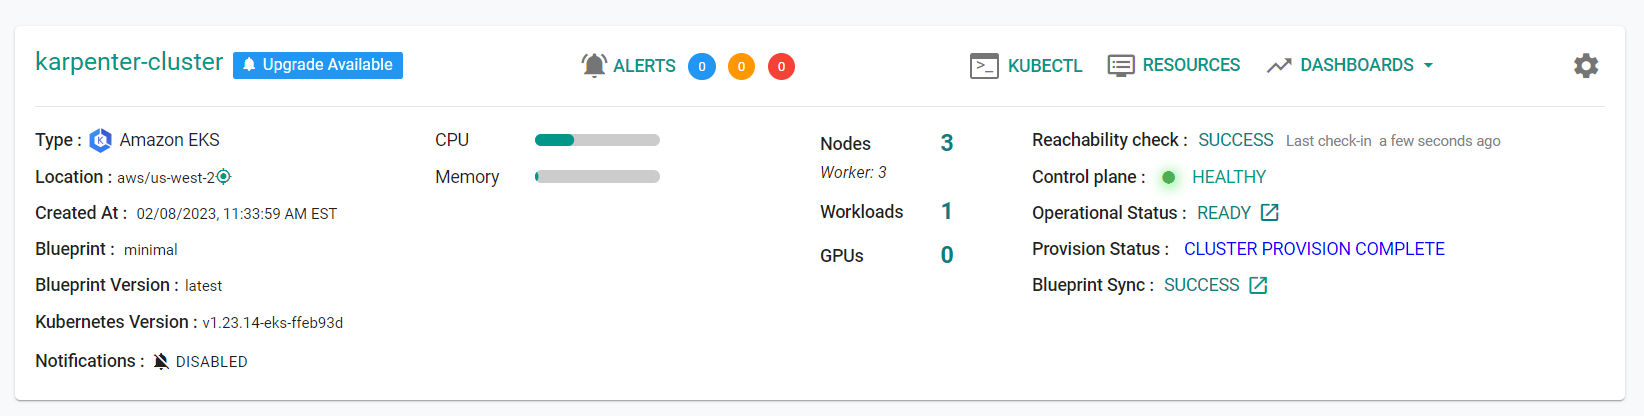
Step 3: Verify Cluster
Once provisioning is complete, you should see the cluster in the web console
- Click on the kubectl link and type the following command
kubectl get nodes
You should see something like the following
NAME                                           STATUS   ROLES    AGE   VERSION
ip-192-168-29-232.us-west-2.compute.internal   Ready    <none>   18m   v1.28.8-eks-ae9a62a
Recap
Congratulations! At this point, you have successfully provisioned an Amazon EKS cluster with a managed node group in your AWS account using the RCTL CLI.