Custom Add-Ons
The first part of defining your cluster blueprint or using the default blueprints in the system involves making a decision on what software you want present in your Kubernetes clusters. An add-on is defined as a software component that runs inside a cluster. All cluster blueprints are comprised of one or more software add-ons.
The platform supports two types of add-ons:
1) Managed System Add-Ons: These are software components that are provided by the system so that you don't need to configure or package them yourself.
Some of these today include:
- Monitoring & Visibility (based on Prometheus)
- Secret Store CSI Driver
- Local Storage
To read more about what the platform has available, check out the Managed Add-Ons documentation. The rest of this doc
2) Custom Add-Ons: Custom Add-Ons are meant to be software components that are meant to be cluster-wide services or operate invisibly in the background.
This could be tied to things such as:
- Ingress Controllers (Nginx etc)
- Security Products (StackRox, Twistlock, Sysdig etc)
- Cluster Monitoring (Prometheus, Datadog etc)
- Log Collection (Fluentd etc)
- Backup and Restore (Velero etc)
Infra admins can assemble one or more add-ons to create a cluster blueprint.
The rest of this doc talks about custom add-ons. See Managed Add-Ons for info on managed add-ons.
What types of custom add-ons are available and when should I use each?
The following lists the add-on types available and when an admin should use that add-on type. It comes down to either using add-ons that are pre-packaged from a catalog or packaging your own.
- Catalog App: Catalog app type should be used when the admin wants to use a wide variety of packaged add-ons available in the system such as ArgoCD, Datadog, Kubecost, etc. This add-on type should be used when an admin wants to use software that is already available and does not have to customize too much to meet their organizational and end user needs. These are based on helm and admins can supply their values.yaml file to override or change certain configurations as needed.
Refer Catalog for more information
- k8s YAML: This falls in the line of packaging your own and this should be used when an admin wants to supply standard Kubernetes YAML to define the software add-on. In addition, these add-on types can be managed via GitOps processes by pulling the appropriate files from a Git repository.
- Helm: This also falls in the line of packaging your own. With Helm 3, you can supply multiple values.yaml files and can be easier for streamlining more complex software add-on installations. In addition, these add-on types can be managed via GitOps processes by pulling the appropriate files from a Git or Helm repository.
Helm Versions
The controller supports Helm packages in both Helm 2 and 3 package formats. With Helm 3, the Controller acts like a Helm 3 client and does not have to parse and break down the chart down to its atomic k8s resources for deployment. Support for Helm 2 in workloads is deprecated and is only meant to be used for legacy charts that are incompatible with Helm 3. Read more about Helm 2 End of Life.
Can I mix and match add-on types in a blueprint?
Yes. You can have different types of add-ons, some ranging from managed add-ons to custom ones as well having different types of custom add-ons.
How Are Add-Ons Scoped?
By default, add-ons are NOT "Org wide" resources and are scoped to a project to guarantee a "hard" isolation boundary. All clusters in a given project can use/leverage blueprints based on the add-ons in the Project.
Who can create and manage add-ons?
The lifecycle of add-ons is managed by users with an "infrastructure administrator" role or "organization administrator" role. See the [roles documentation]((../security/rbac/roles.md) for more details.
What are the pre-requisites for creating an add-on?
- You must be an Infra Admin or Org Admin
- You must have a namespace provisioned for your add-on as this is needed to specify the location of where the software-add on will get deployed. See the namespace documentation for more information on how to create a namespace
- If using GitOps processes to pull files from a repository, you must configure the repository. See instructions here on how to do so.
Is there a way for me to group add-ons together?
Yes, you can accomplish this via labels for add-ons. See below for more on how to leverage this functionality.
What mechanisms are available for me to create add-ons?
Add-Ons can be created in a specific project via multiple mechanisms
- Using the Web Console
- Using the RCTL CLI Utility
- Programmatically using the REST API
- Terraform
Important
You can manage the lifecycle of add-ons using the Web Console or RCTL CLI or REST APIs. It is strongly recommended to automate this by integrating RCTL with your existing CI system based automation pipeline.
Creating a Custom Add-On
The following steps will leverage the Web Console. Following the RCTL CLI Utility doc or REST API documentation if you want to use those mechanisms.
Catalog App Type
- Navigate to your Project in your Org
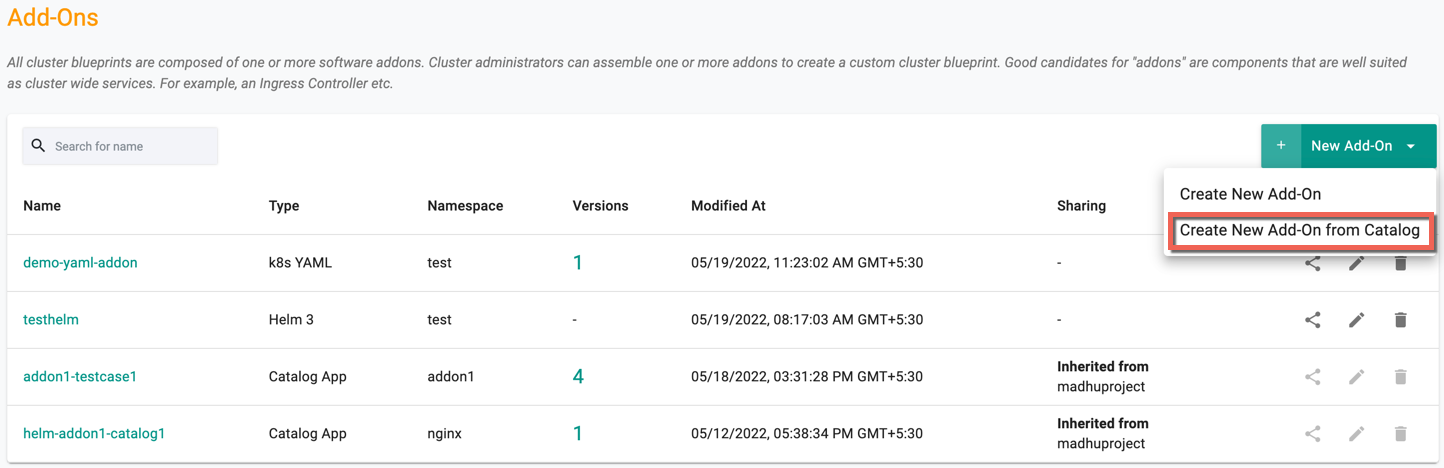
- Select Infrastructure and click Add-Ons
- Click the New Add-On drop-down and select Create New Add-On from Catalog
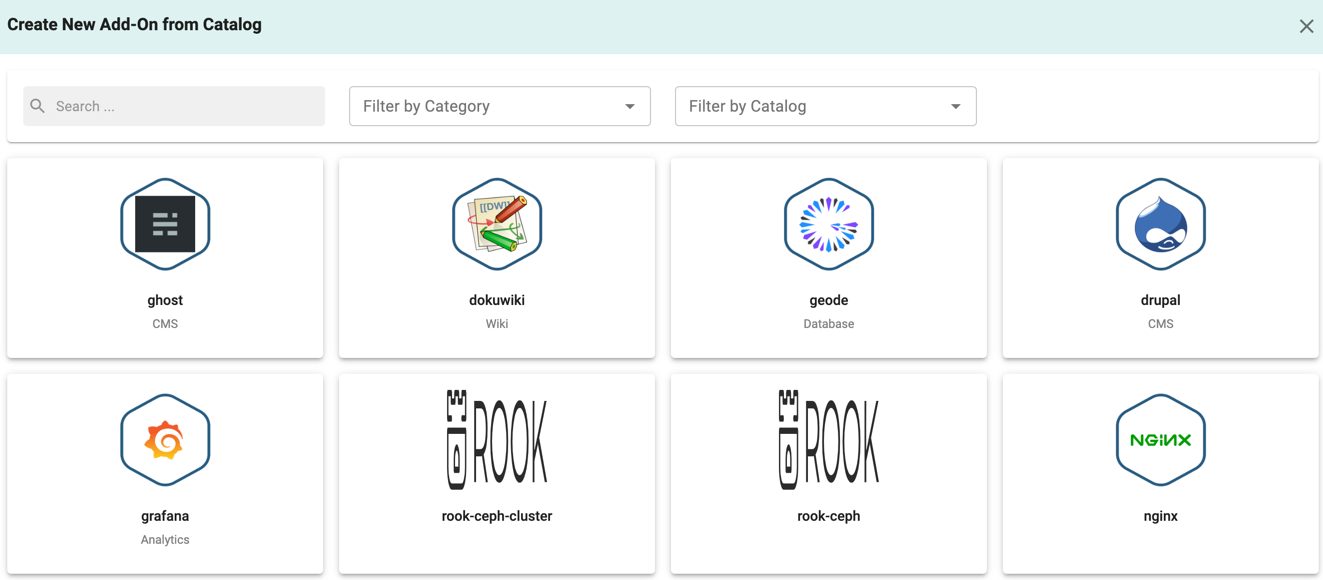
- Next it's time to select the catalog item. You can also search for it, or filter by category and catalog. Click the catalog item tile to continue
- Select the version you want to use in the select version dropdown
- Go to the VALUES YAML tab and use the download button on the right to download the values.yaml file. This will be used in later steps
- Click Create Add-On
- Enter a name for the add-on and supply the namespace using the dropdown. Then click CREATE.
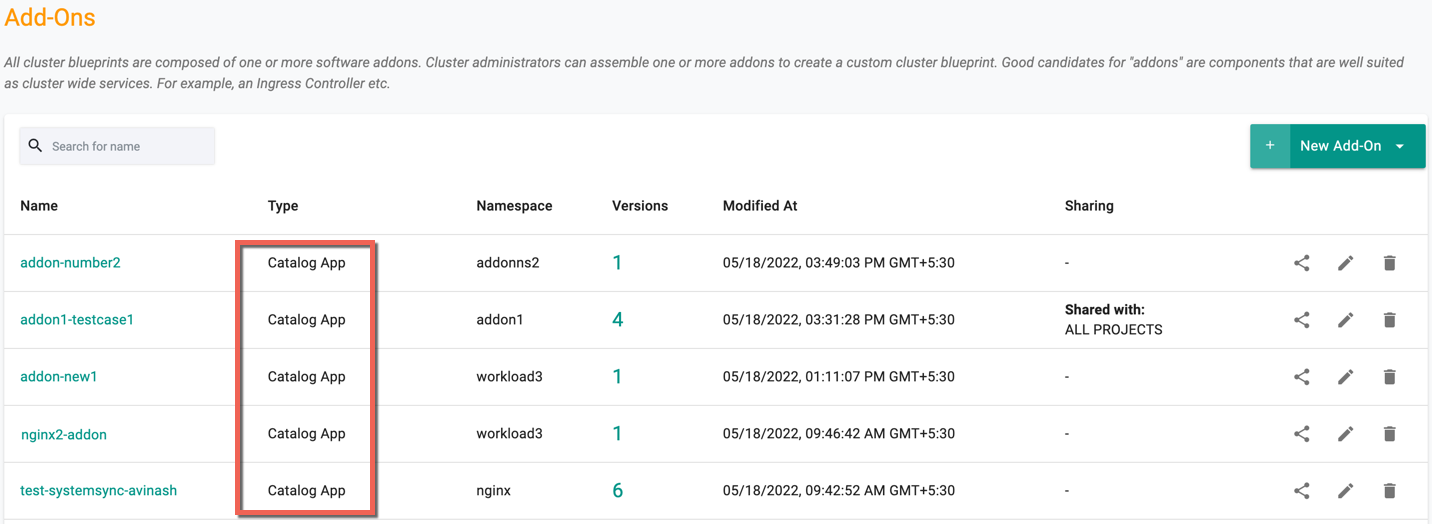
- On successful creation, add-ons are listed with the type Catalog App as shown below.
Now that we have created an add-on, you can manage it, including defining values.yaml file by creating a new version.
Selecting the Type
- Navigate to your Project in your Org
- Select Infrastructure and click Add-Ons
- Click the New Add-On drop-down and select Create New Add-On
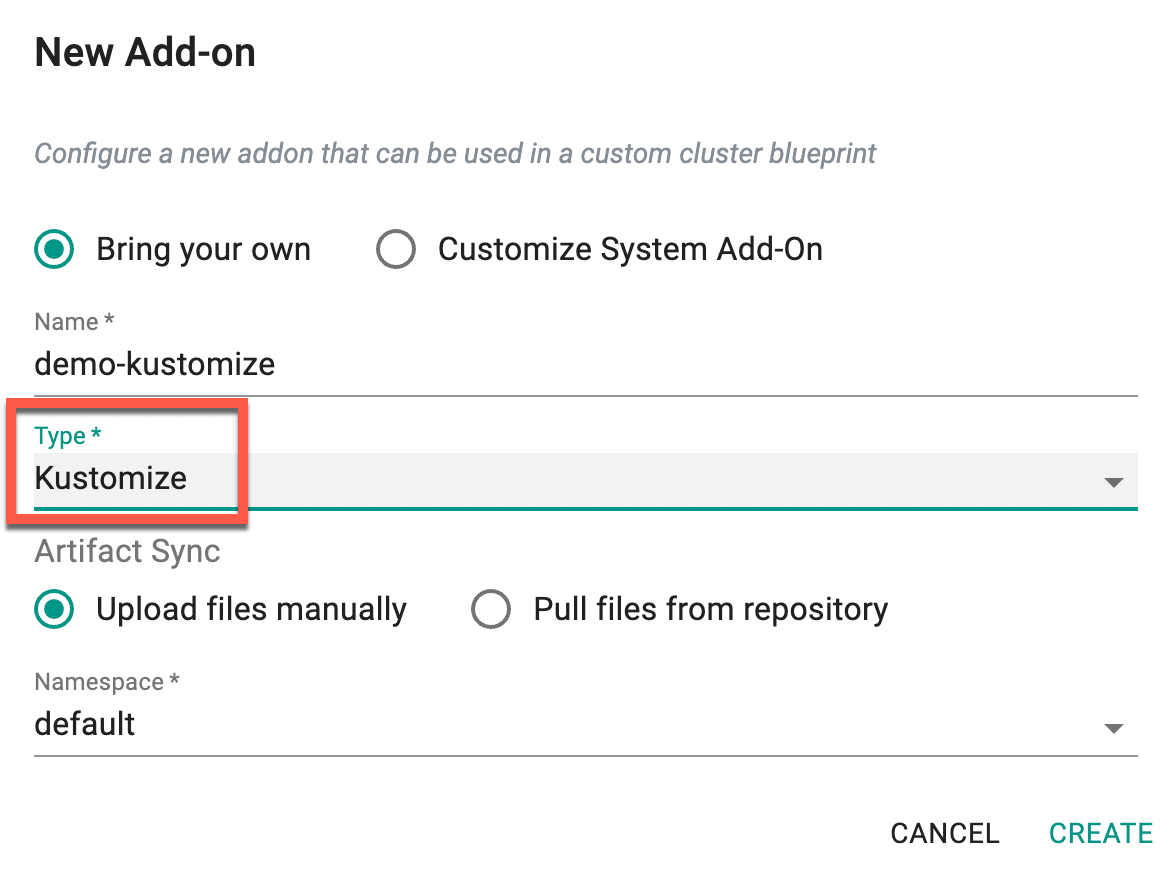
- When the modal opens, enter a name and select Bring Your Own for type
- Provide a name, select package type (k8sYAML or Helm 3 or Kustomize) depending on how you want to package and define your add-on
Artifact Sync Options
Depending on the selected package type, different artifact sync options are available:
- For K8s YAML:
- Upload files manually: Upload YAML files directly from your local system.
- Pull files from repository: Allow the controller to pull YAML artifacts from a Git repository (GitOps workflow).
- Pull file from URL: Provide a direct URL from which the controller can automatically fetch the YAML artifact.
- For Helm 3:
- Upload files manually: Upload Helm chart files directly.
- Pull files from repository: Allow the controller to sync Helm chart artifacts from a Git repository.
- For Kustomize:
- Upload files manually: Upload Helm chart files directly.
- Pull files from repository: Allow the controller to sync Helm chart artifacts from a Git repository.
- Select the namespace where the add-on will be deployed on the cluster.
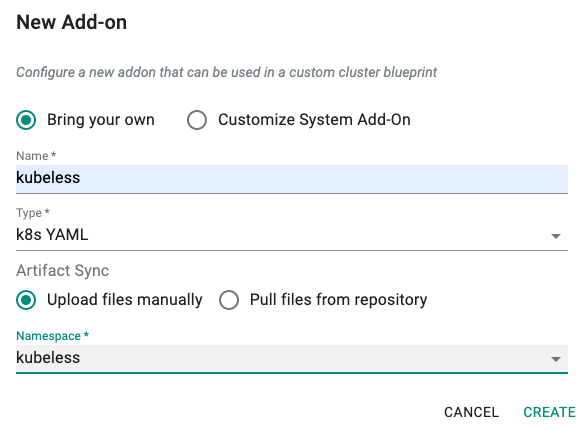
Example 1: In the example below, we are creating an add-on for "kubeless" which is packaged as a Kubernetes yaml file. We want to deploy this into a namespace called "kubeless" and we plan to provide the artifact as a k8s yaml file.
Example 2: In the example below, a new add-on is being created using Kustomize, where the customized manifests are provided as a zipped folder containing the required base and overlay structure.
Managing Custom Add-Ons
Now that you have created the add-on, the next step is to define a version for the add-on which is used for managing certain configurations. Multiple versions/updates of the add-on may be required during the life of an add-ons. Users can manage multiple versions of add-ons. At least one add-on version is required meaning the user will be prompted to "create" a new version the first time an add-on is created.
Version updates differ between the add-on type as well as whether you are uploading your own files or pulling from repository.
K8s YAML
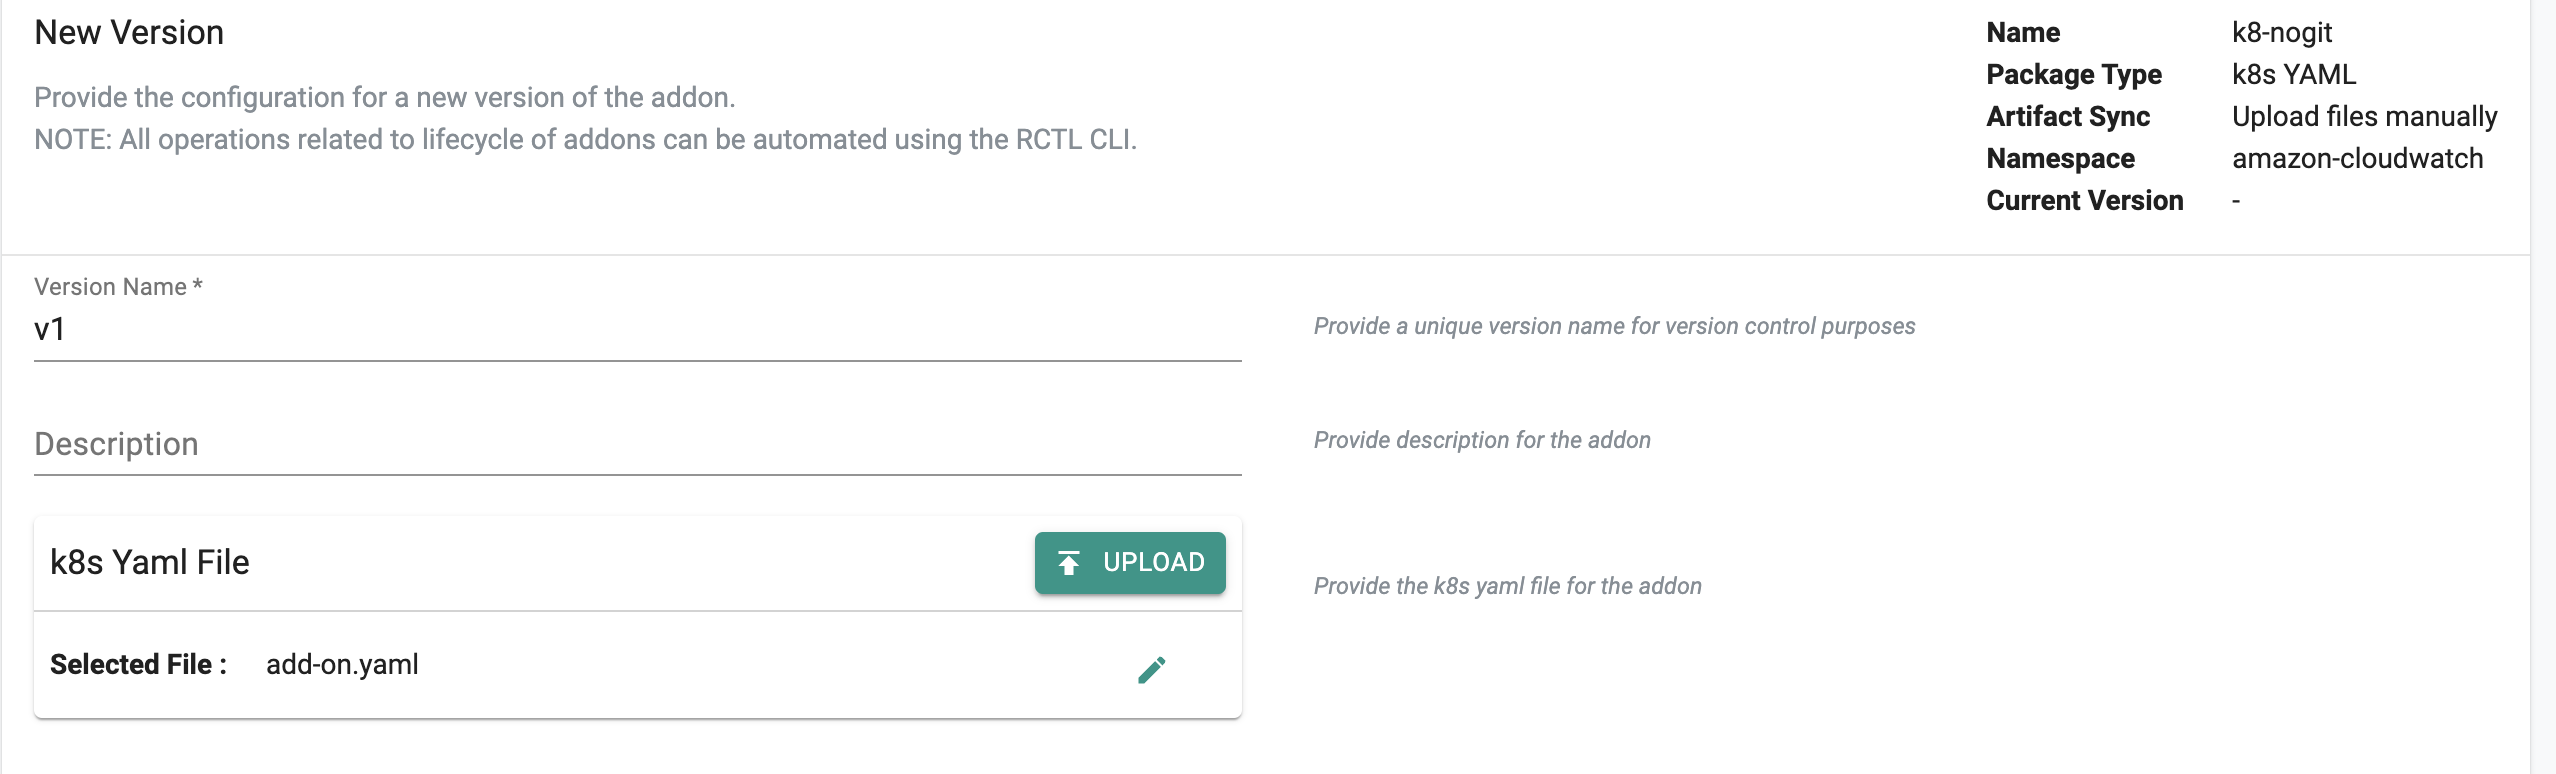
- Click on New Version
- Enter a version name (such as v1) and a description for the add-on version
- Next it's time to provide the artifacts.
Uploading Your Own File
- Simply click the upload button to upload your add-on YAML file.
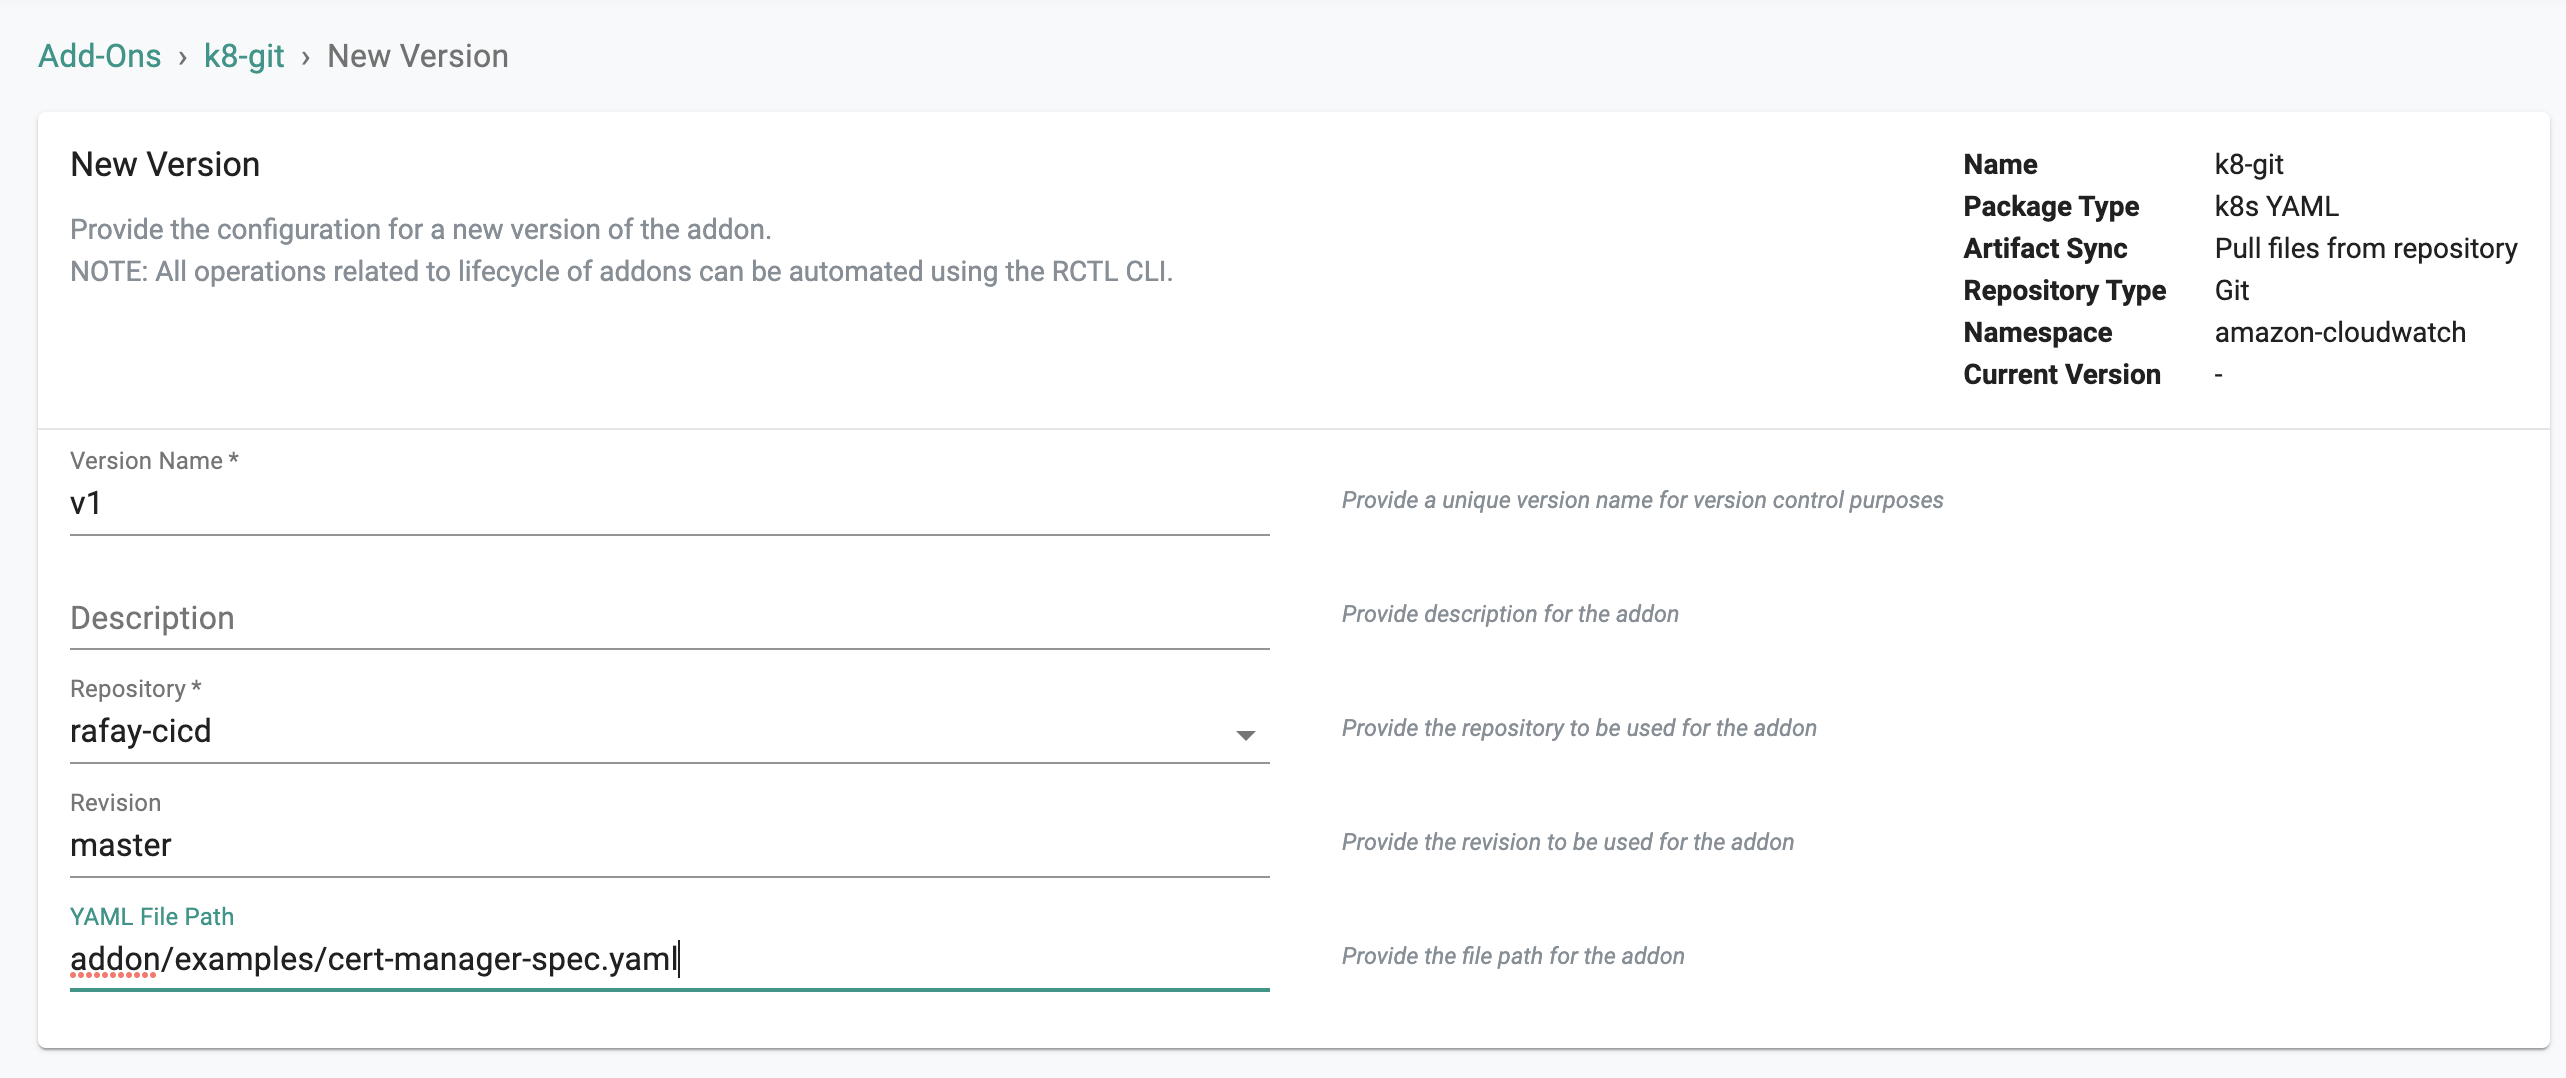
Pulling Files From Git Repository
- Select your repository from the dropdown
- For revision enter the name of the Git branch (for example master)
- Put the file path in Git starting from the root of the branch
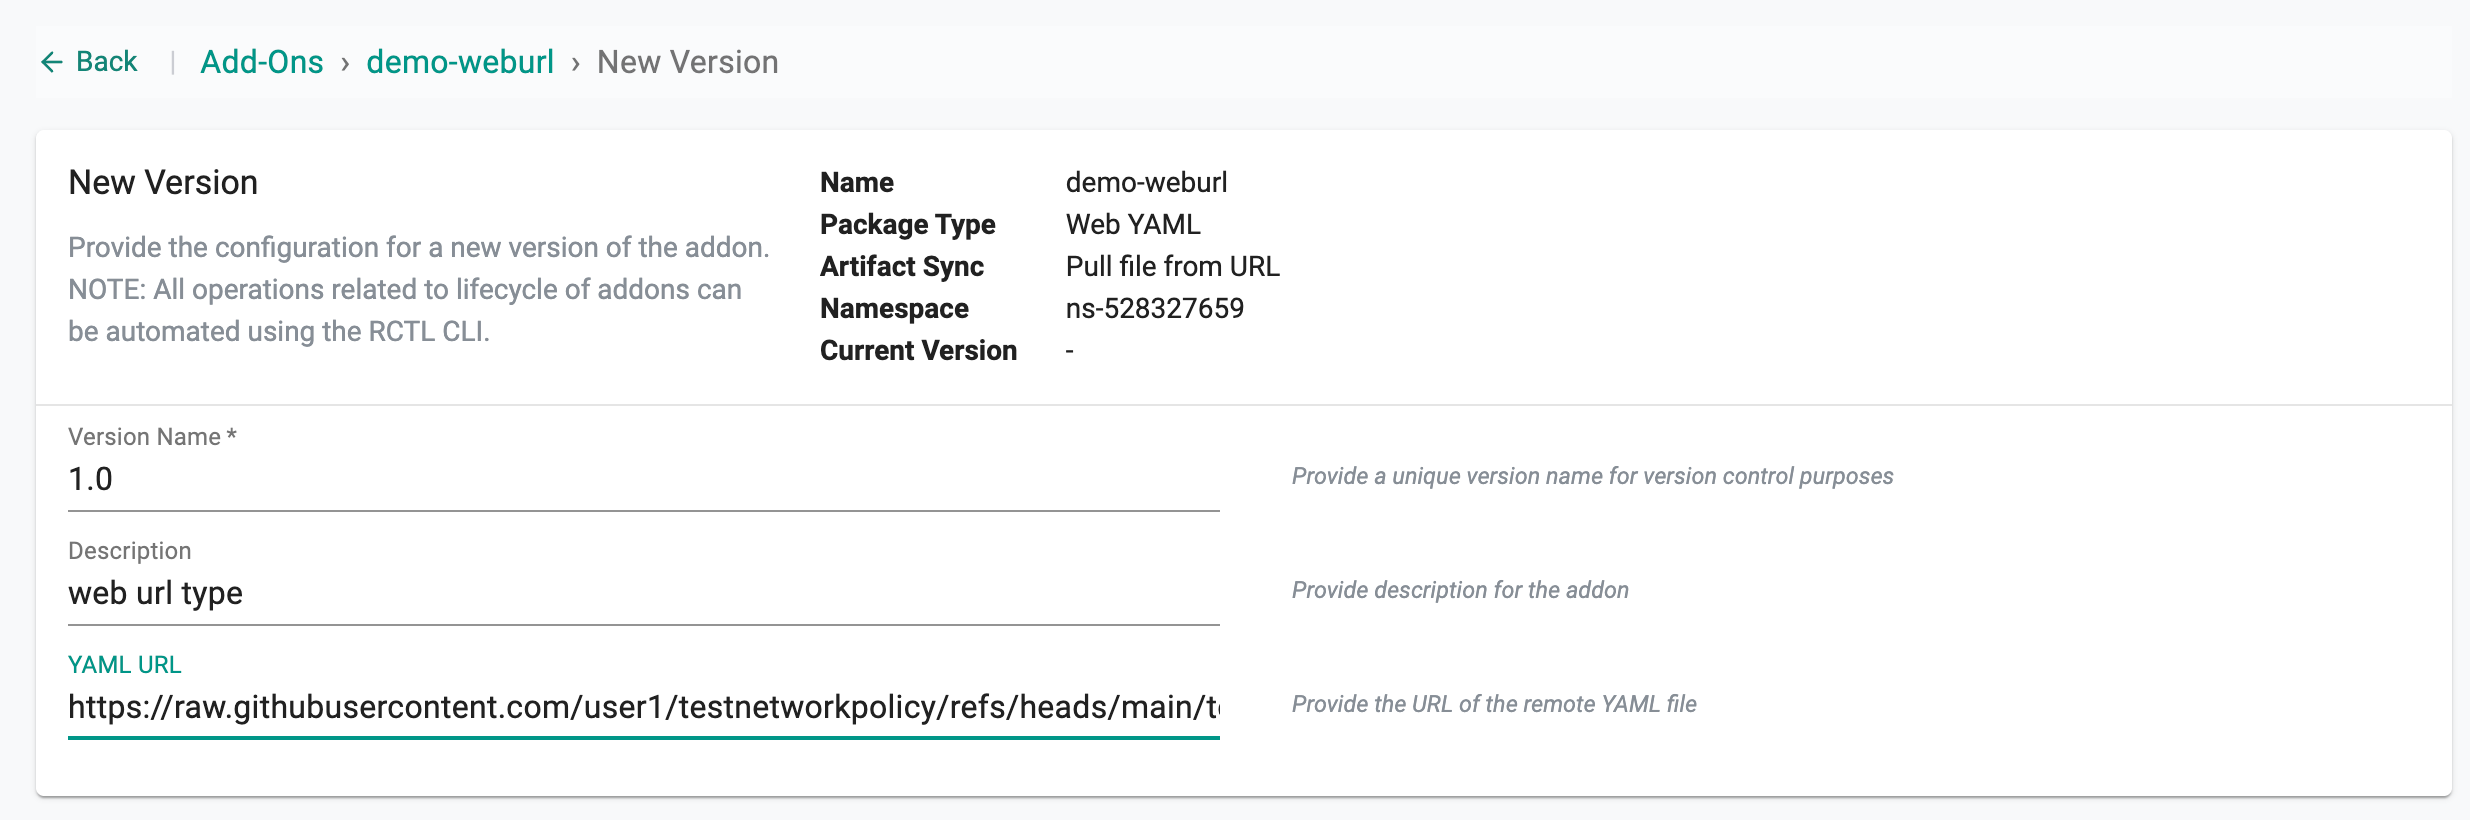
Pulling File From URL
- Enter a Version Name (for example,
1.0) and an optional Description for the add-on version. - In the YAML URL field, provide the complete URL of the remote YAML file.
- The system will automatically fetch the artifact from the provided URL and associate it with this version.
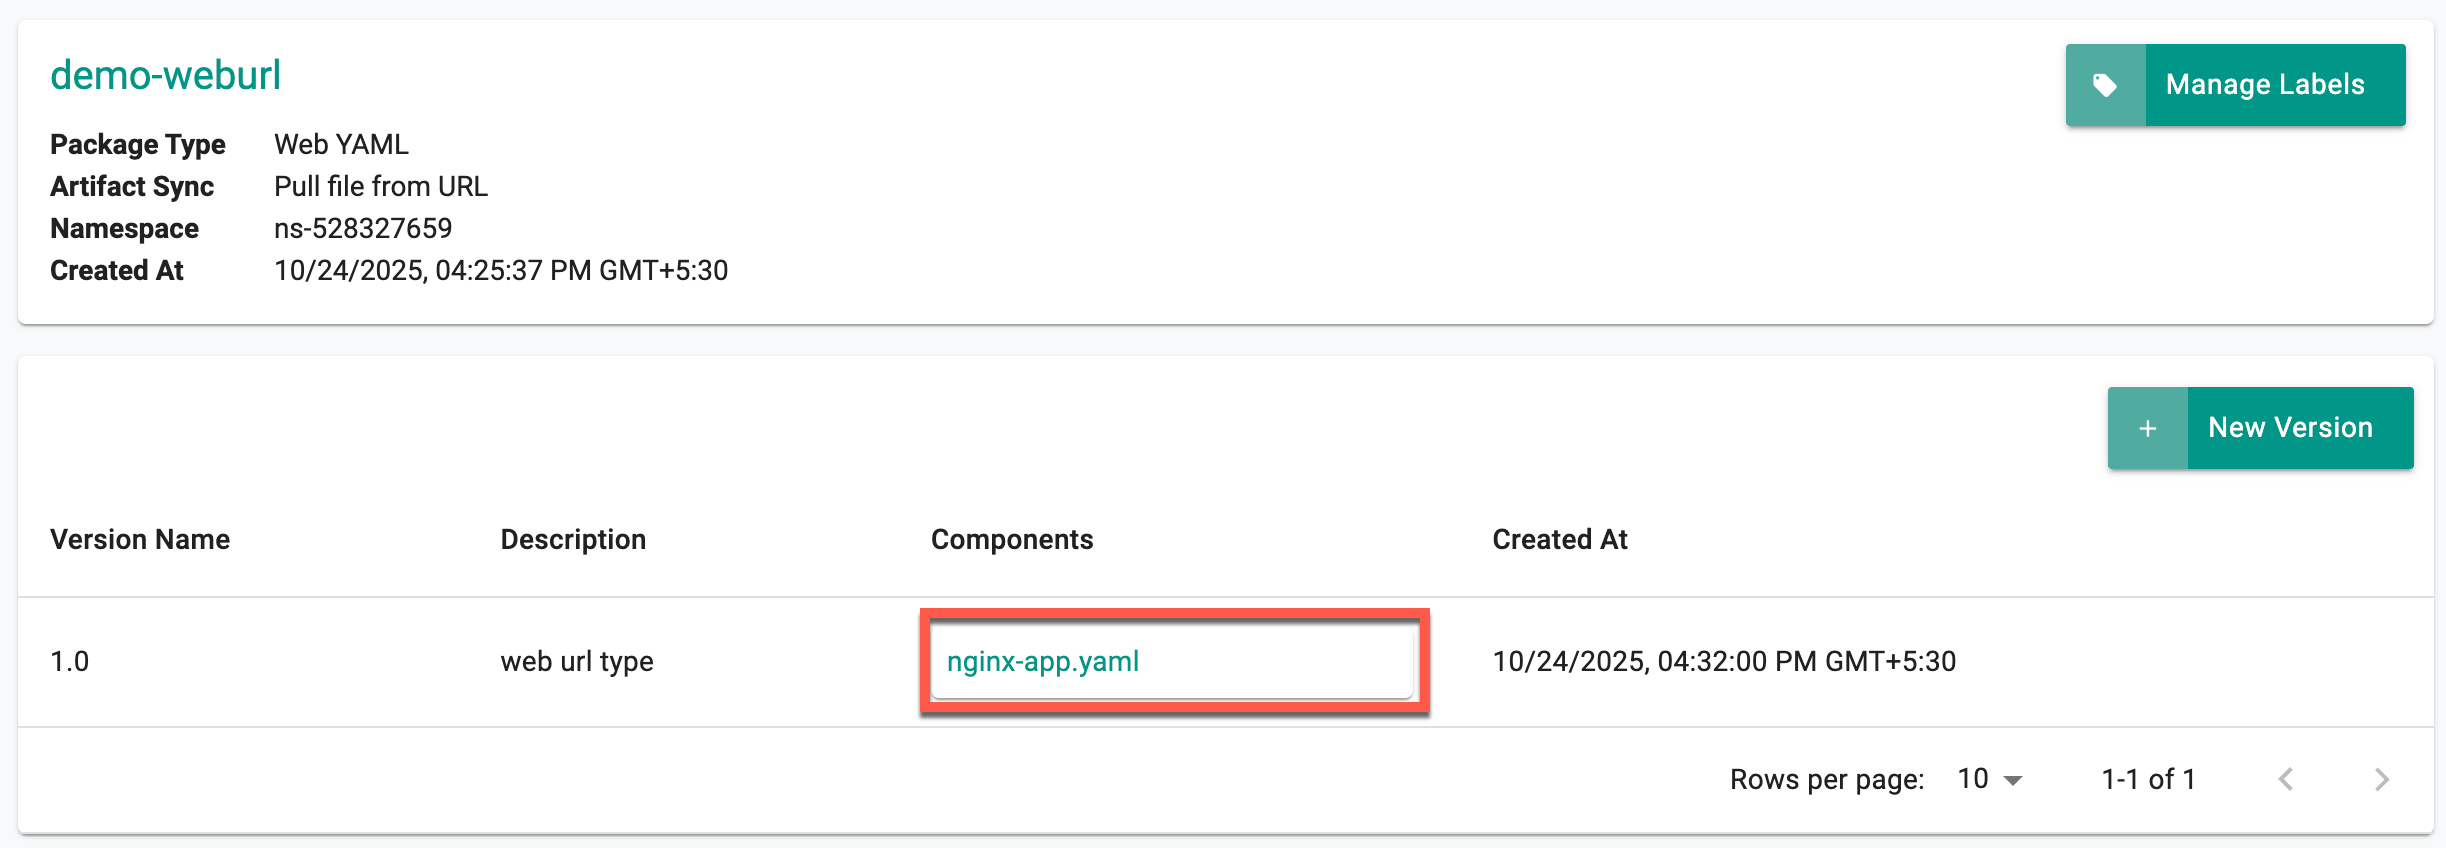
In the example below, the add-on named demo-weburl uses the K8s YAML package type and Pull file from URL artifact sync option. The YAML file is fetched directly from the specified GitHub raw content URL, and the add-on will be deployed in the namespace ns-528327659.
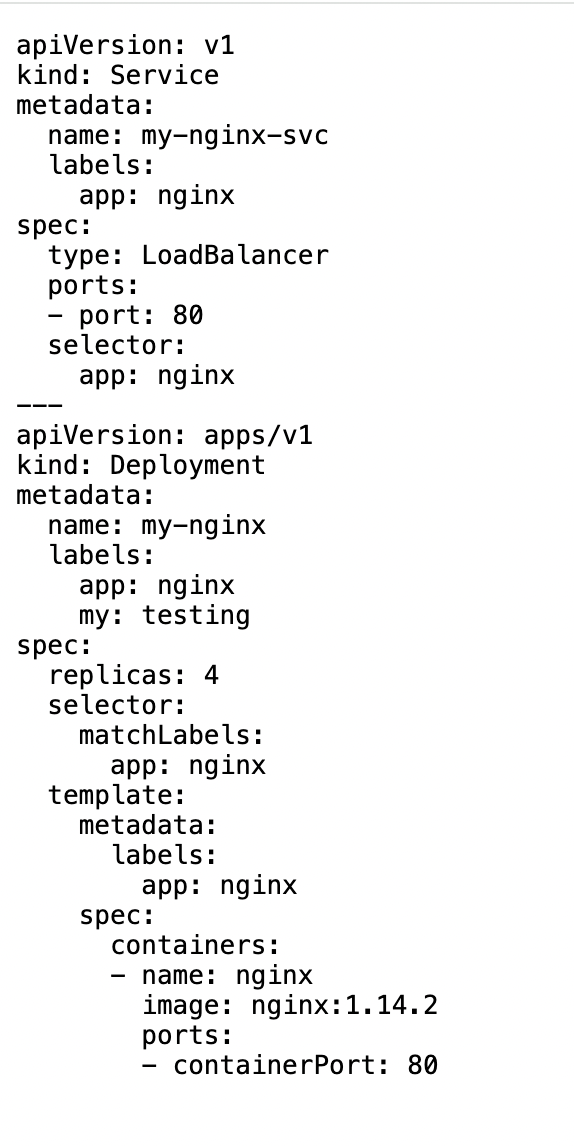
Once a new version is created, the file can be viewed by clicking the link provided, as shown below.
Helm
It's possible to have multiple values.yaml files for the same helm chart. They are processed and applied to the chart in the order they are uploaded.
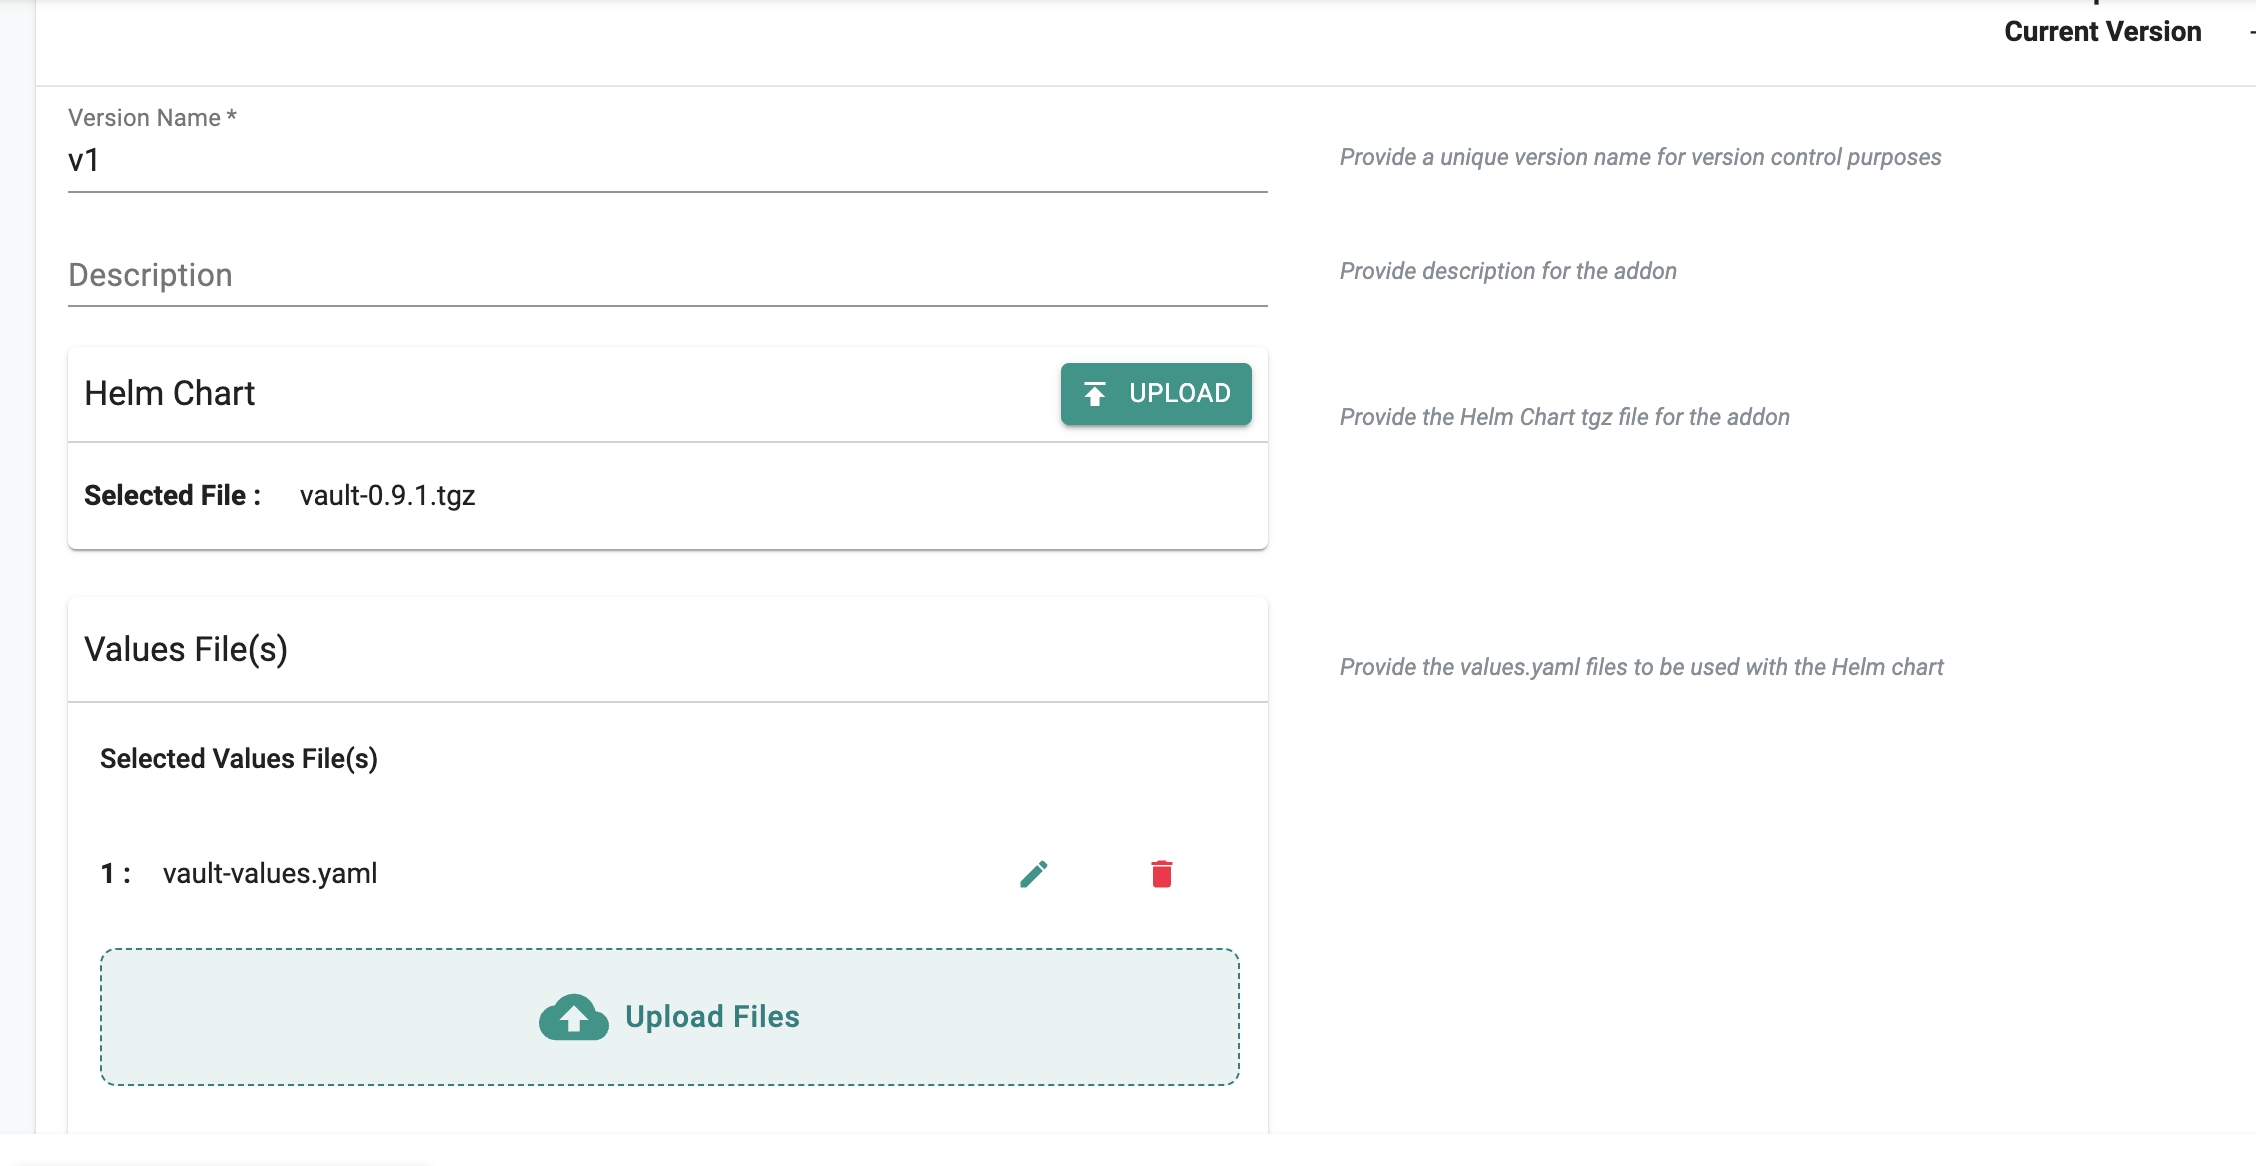
Uploading Your Own File(s)
- Upload the Helm chart bundled in tar .tgz format
- Supply either one or multiple values.yaml files for the same helm chart. It's possible to have multiple values files for the same helm chart. They are processed and applied to the chart in the order they are uploaded.
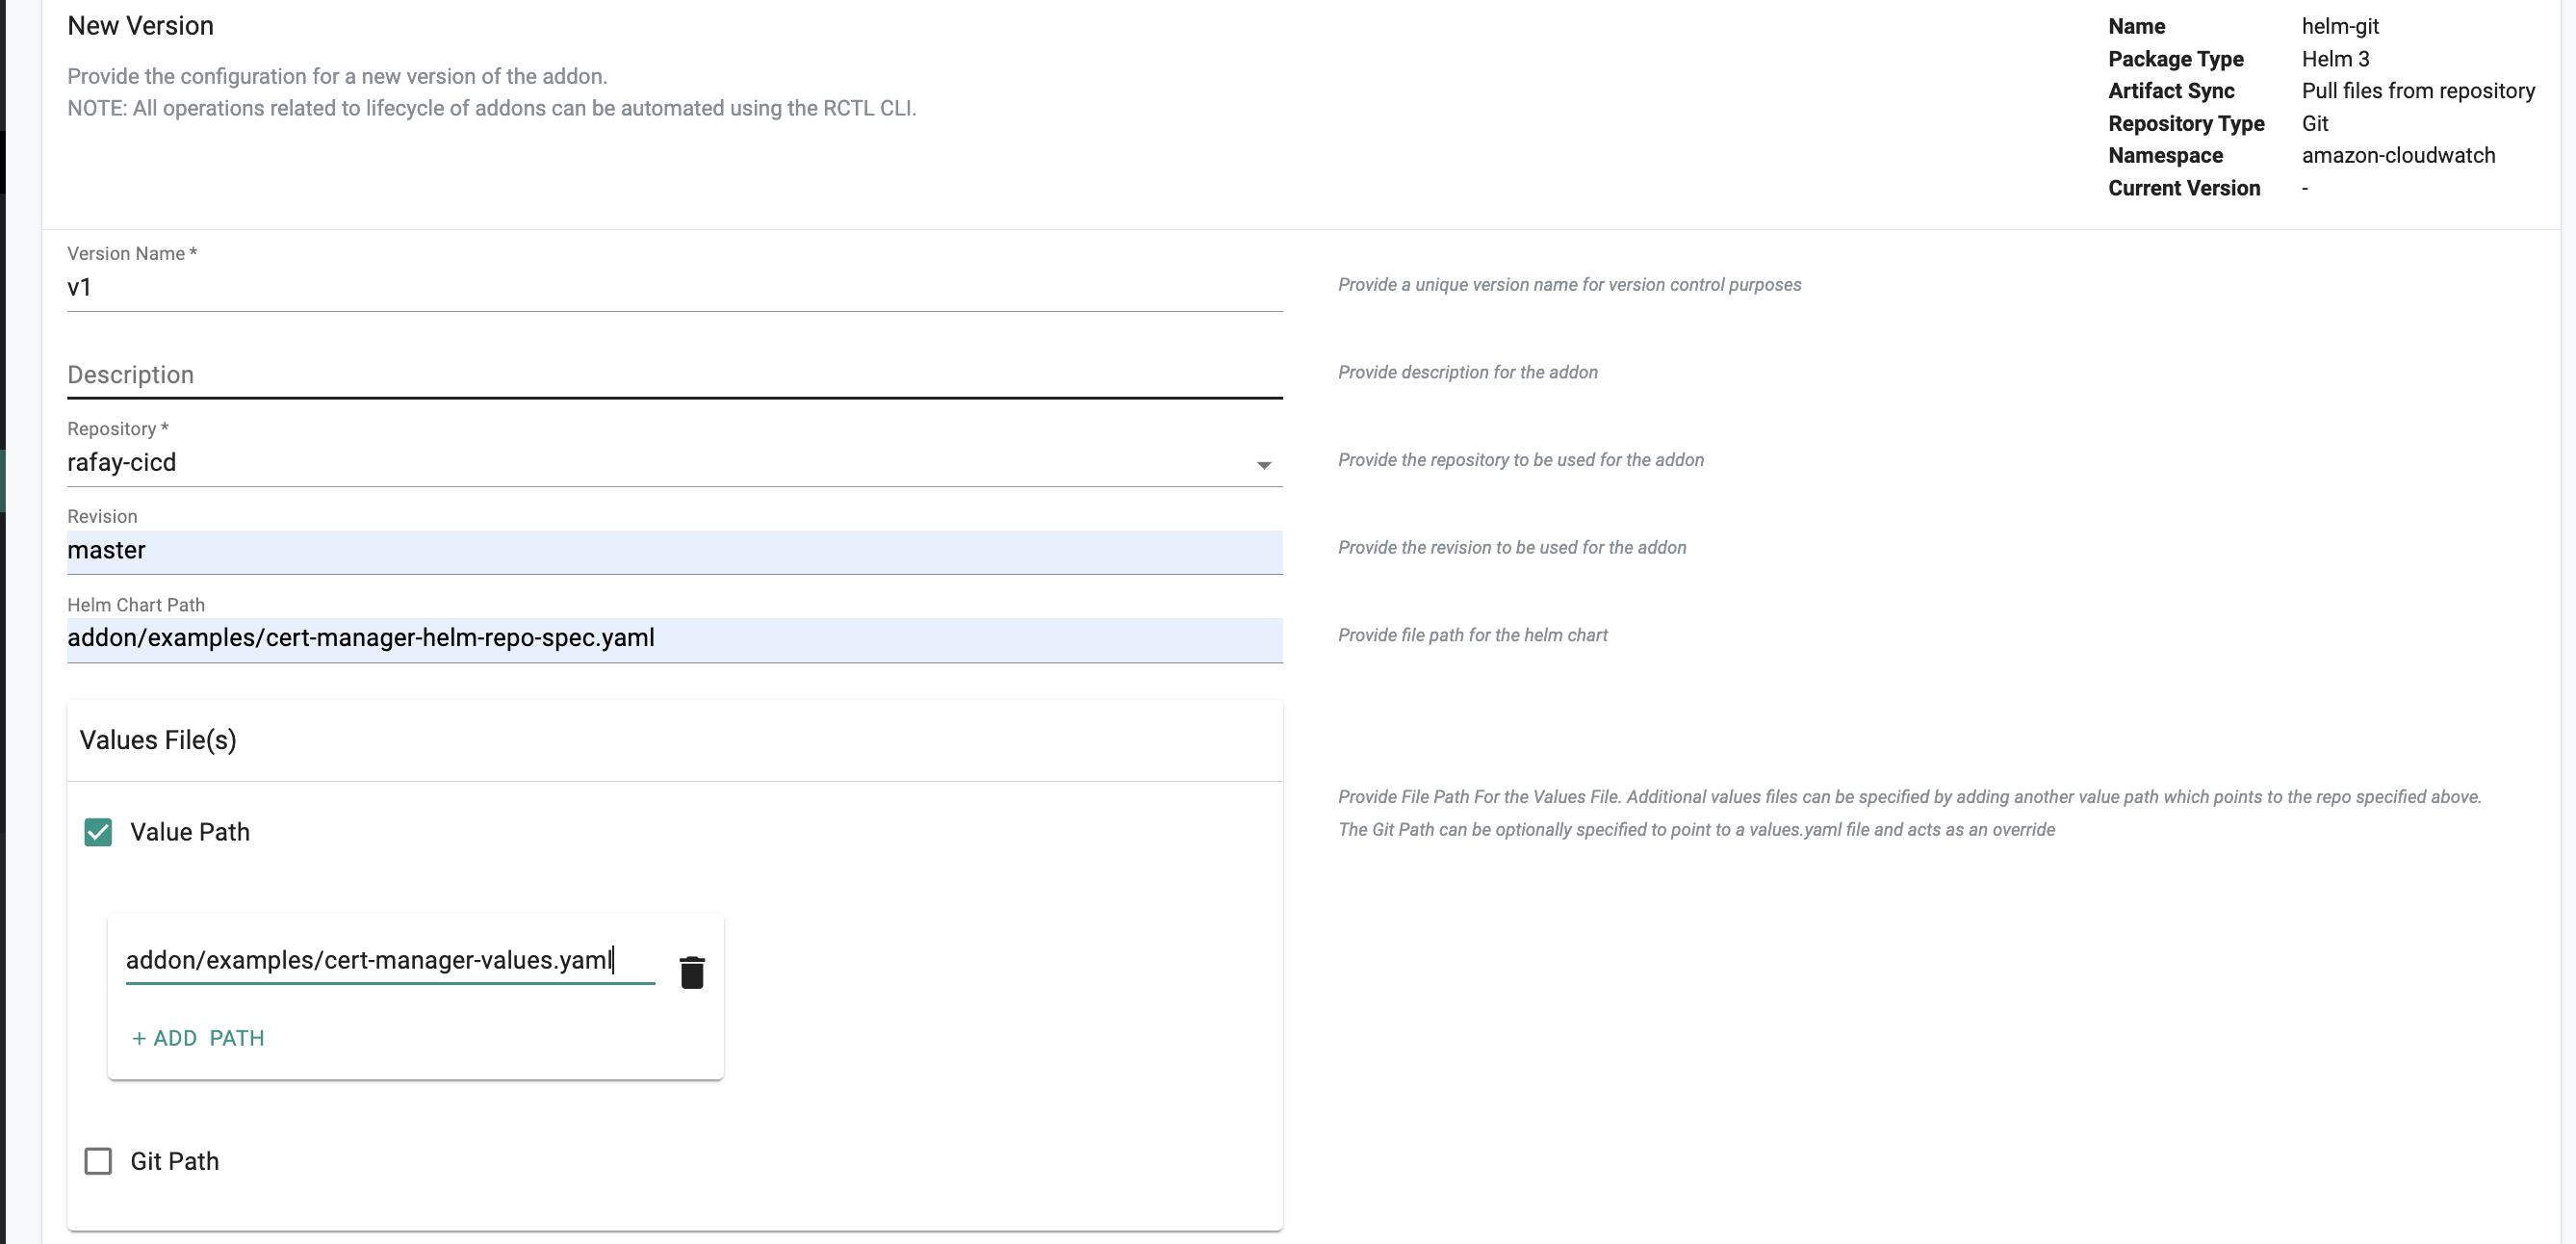
Pulling Files From Git Repository
- Select your repository from the dropdown
- For revision enter the name of the Git branch (for example master)
- Enter the path for the helm chart from your git repo starting from the root
- For the values file(s) you have the following options that you can enable:
1) Value Path: This involves specifying the values.yaml path(s). It's possible to have multiple values files for the same helm chart. They are processed and applied to the chart in the order they are uploaded.
- Simply check Value Path.
- Set the path for your values.yaml file in Git.
- Click Add Path to add more multiple values.yaml files. Make sure the order is in the one you want the values.yaml files to be processed in.
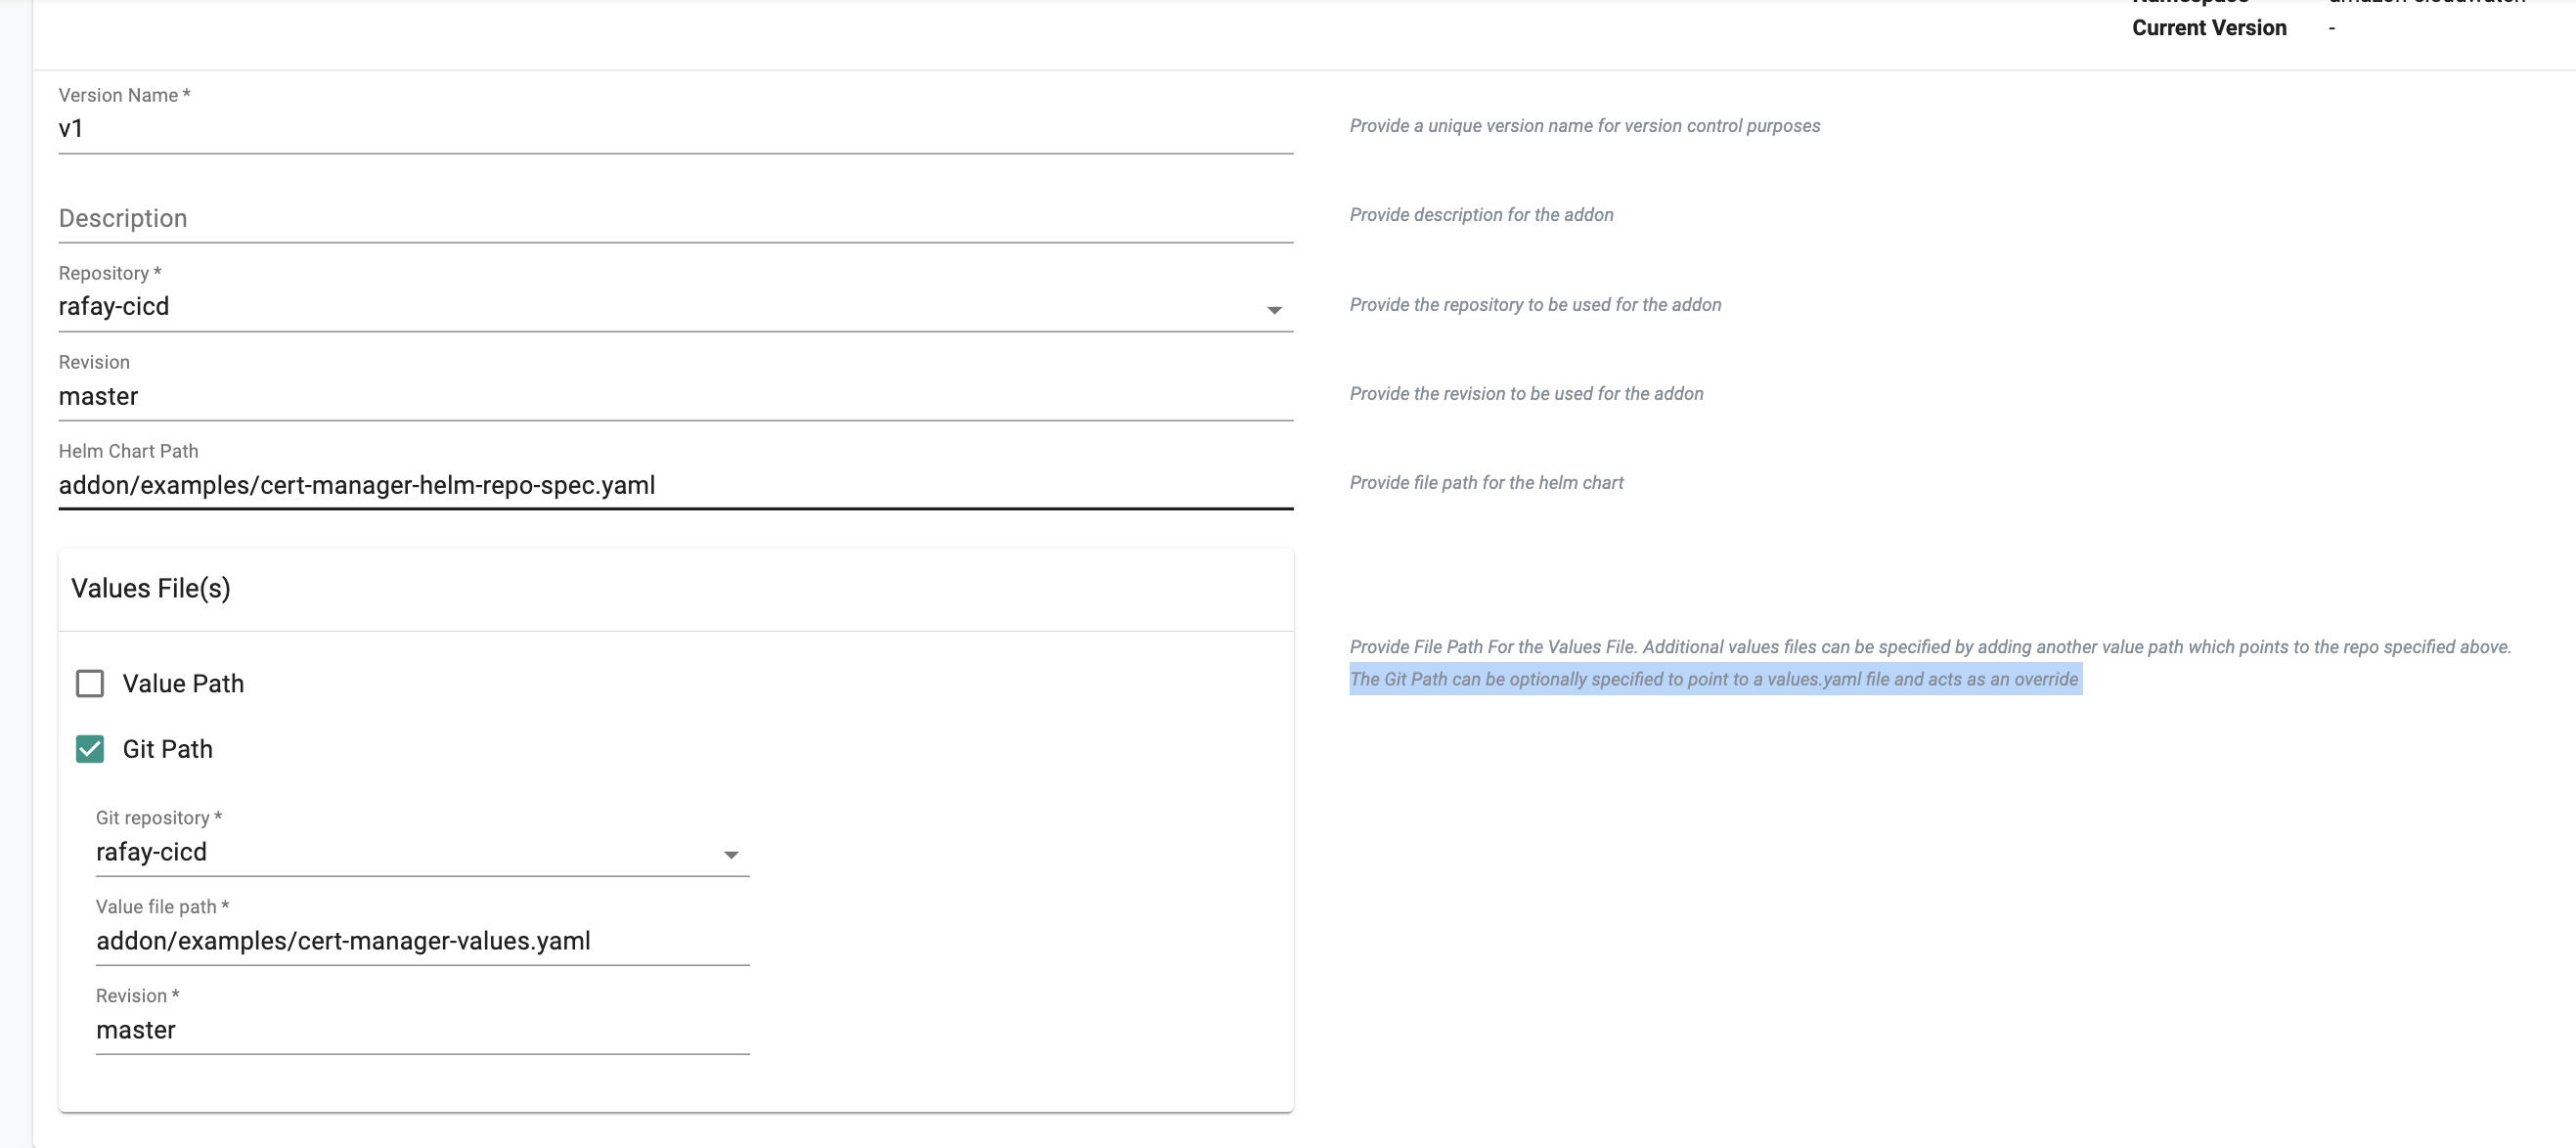
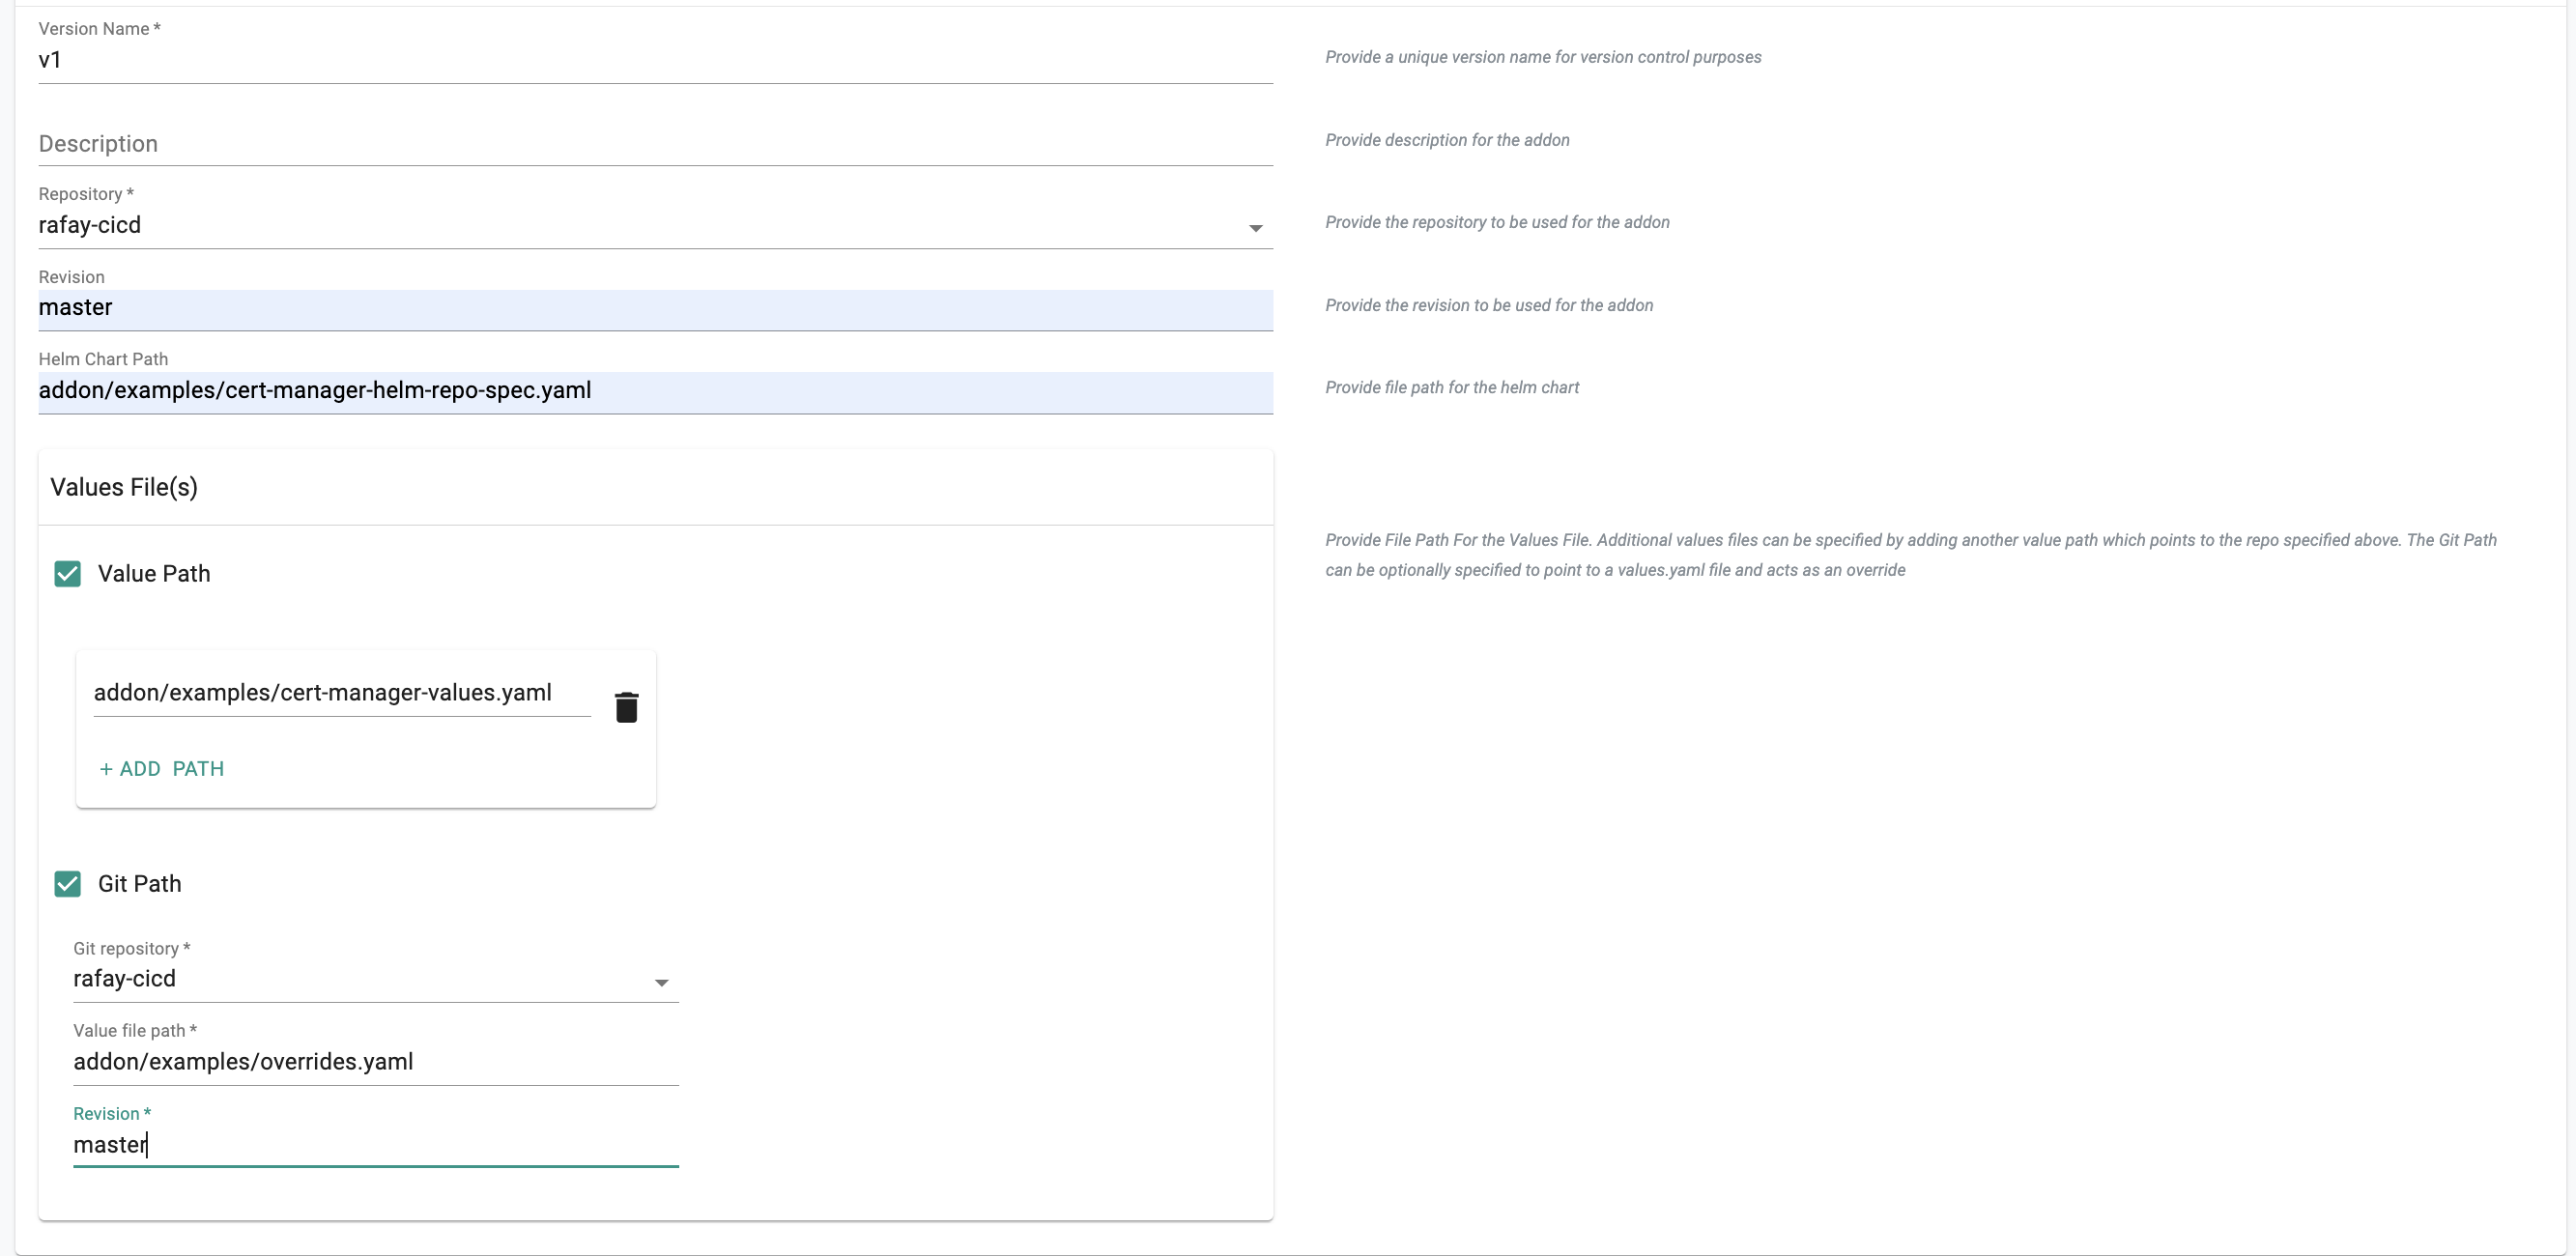
2) Git Path: A Git Path can be optionally specified to point to a values.yaml file. This file can either serve as your core values.yaml file or specifically as an override to override certain values defined in the Helm charts that come from the value path.
- Check Git Path
- Select your Git Repository from the dropdown
- Enter the path for the values YAML file in Git
- Enter the name of the branch (for example master)
The following example below shows when the specified file acts as your core values.yaml file:
The other example below shows when the specified file acts as an override to certain values configured in the value path:
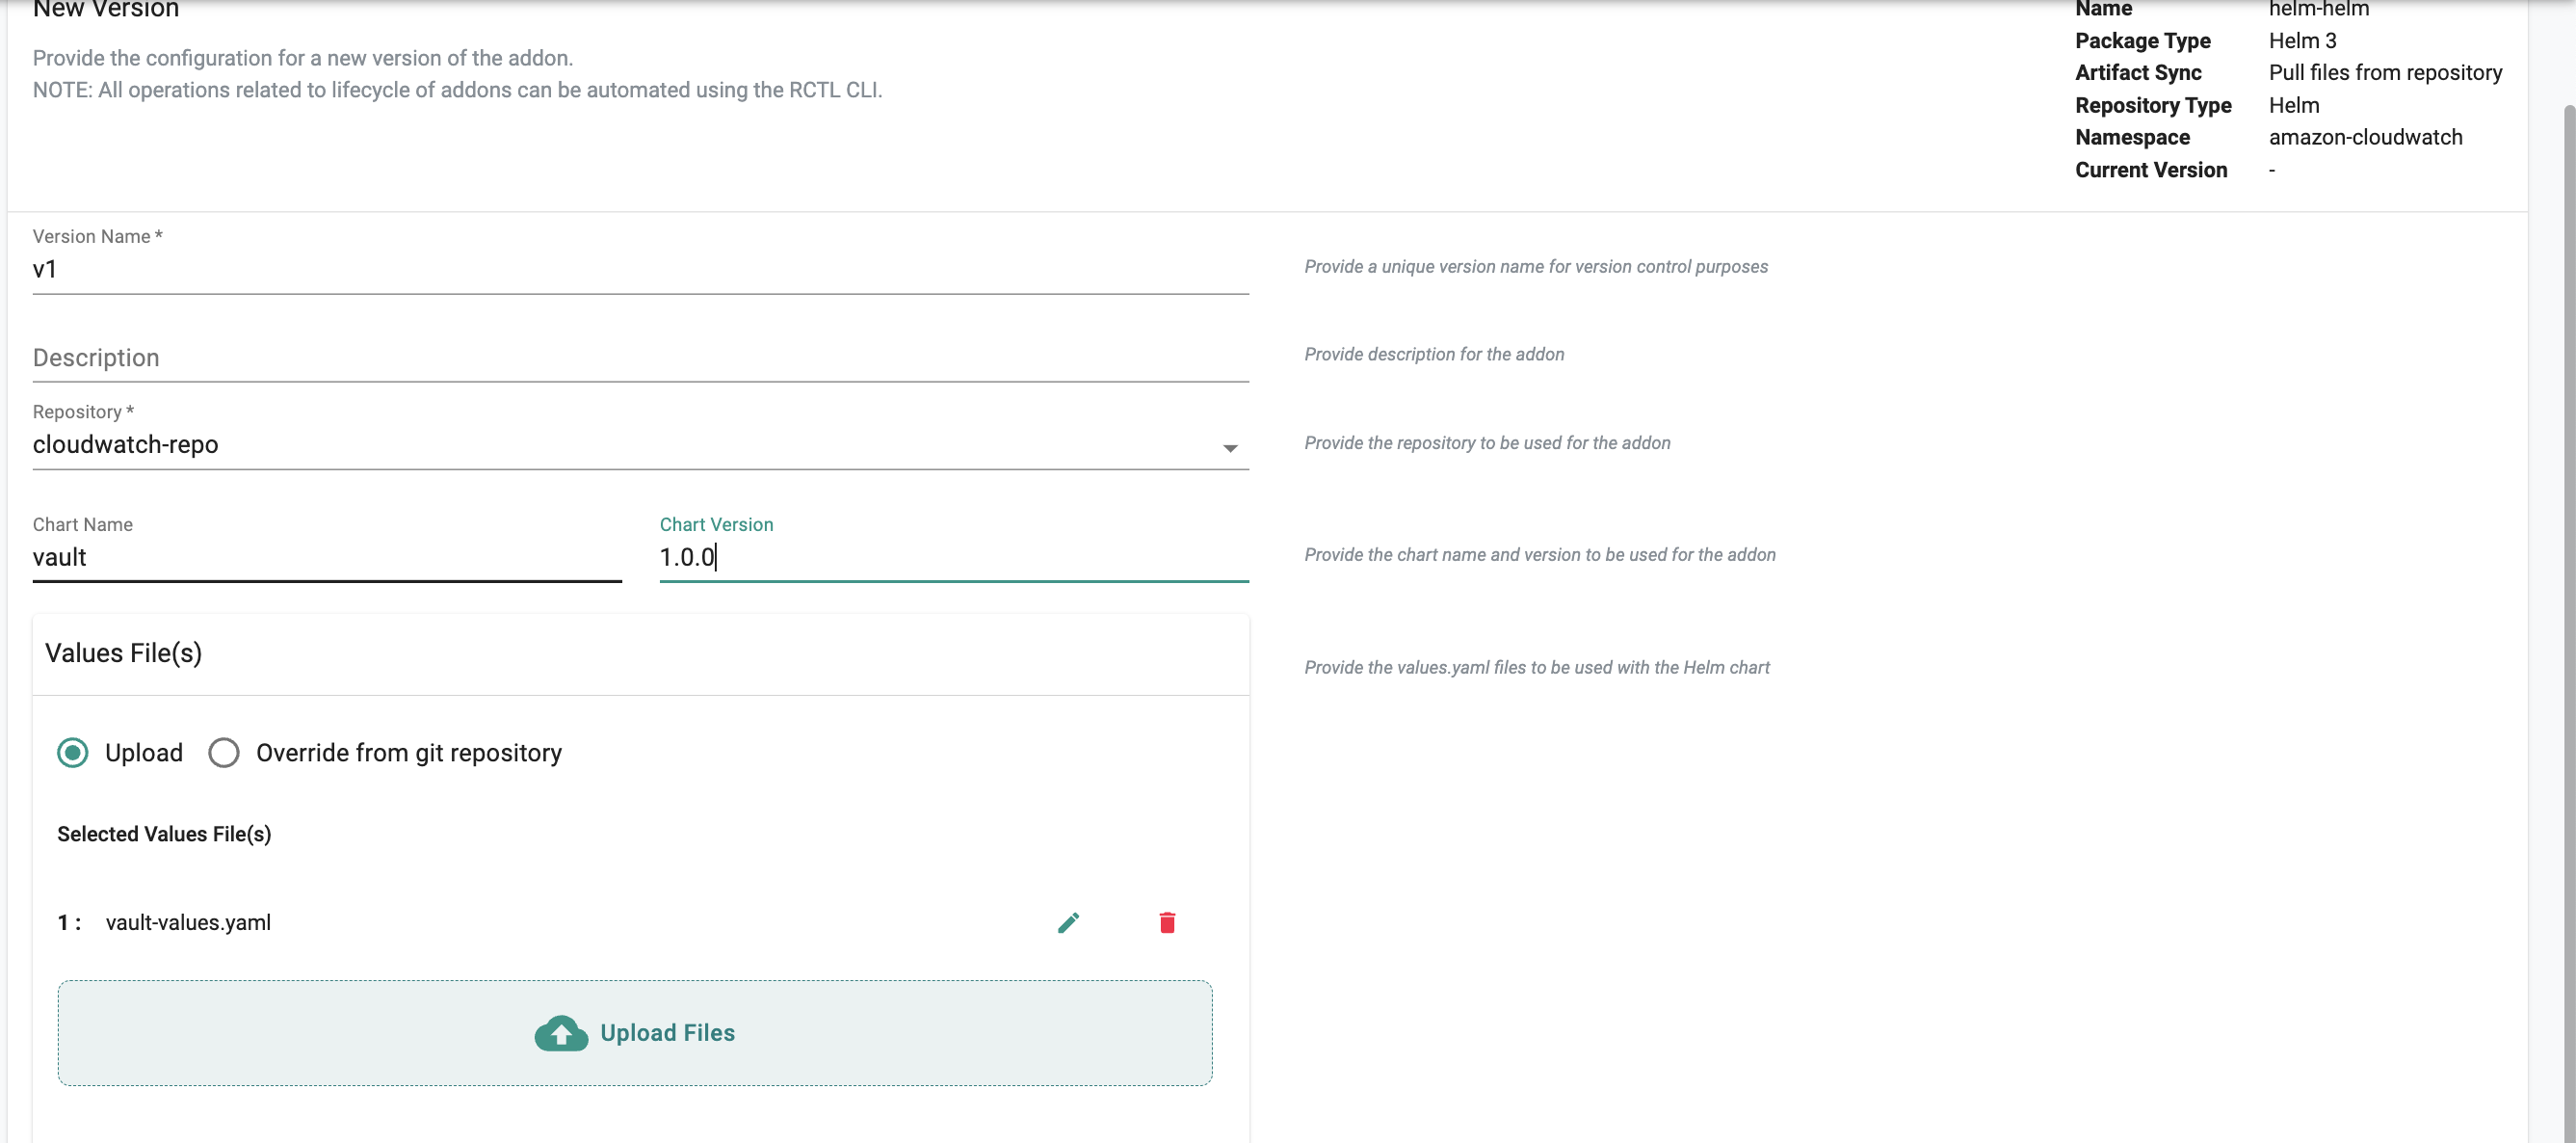
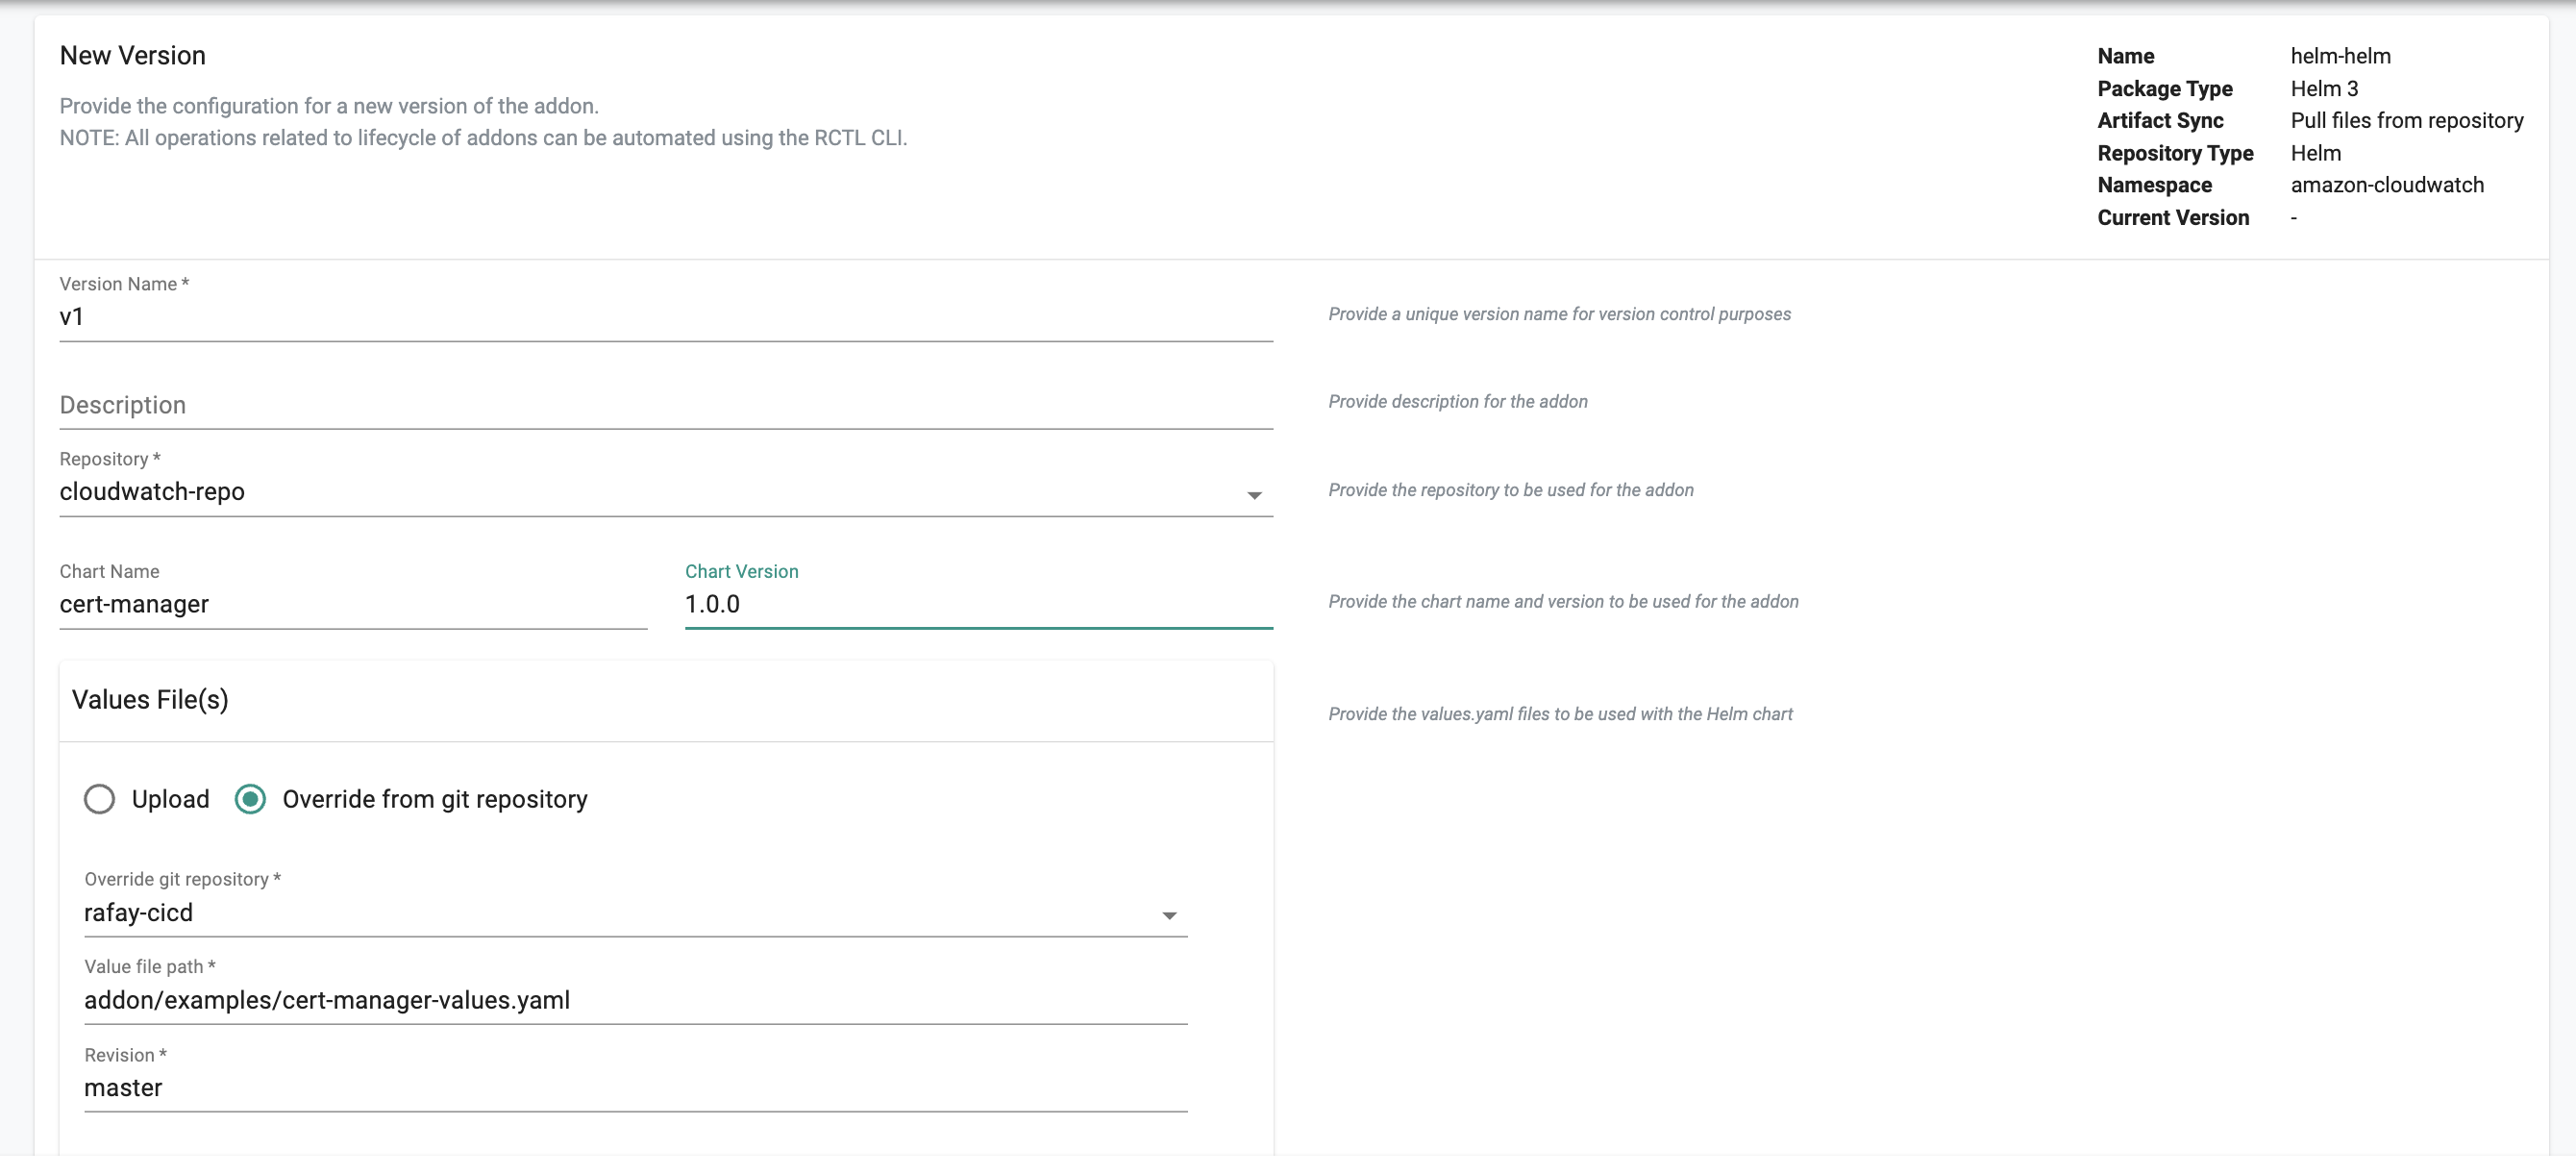
Pulling Files From Helm Repository
- Select your Helm Repository from the dropdown
- Enter the name and version for the chart
- For the values.yaml file(s) it's possible to have multiple values files for the same helm chart. They are processed and applied to the chart in the order they are uploaded. There are two ways to set the values.yaml file(s):
1) Upload: You can upload the values.yaml files from a local machine.
- Check Upload.
- Click Upload Files to upload the values.yaml file(s).
- Use the edit icon to make edits to the file with the in-line editor if necessary.
2) Override From Git Repository: You can also specify a values.yaml file from a Git Repository and have that act as an override.
- Check Override from git repository
- Select the Git repository from the dropdown
- Enter the path for the values.yaml file in your Git repo
- Enter the name of the branch in revision (for example master)
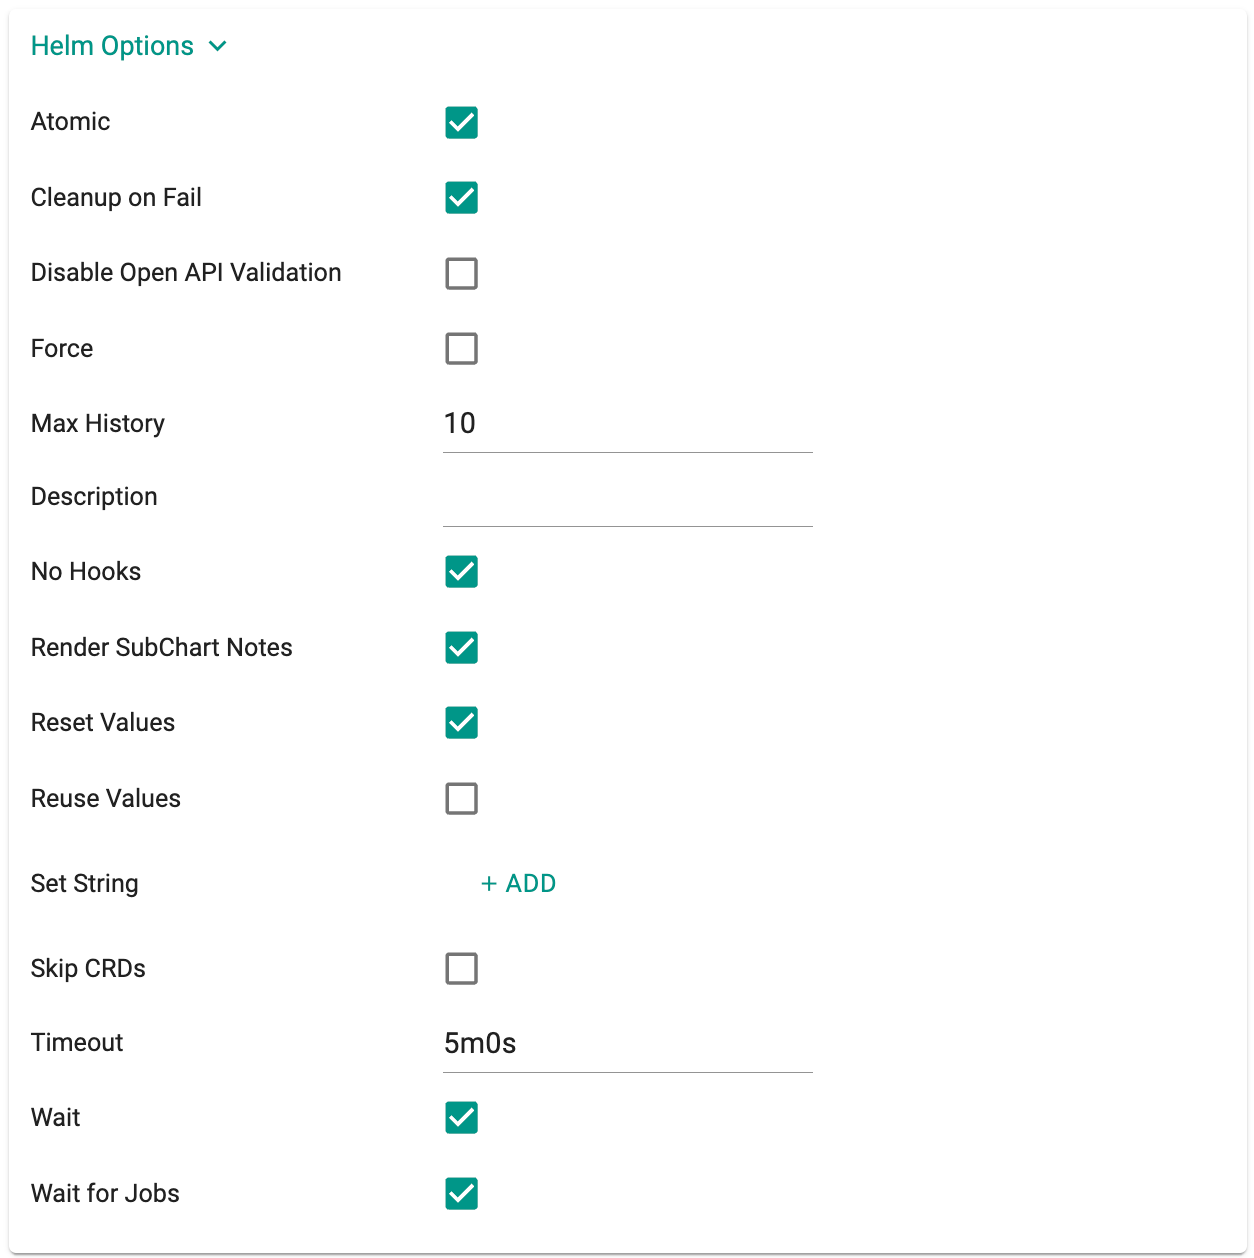
Advanced Helm Options
Support for advanced Helm options is available under "Helm Options".
| Helm Option | Description |
|---|---|
| Atomic | If enabled, upgrade process rolls back changes made in case of failed upgrade. The --wait flag will be set automatically if this option is enabled. It will wait for as long as the configured timeout duration |
| Cleanup on Fail | Allow deletion of new resources as part of the upgrade when upgrade fails |
| Disable Open API Validation | If enabled, the installation/upgrade process will not validate rendered templates against the Kubernetes OpenAPI Schema |
| Force | Force resource updates through a replacement strategy |
| Max History | Limit the maximum number of revisions saved per release, default value is 10 |
| Description | Add a custom description |
| No Hooks | If this option is enabled, pre/post hooks are disabled |
| Render SubChart Notes | If enabled, subchart notes are rendered along with the parent |
| Reset Values | When upgrading, reset the values to the ones built into the chart |
| Reuse Values | When upgrading, reuse the last release's values |
| Set String | set STRING values |
| Skip CRDs | If this option is enabled, no CRDs will be installed. By default, CRDs are installed if not already present |
| Timeout | Time to wait for any individual Kubernetes operation (like Jobs for hooks), default is 5m0s |
| Wait | If enabled, will wait until all Pods, PVCs, Services, and minimum number of Pods of a Deployment, StatefulSet, or ReplicaSet are in a ready state before marking the release as successful. It will wait for as long as the configured timeout duration |
| Wait for Jobs | When configured, it will wait until all Jobs are finished before marking the release as successful. It will wait for as long as the configured timeout duration |
Warning - If the Atomic option is set, upgrade process will roll back changes automatically in case of a failed upgrade. Please make sure to specify an appropriate timeout (default is 5 min) if you want to set the Atomic option. More information on Advanced Helm Options is available here - When the timeout is set to 0, a default Addon Timeout of 60 minutes is applied to prevent infinite wait loops. If configured with a higher timeout and the Helm chart encounters issues (e.g., in pre-hooks), the blueprint may remain stuck for that duration. It is recommended to set a reasonable timeout to avoid extended delays.
Kustomize
Kustomize provides a Kubernetes-native approach for defining and managing add-ons by building manifests from a set of YAML files and applying configuration transformations. It allows managing environment-specific variations, such as production, staging, or development, within a single packaged structure.
Uploading Your Own File(s)
- Upload the Kustomize package bundled as a zipped (
.zip) or tarred (.tar) file. - The uploaded package should include the necessary configuration files and their corresponding
kustomization.yaml. - Provide the Kustomize path (for example,
productionorstaging) that points to the specific configuration to be applied during deployment. - The uploaded package represents a version that can be managed and updated as needed.
Example Folder Structure
my-kustomize-folder/
├── common/
│   ├── deployment.yaml
│   ├── service.yaml
│   └── kustomization.yaml
├── dev/
│   └── kustomization.yaml
├── staging/
│   └── kustomization.yaml
└── production/
    └── kustomization.yaml
In this example:
- The folder includes a common configuration and additional environment-specific variations.
- Each configuration folder (for example,
dev,staging,production) contains its ownkustomization.yamlfile. - When uploading, compress the entire folder (for example,
my-kustomize-folder.zip) and specify the path to the appropriatekustomization.yamlfile (for example,production/kustomization.yaml).
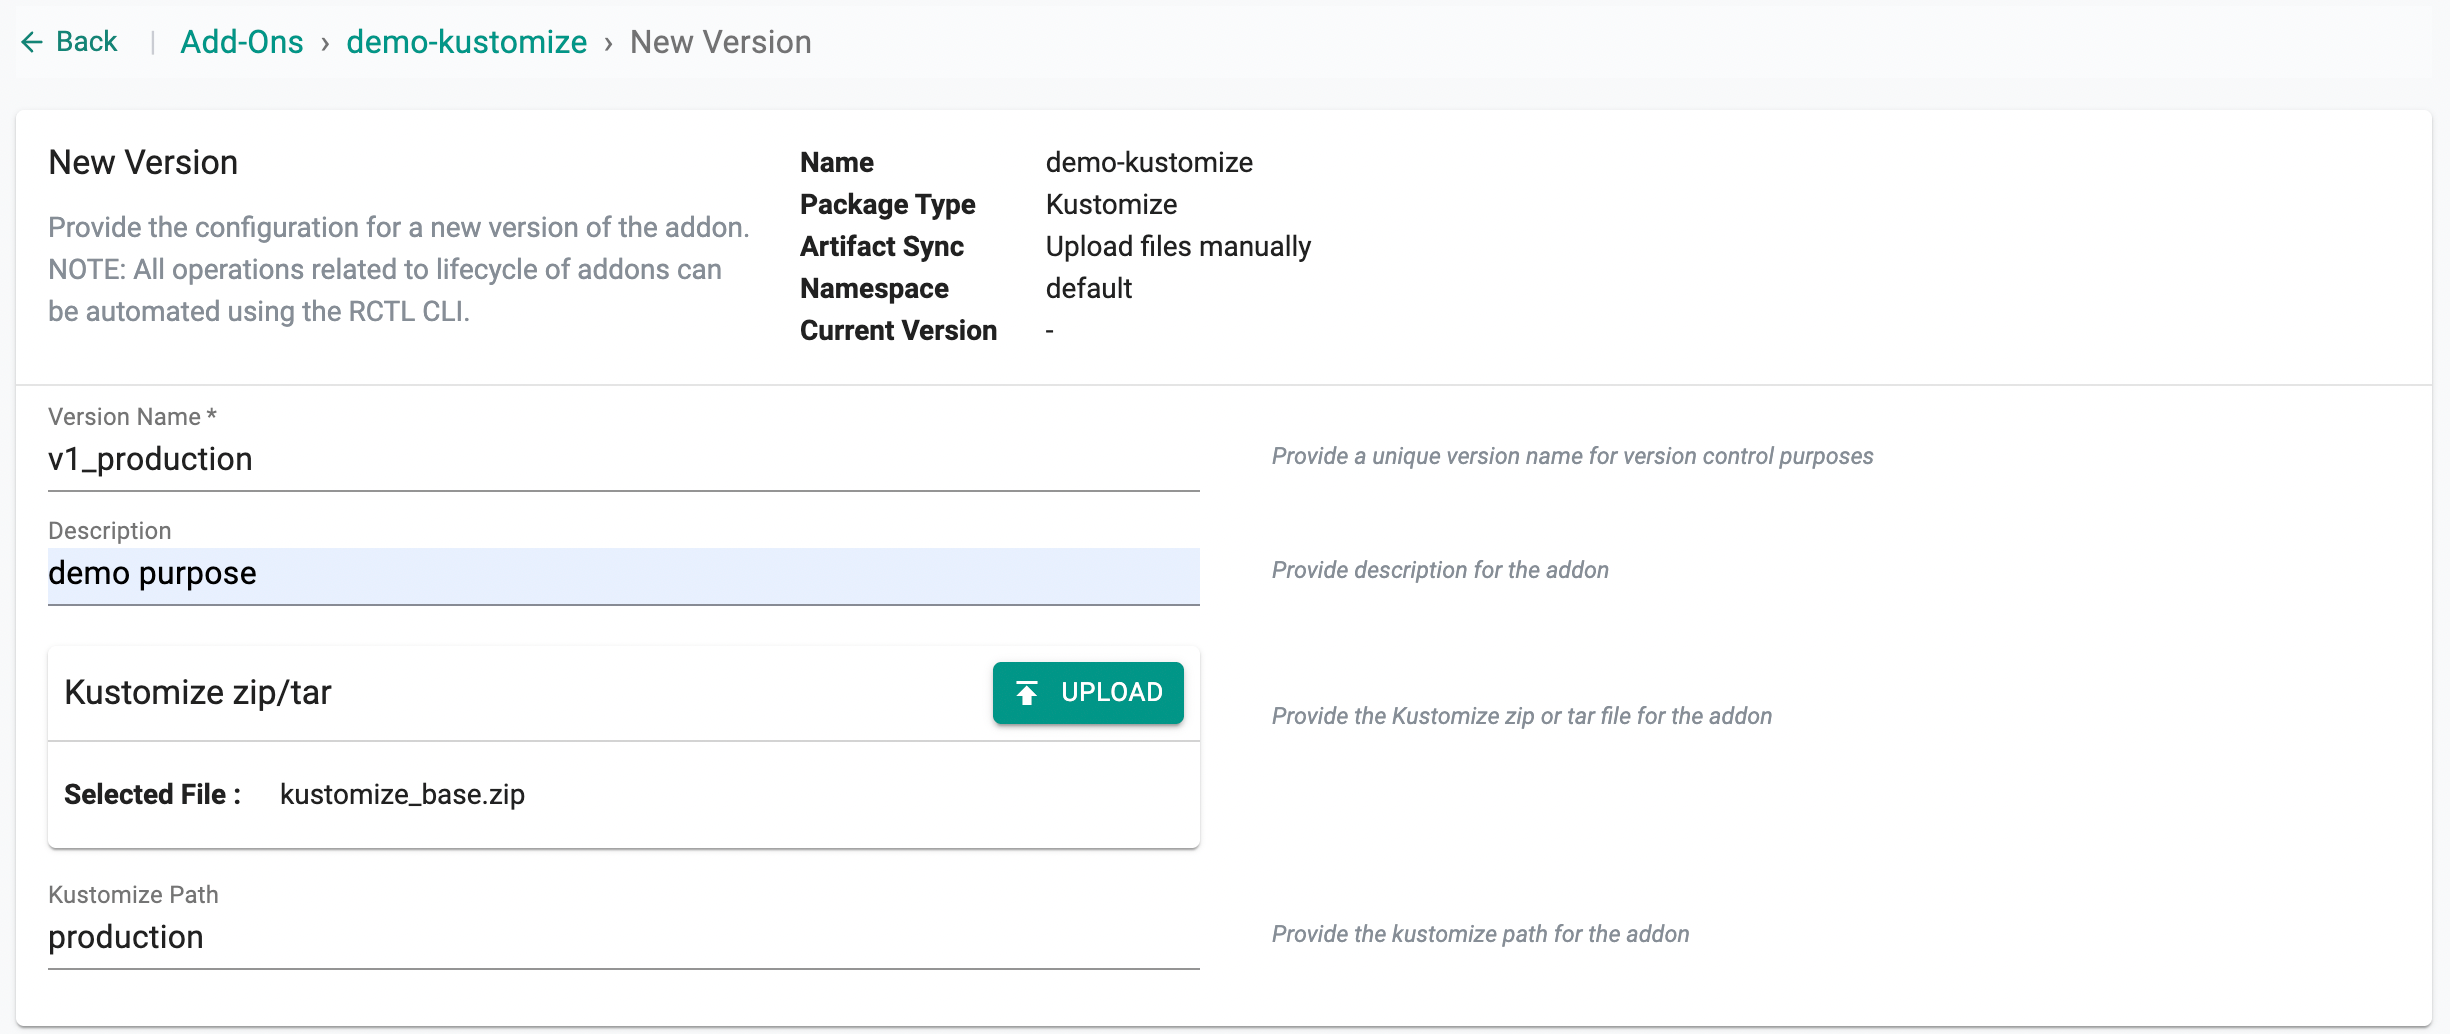
In the example shown, a new version named v1_production is created by uploading a zipped folder (kustomize_config.zip) containing the configuration files, with the deployment path set to production.
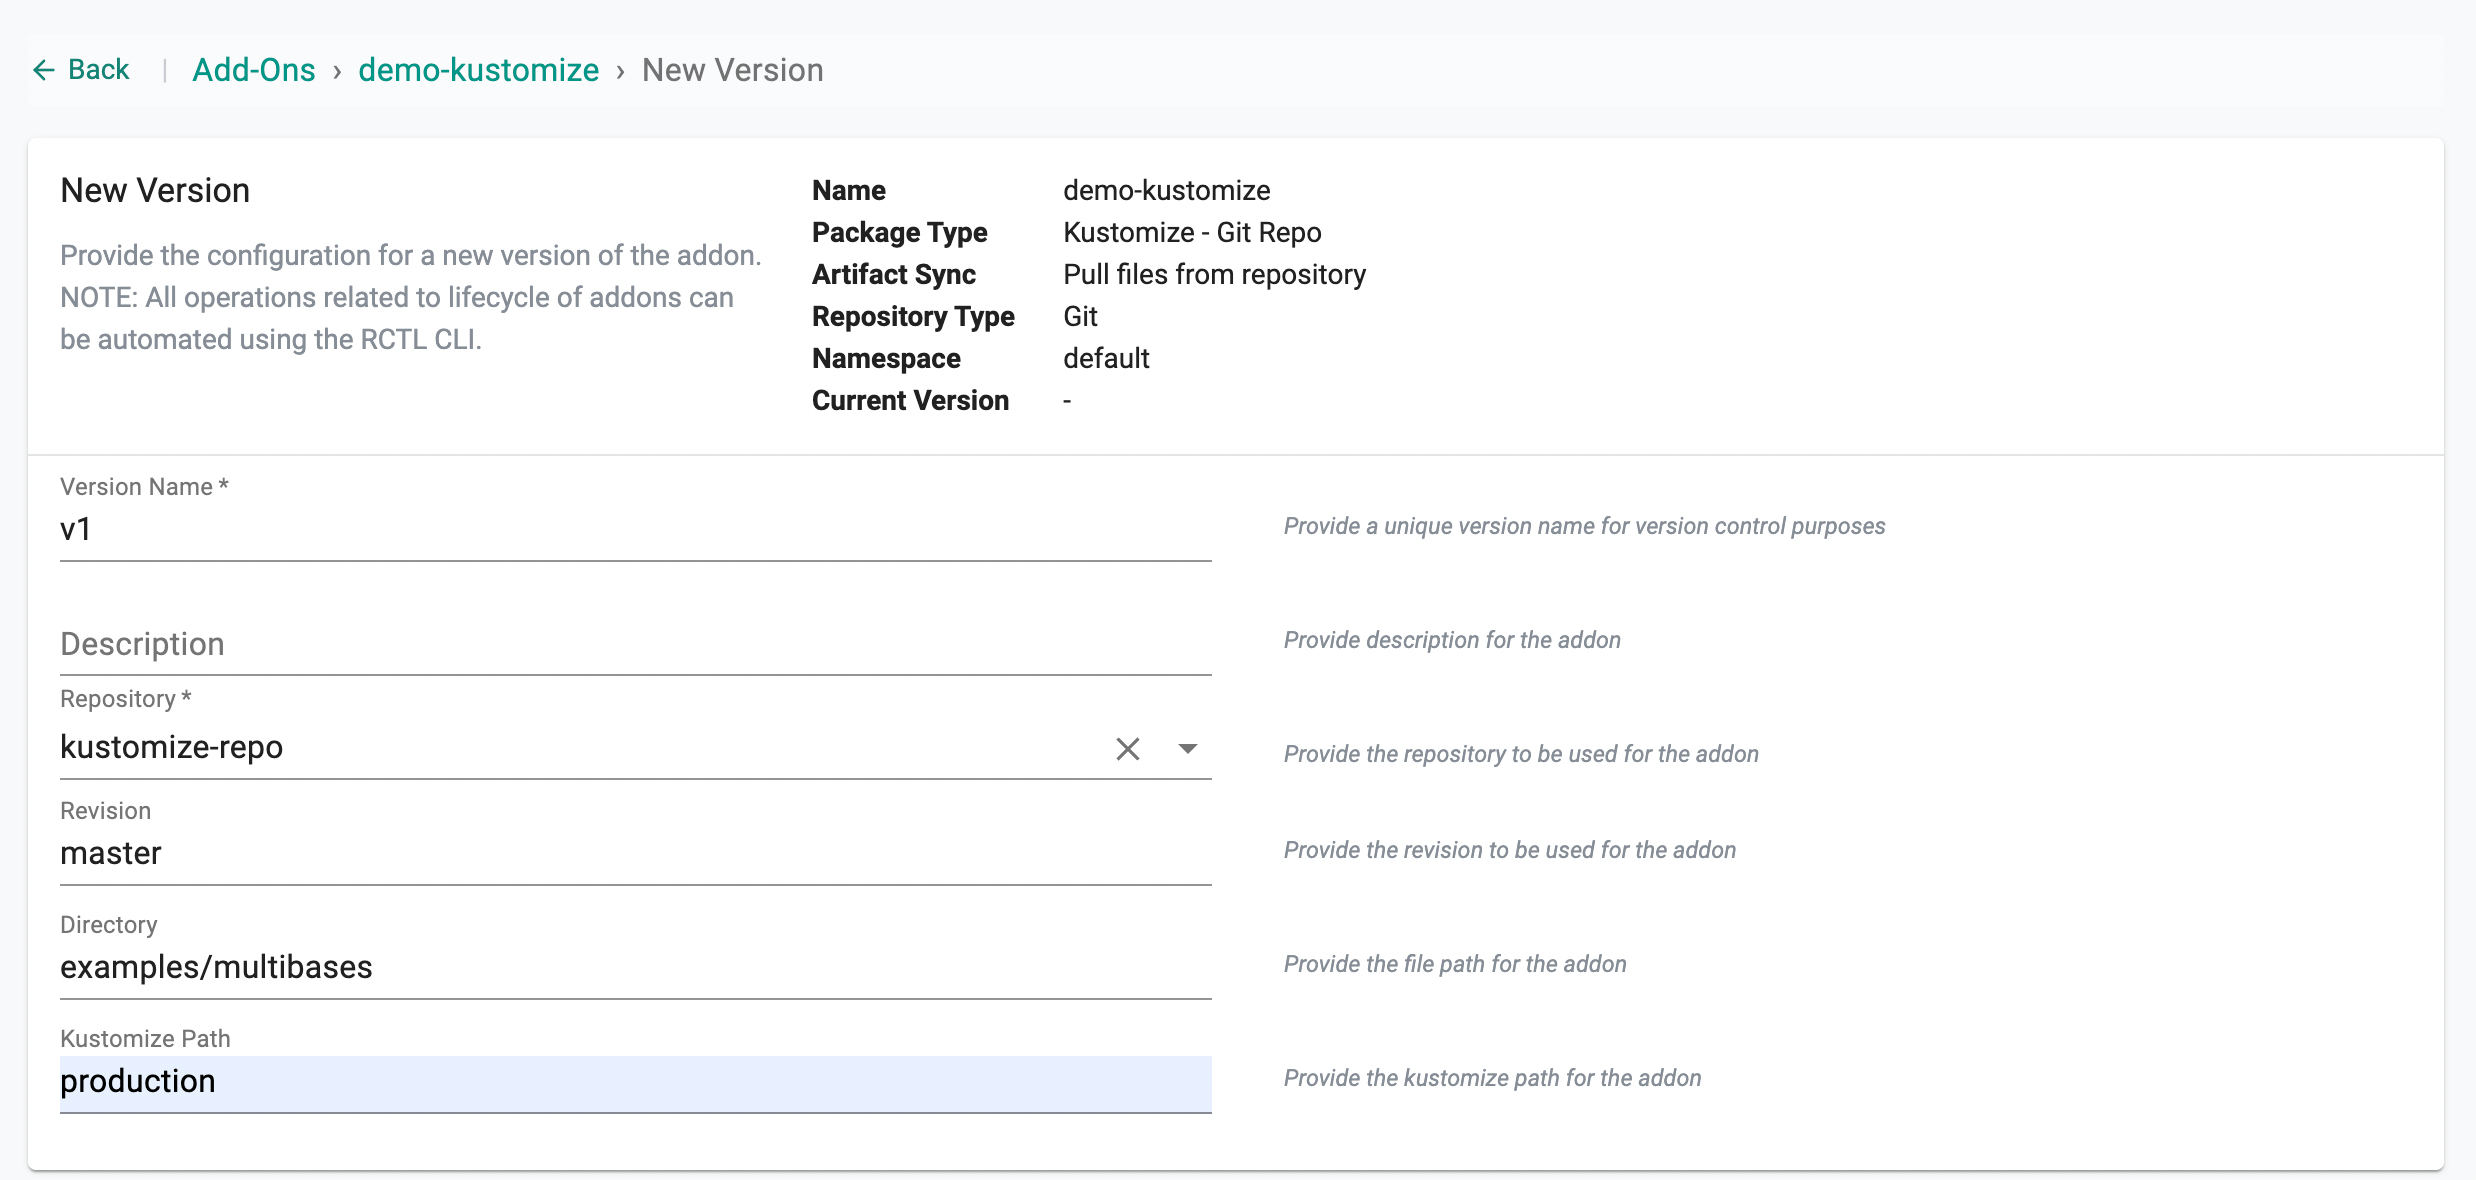
Pulling Files From Git Repository
This method allows users to maintain and build YAML manifests (for example, pod.yaml) directly from a Git repository, applying environment-specific configurations based on the specified Kustomize path.
- Select your repository from the dropdown (for example,
kustomize-repo). - Enter the revision name for the Git branch (for example,
master). - Specify the directory path in the repository starting from the root of the branch (for example,
examples/configs). - Provide the Kustomize Path (for example,
production) where the configuration files are located.
This approach offers a Kubernetes-native alternative to Helm-based add-ons, supporting flexible configuration and deployment workflows.
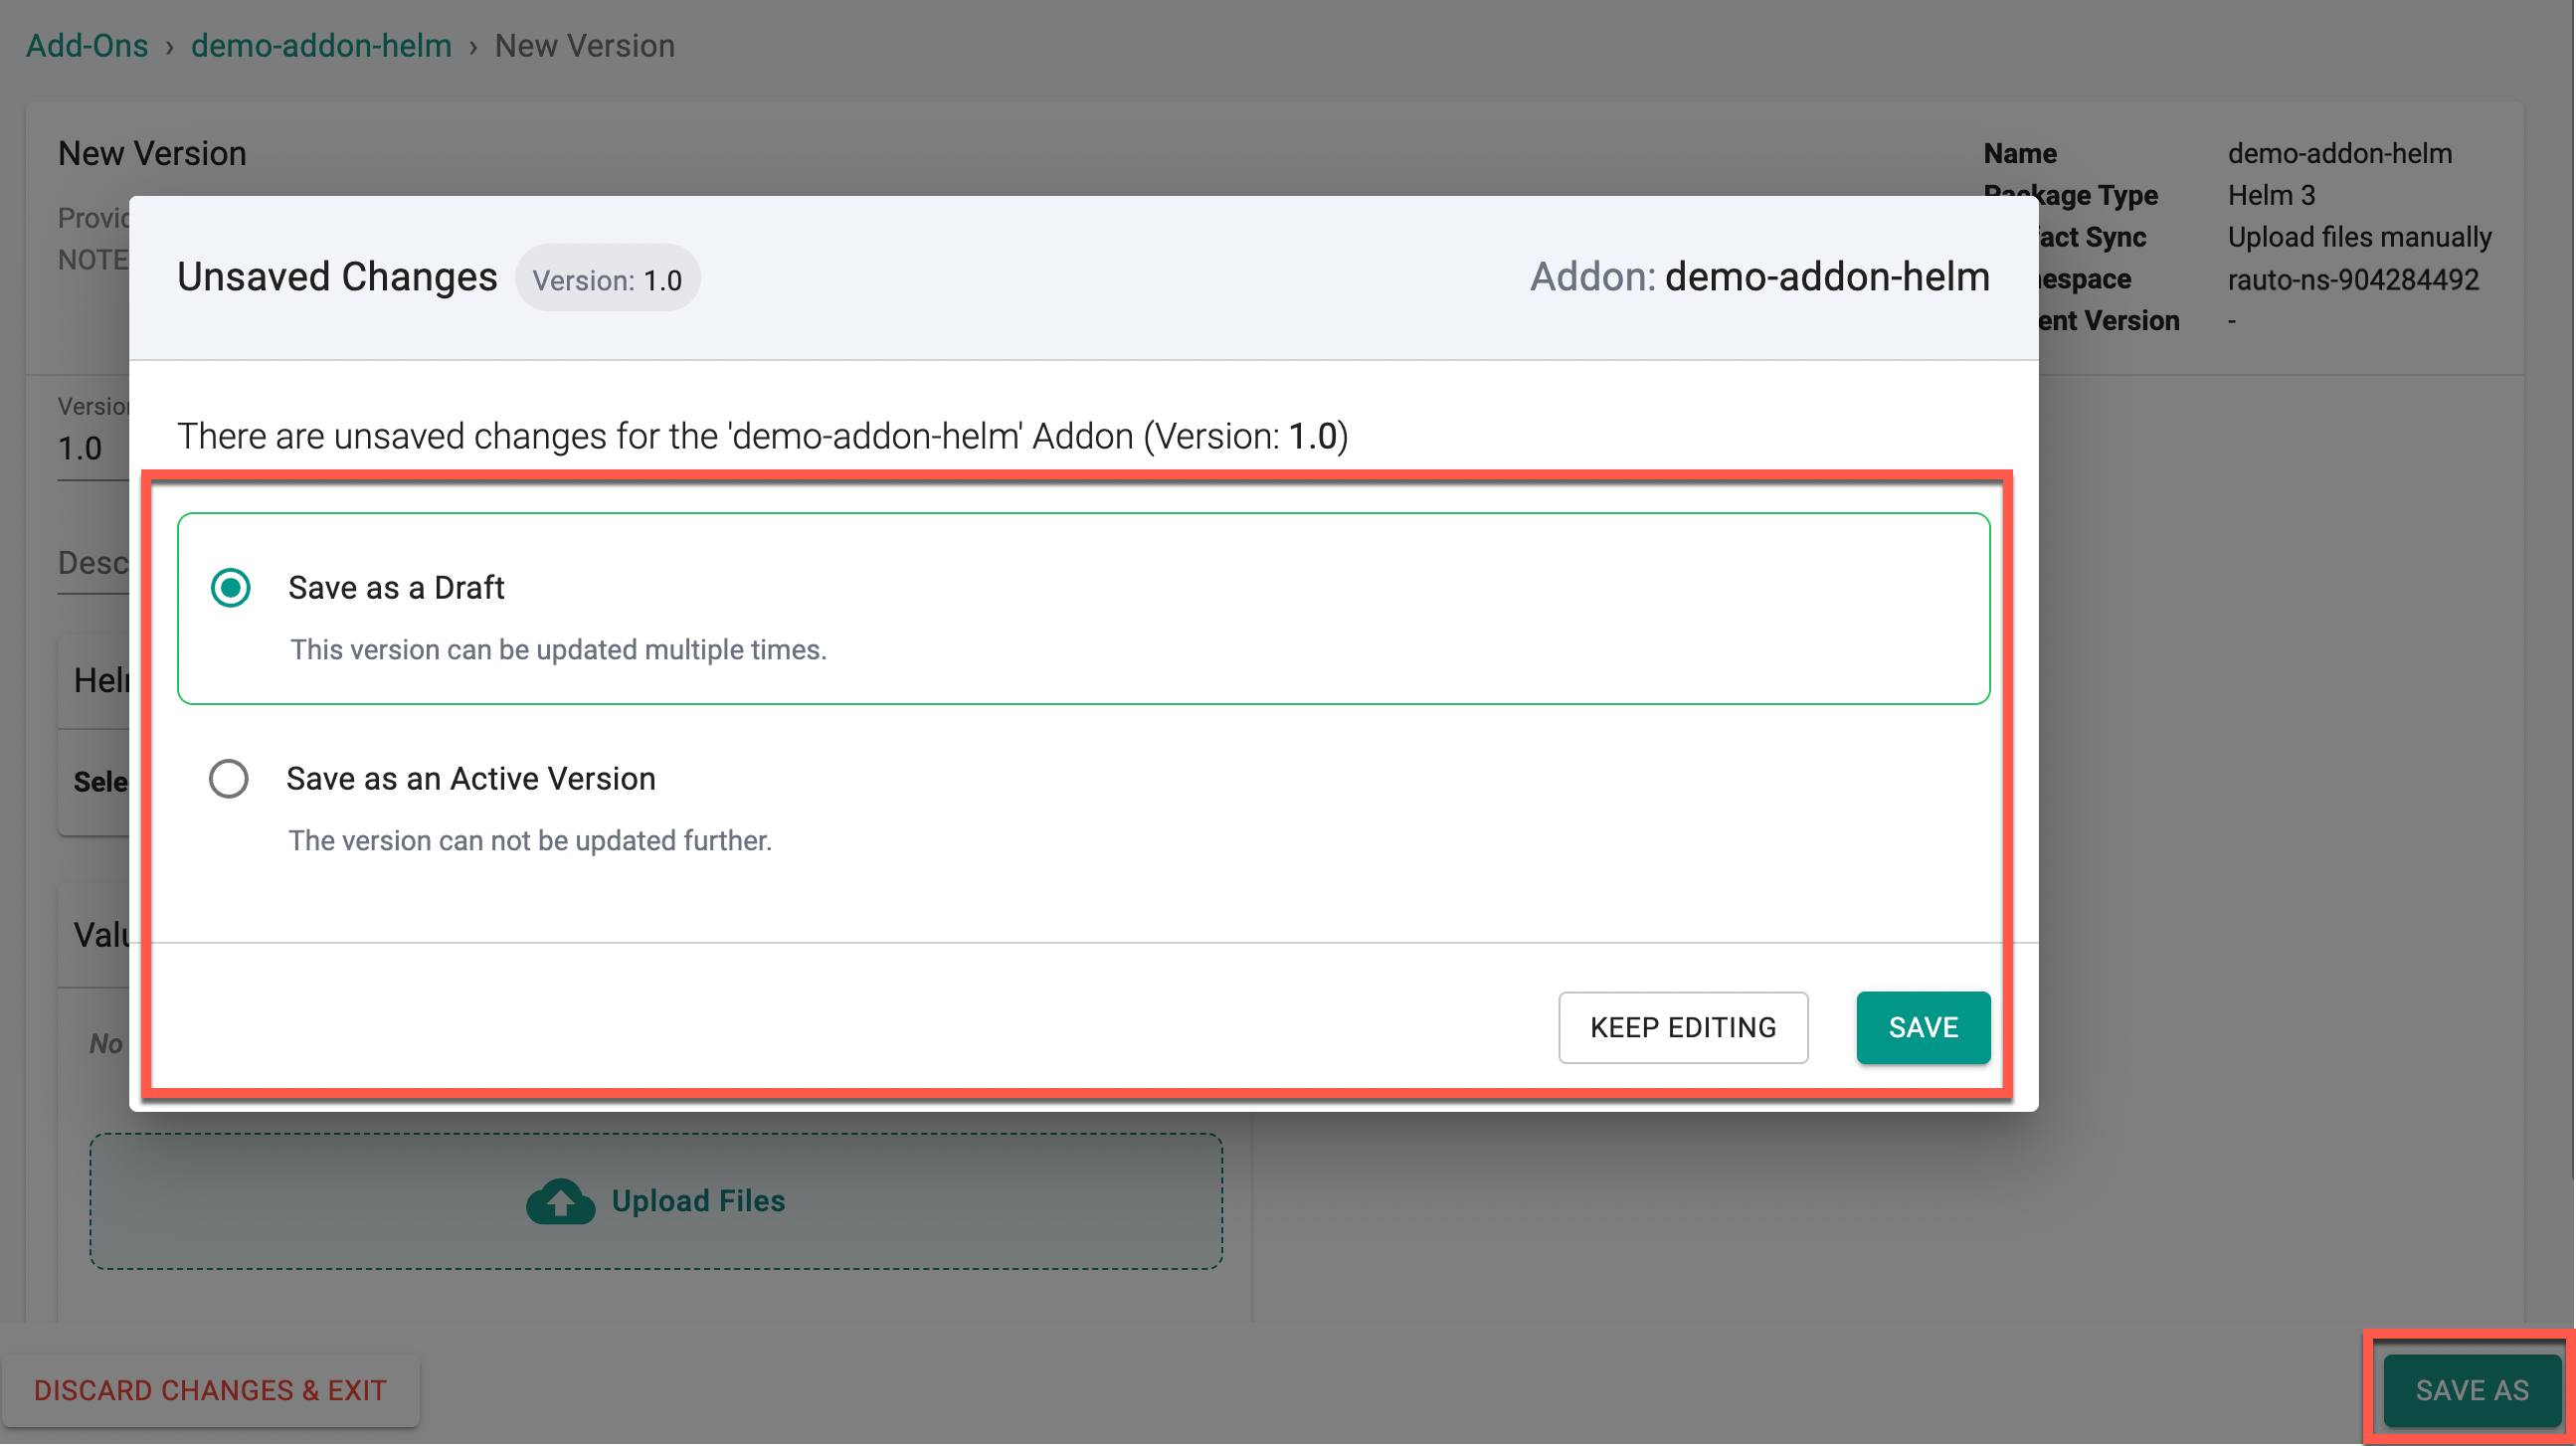
- Click Save As and choose either Save as a Draft or Save as an Active Version
- Click Save
🚨 Version Management for Add-Ons
Version management for Add-ons is supported through RCTL, API, and Terraform, enabling efficient lifecycle management and controlled updates.
To understand draft versioning, state management, and best practices, refer to the Version Management documentation
Grouping Add-Ons Via Labels
Many times, there will be a need to group specific add-ons in a single bucket for organization and management purposes. For example, you may want to group all security add-ons into one specific bucket. Or maybe there's a specific set of pre-requisite add-ons that have to be deployed to every cluster blueprint.
To facilitate this, you can use the add-on labels functionality which allows you do to the following:
- Tag add-ons with specific label(s)
- Search for add-ons by label(s)
- Bulk select a list of add-ons by label to add to a cluster blueprint
Some key things to note are the following:
- The same label can be used across multiple add-ons
- Labels are key based or key value based
- Add-on labels are project scoped. If an add-on is shared across projects, the labels that the add-on leverages will also be shared as well. Therefore you must validate that you don't have conflicting add-on labels by name across 2 or more projects when sharing
- Search is done based on an intersection of labels. See the Searching Custom Add-Ons section below for more details
- If you have existing add-ons where you want to bulk update with a given label, refer to the CLI section to accomplish this via RCTL.
- Add-on labels are purely to facilitate search and organization. If you remove a label from an add-on and had previously used a label to add/search to a custom blueprint, nothing is affected. The add-on will still be part of the blueprint
Let's take a look at each of these specific pieces of functionality.
Creating and Assigning Labels To Add-Ons
In order to assign labels to an add-on:
- Go to Infrastructure, Add-Ons
- Find the add-on you want to add labels to. Then click the name of the add-on
- Click Manage Labels
- Next, either select existing labels from the dropdown menu or create a new label. You can create a key based label or key-value based label. Values are useful when for a given key, you have multiple values you need to support. Searching for add-ons is based on key
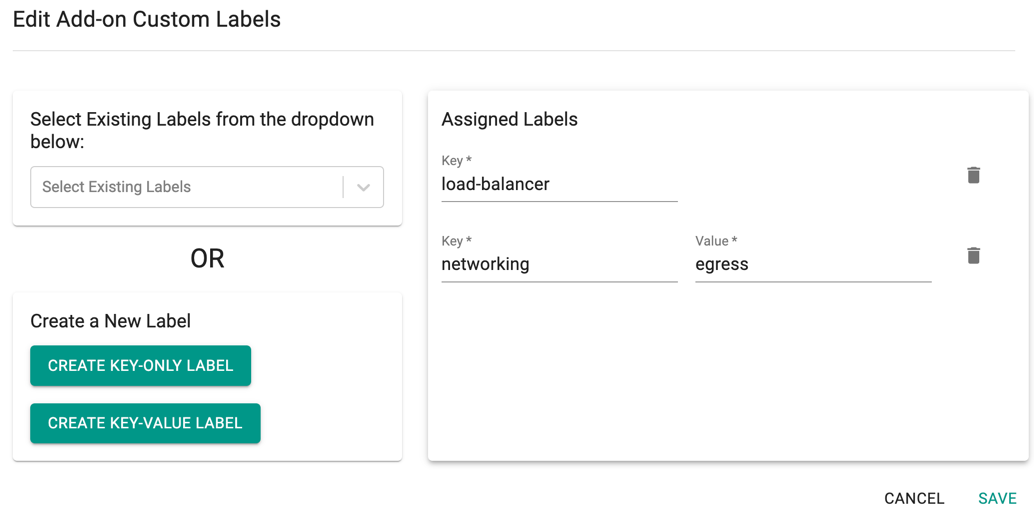
- This label is now project scoped and can be used in other add-ons as well (i.e. it will now appear in the dropdown menu once you click SAVE)
- Click SAVE
Important
For existing add-ons where you want to bulk update with a given set of labels, refer to the CLI section to accomplish this via RCTL
Select Add-Ons by label for a custom blueprint
When creating or updating a cluster blueprint, you can select add-ons by label rather than adding add-ons one by one to your list of custom add-ons for the blueprint as shown in the example below. To understand more about this workflow, refer to the Custom Blueprint documentation.
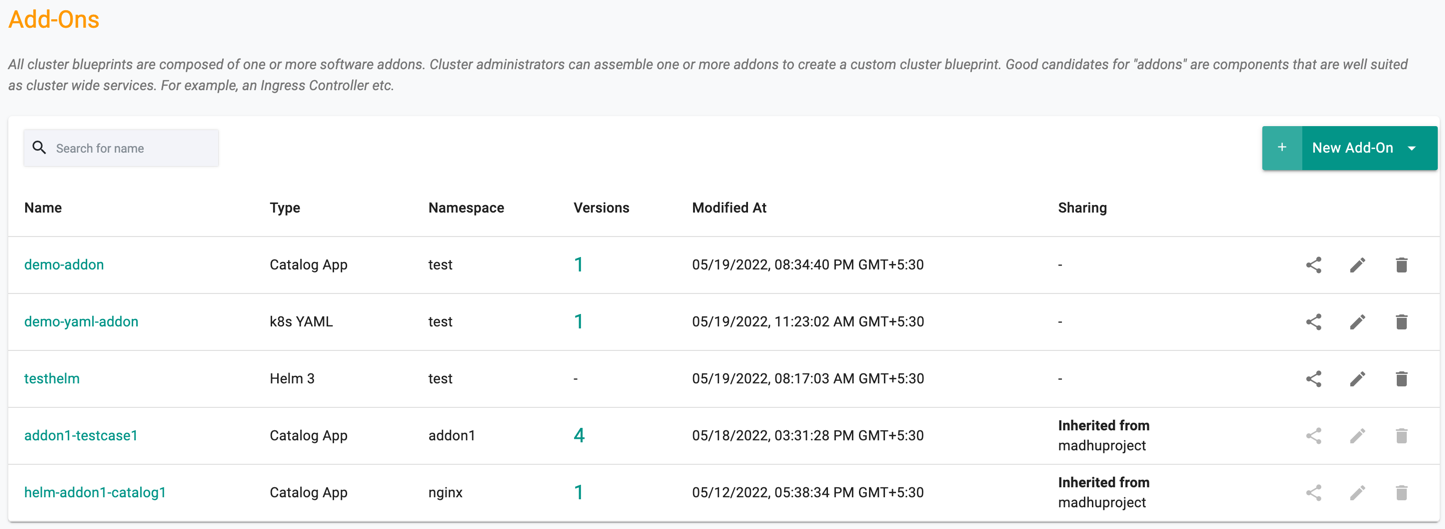
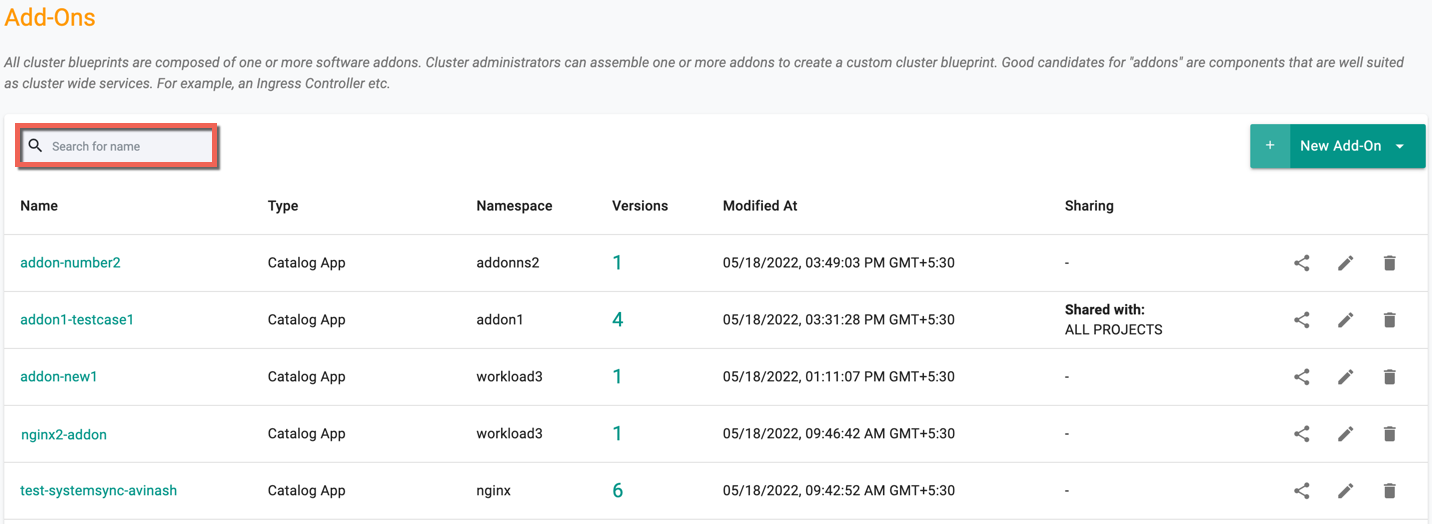
Viewing Custom Add-Ons
To view all custom add-ons in a project,
- Click on Infrastructure -> Add-Ons
- This will display the entire list of configured custom add-ons and associated metadata such as which namespace, whether sharing is enabled, time modified, etc.
An illustrative example is shown below:
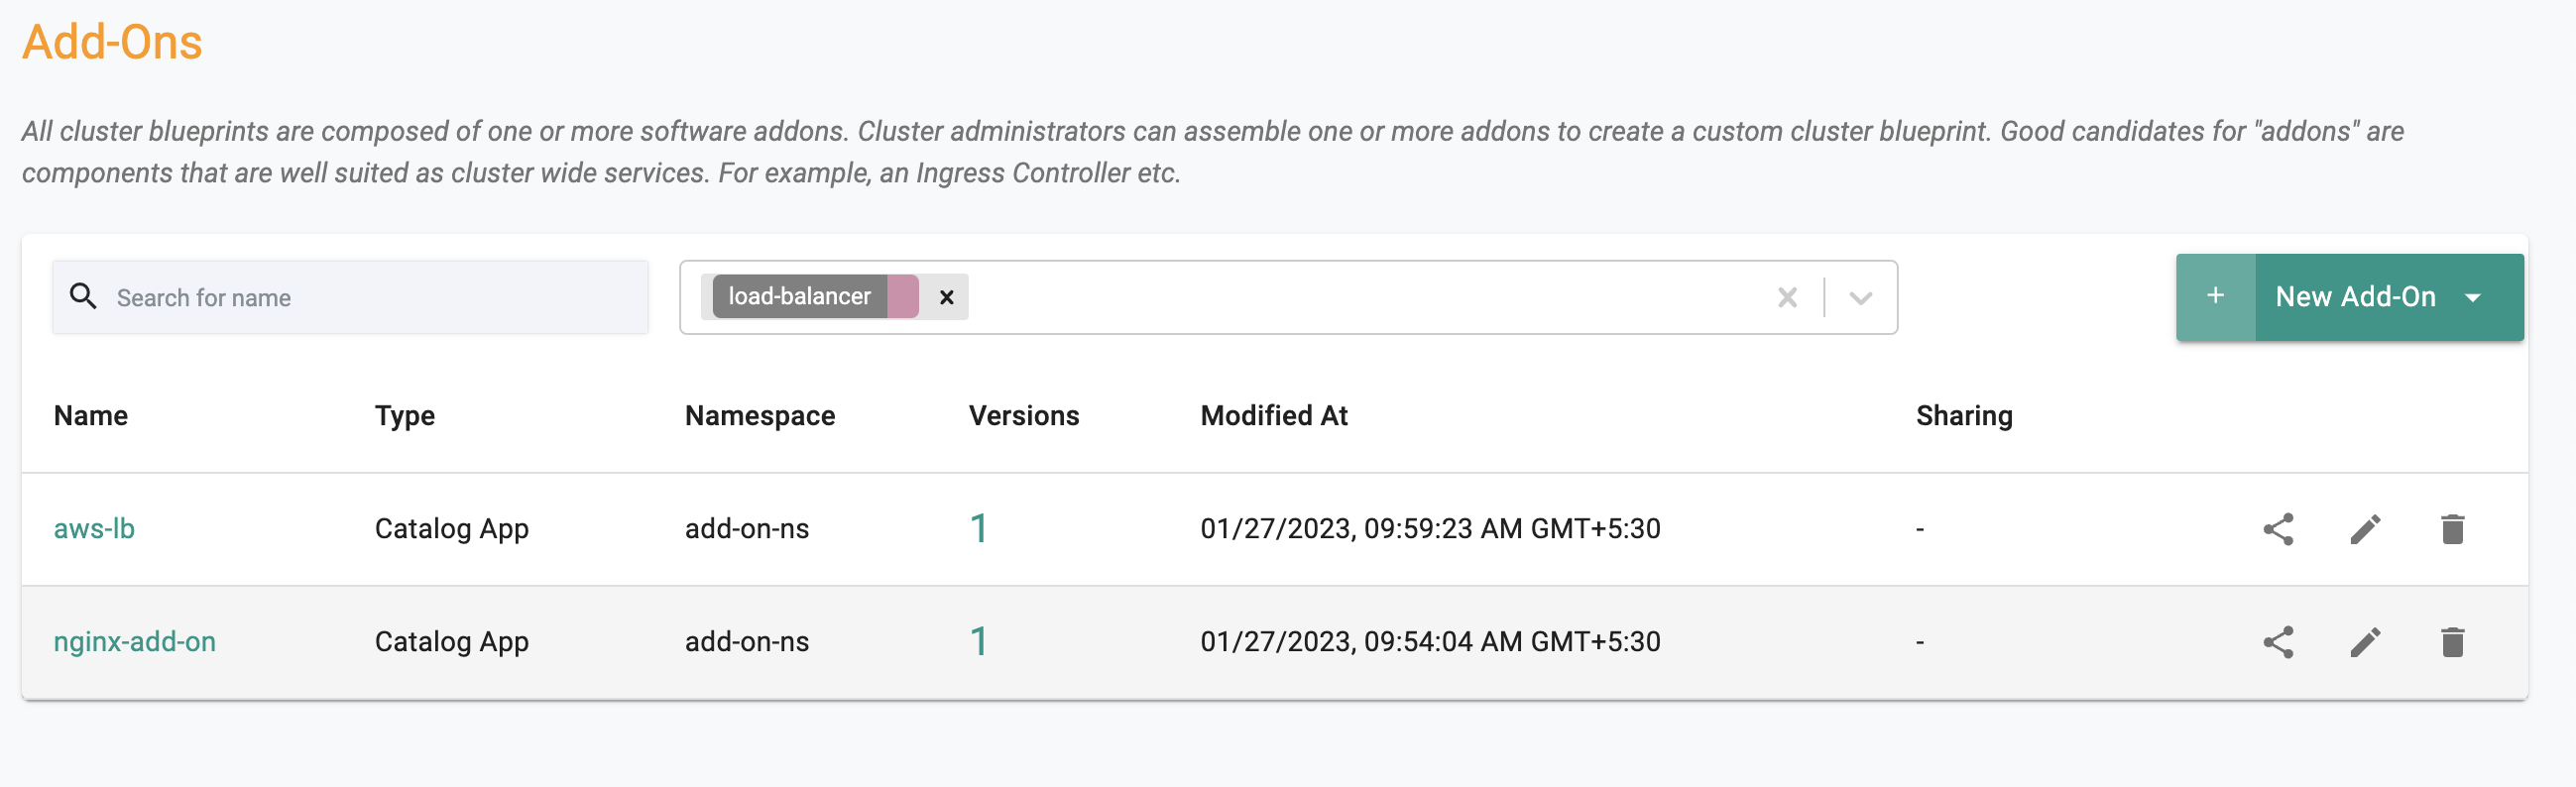
Searching Custom Add-Ons
For scenarios where organizations have 100s of add-ons in a project, a facility for "search" is provided to help the user quickly zero in on the add-on they are looking for.
Searching By Add-On Label(s)
You can also search for add-ons by add-on labels. When you search by multiple labels, the search is done based on an intersection.
Let's take an example:
Add On 1: Labels "database" and "big data" Add On 2: Labels "database" Add On 3: Labels "big data" and "cassandra"
- Search by database: Add On 1 and Add On 2 show up
- Search by big data: Add On 1 and Add On 3 show up
- Search by database and big data: Add On 1 and Add On 2 show up
In order to search by label
- Go To Infrastructure, Add-Ons
- At the top, use the filter by Add-On label search.
The following shows an illustrative example:
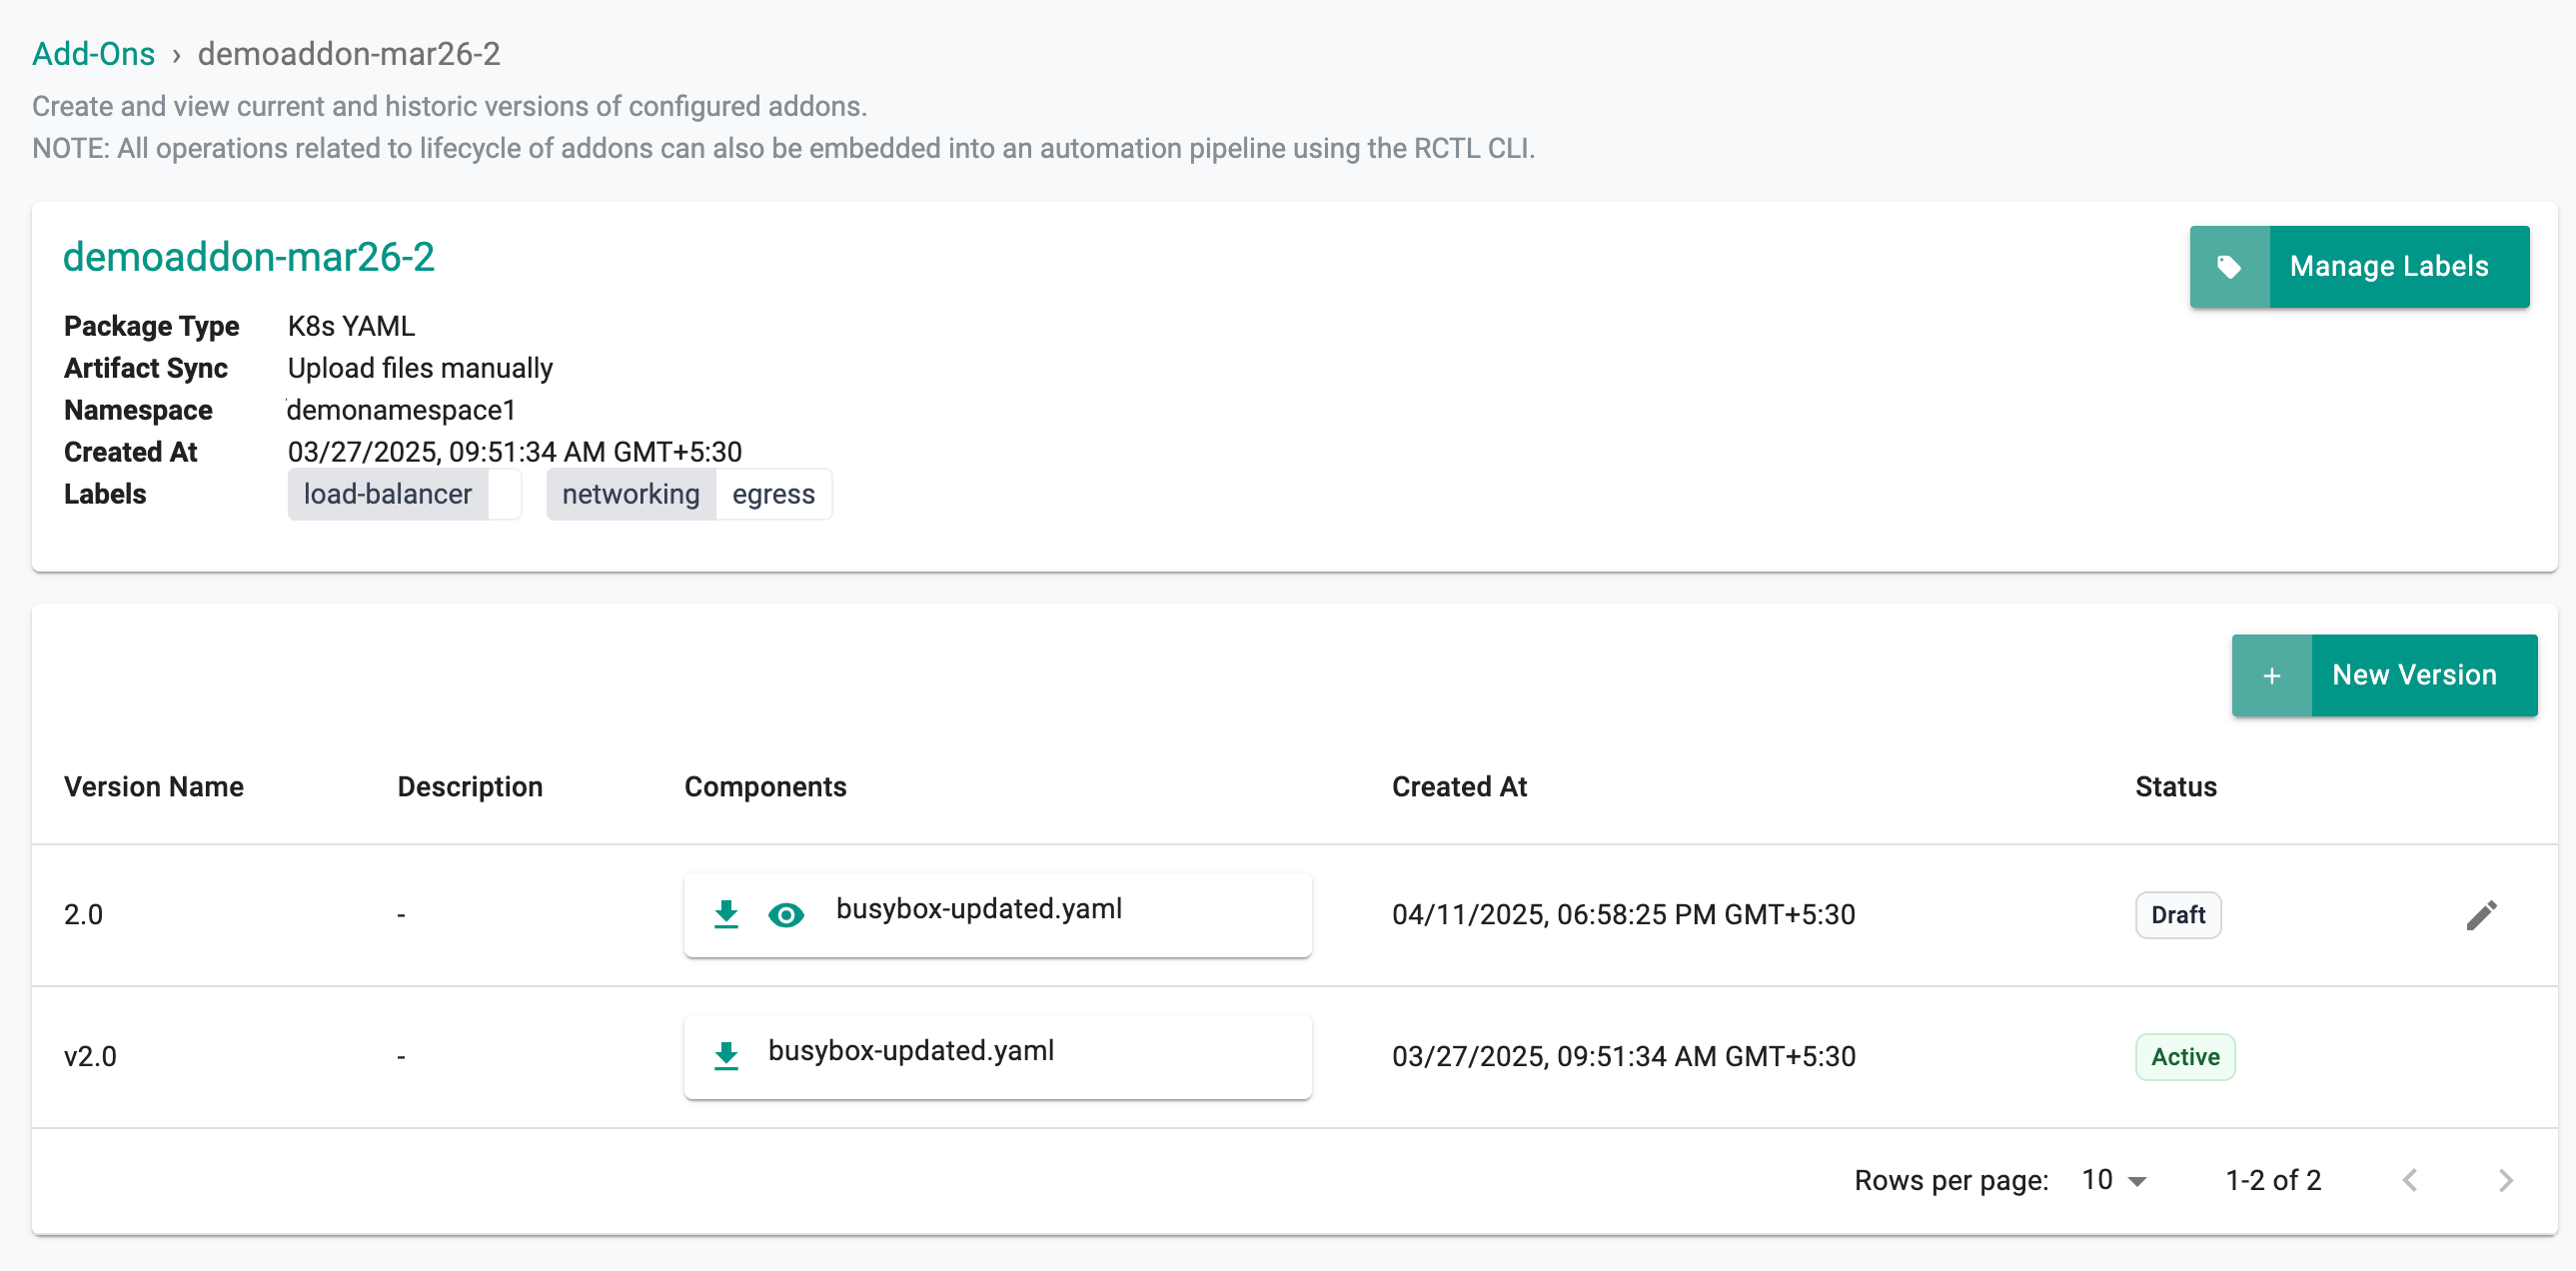
Viewing Details For a Specific Custom Add-On
To view details of an existing add-on such as version history or other metadata, do the following:
- Click on Infrastructure -> Add-Ons
- Find your add-on (search for it if needed)
- Click the name of the add-on
In the example below, we can see that there are three versions.
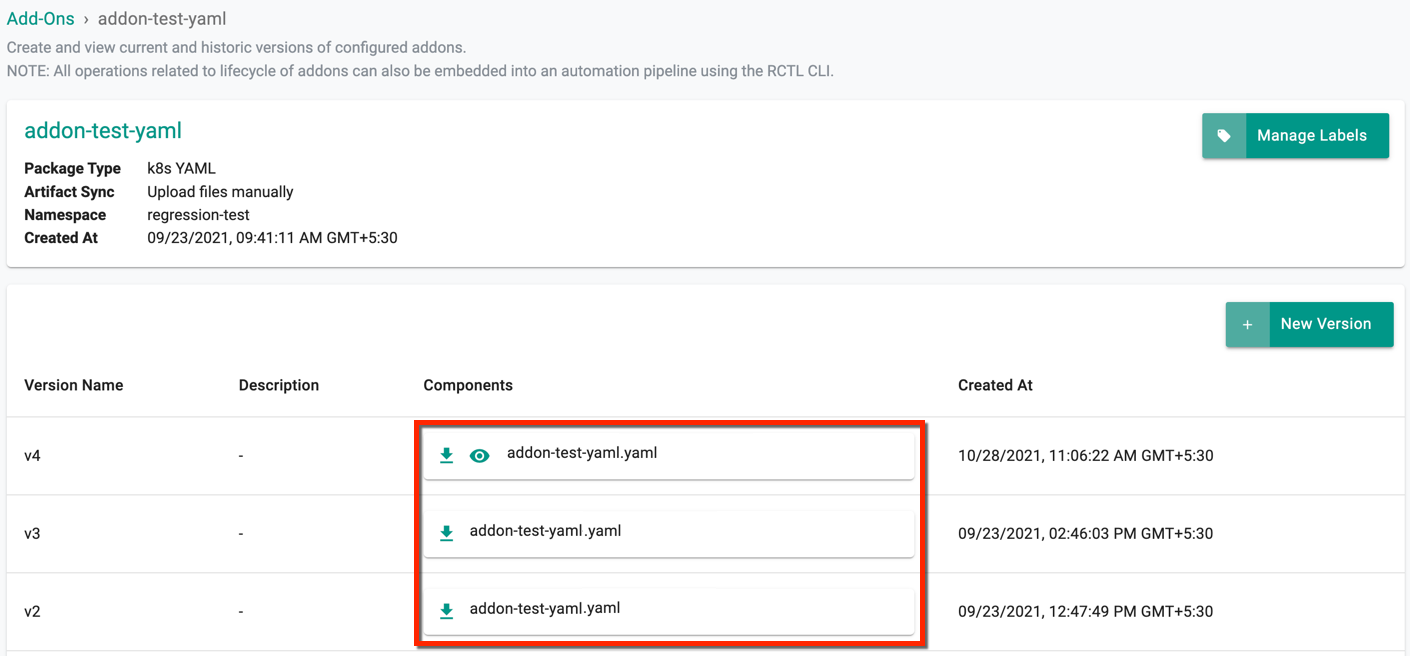
View/Download Add-On Artifacts
If the files were uploaded manually via the controller, artifacts for the current or previous versions of the add-on can be retrieved. This is applicable for the following types of add-ons:
- k8s YAML
- Helm
Important
Artifact downloads are not supported natively when Pull Files From Repository is selected as the Artifact Type as those files can be retrieved directly from the repo, including checking out older commits to get access to historical artifacts.
- Click on Infrastructure -> Add-Ons
- Find your add-on (search for it if needed)
- Click the name of the add-on
- This will bring you to the details page. The steps then differ slightly for a current version of an add-on versus a historical version.
Current Version
View/download the current add-on version value file(s) using the respective icons.
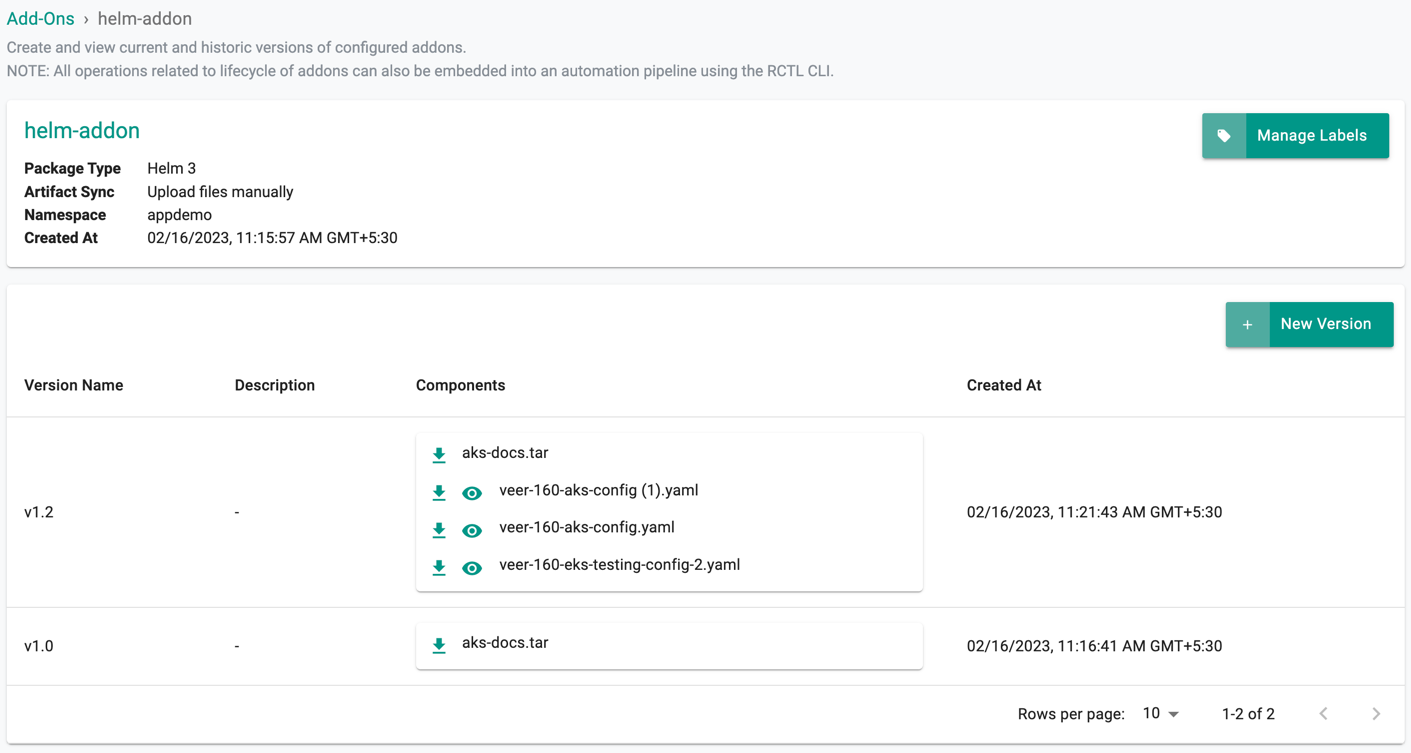
For Helm type, the tar file contains the helm chart along with the metadata file.
Older Versions
For older versions, the artifacts can only be downloaded and not viewed in the console directly as artifacts for older versions of an add-on are downloaded as a zip file, which contains the uploaded artifacts of that add-on version.
For example, for an older version of Helm type addon, the downloaded zip file contains the values files along with the helm chart and its metadata.
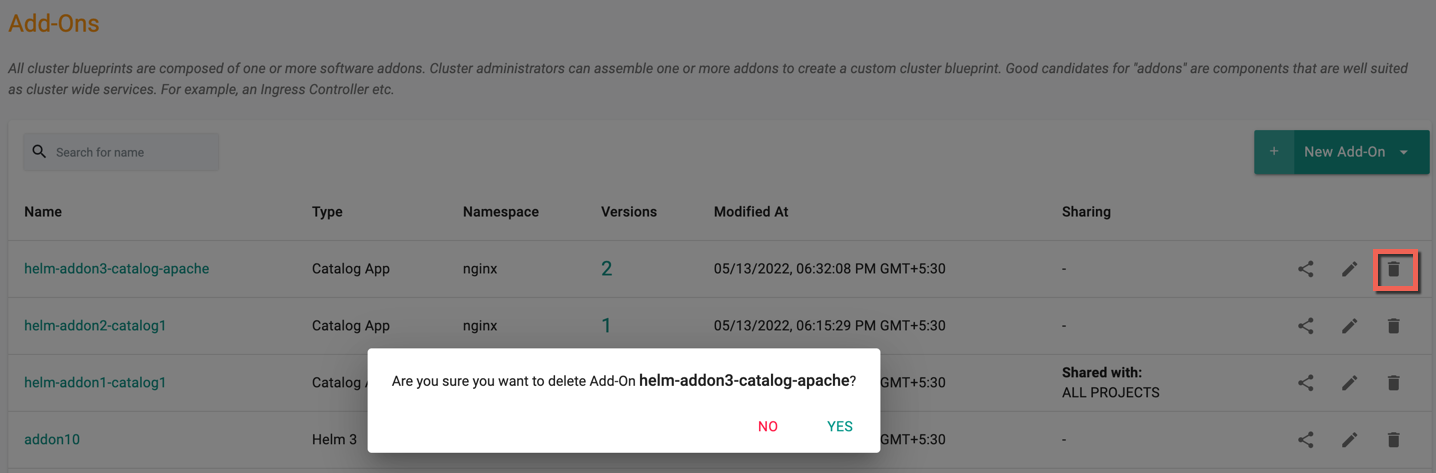
Deleting An Add-On
If an add-on is not required anymore, the admin may wish to delete it from the Project.
Important
The add-on must not be used by any blueprint in order to successfully delete the add-on.
To delete an add-on:
- Click on Infrastructure -> Add-Ons
- Find your add-on (search for it if needed).
- Click the delete icon to the right of the add-on to delete it. In the view all add-ons page, click on the "delete" icon to delete an existing add-on.
Debugging Add-Ons
Many times, infrastructure admins will need to debug add-ons to validate deployments, check the status, and more. The following mechanisms are available to debug add-ons:
Infrastructure admins or organization admins can view the status of each addon using the cluster dashboard on the Web Console. In addition,
Zero Trust KubeCTL
Infra admins have access to a secure, RBAC controlled, zero trust KubeCTL channel to the remote cluster to perform deep diagnostics.
Click on "KubeCTL" to launch a browser based Zero Trust KubeCTL shell. Alternatively, admins can also download the kubeconfig file and perform the same operations remotely using a KubeCTL CLI.
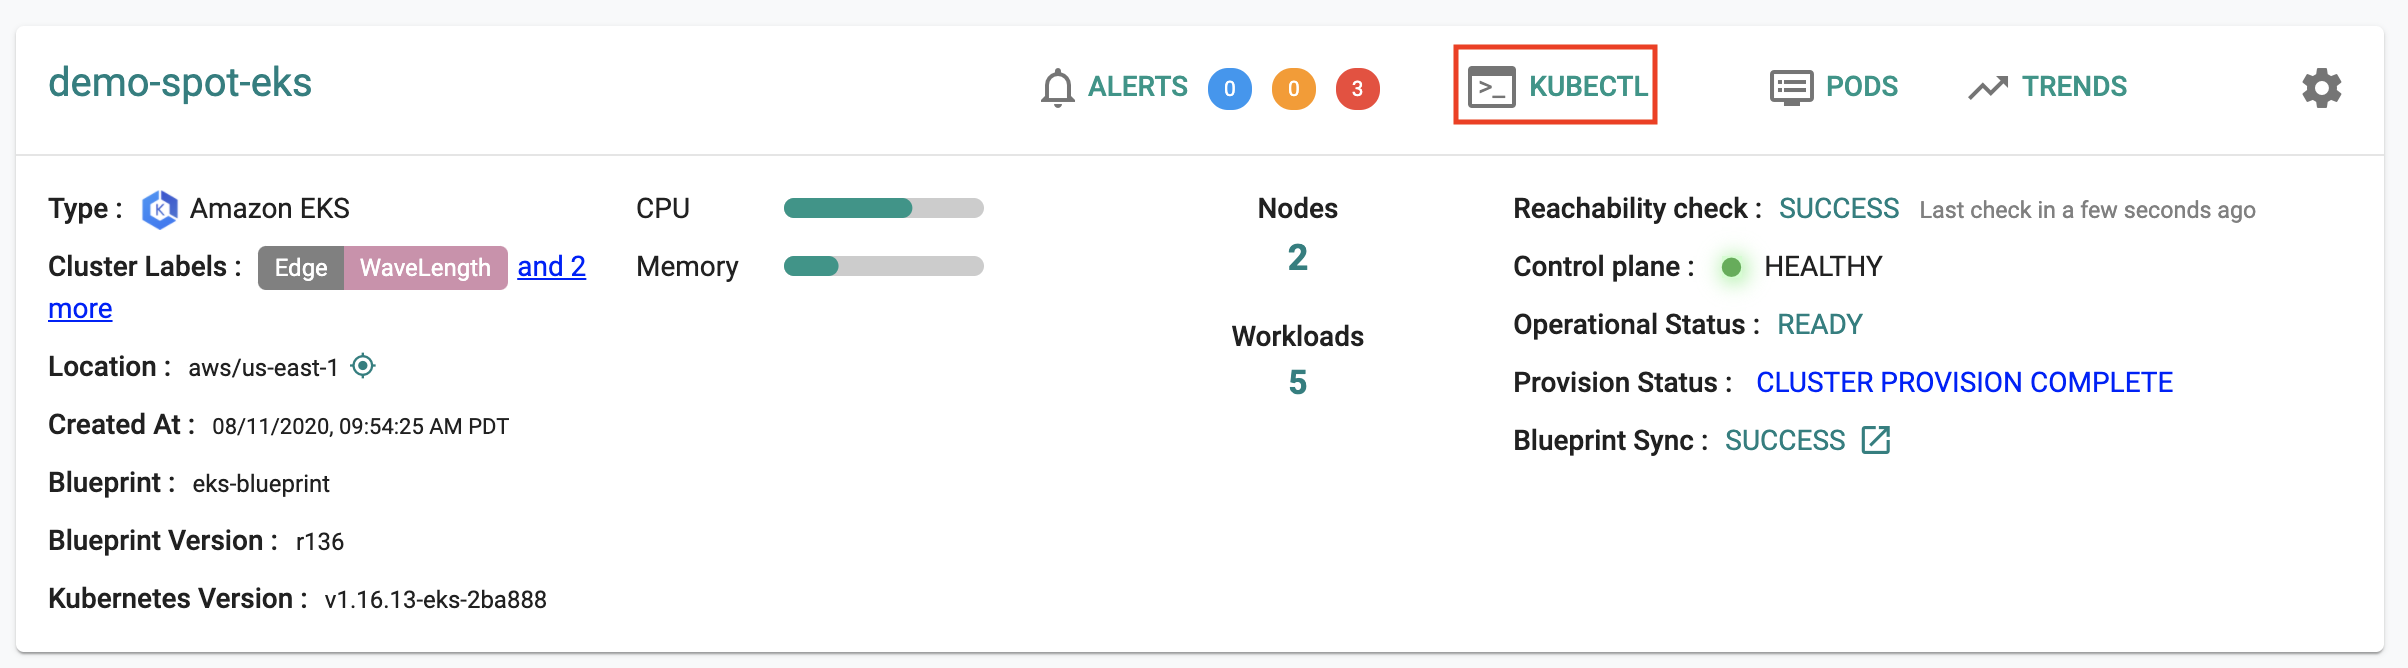
Note the KubeCTL operations this user can perform is access controlled and secured using the configured ROLE. All actions performed by the user are audited for compliance.
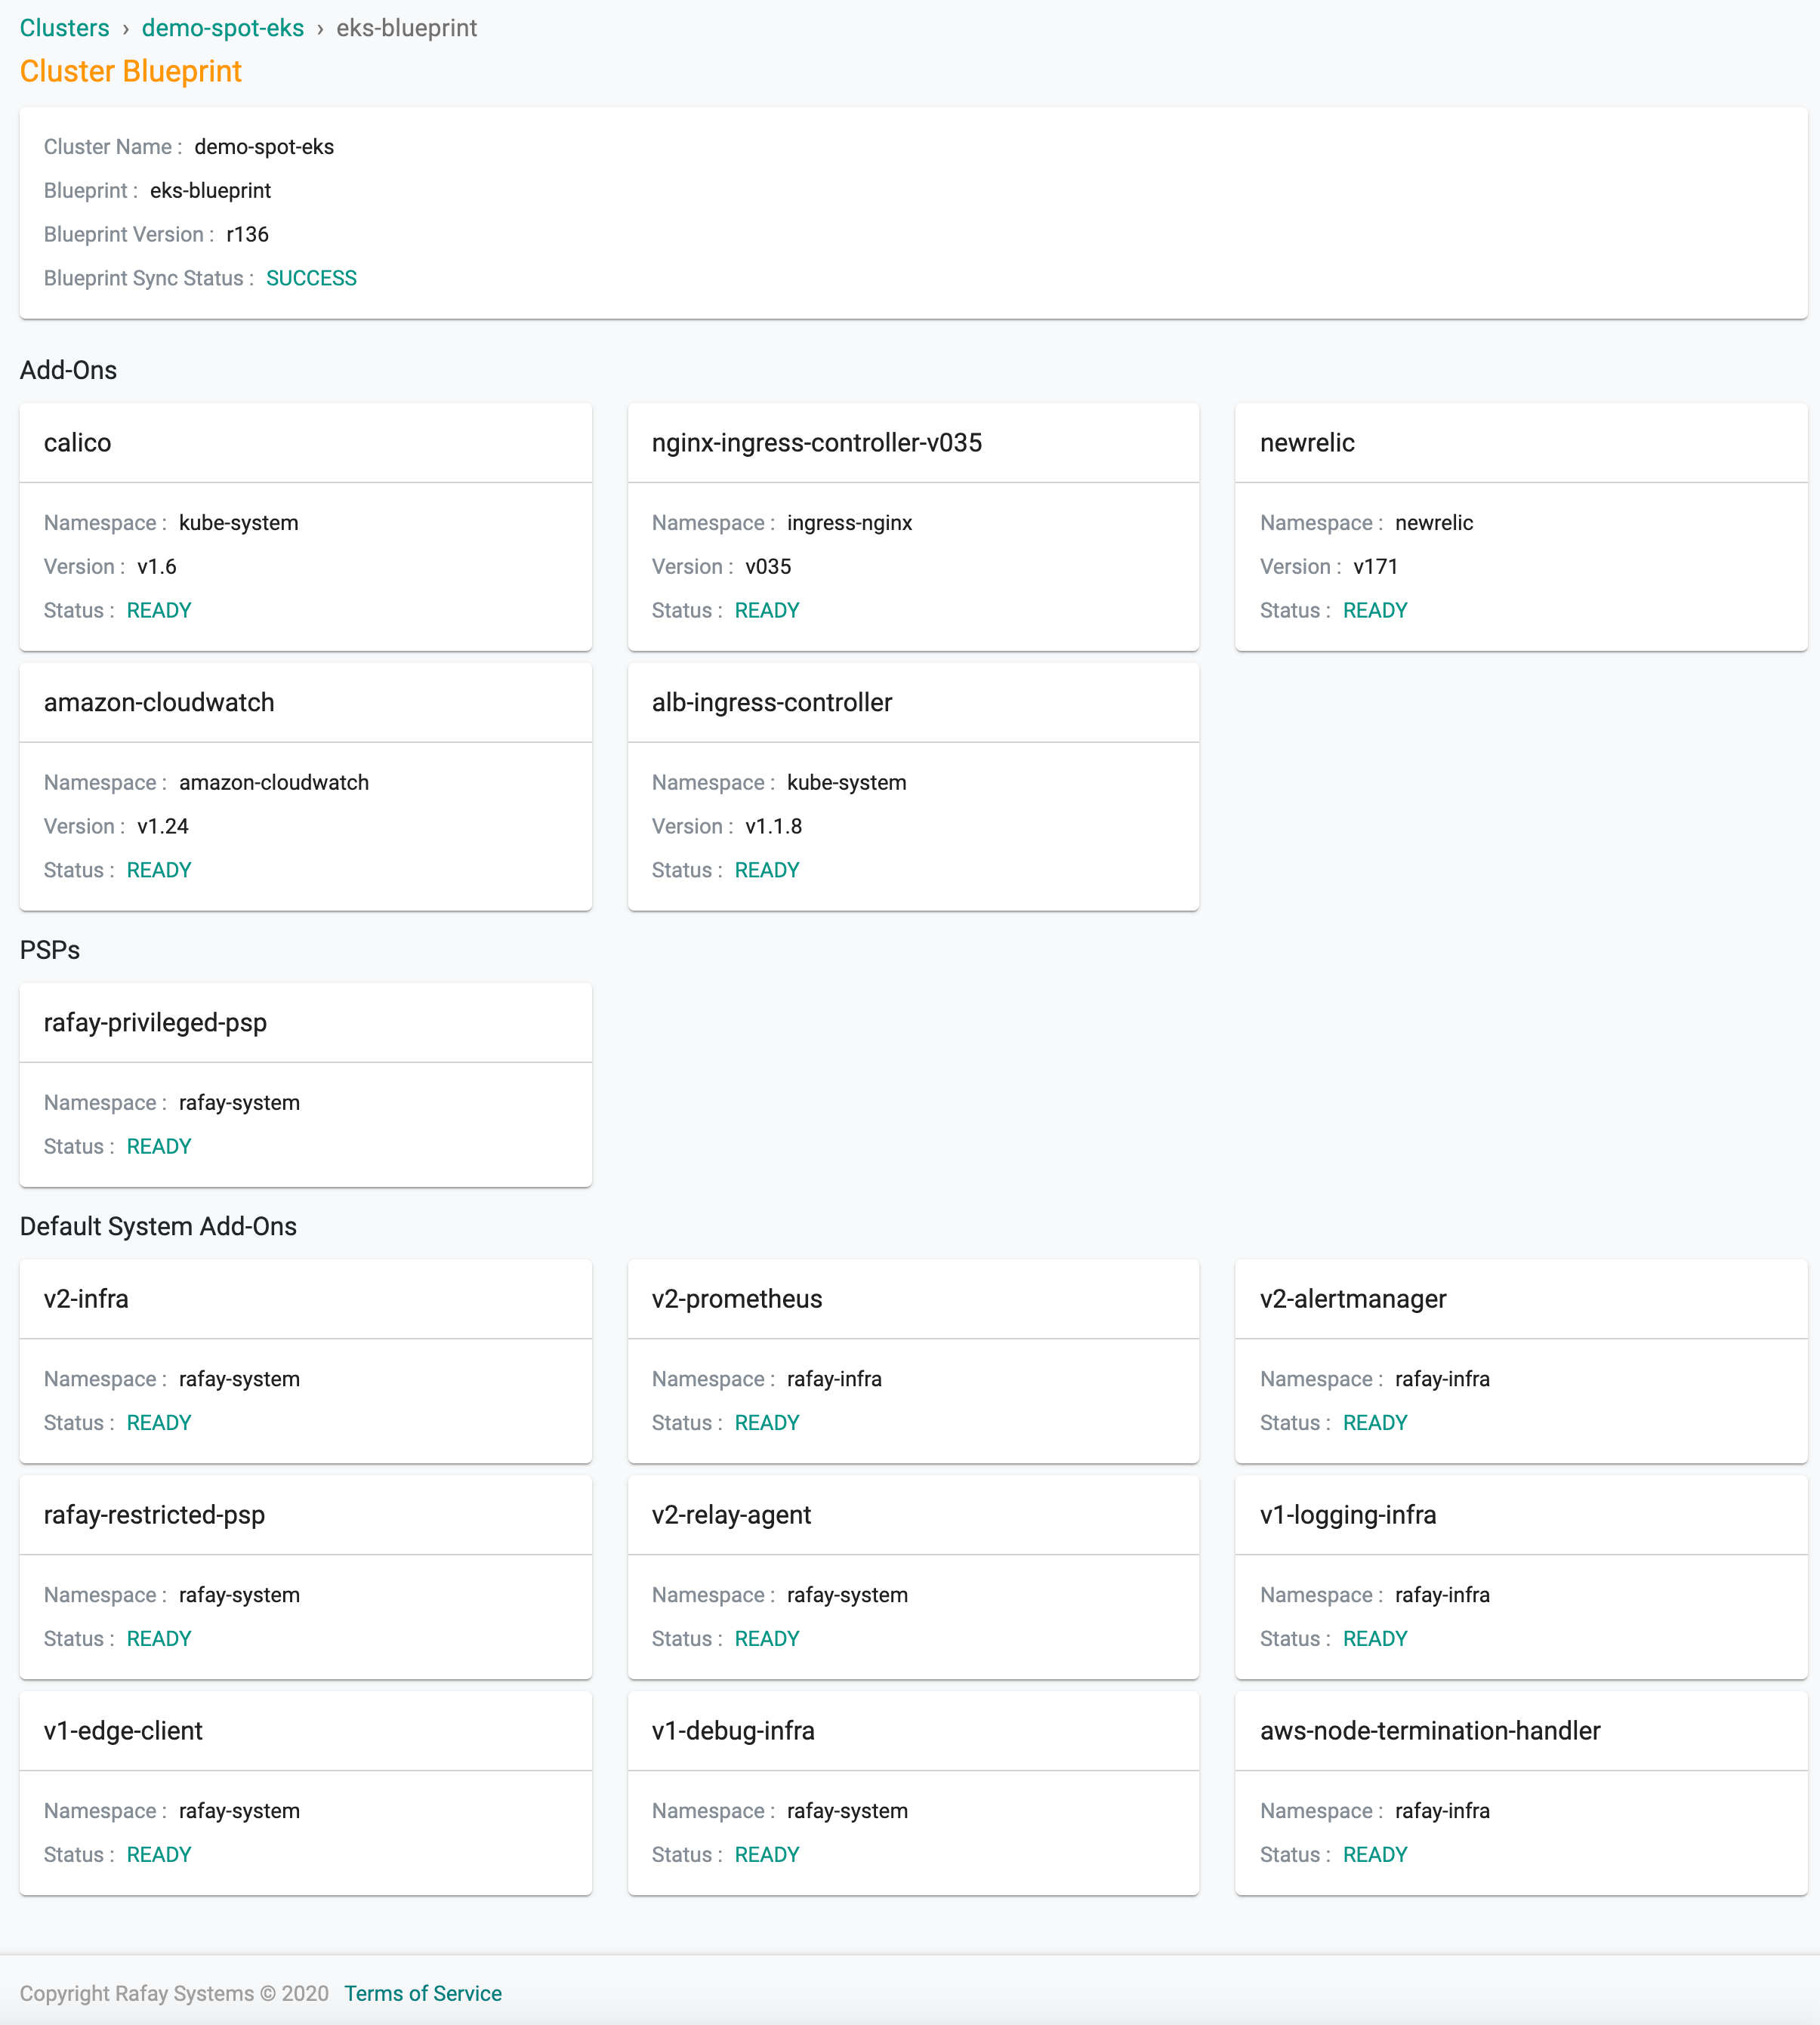
Status By Add-On
Infrastructure admins can view details about the k8s resources for a given add-on on a cluster.
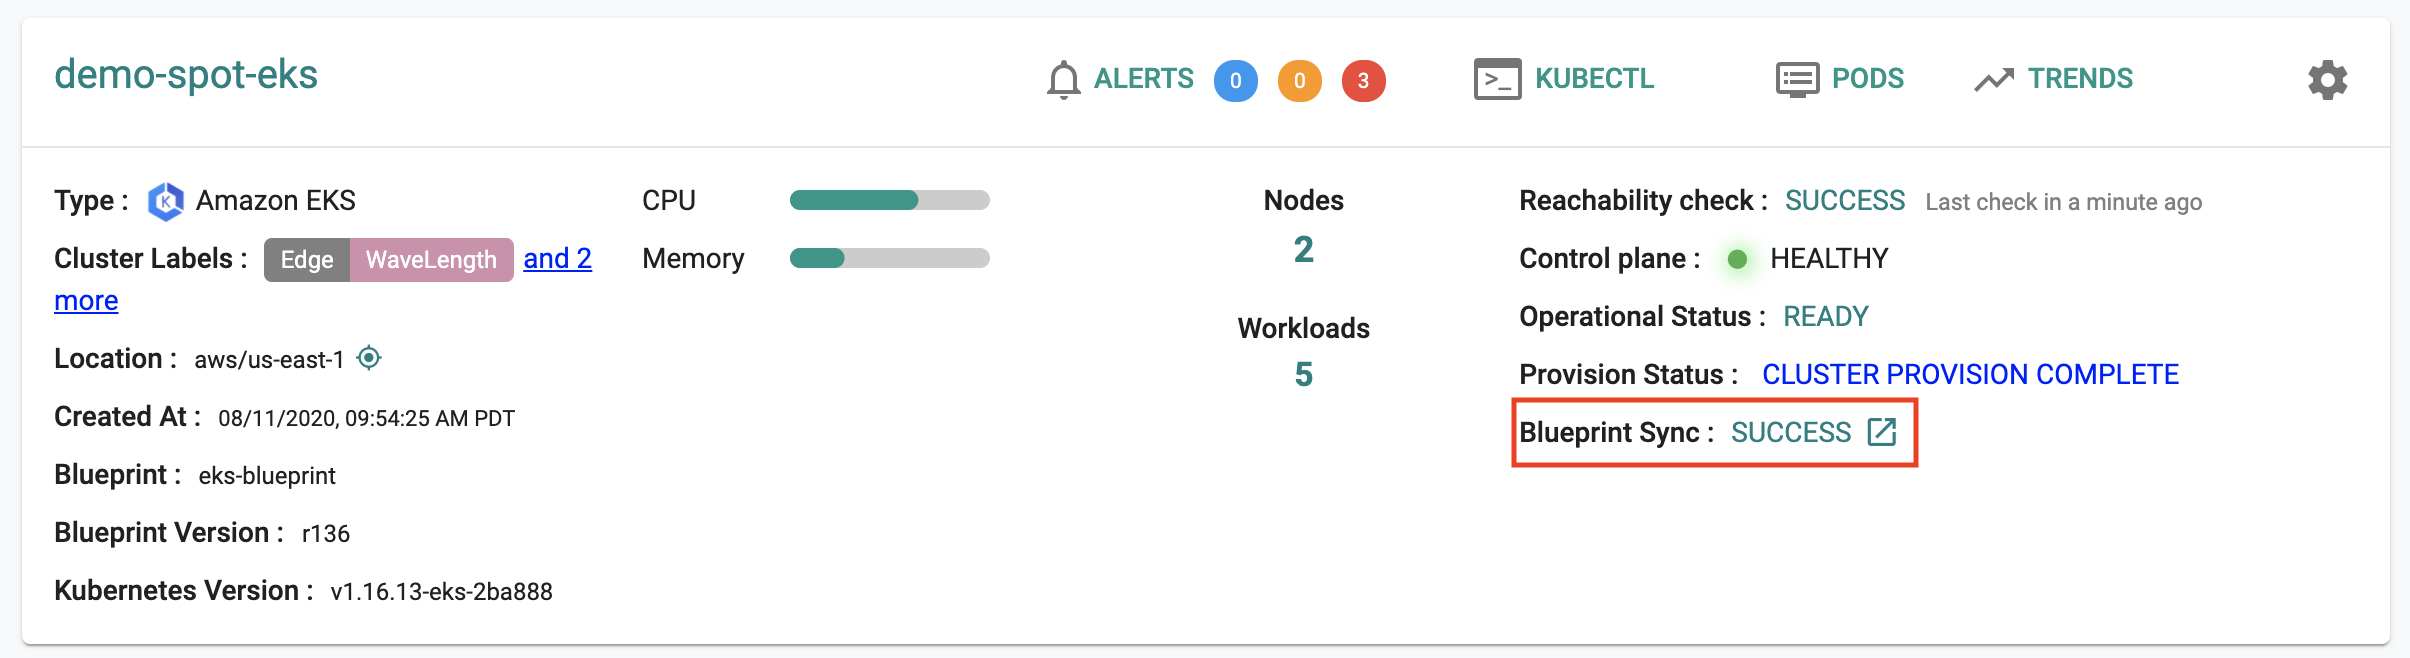
Click on the status link for "Blueprint Sync". This will display a detailed status of each add-on in the blueprint on the cluster. In the example below, you can view the details of all the k8s resources for our "apache-helm3" workload.
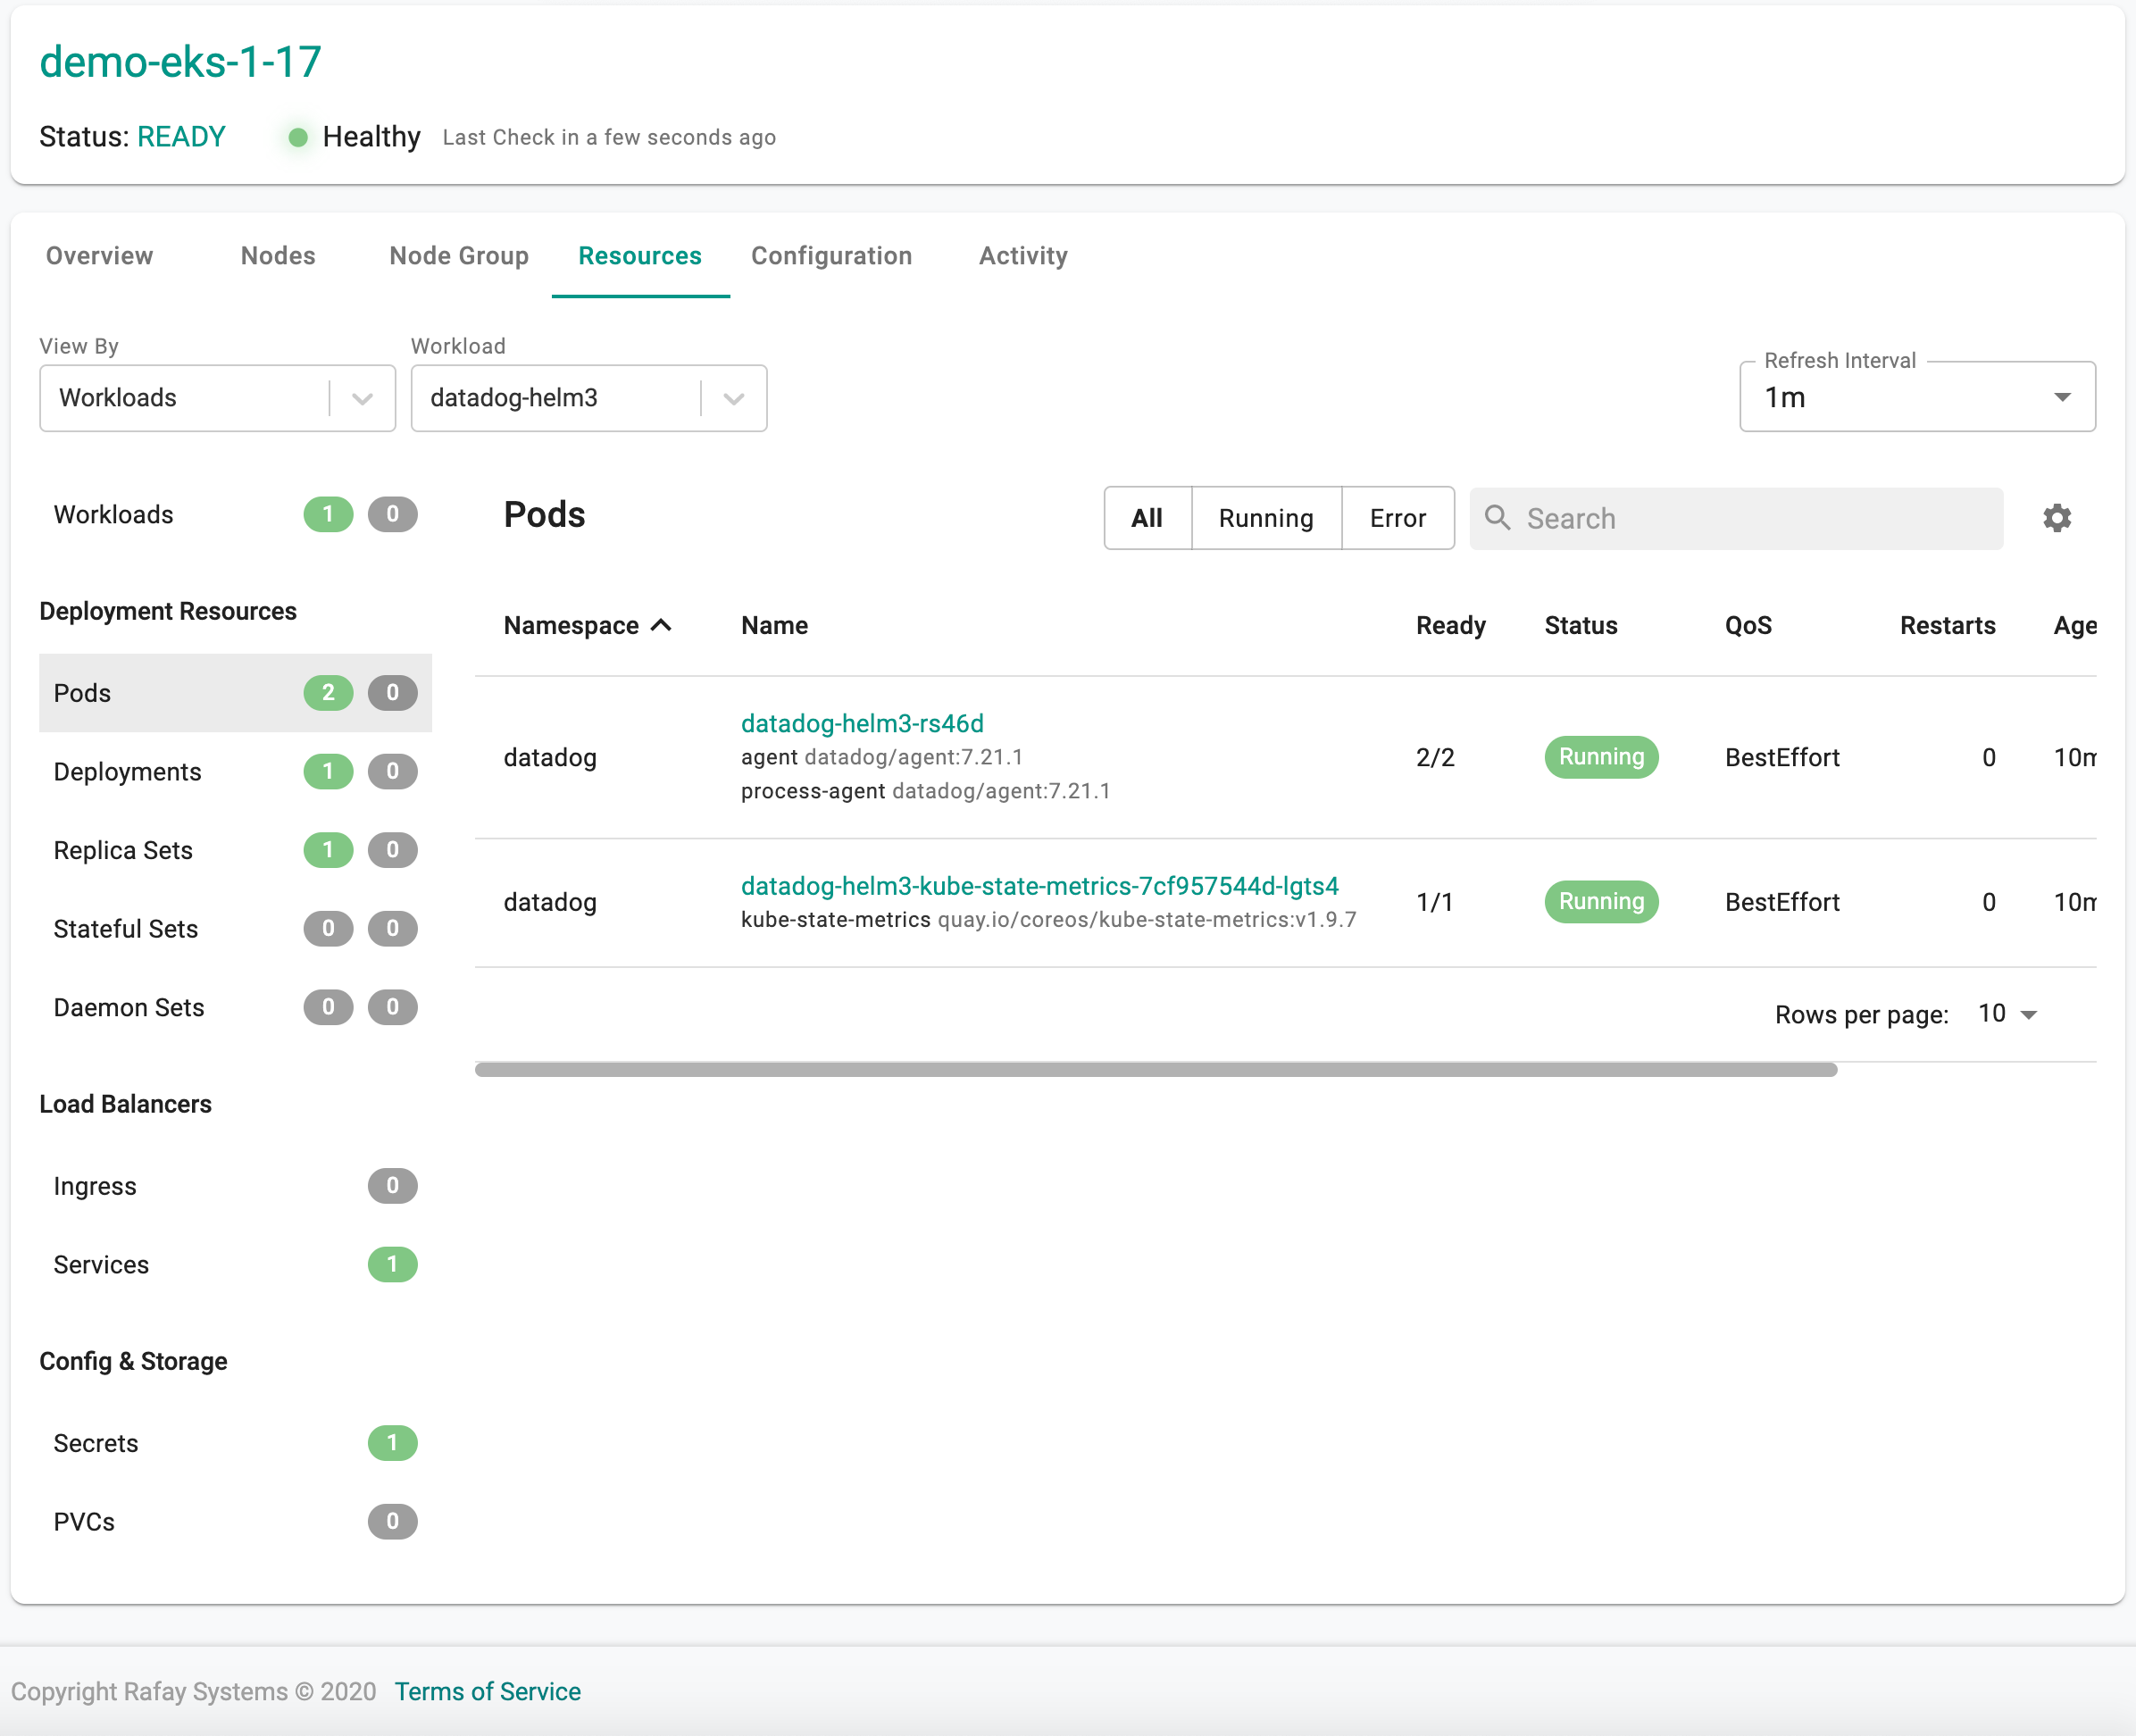
Status by K8 Resource For Add-On
- Click on the Cluster Dashboard
- Click on Resources
- Select "Workload" for "View By"
- Select the name of the "add-on"
In the example below, you can view the k8s resources for the Helm 3 based "datadog" add-on operational on this cluster.
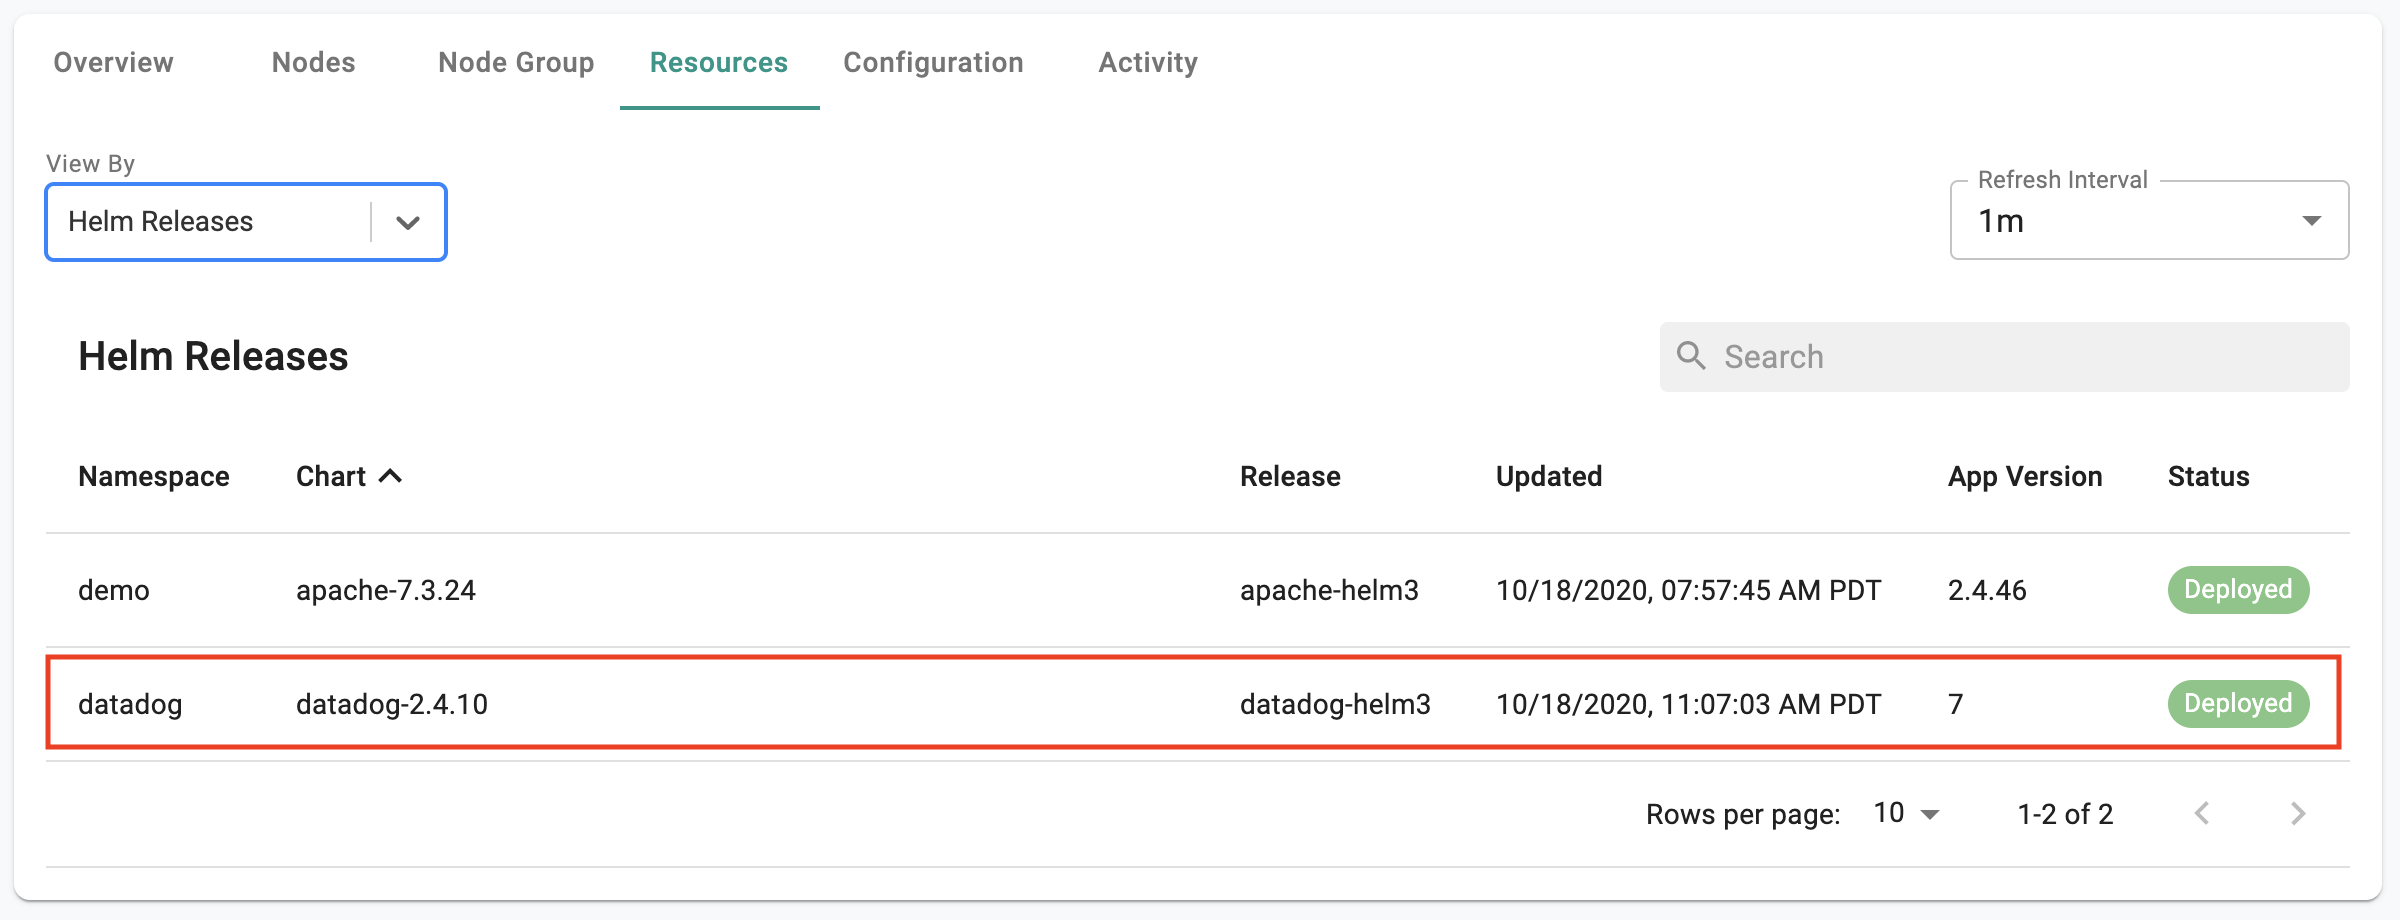
By Helm Release
- Click on the Cluster Dashboard
- Click on Resources
- Select "Helm Releases" for "View By"
In the example below, you can view the details of the "datadog" Helm 3 based add-on operational on this cluster.
Drift Detection and Blocking
The configuration for add-ons deployed to remote clusters as part of a cluster blueprint are protected from manual, out of band changes (inadvertent or malicious). The k8s mgmt operator will detect and block any attempts to perform manual changes using Kubectl or Helm.