Part 1: Provision
This is Part 1 of a multi-part, self-paced quick start exercise that will focus on provisioning an EKS Anywhere Cluster on Baremetal using the web console, RCTL CLI.
What Will You Do
In part 1, you will:
- Create a Gateway
- Configure and Provision an Amazon EKS Anywhere Cluster on Bare Metal.
- Access the cluster using the integrated "Kubernetes Resources Dashboard"
Watch a video of this exercise.
Step 1: Create Gateway
A gateway agent running on the machine within the same network as the control plane and worker node is used to facilitate communication with the Rafay controller to install a Kubernetes cluster in a private data center without the need for a direct incoming connection from the controller.
First, you will create the gateway resource in the console.
- Navigate to a project in your Org
- Select Infrastructure -> Gateway
- Click "New Gateway"
- Enter a name for the gateway
- Choose "EKSA Bare metal" as the gateway type from the drop-down menu.
- Click "Create"
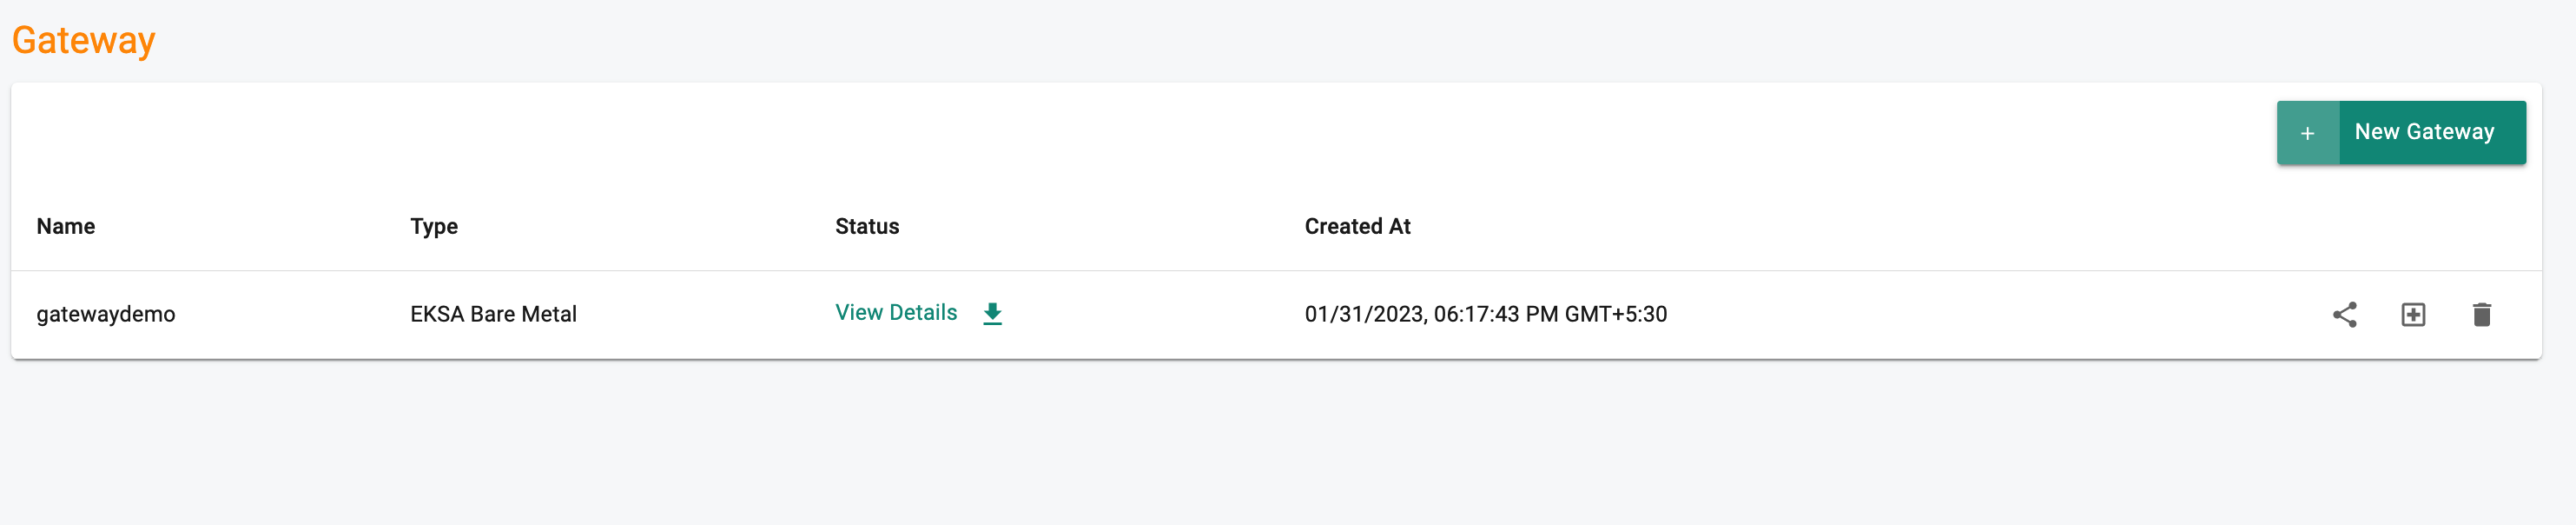
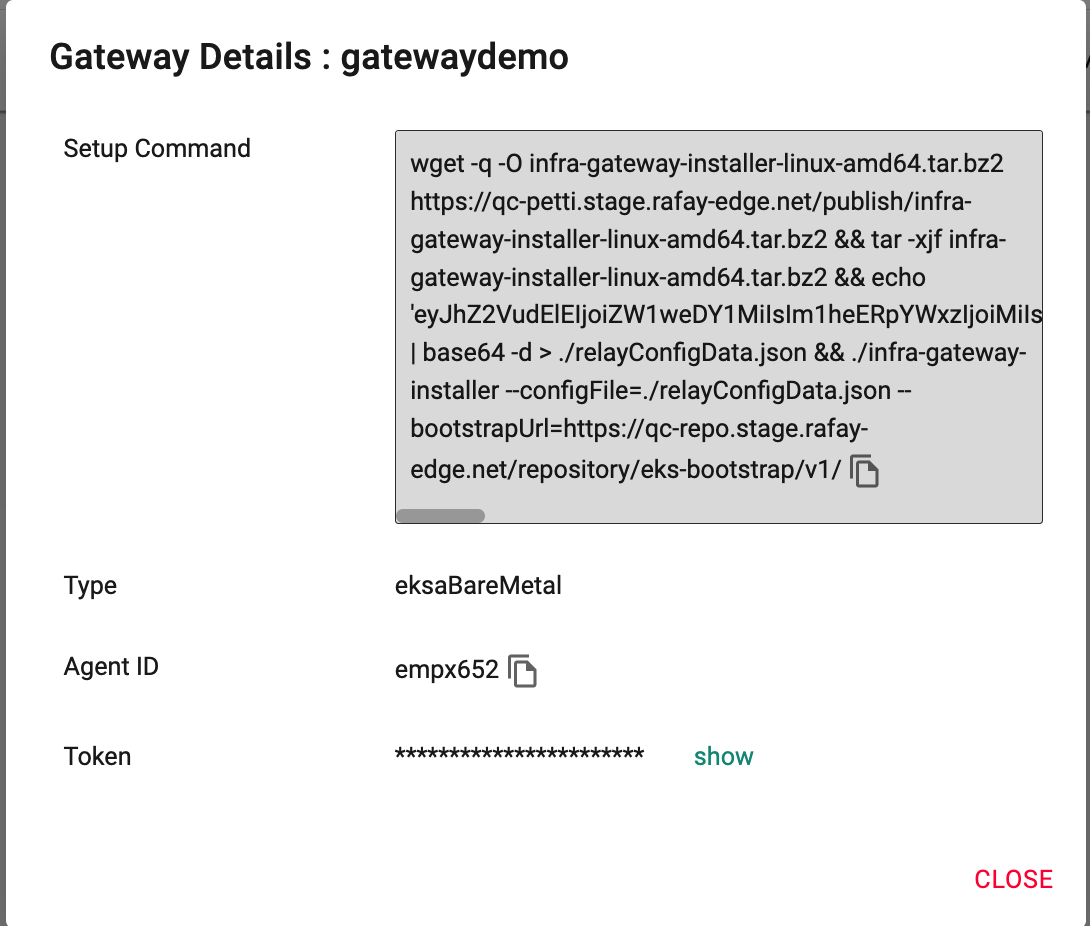
- Click "View Details" of the newly created gateway.
The information in this screen will be needed to deploy the gateway agent on the admin machine.
Step 2: Configure EKSA Bare Metal Cluster
In this step, you will configure and provision an Amazon EKSA Bare Metal Cluster with the following configuration:
The following will be automatically selected by default
- Minimal Cluster Blueprint.
- Management Cluster name ,which should be same as cluster name.
- The Latest available kubernetes Version.
- Default Services/Pods CIDR.
- No of Nodes Count which is set to 1 by default.
Select a method to provision and manage your EKSA Bare Metal Cluster from the tabs below.
Login into the controller's web console and into your Org.
- Navigate to the "defaultproject" and click on "New Cluster"
- Select "Private Cloud -> EKSA Bare Metal
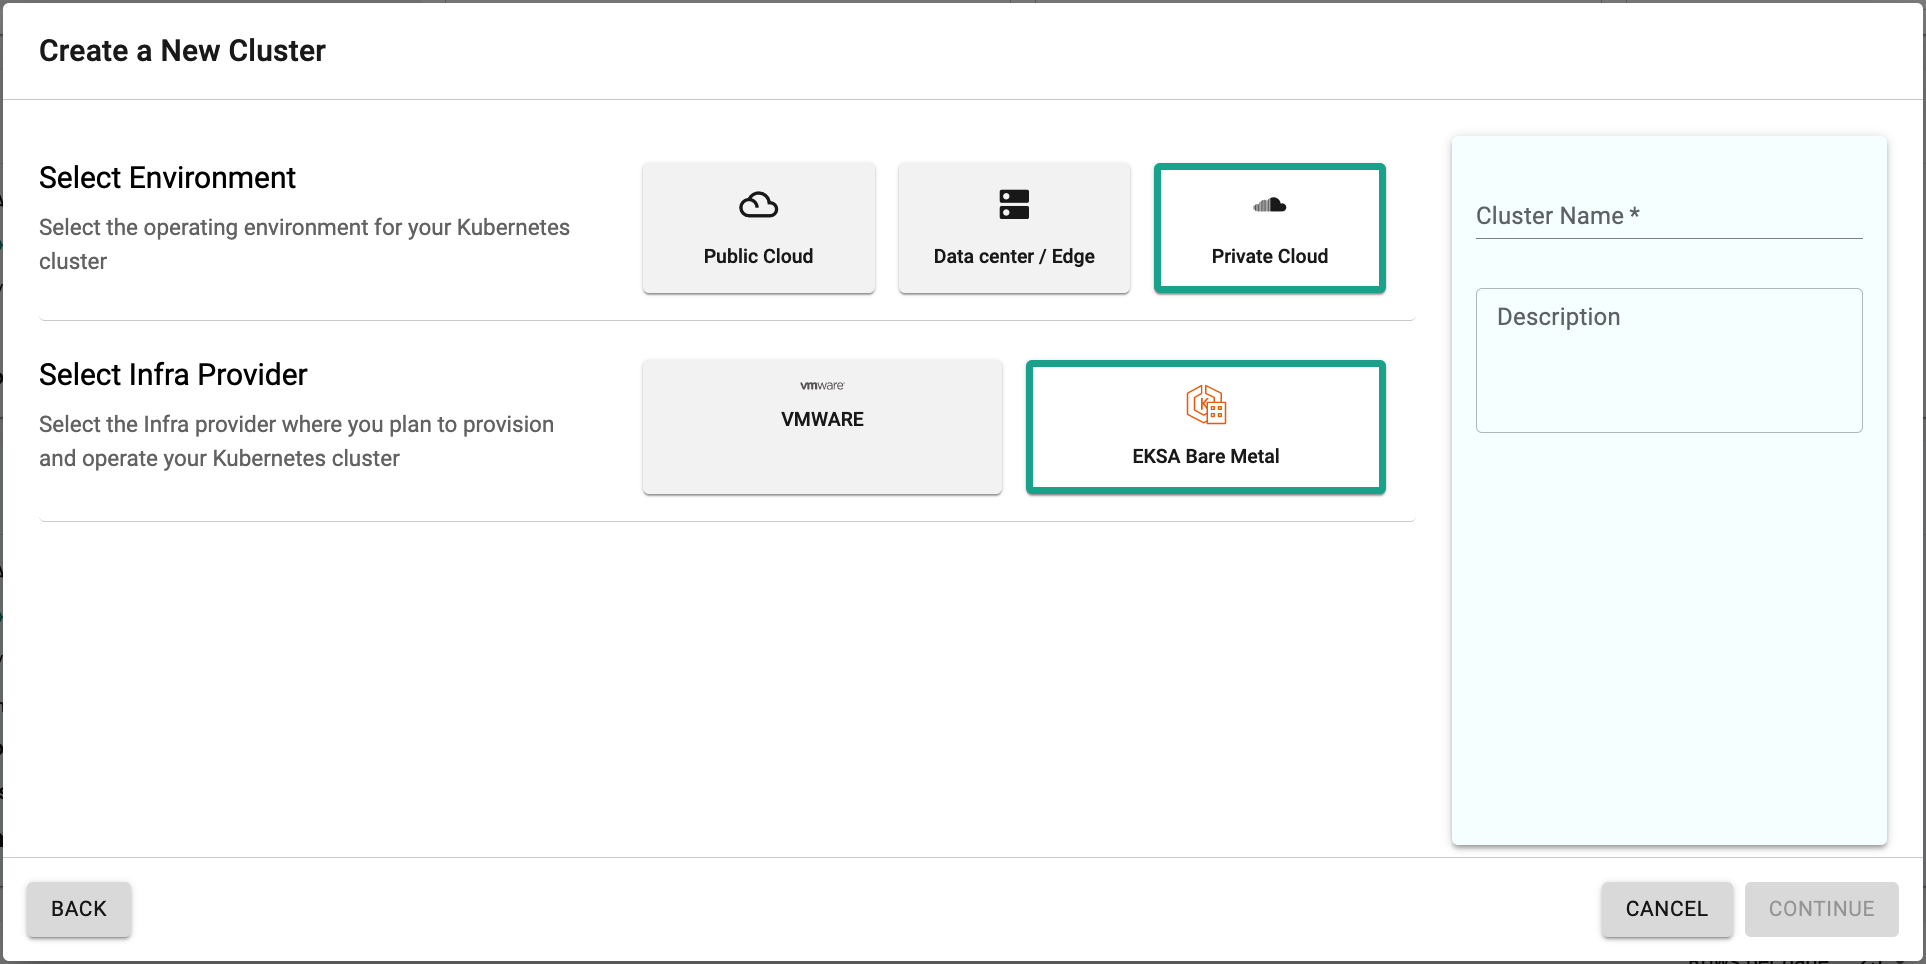
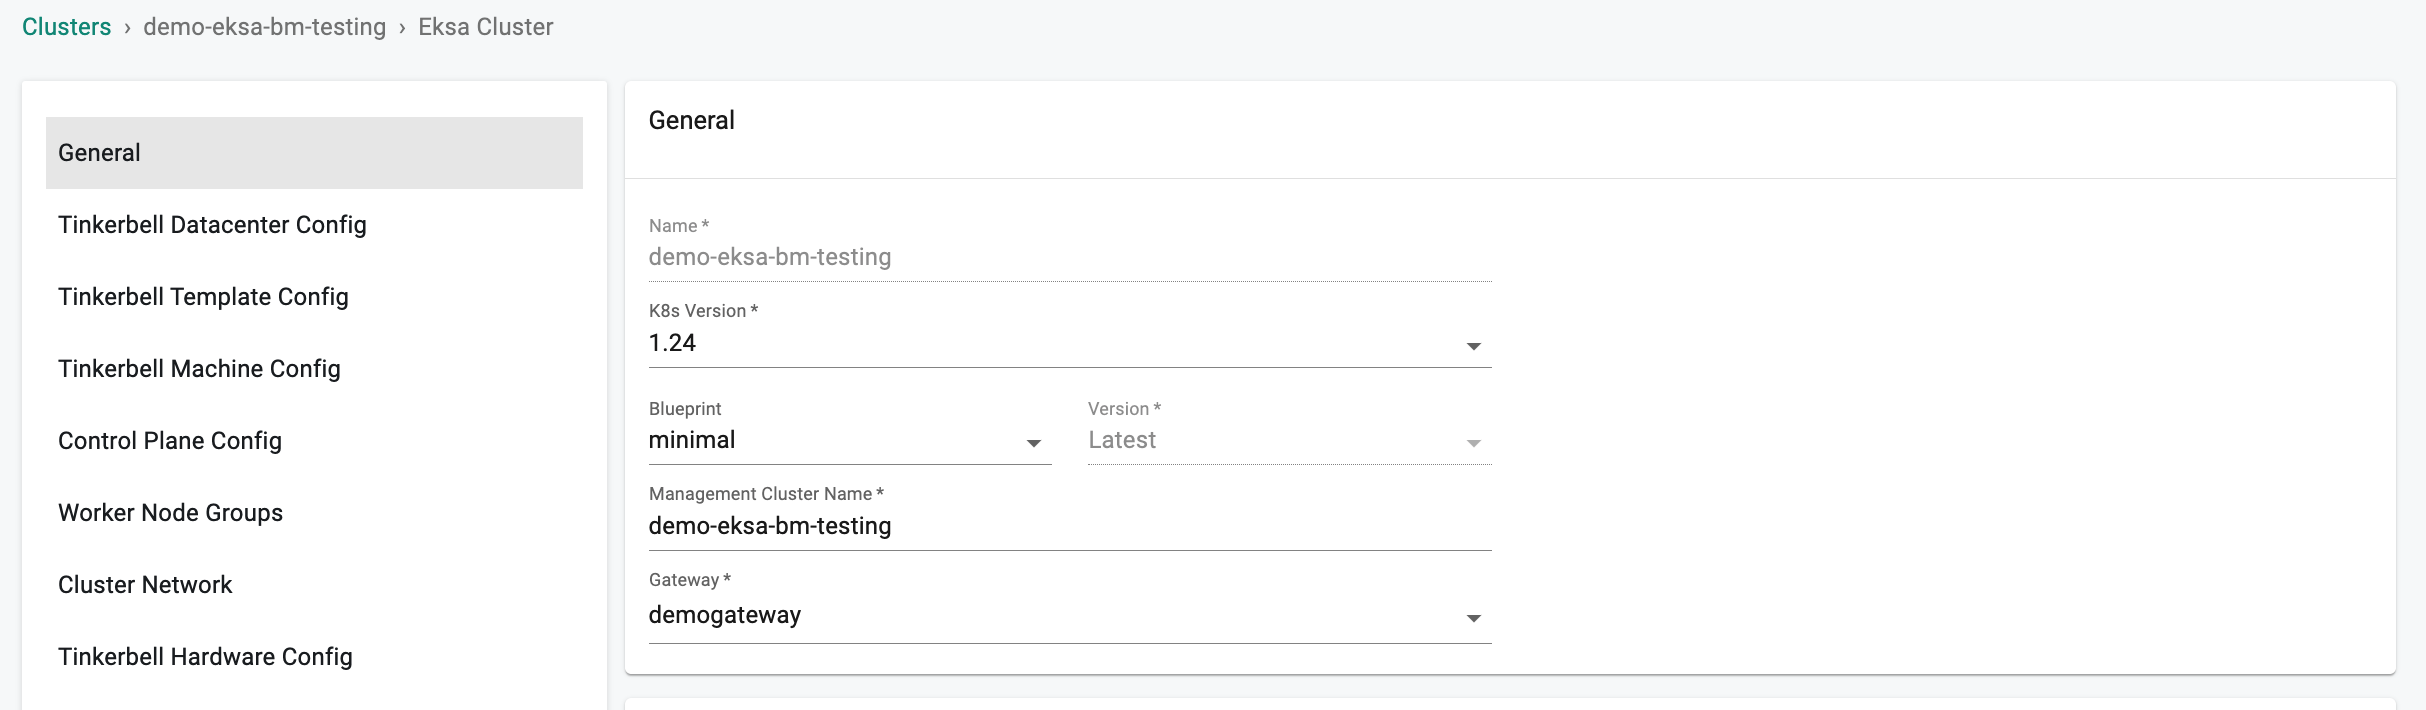
In the cluster configuration wizard,
- Enter the "name" for the EKSA Bare Metal cluster (demo-eksa-bm-testing in our case)
- Select the "Gateway" from the drop down
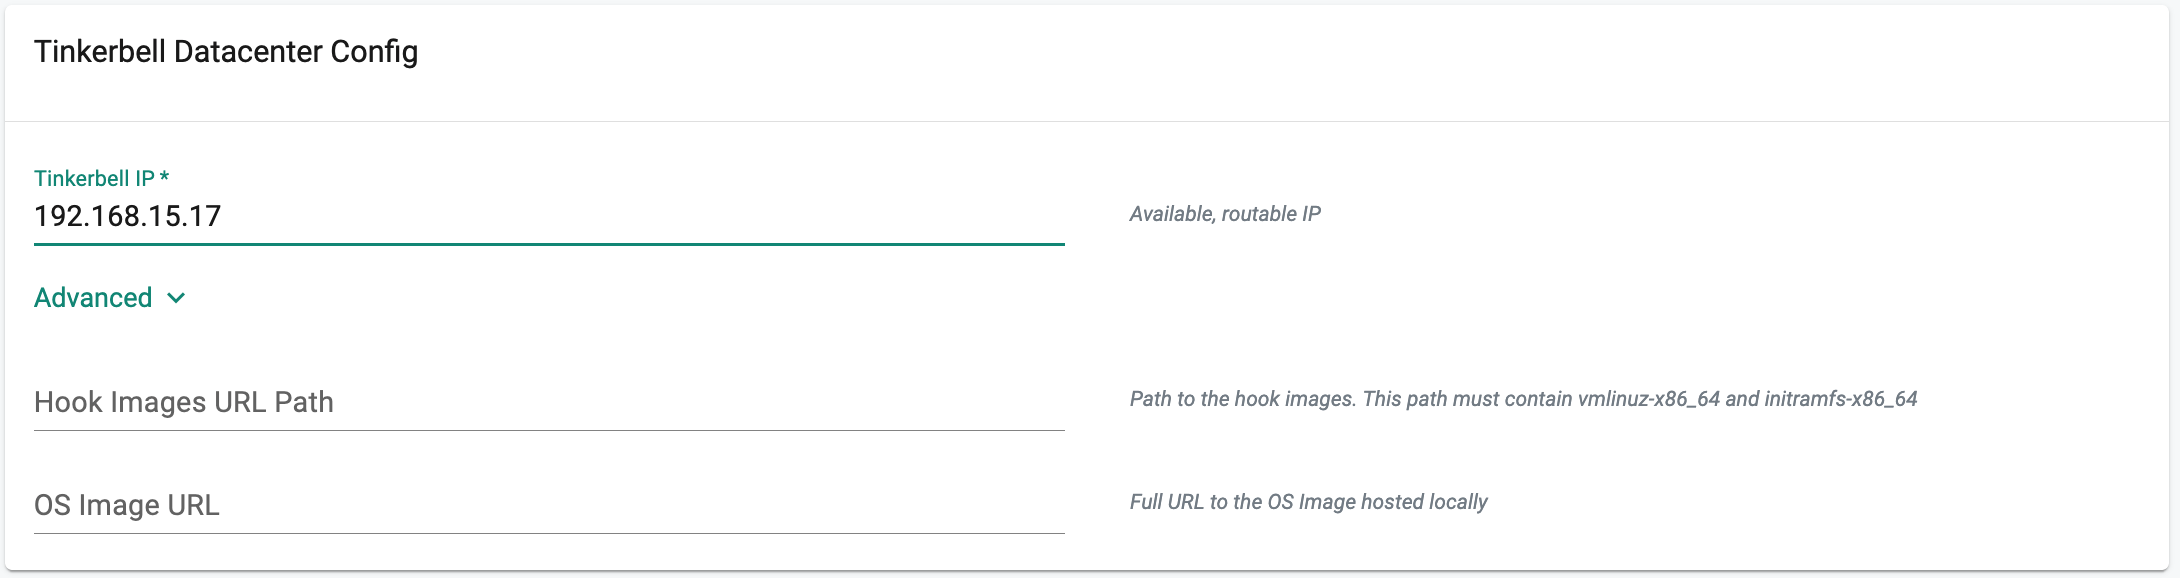
In the Tinkerbell Datacenter Config,
- Enter an Available, routable IP for the Tinkerbell service in the required field. This IP must be unique within the network and not conflict with other IPs.
- In the Advanced Settings, two optional fields allow you to replace the hook OS image and OS image
- If you have locally hosted hook images, provide the path which must include vmlinuz-x86_64 and initramfs-x86_64 in "Hook Image URL path".
- If you have a locally hosted OS image, provide the Full URL in the OS image URL field.
In the Tinkerbell Template Config,
This setting outlines the steps to be taken for setting up each node, including installation of the OS, configuration of the network, and any other necessary configurations.
- To add a template config, click "Add Template Config."
- In the "Template Name" field, enter "templateconfigcp." for controlplane.
- The "Tinkerbell IP" will be retrieved from the Tinkerbell DataCenter config.
- To find the "Gateway IP," click the "Gateway IP's" button to view available options. Choose an IP on the same Layer 2 network as the cluster nodes.
- From the drop-down, select the desired "OS" (e.g. bottlerocket or ubuntu).
- Choose the platform category that includes both generic and Equinix options from the dropdown menu.
- By default, the IP allocation type is set to static to ensure that static IP addresses are assigned to machines. However, you can choose DHCP as the IP allocation method from the dropdown menu based on your requirements.
- In the "K8s Version" field, enter the desired Kubernetes version.
- In the "Network Interface Name" field, the default value is "enp0s3," which is specific to the "generic" platform. If you're using a different inferface, adjust this value accordingly.
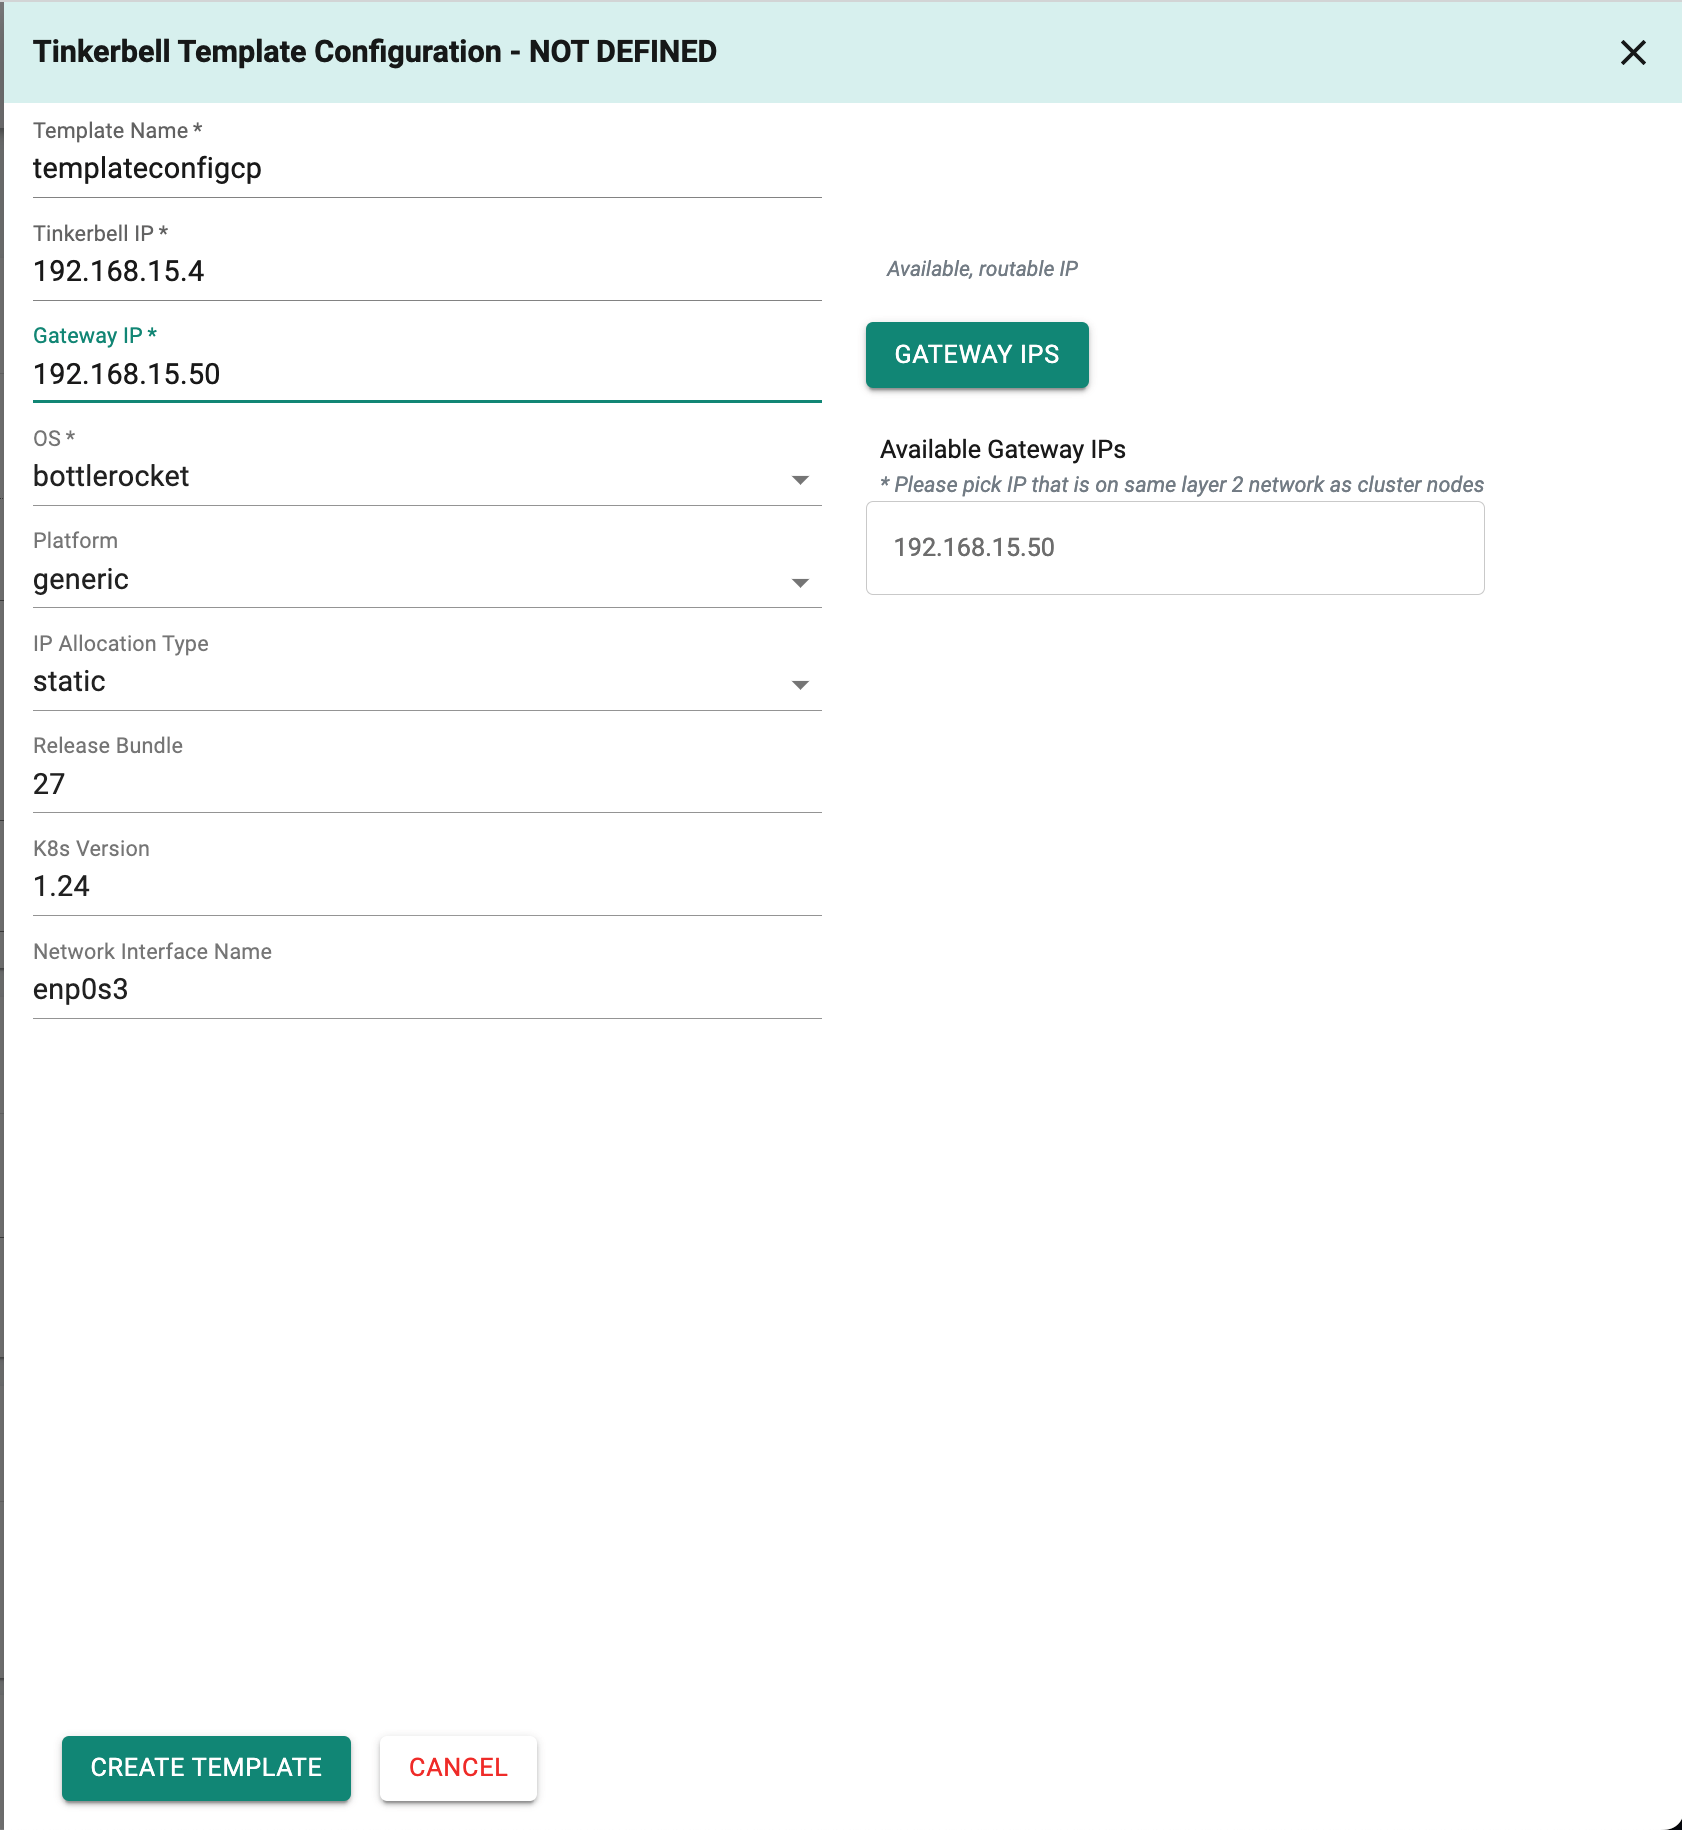
Click on "Create Template" and Click on "Save" to save the tinkerbell template config.
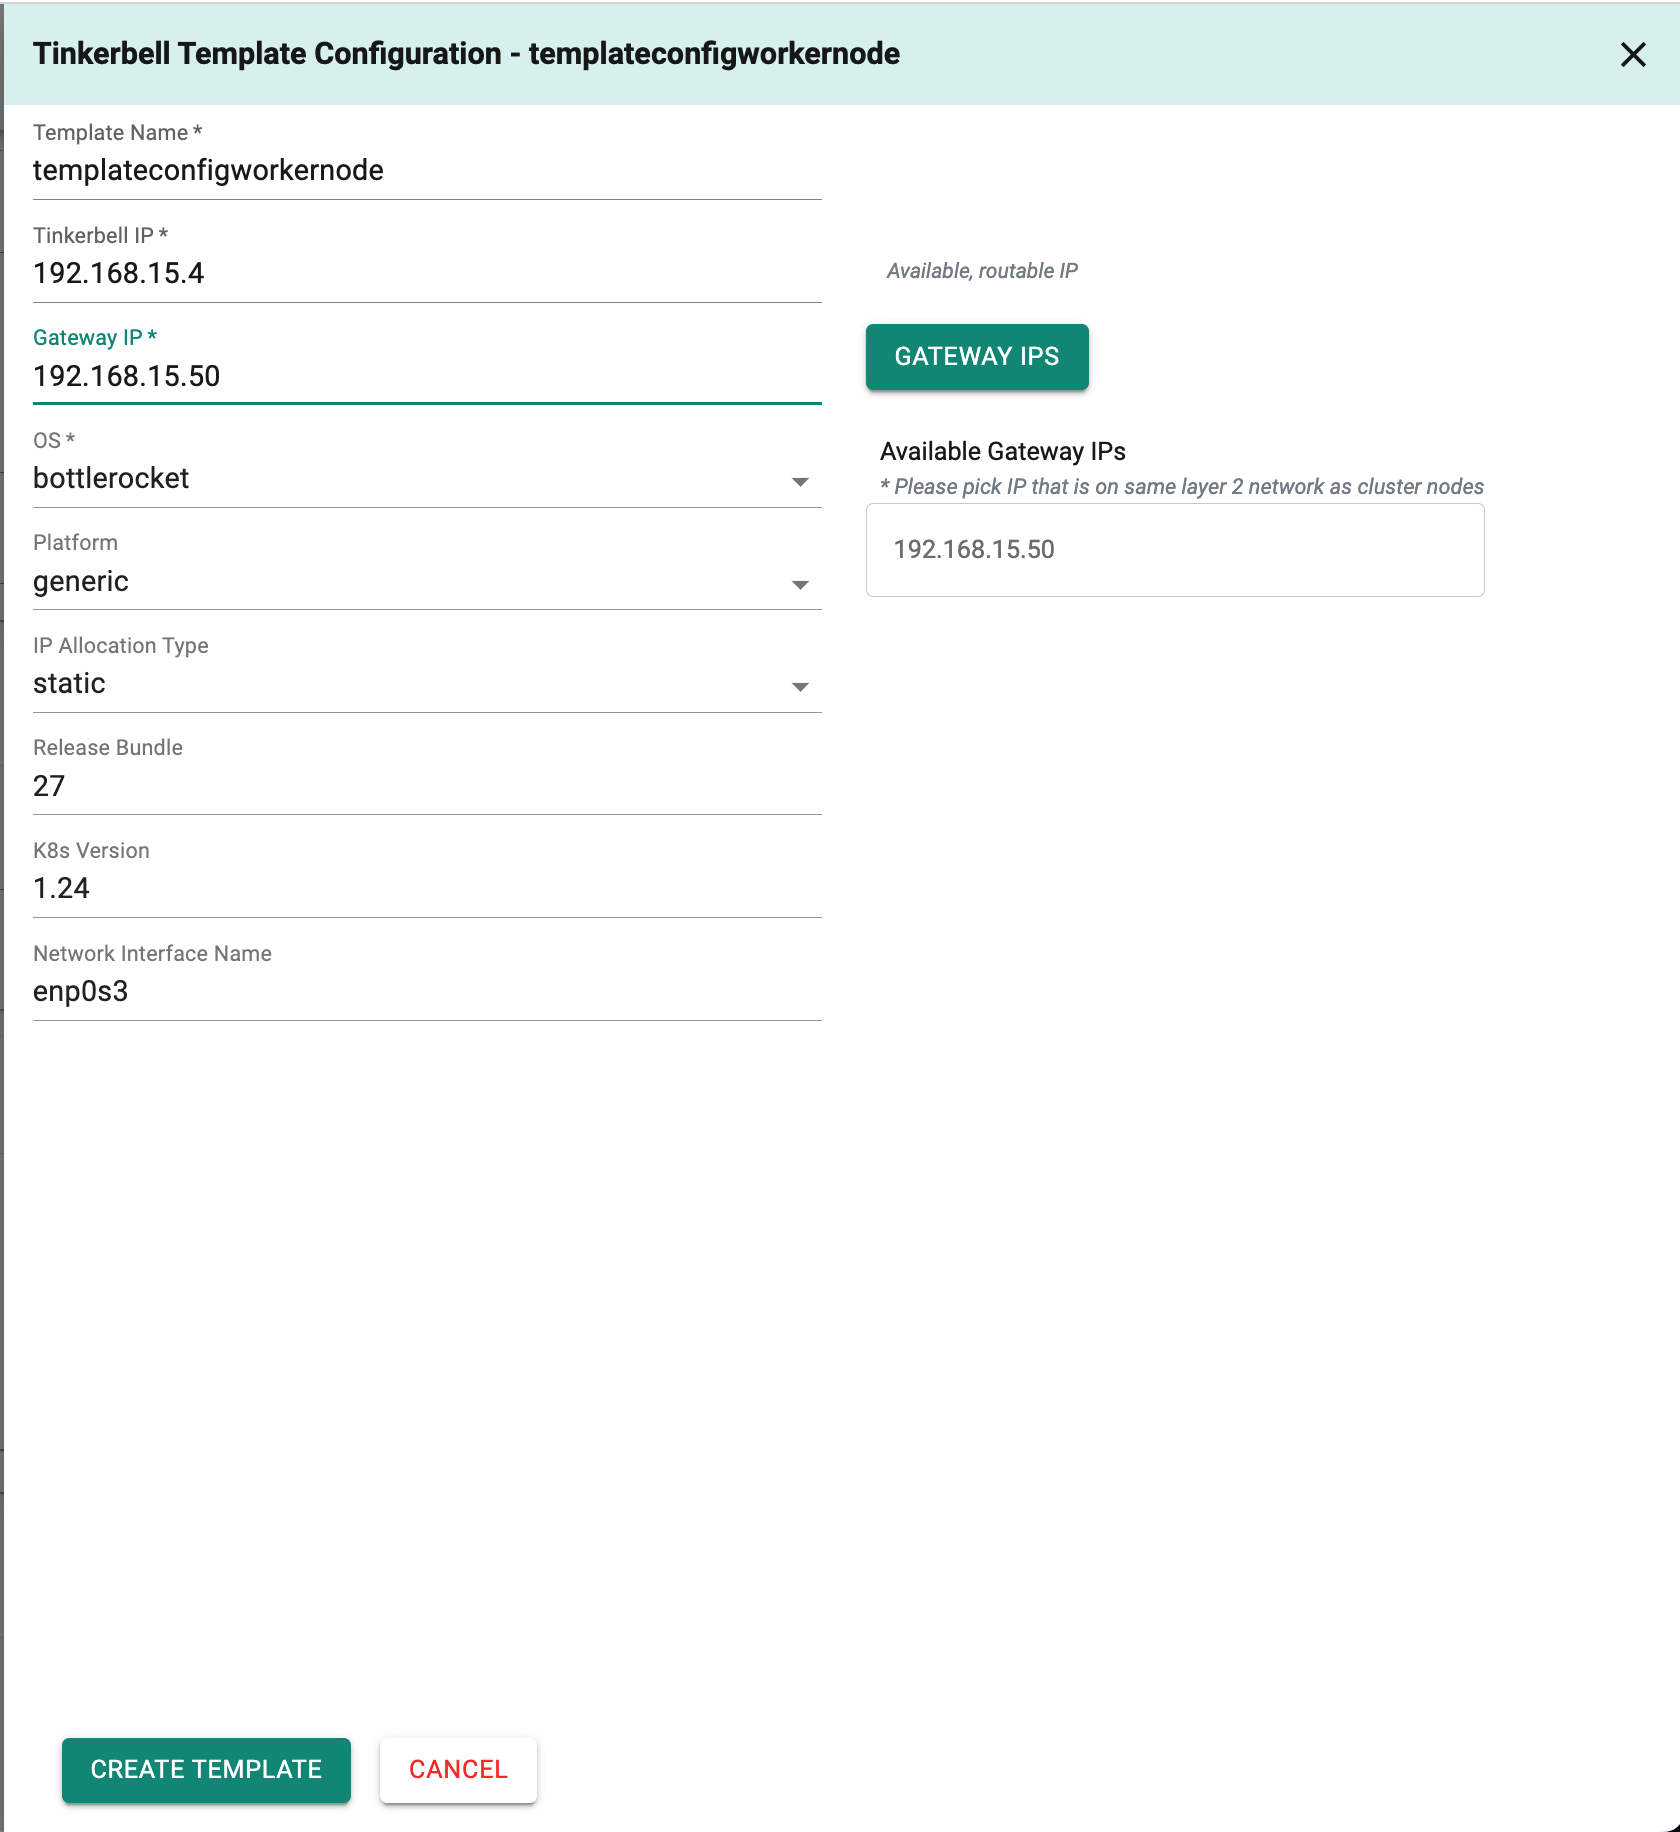
Include the tinkerbell template configuration for worker nodes in a similar manner.
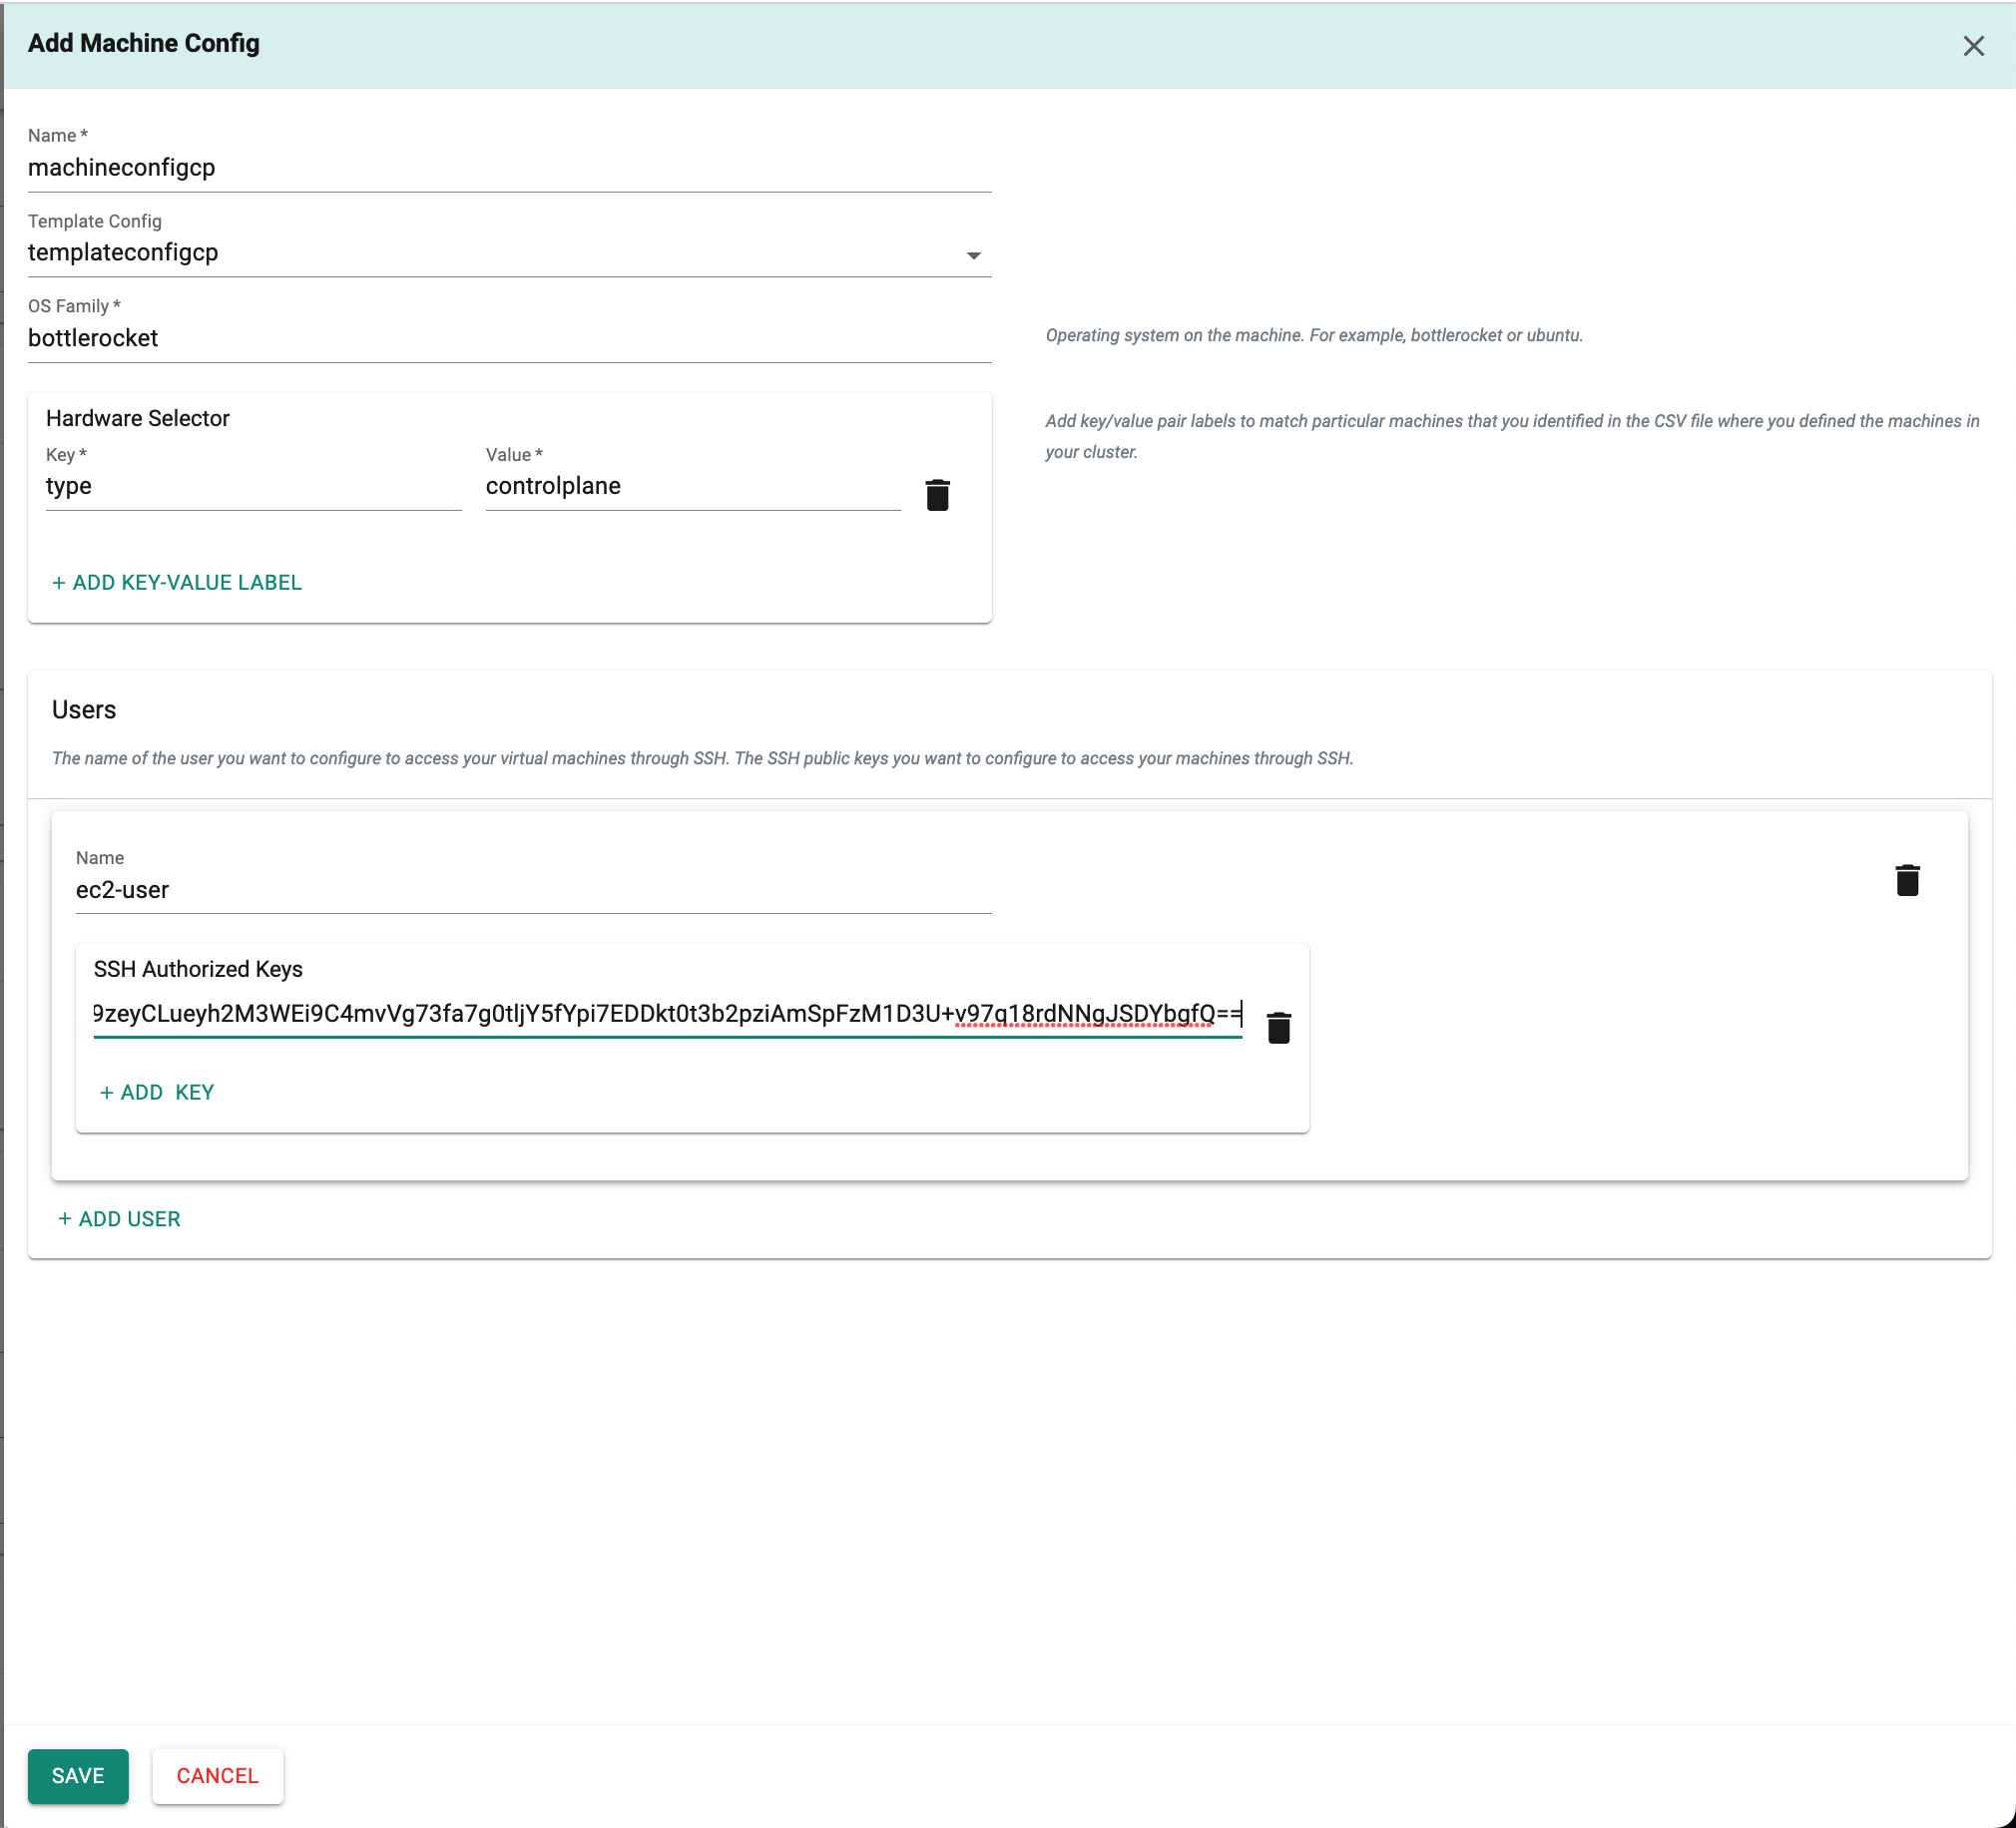
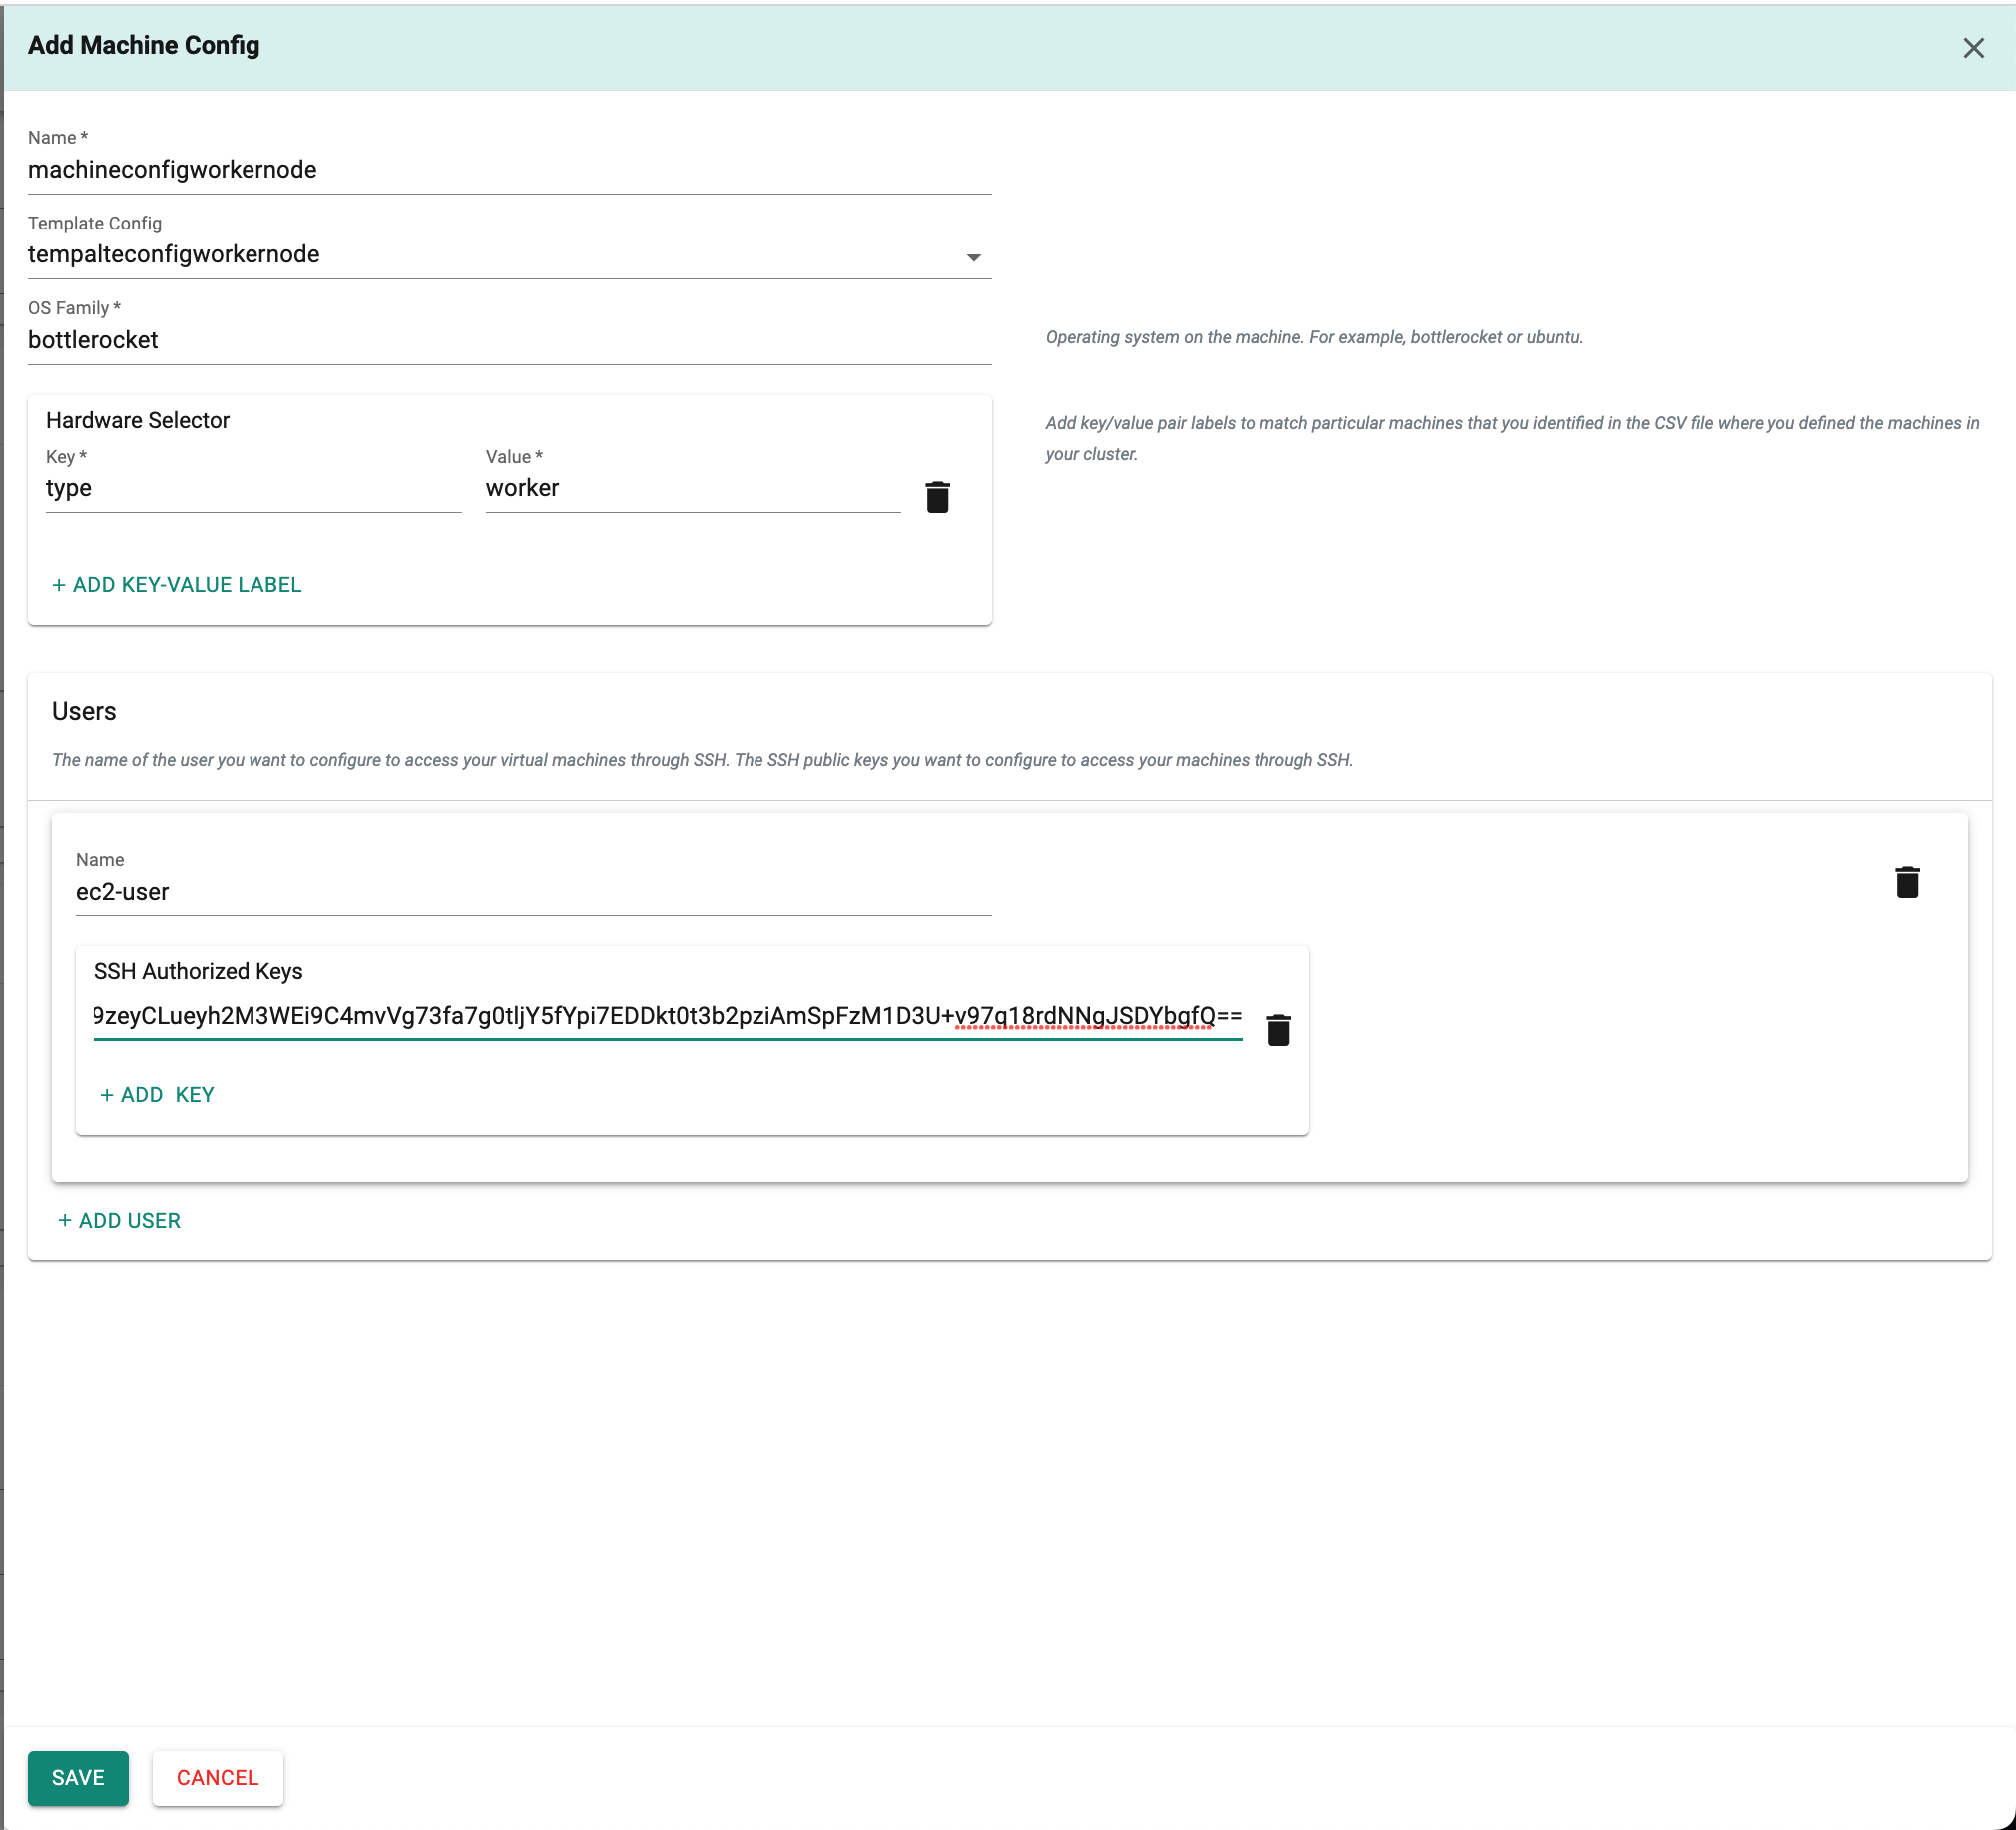
In the Tinkerbell Machine Config,
This configuration outlines the settings for each node, referencing the Tinkerbell template config, which includes the username, SSH keys, and the hardwareSelector field to add a key/value label for matching specific machines.
- In the "Machine config name" field ,enter the "machineconfigcp" for control plane.
- In the "Template Config" field, select the specific Template config from the drop-down menu for the control plane machine.
- In the "OS Family" field,enter the operating system required to be installed on the machine.(e.g. bottlerocket or ubuntu).
- In the "Hardware Selector" Section,add key/value pair labels to match particular machines.
- In the "Users" section, enter the user name in the "Name" field and the SSH authorized keys in the "SSH Authorized Keys" field.The name of the user is for configuring SSH access to your virtual machines.
Include the Tinkerbell machine configuration for worker nodes in a similar manner.
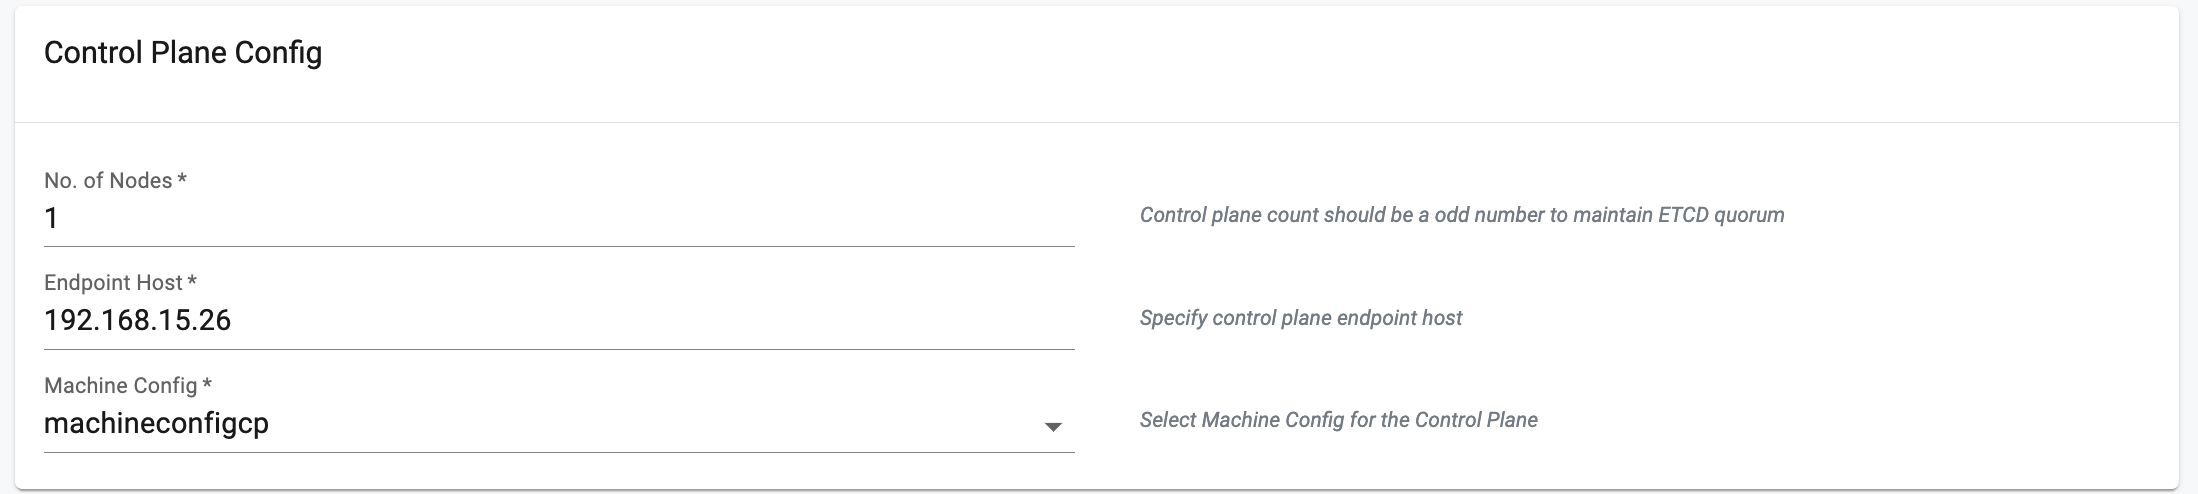
In the Control Plane Config,
- Enter the number of nodes count in the "No of Nodes" field. The default is set to 1.
- In the "Endpoint Host" Field,enter the unique IP for the control plane in your EKS Anywhere cluster. It should be within your network range and not in conflict with other machines.
- In the "Machine config",Choose the Control Plane's Machine Configuration from the drop down.
In the Worker Node Groups,
- Click on "Add Node Group"
- In the "Node Group Name" field,enter the "nodegroupname" for worker node.
- Enter the number of nodes count in the "Nodes" field. The default is set to 1.
- In the "Machine config",Choose the Worker Node Machine Configuration from the drop down.

In the Cluster Network,
- Under Services, in the cidrBlocks section, enter the CIDR needed for the Kubernetes service.
- Under Pods ,in the cidrBlocks section, enter the CIDR needed for the Kubernetes Pods.
- In the Cilium CNI configuration, select the Policy Enforcement Mode from the drop-down menu. The default is set to "default," but you can choose a different option.

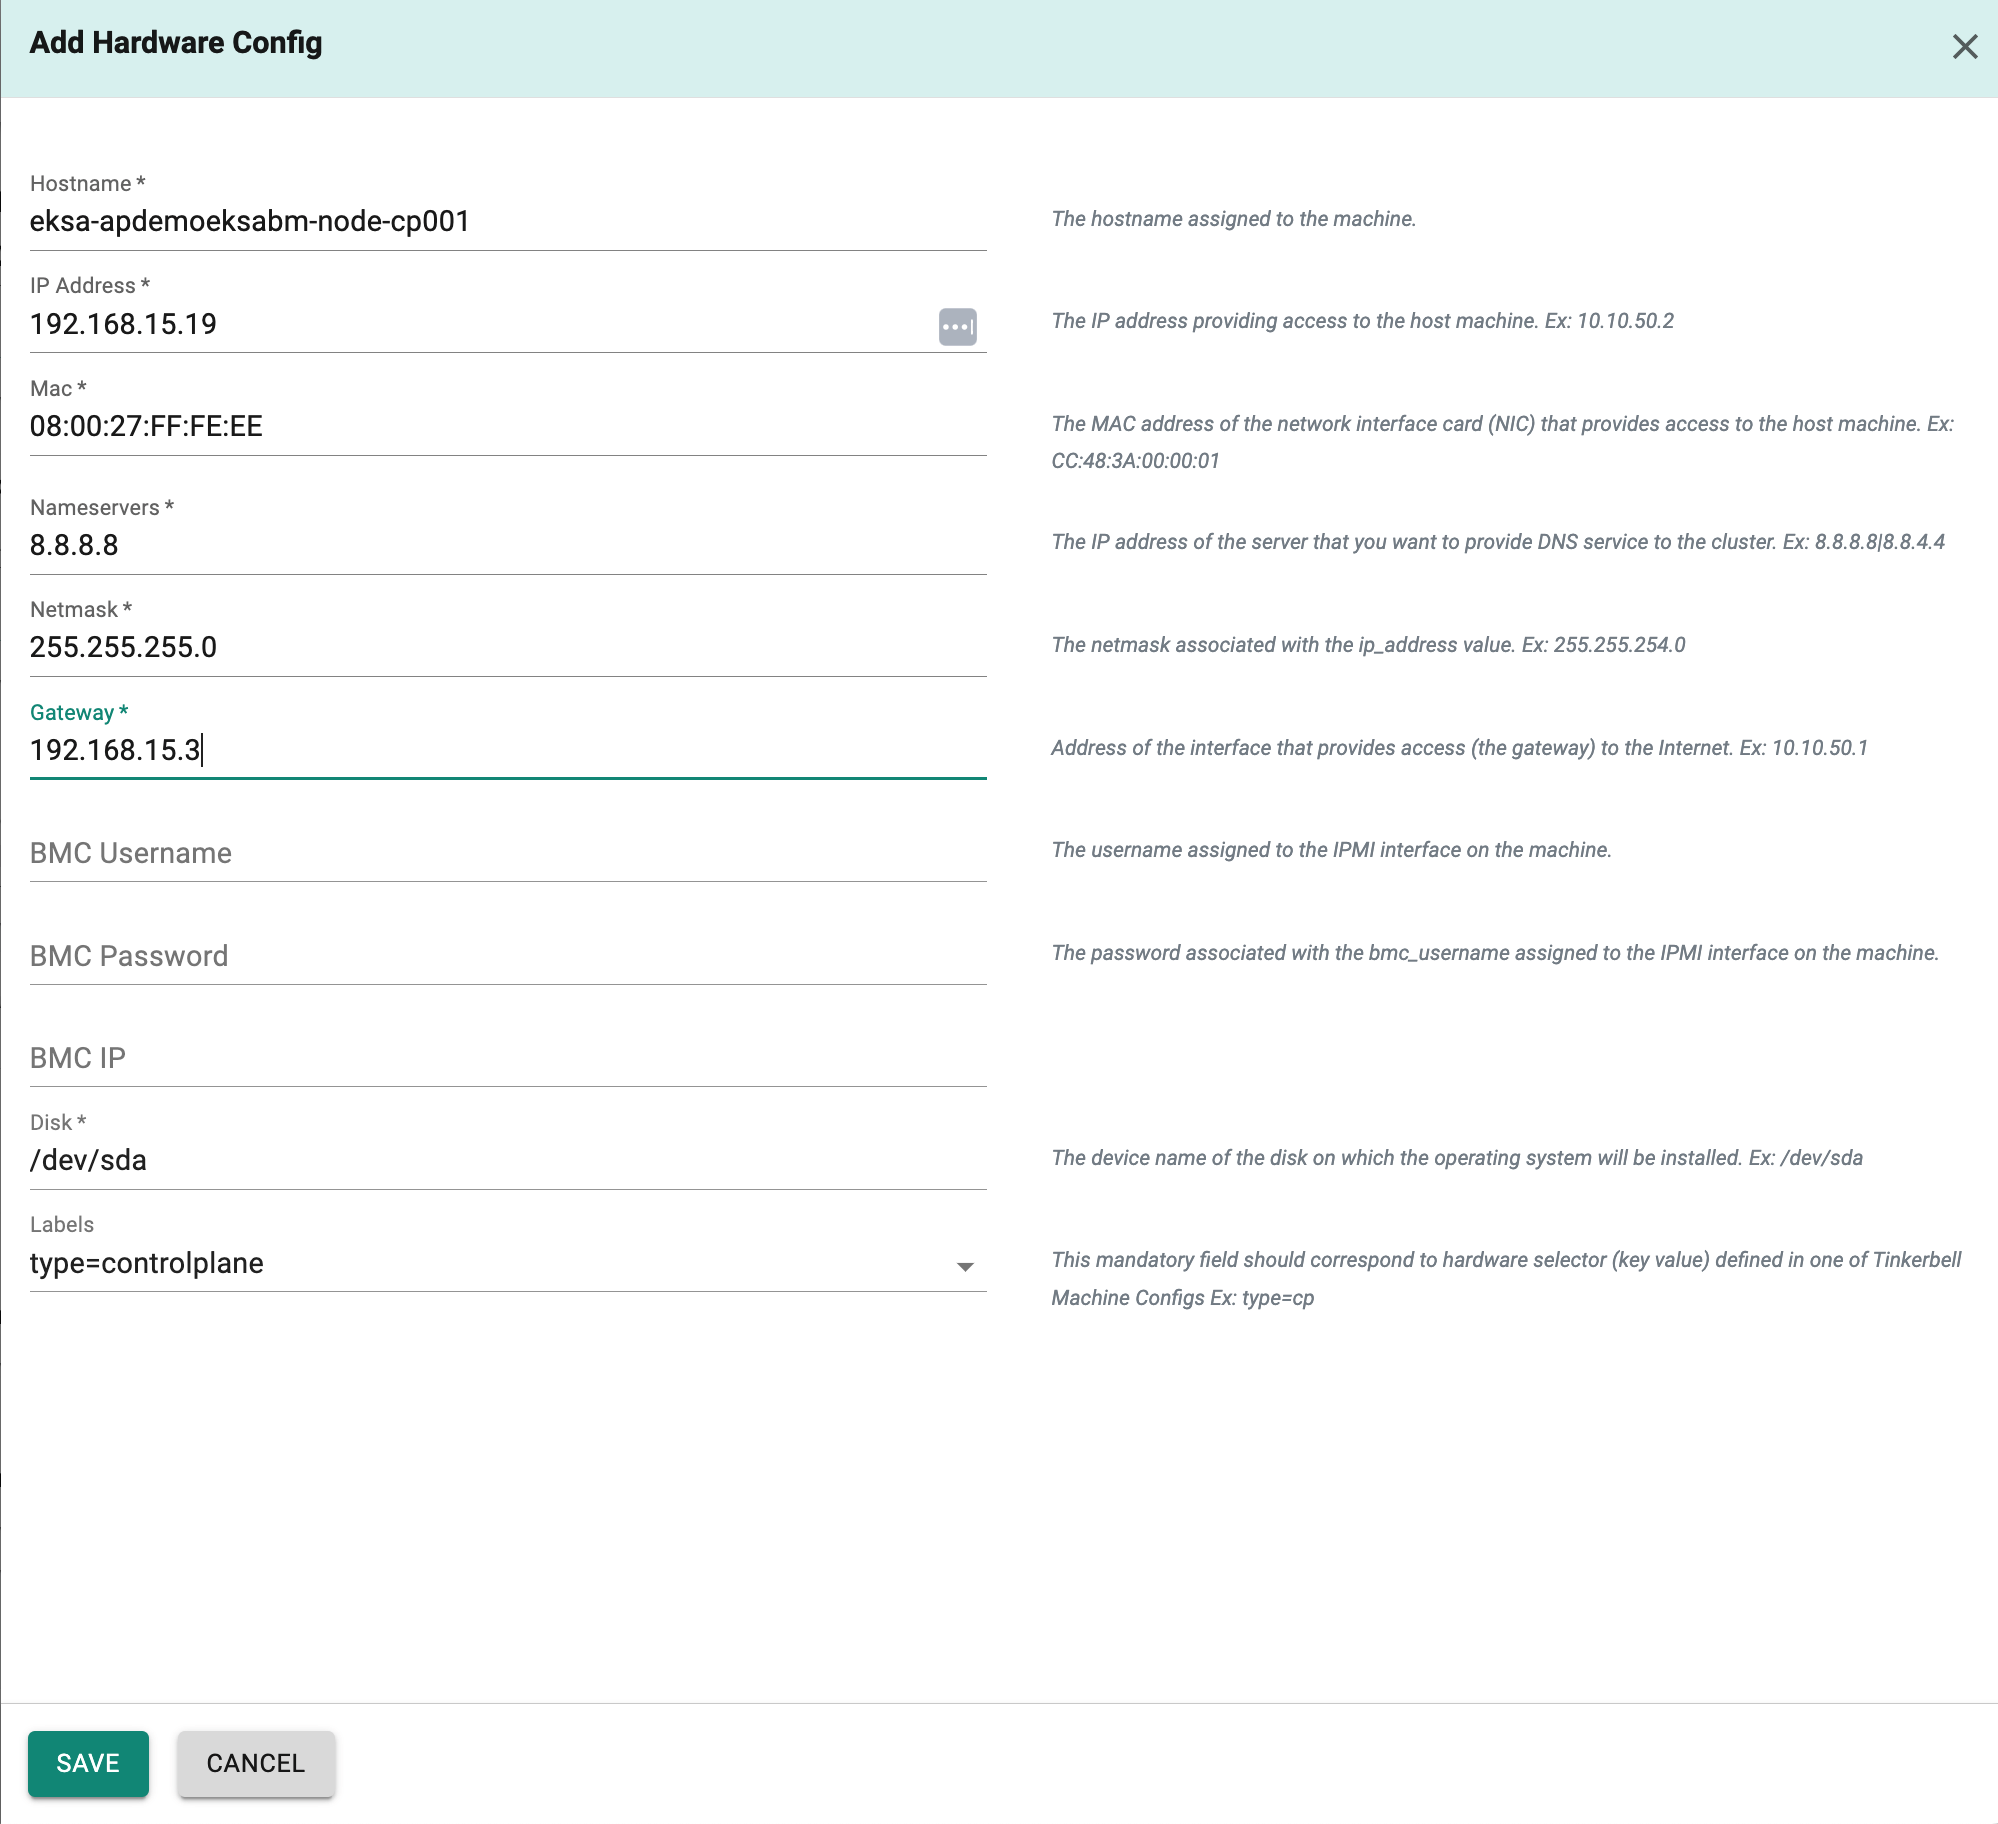
In the Tinkerbell Hardware Config,
In this section, provide information about all physical machines that you want to add to your target Bare Metal cluster.
- Click on "Add Hardware Config".
- In the "Hostname" field,enter ths host name of the control plane machine.
- In the "IP Address" field,enter the IP Address of the control plane machine.
- In the "Mac" field,enter the Mac of the control plane machine.
- In the "Nameservers" field,enter the IP address of the server that you want to provide DNS service to the cluster.
- In the "Netmask" field,enter the netmask associated with the Ip address.
- In the "Gateway " field,enter the IP Address interface that provides access (the gateway) to the Internet.
- In the "BMC Username" field,enter the username assigned to the IPMI interface on the machine.
- In the "BMC Password" field,enter the password assigned to the IPMI interface on the machine.
- In the "BMC IP" field,enter the IP Address of the IPMI Interface.
- In the "Disk" field,enter the device name of the disk on which the operating system will be installed.Ex: /dev/sda
- In the "Labels" field,slect from the drop down defined in the tinker machine config.
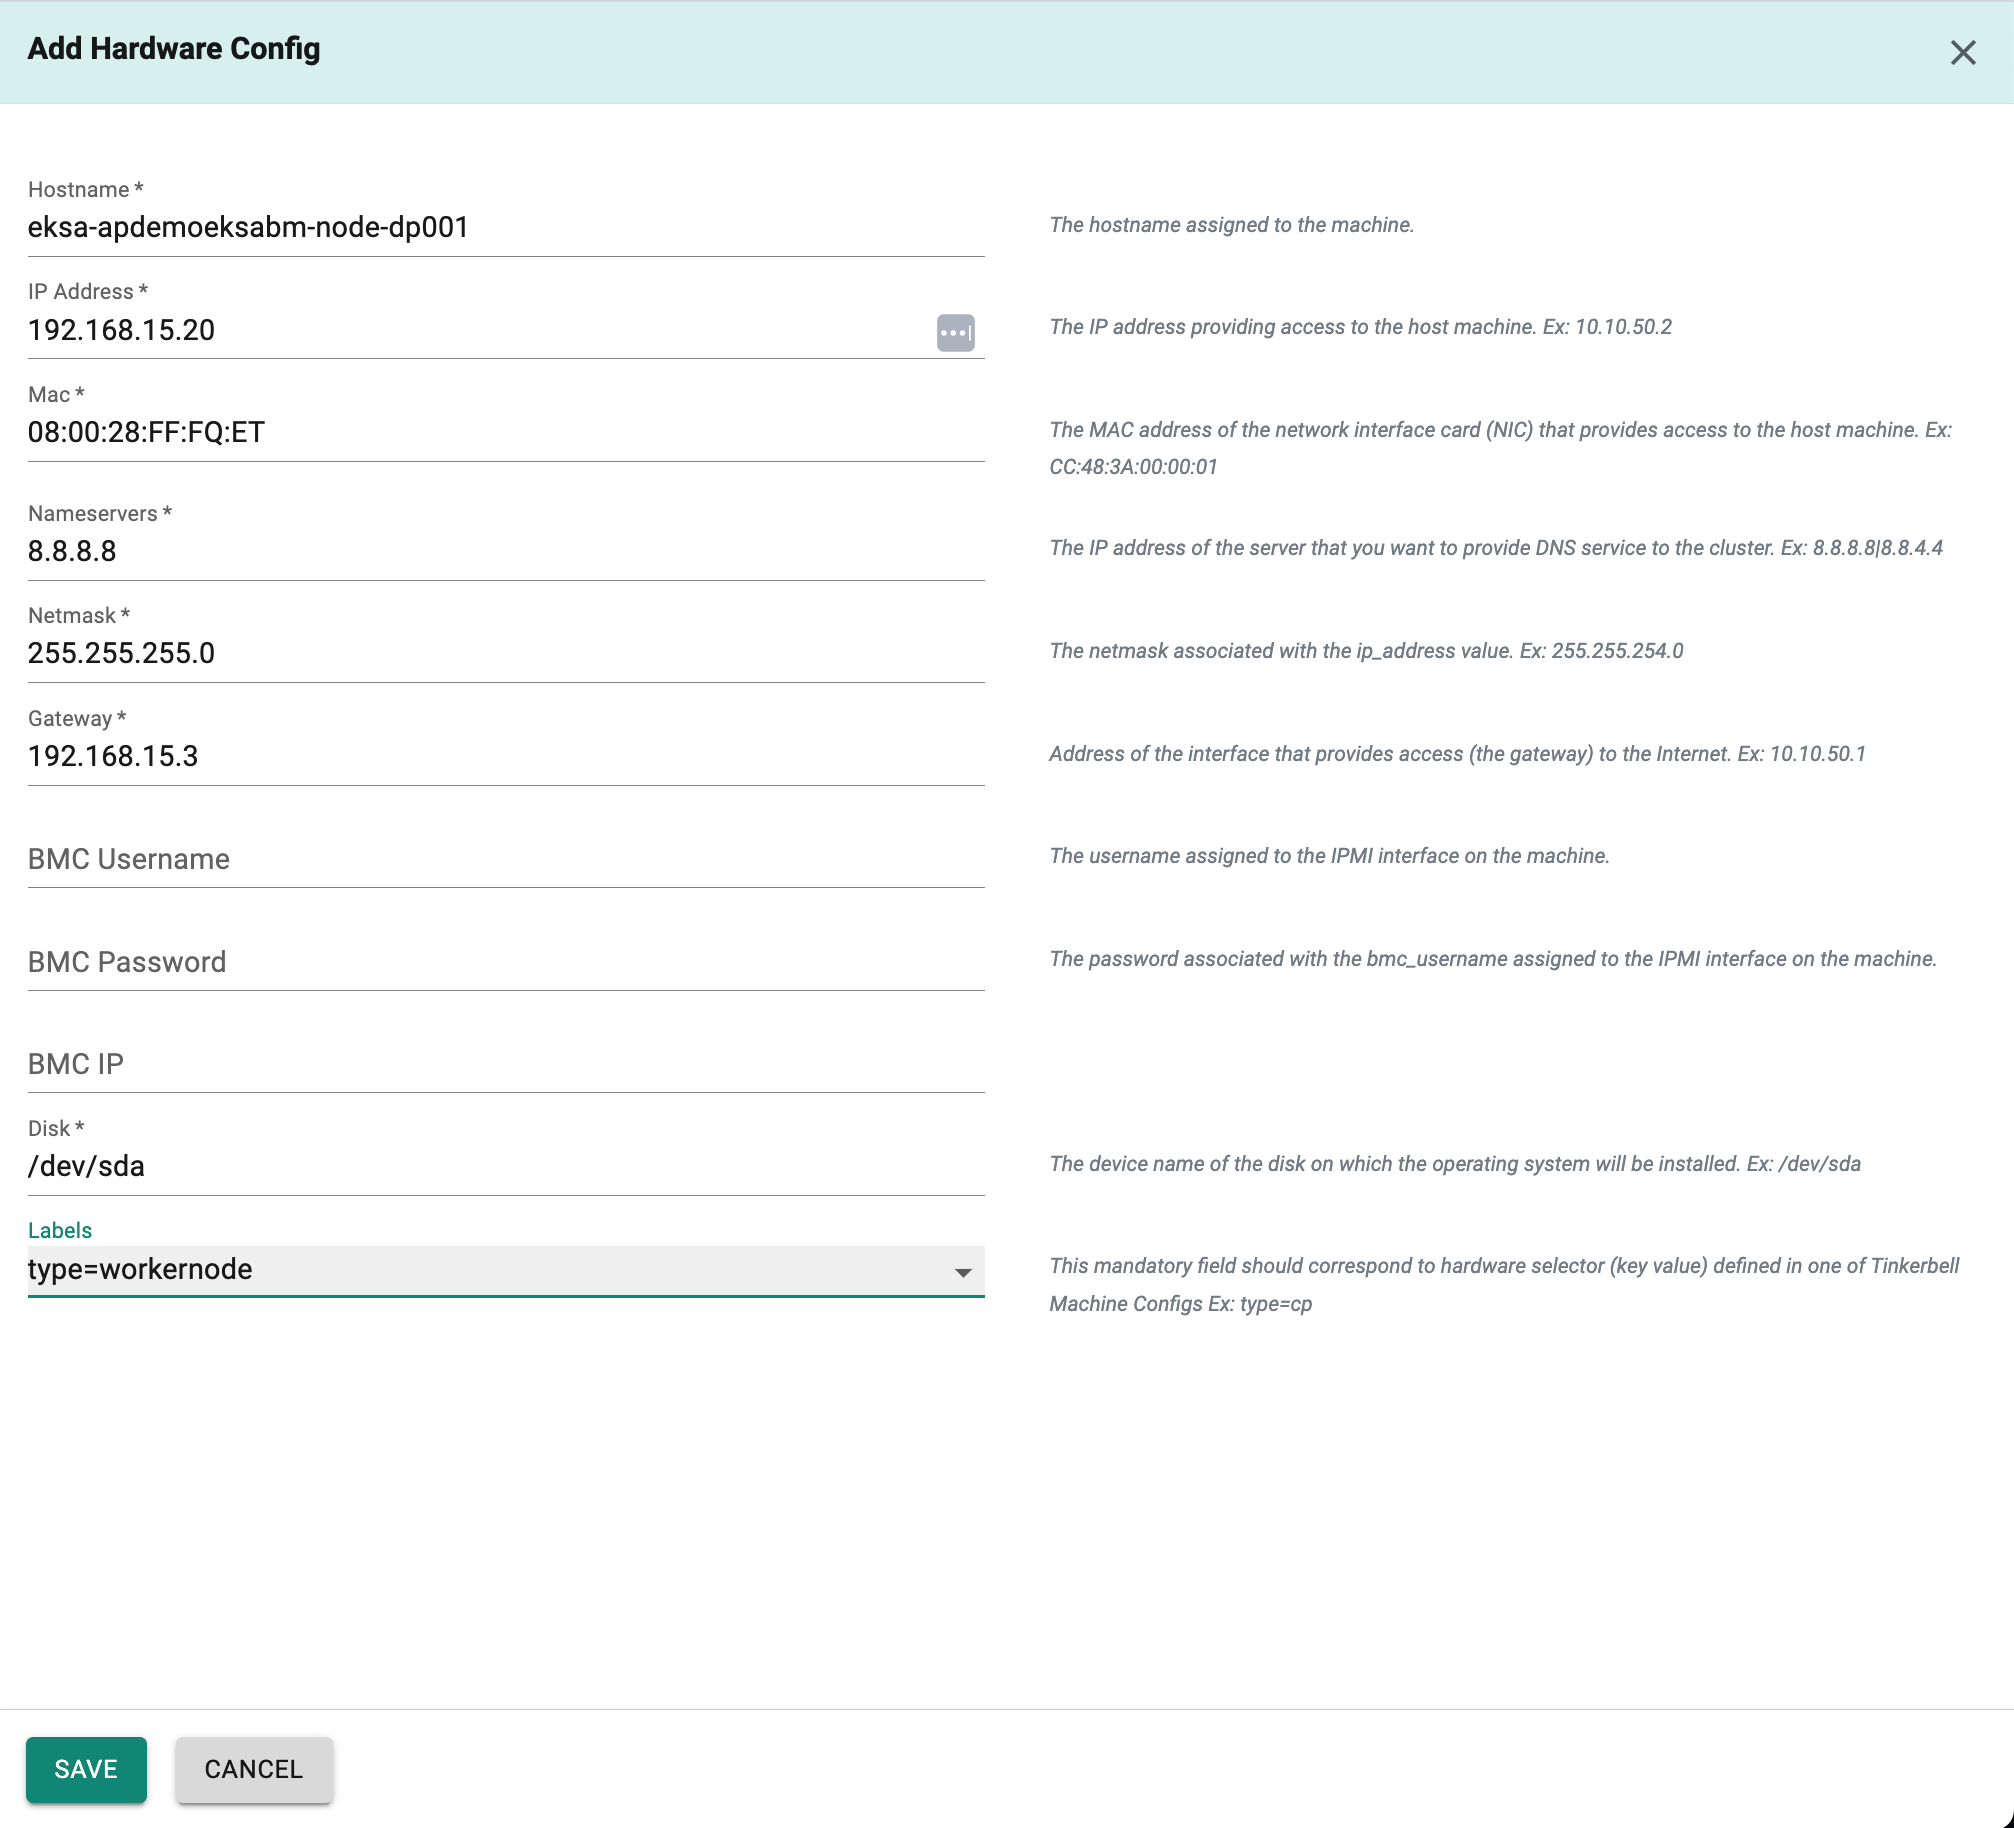
Add the Hardware configuration for worker nodes in a similar manner.Enter the hostname, IP Address, Mac, nameservers, netmask, gateway IP, IPMI username, password, IP, disk device name, and label in their respective fields for worker node machine.
Click on "Save Changes" and Click on "Provision" to start provisioning the EKSA Bare Metal Cluster.
You can monitor the progress of your Amazon EKSA Baremetal cluster being provisioned step by step right in the web console.
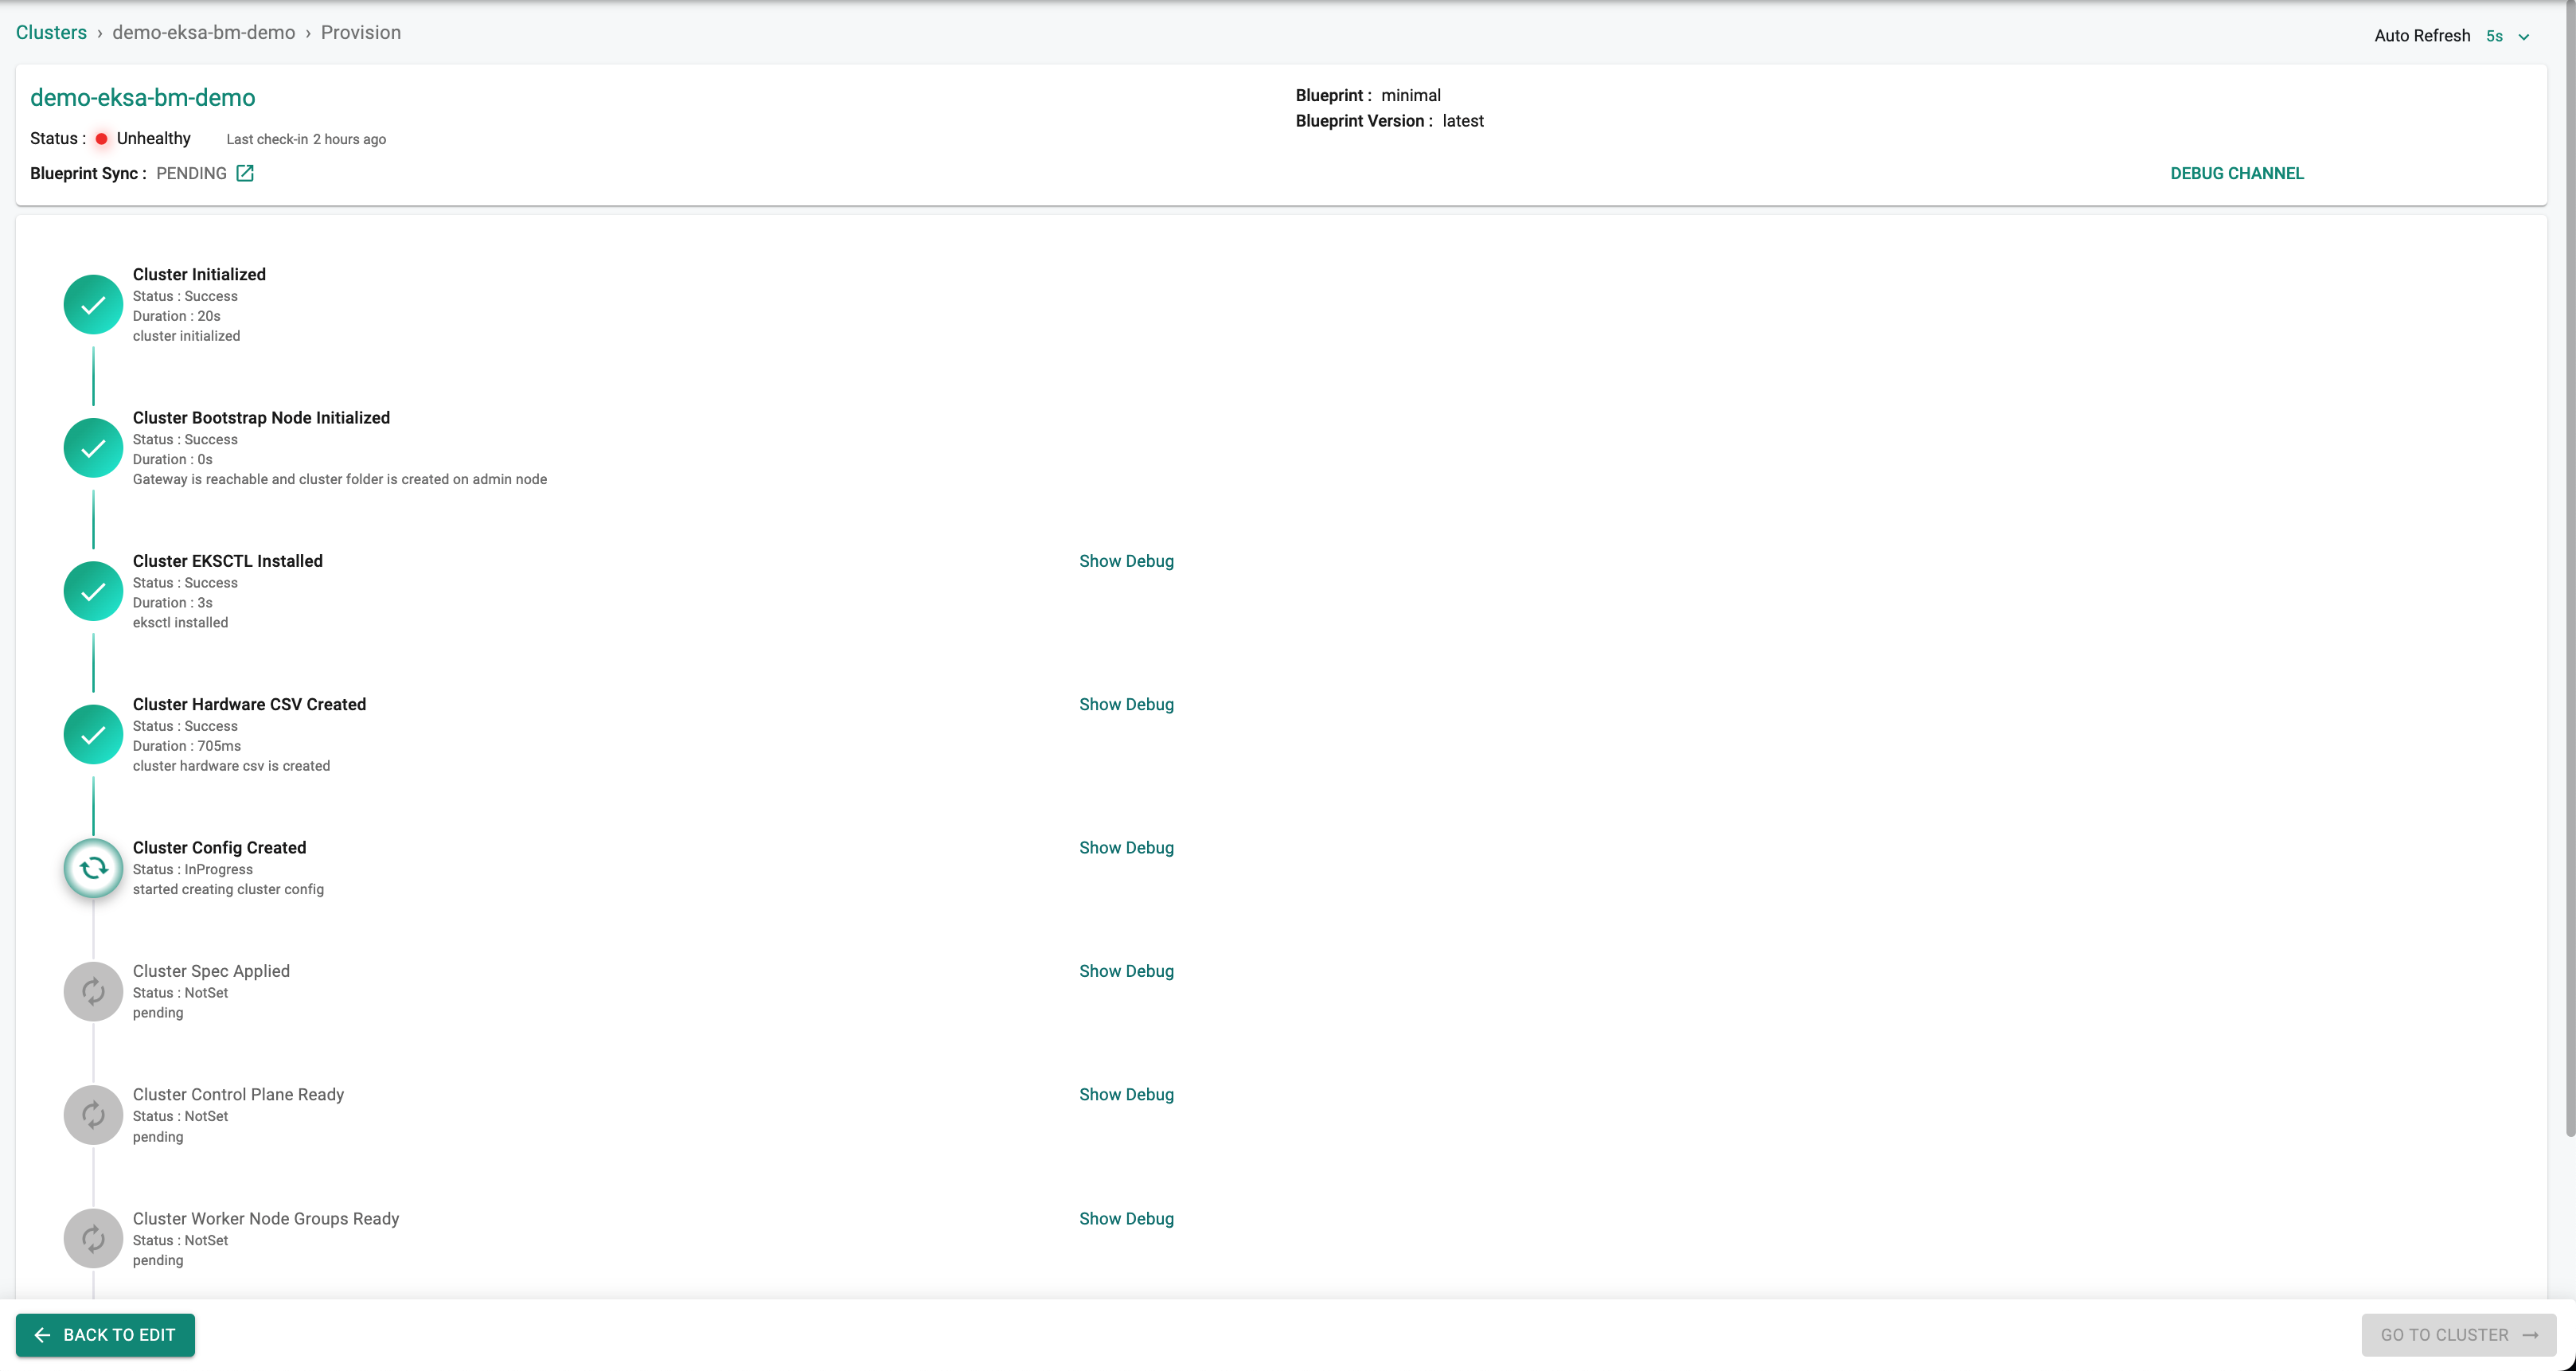
When the Provision Step reaches the "Cluster Spec Applied" state, clicking the "Show Debug" hyperlink will display a Hint Action with the output message "Cluster machines are ready to be powered on / rebooted" as shown below.
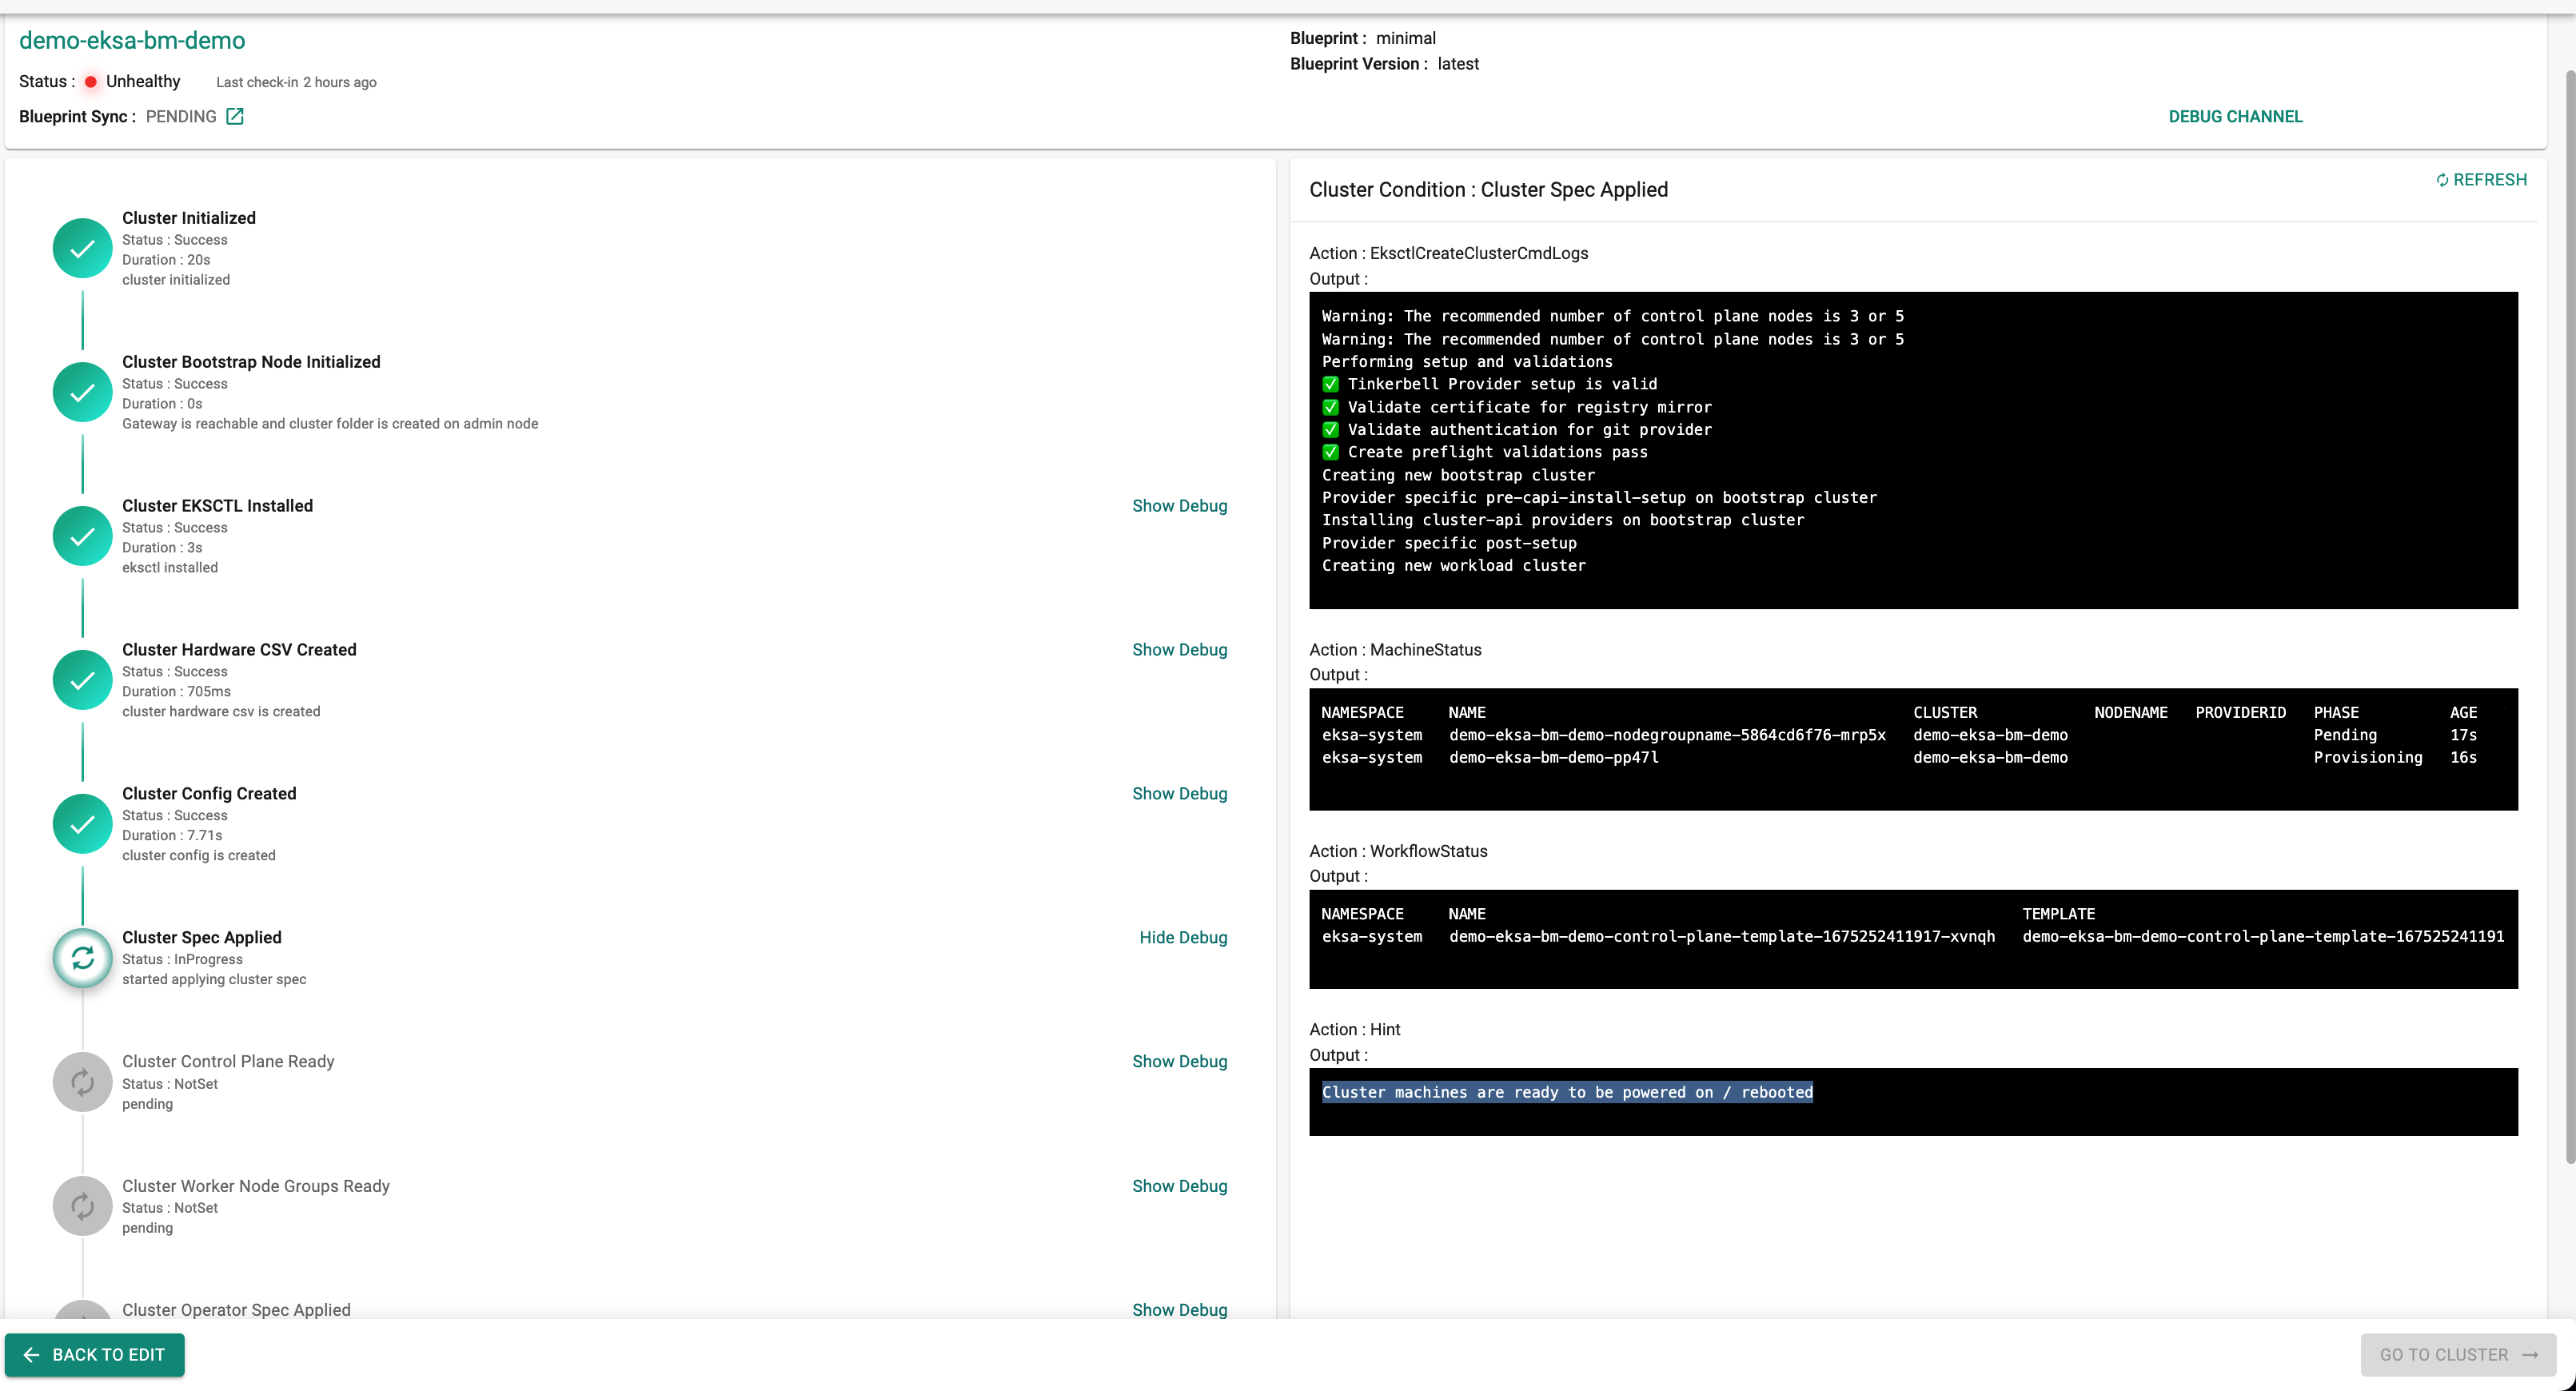
Reboot or power on the "ControlPlane" machine first. Then, after clicking the "Show Debug" link, monitor the machine's status by observing the "MachineStatus" output on the right side of the screen.
After the control plane boots up and its "MachineStatus" output shows "Running" for the control plane machine, reboot or power on the "WorkerNode" machine.
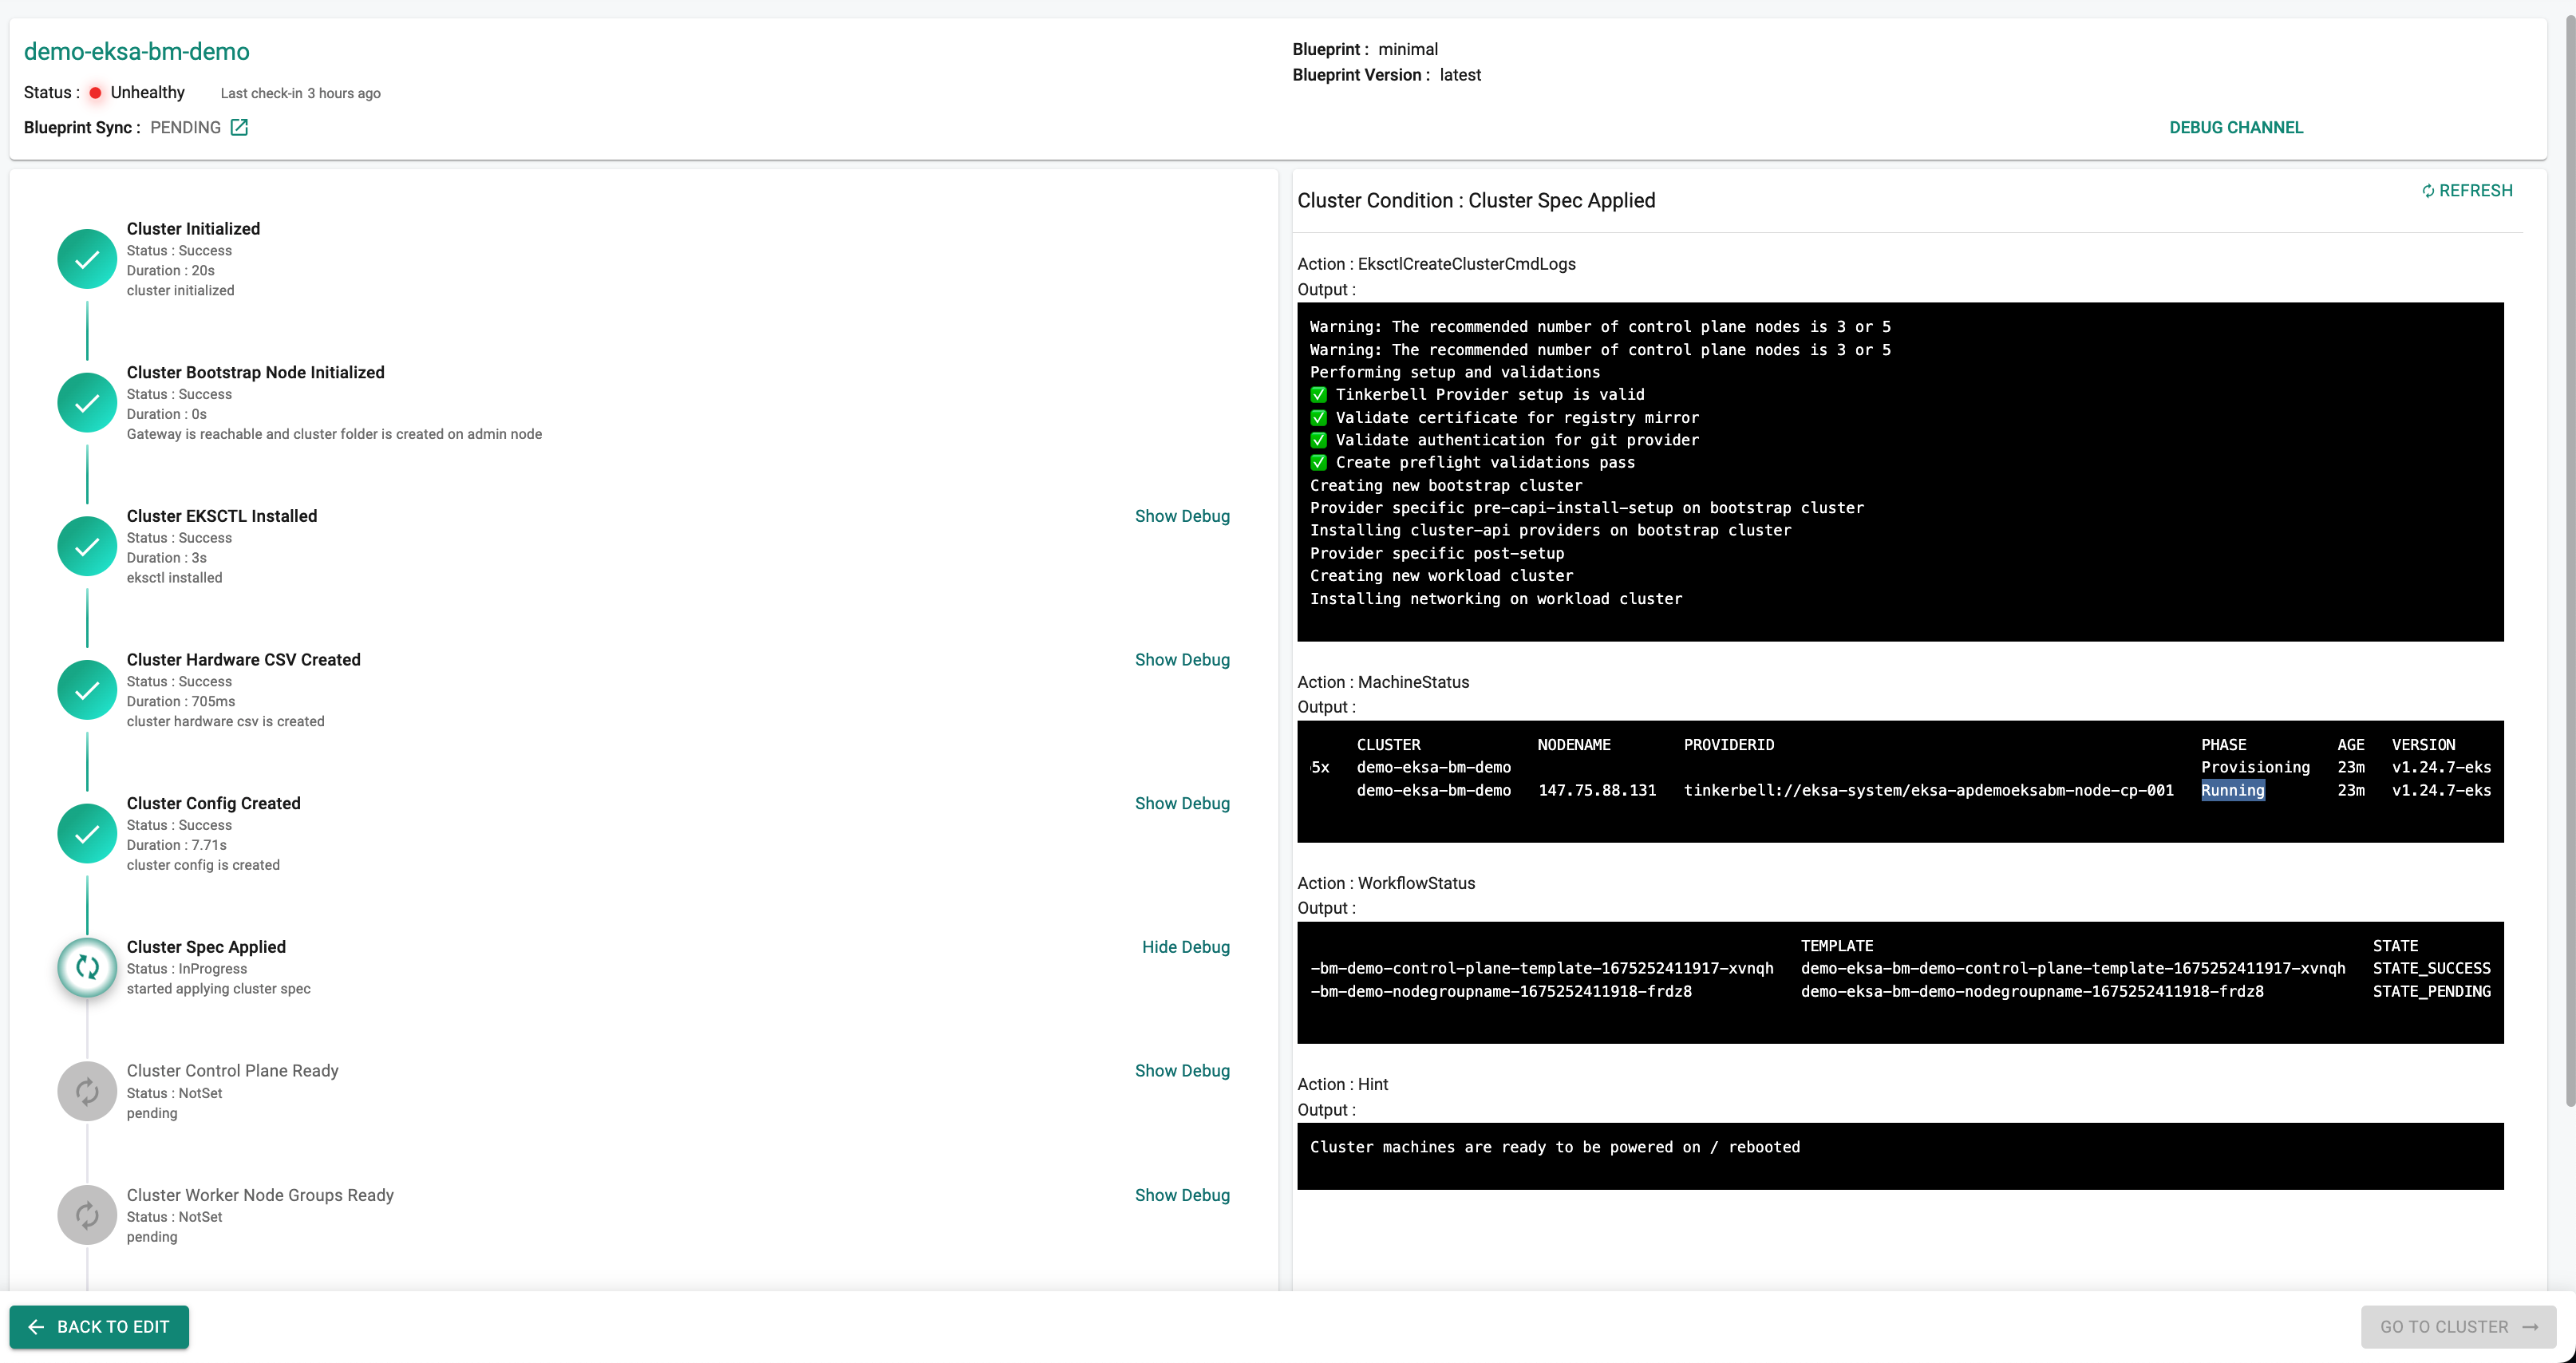
Once the machines are running, the provisioning process will continue and complete.
Note
It can take 30-40 minutes to fully provision the EKSA Baremetal Cluster along with the cluster blueprint's resources.
Once provisioning is complete, you should see a healthy EKSA Bare Metal cluster with a worker node and all the resources associated with the cluster blueprint.

In this step, we will provide the RCTL CLI with a "declarative cluster specification" for our Amazon EKS Anywhere Cluster on Baremetal . We will then use the RCTL CLI to send a suitable command to the controller to initiate provisioning or future lifecycle operations.
Save the cluster specification file below to your computer as "eksa-bm-cluster-basic.yaml"
apiVersion: infra.k8smgmt.io/v3
kind: Cluster
metadata:
  name: demo-eksa-bm-demo
  project: demo
spec:
  blueprint:
    name: minimal
    version: latest
  config:
    eksaClusterConfig:
      apiVersion: anywhere.eks.amazonaws.com/v1alpha1
      kind: Cluster
      metadata:
        name: demo-eksa-bm-demo
      spec:
        clusterNetwork:
          cniConfig:
            cilium: {}
          pods:
            cidrBlocks:
            - 192.168.0.0/16
          services:
            cidrBlocks:
            - 10.96.0.0/12
        controlPlaneConfiguration:
          count: 1
          endpoint:
            host: 1.x.x.x
          machineGroupRef:
            kind: TinkerbellMachineConfig
            name: machineconfigcp
        datacenterRef:
          kind: TinkerbellDatacenterConfig
          name: demo-eksa-bm-demo
        kubernetesVersion: "1.24"
        managementCluster:
          name: demo-eksa-bm-demo
        workerNodeGroupConfigurations:
        - count: 1
          machineGroupRef:
            kind: TinkerbellMachineConfig
            name: machineconfigworkernode
          name: workerng
    tinkerbellDatacenterConfig:
      apiVersion: anywhere.eks.amazonaws.com/v1alpha1
      kind: TinkerbellDatacenterConfig
      metadata:
        name: demo-eksa-bm-demo
      spec:
        tinkerbellIP: 1.x.x.x
    tinkerbellHardwareConfig:
    - disk: /dev/sda
      gateway: 1.x.x.x
      hostname: eksa-apdemoeksabm-node-cp-001
      ip_address:  1.x.x.x
      labels: type=controlplane
      mac: x:x:x:86:ee:5e
      nameservers: 8.8.8.8
      netmask: x.x.x.x
    - disk: /dev/sda
      gateway: 1.x.x.x
      hostname: eksa-apdemoeksabm-node-dp-001
      ip_address: 1.x.x.x
      labels: type=workernode
      mac: x:x:x:x:94:9e
      nameservers: 8.8.8.8
      netmask: x.x.255.240
    tinkerbellMachineConfig:
    - apiVersion: anywhere.eks.amazonaws.com/v1alpha1
      kind: TinkerbellMachineConfig
      metadata:
        name: machineconfigcp
      spec:
        hardwareSelector:
          type: controlplane
        osFamily: bottlerocket
        templateRef:
          kind: TinkerbellTemplateConfig
          name: templateconfigcp
        users:
        - name: ubuntu
          sshAuthorizedKeys:
          - ssh-rsa AAAAB3sssNzaC1ssyc2EAAAADAQABAAABAQDIFohJ3sN0Qkap0ts/FjXm8PDr/d4O7RuAJfdhJy9YtC3Nck6r7wPaN443Ty7fzIZ18vqM77Ll4gxLlC0cv6sssdsKWlsss6MSEssRsds1Y6Ysdss0TmQBAO2pnJEssLvClSY9nTSQ8qIwXfhI+IiLdscUWeeP70s9/QE6ASqC2/C1jhHu4RD08MFT5OLH53iNll5DKsVz9Ojoxgsdds+WcPOvdhKssfD0VssnH5CZsssEKjdmYiyssQsds7R8vLNmn7NCqfosuZDbQuENKtRFa5H2qn4b84VuBk9hFyTE9DeyM29uJDWjBft7Lsna6+TvLD1Ni+l1Q5C4H5ssJiud7EynYhUrY+4Hzj4xhpQEO3oowIuJExLTXNh
            ubuntu@testbox
    - apiVersion: anywhere.eks.amazonaws.com/v1alpha1
      kind: TinkerbellMachineConfig
      metadata:
        name: machineconfigworkernode
      spec:
        hardwareSelector:
          type: workernode
        osFamily: bottlerocket
        templateRef:
          kind: TinkerbellTemplateConfig
          name: tempalteconfigworkernode
        users:
        - name: ubuntu
          sshAuthorizedKeys:
          - ssh-rsa AAAAB3NzaC1yc2EAAAADAQABAAAsssBAssQDIFohJ3sN0Qkap0ts/FjXm8PDr/d4O7RuAJfdhJy9YtC3Nck6r7wPaN443Ty7fzIZ18vqM77Ll4gxLlC0cv6KWl6MSER1Y6Yv0TmQBAO2pnsdsdJELvClSY9nTSQ8qIwXfhI+IiLdsdsdscUWeeP70s9/QE6ASqC2/C1jhHu4RD08MFT5OLH53iNll5DKsVz9Ojoxg+WcPOvdhKfD0VnH5CZsEKjdmYiyQ7R8vLNmn7NCqfosuZDbQuENKtRFa5H2qn4b84VuBk9hFyTE9DeyM29uJDWjBft7Lsna6+TvLD1Ni+l1Q5C4H5Jiud7EynYhUrY+4Hzj4xhpQEO3oowIussJExLTXNh
            ubuntu@testbox
    tinkerbellTemplateConfig:
    - apiVersion: anywhere.eks.amazonaws.com/v1alpha1
      kind: TinkerbellTemplateConfig
      metadata:
        name: templateconfigcp
      spec: |
        template:
          global_timeout: 6000
          id: ""
          name: templateconfigcp
          tasks:
          - actions:
            - environment:
                COMPRESSED: "true"
                DEST_DISK: /dev/sda
                IMG_URL: https://anywhere-assets.eks.amazonaws.com/releases/bundles/27/artifacts/raw/1-24/bottlerocket-v1.24.9-eks-d-1-24-7-eks-a-27-amd64.img.gz
              image: public.ecr.aws/eks-anywhere/tinkerbell/hub/image2disk:6c0f0d437bde2c836d90b000312c8b25fa1b65e1-eks-a-27
              name: stream-image
              timeout: 600
            - environment:
                BOOTCONFIG_CONTENTS: |
                  kernel {}
                DEST_DISK: /dev/sda12
                DEST_PATH: /bootconfig.data
                DIRMODE: "0700"
                FS_TYPE: ext4
                GID: "0"
                MODE: "0644"
                UID: "0"
              image: public.ecr.aws/eks-anywhere/tinkerbell/hub/writefile:6c0f0d437bde2c836d90b000312c8b25fa1b65e1-eks-a-27
              name: write-bootconfig
              pid: host
              timeout: 90
            - environment:
                DEST_DISK: /dev/sda12
                DEST_PATH: /user-data.toml
                DIRMODE: "0700"
                FS_TYPE: ext4
                GID: "0"
                HEGEL_URLS:  http://1.x.x.x:50061,http://1.x.x.x:50061
                MODE: "0644"
                UID: "0"
              image: public.ecr.aws/eks-anywhere/tinkerbell/hub/writefile:6c0f0d437bde2c836d90b000312c8b25fa1b65e1-eks-a-27
              name: write-user-data
              pid: host
              timeout: 90
            - environment:
                DEST_DISK: /dev/sda12
                DEST_PATH: /net.toml
                DIRMODE: "0755"
                FS_TYPE: ext4
                GID: "0"
                IFNAME: enp0s3
                MODE: "0644"
                STATIC_BOTTLEROCKET: "true"
                UID: "0"
              image: public.ecr.aws/eks-anywhere/tinkerbell/hub/writefile:6c0f0d437bde2c836d90b000312c8b25fa1b65e1-eks-a-27
              name: write-netplan
              pid: host
              timeout: 90
            - image: public.ecr.aws/eks-anywhere/tinkerbell/hub/reboot:6c0f0d437bde2c836d90b000312c8b25fa1b65e1-eks-a-27
              name: reboot-image
              pid: host
              timeout: 90
              volumes:
              - /worker:/worker
            name: cptemplate
            volumes:
            - /dev:/dev
            - /dev/console:/dev/console
            - /lib/firmware:/lib/firmware:ro
            worker: '{{.device_1}}'
          version: "0.1"
    - apiVersion: anywhere.eks.amazonaws.com/v1alpha1
      kind: TinkerbellTemplateConfig
      metadata:
        name: tempalteconfigworkernode
      spec: |
        template:
          global_timeout: 6000
          id: ""
          name: tempalteconfigworkernode
          tasks:
          - actions:
            - environment:
                COMPRESSED: "true"
                DEST_DISK: /dev/sda
                IMG_URL: https://anywhere-assets.eks.amazonaws.com/releases/bundles/27/artifacts/raw/1-24/bottlerocket-v1.24.9-eks-d-1-24-7-eks-a-27-amd64.img.gz
              image: public.ecr.aws/eks-anywhere/tinkerbell/hub/image2disk:6c0f0d437bde2c836d90b000312c8b25fa1b65e1-eks-a-27
              name: stream-image
              timeout: 600
            - environment:
                BOOTCONFIG_CONTENTS: |
                  kernel {}
                DEST_DISK: /dev/sda12
                DEST_PATH: /bootconfig.data
                DIRMODE: "0700"
                FS_TYPE: ext4
                GID: "0"
                MODE: "0644"
                UID: "0"
              image: public.ecr.aws/eks-anywhere/tinkerbell/hub/writefile:6c0f0d437bde2c836d90b000312c8b25fa1b65e1-eks-a-27
              name: write-bootconfig
              pid: host
              timeout: 90
            - environment:
                DEST_DISK: /dev/sda12
                DEST_PATH: /user-data.toml
                DIRMODE: "0700"
                FS_TYPE: ext4
                GID: "0"
                HEGEL_URLS:  http://1.x.x.x:50061,http://1.x.x.x:50061
                MODE: "0644"
                UID: "0"
              image: public.ecr.aws/eks-anywhere/tinkerbell/hub/writefile:6c0f0d437bde2c836d90b000312c8b25fa1b65e1-eks-a-27
              name: write-user-data
              pid: host
              timeout: 90
            - environment:
                DEST_DISK: /dev/sda12
                DEST_PATH: /net.toml
                DIRMODE: "0755"
                FS_TYPE: ext4
                GID: "0"
                IFNAME: enp0s3
                MODE: "0644"
                STATIC_BOTTLEROCKET: "true"
                UID: "0"
              image: public.ecr.aws/eks-anywhere/tinkerbell/hub/writefile:6c0f0d437bde2c836d90b000312c8b25fa1b65e1-eks-a-27
              name: write-netplan
              pid: host
              timeout: 90
            - image: public.ecr.aws/eks-anywhere/tinkerbell/hub/reboot:6c0f0d437bde2c836d90b000312c8b25fa1b65e1-eks-a-27
              name: reboot-image
              pid: host
              timeout: 90
              volumes:
              - /worker:/worker
            name: dptemplate
            volumes:
            - /dev:/dev
            - /dev/console:/dev/console
            - /lib/firmware:/lib/firmware:ro
            worker: '{{.device_1}}'
          version: "0.1"
  type: Eksa_bm
Update the following sections of the specification file with details to match your environment.
- Update the "project" with the name of your project (if you are using a different project other than defaultproject)
- Update the "Gateway" name
- Update the "Tinkerbell IP"
- Update the "Tinkerbell Template Config Details" for each machine.
- Update the "Tinkerbell Machine Config Details" for each machine.
- Update the "Endpoint Host" of Control plane.
- Update the "Hardware Config" for each machine.
The user can generate the Tinkerbell Template configuration using a command and use it in the previous configuration
./rctl tmplgen -f <input.yaml>
The format of the input.yaml file can be as follows.
templateName: tmpl-1
tinkerbellIp: 1.1.1.1
gatewayIp: 2.2.2.2
os: bottlerocket
platform: equinix
releaseBundle: 24
k8sVersion: 1.24
nicName: enp1s0f0np0
Execute the following command to provision the cluster from the specification file previously defined
./rctl apply -f eksa-bm-cluster-testing.yaml
To retrieve the provision status of the CLI operation, enter the below command to get the status of "PROVISION STATUS"
./rctl get cluster demo-eksa-bm-demo
./rctl get cluster demo-eksa-bm-demo -o json
Step 3: Verify Cluster
Once provisioning is complete, you should have a ready to use EKSA Bare Metal Cluster. We will verify the cluster by checking its health and status.
Step 4: Zero Trust Kubectl
Once provisioning is complete and the cluster blueprint has been synchronized, we will attempt to perform Kubectl operations against our "cloaked" EKSA Bare Metal cluster operating "behind a firewall".
The controller provides a zero trust kubectl channel for authorized users.
- Navigate to the EKSA BareMetal Cluster Card in the project where you provisioned the EKSA BareMetal Cluster
- Click on the "Kubectl" link
- This will launch a web based shell for you to securely interact with the API server over a zero trust channel
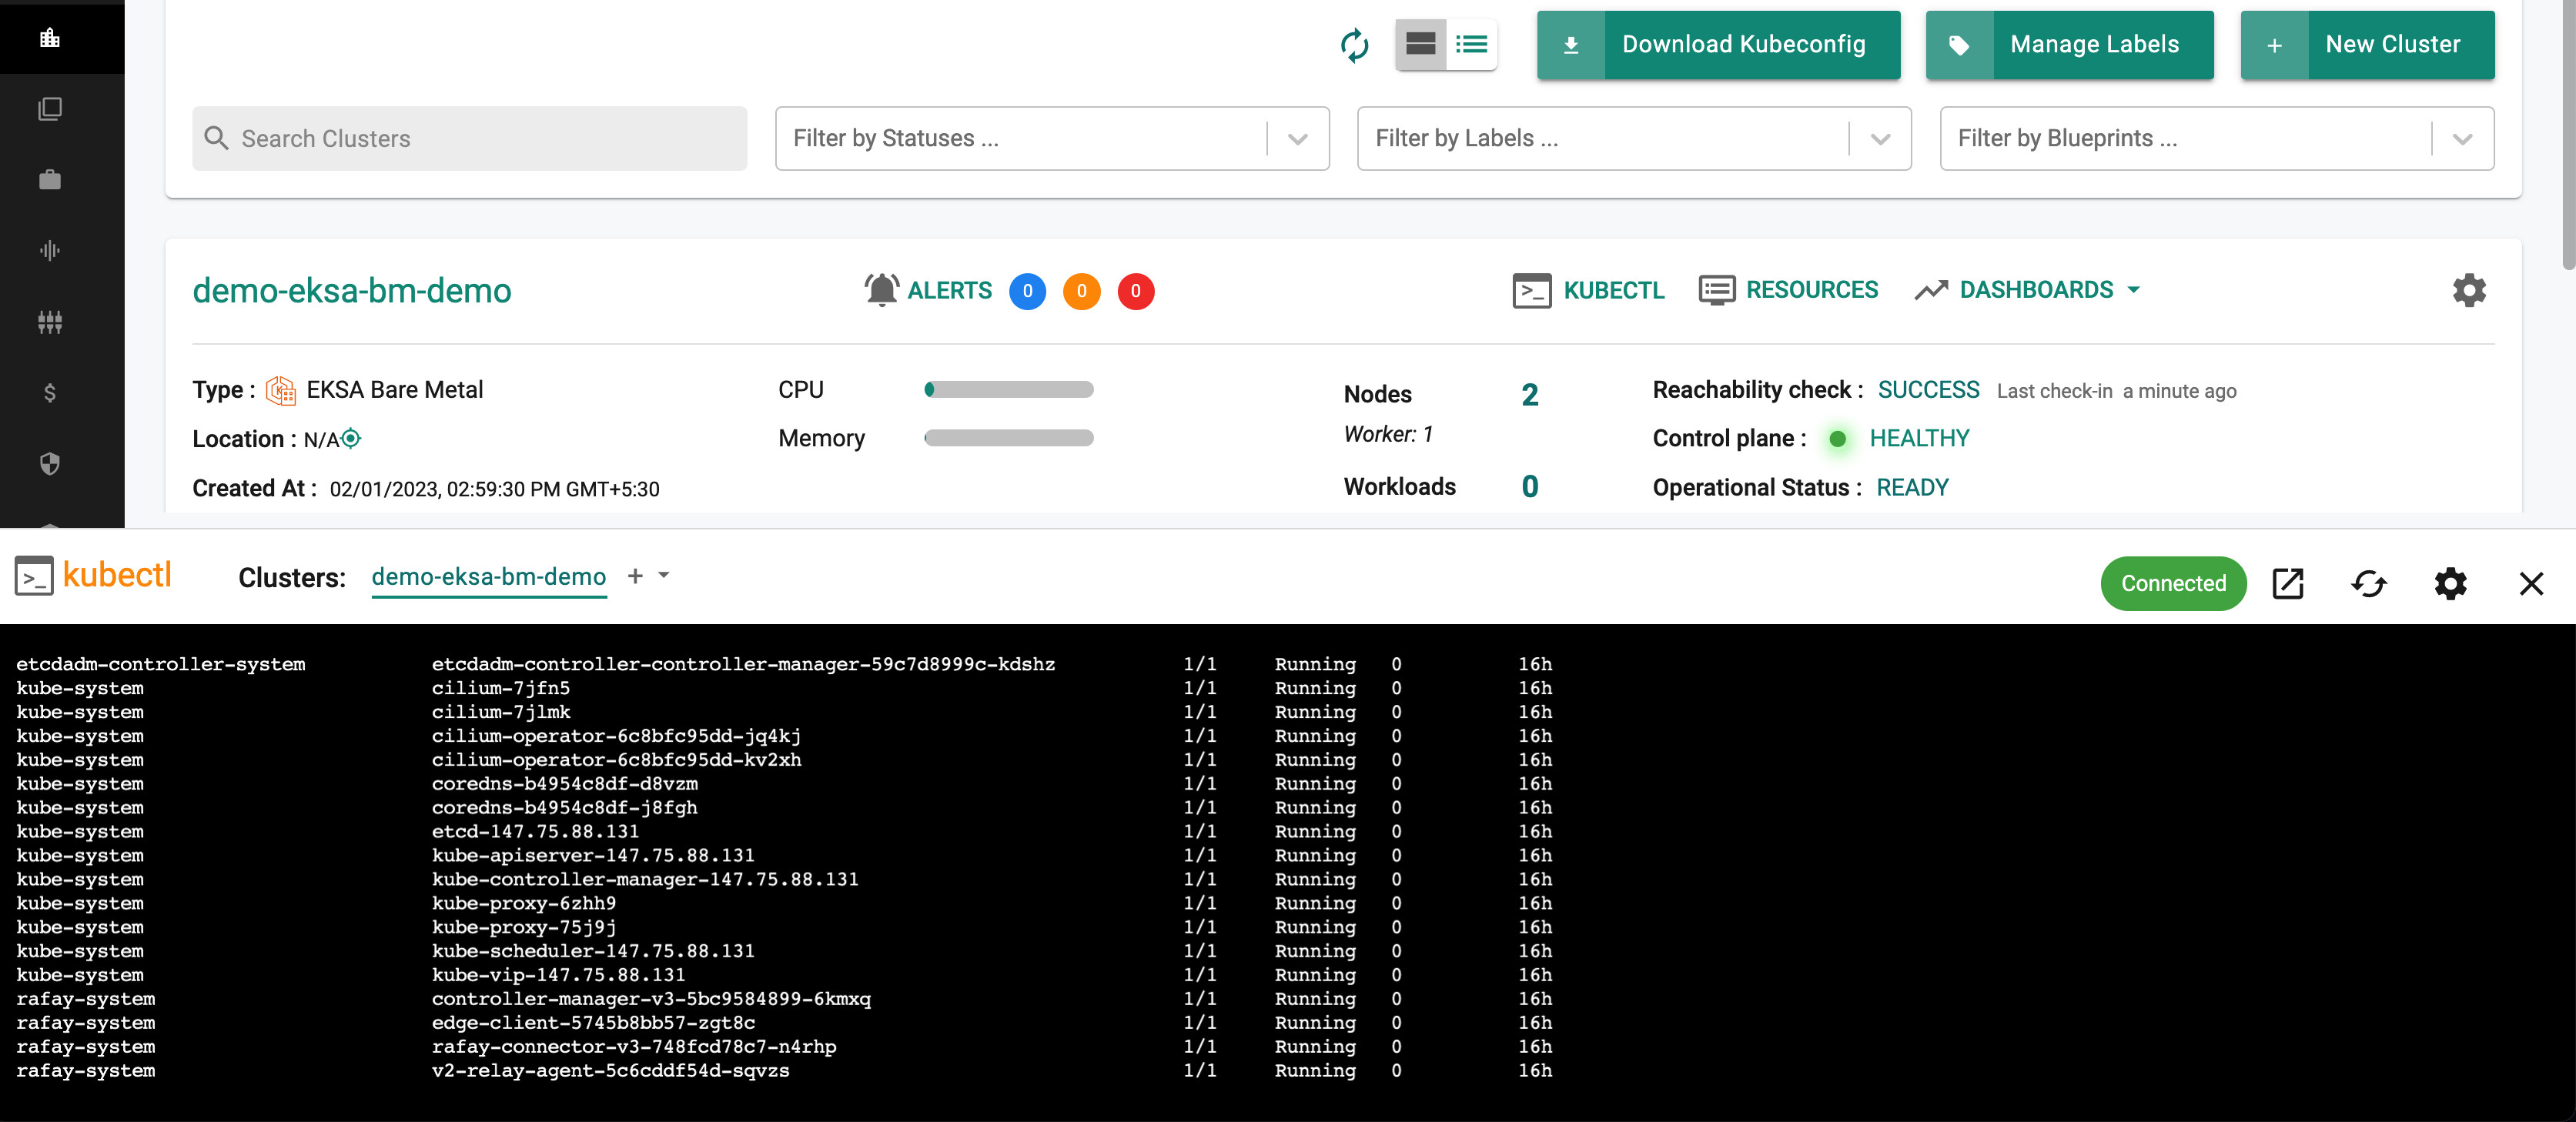
- Type a kubectl command such as "kubectl get po -A" to list the pods in ALL the namespaces in your EKS cluster
- You should see something like the following example.
Note
Learn more about Zero Trust Access.
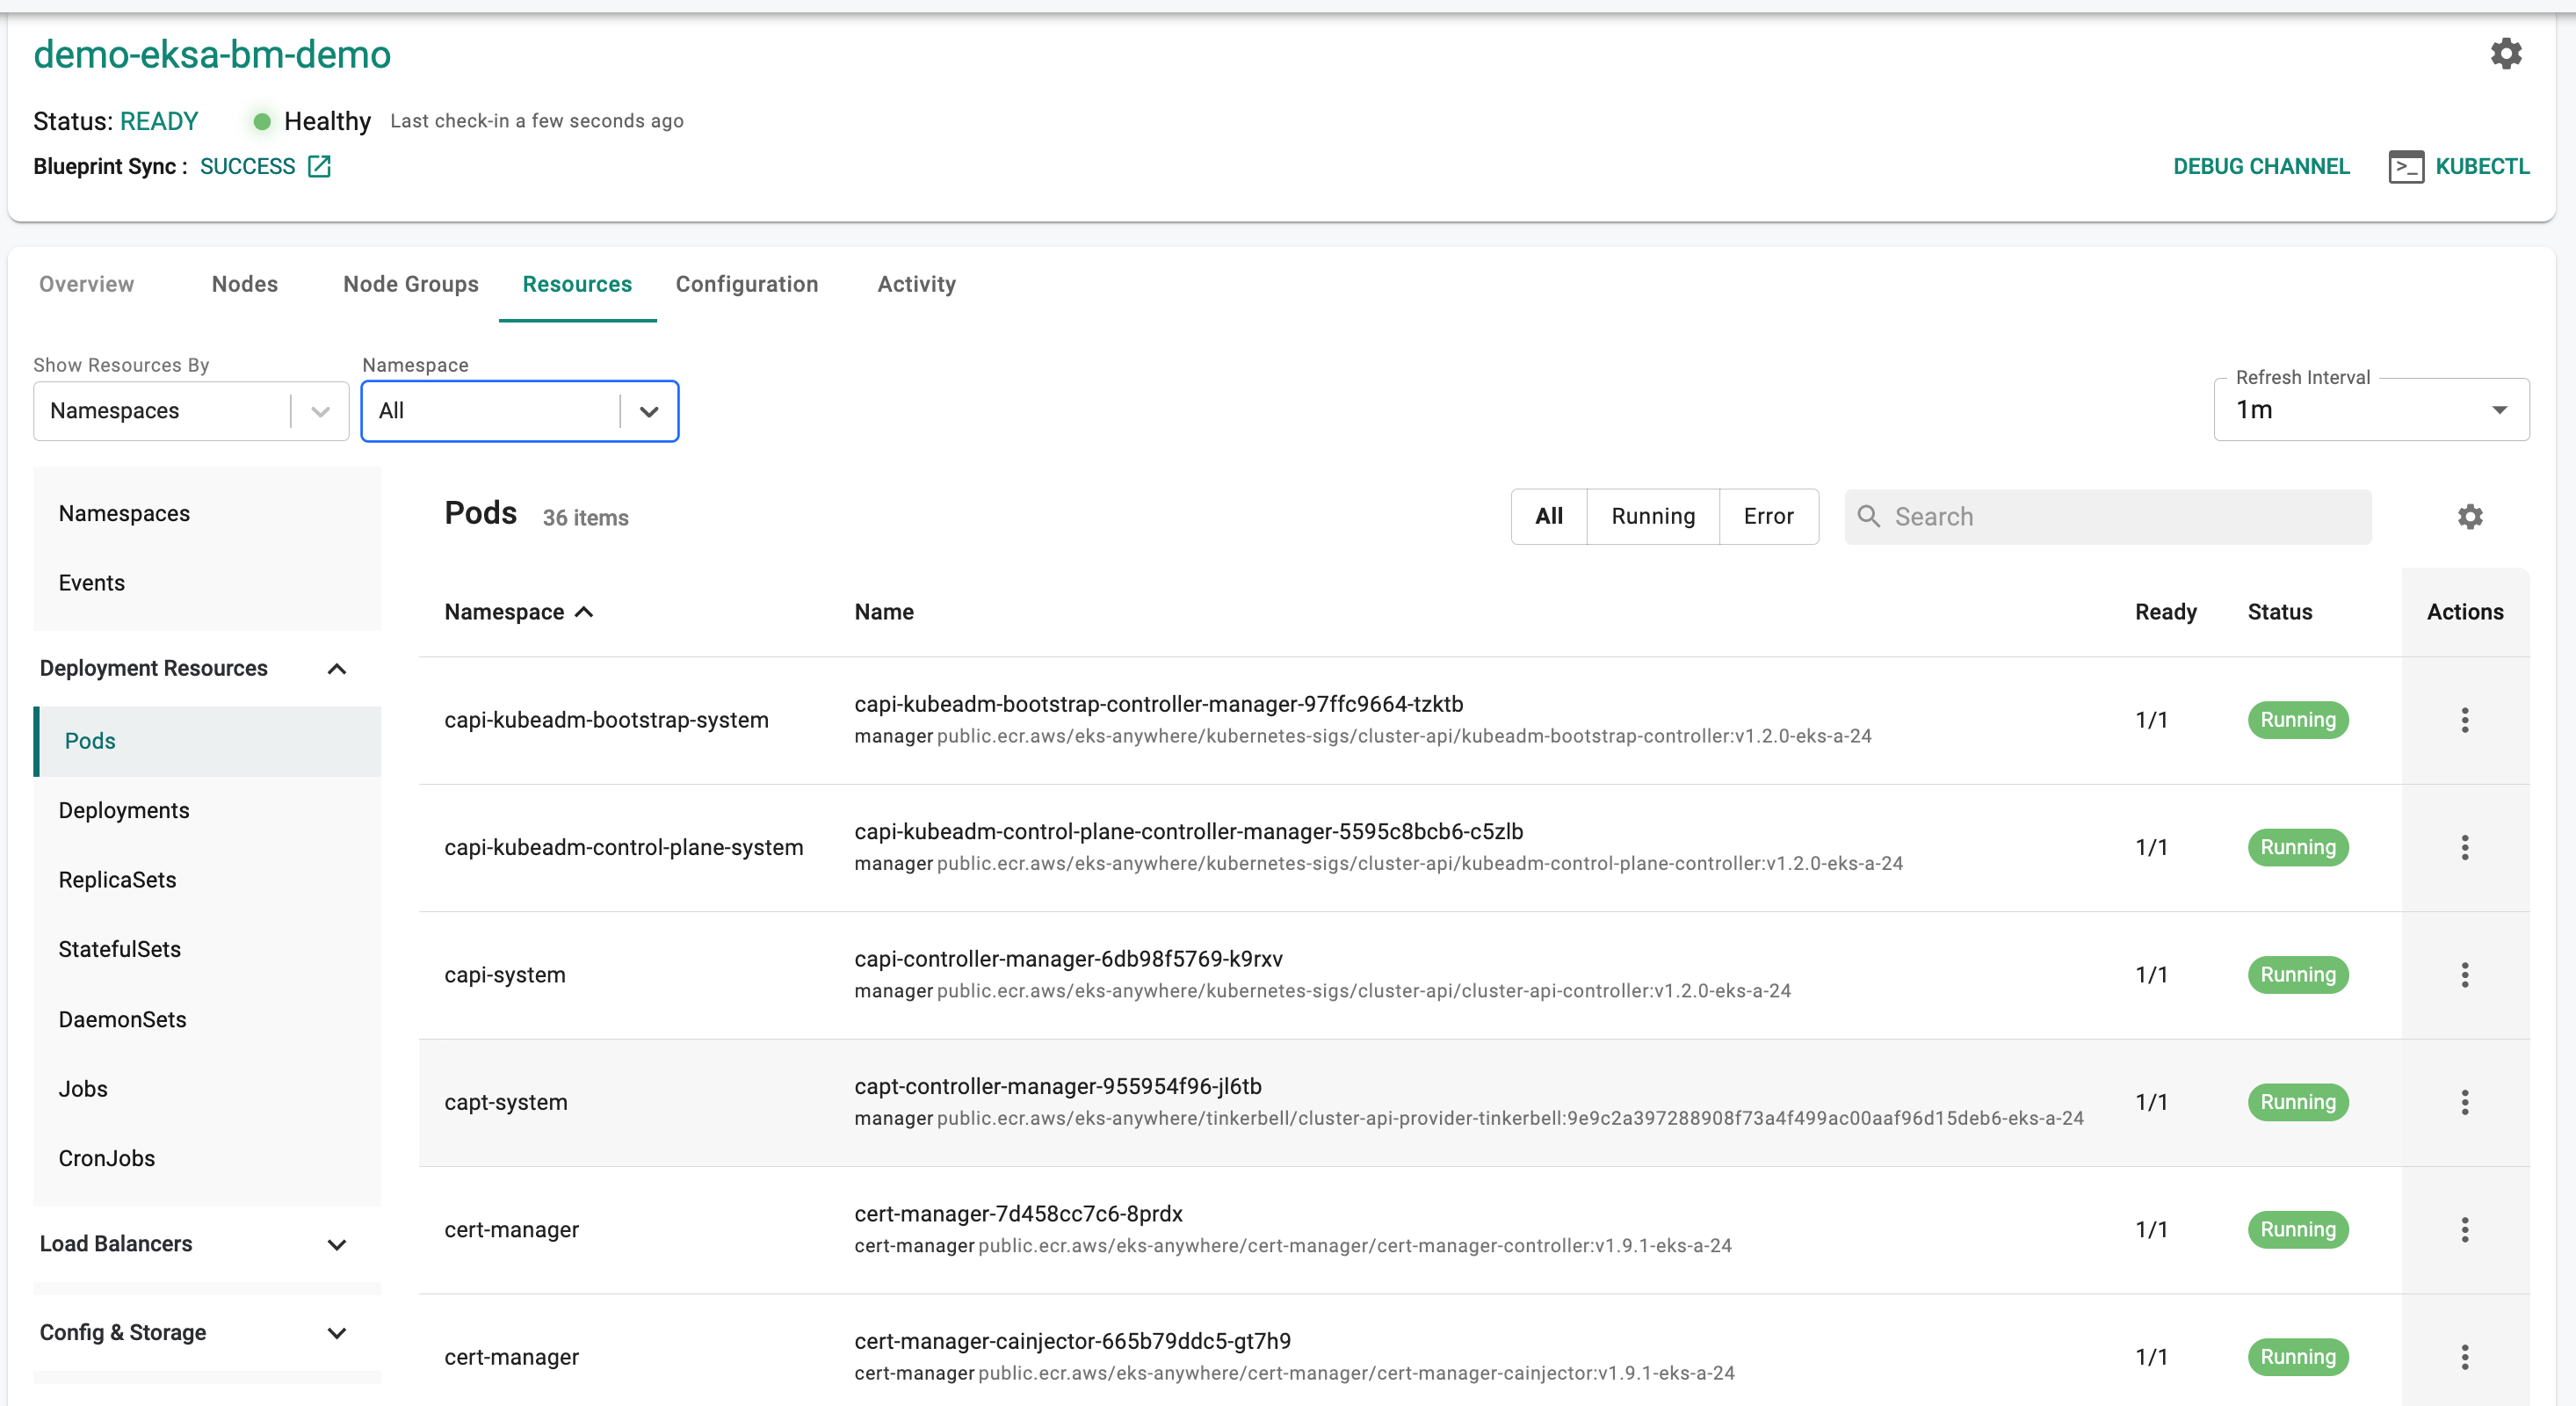
Step 5: Kubernetes Resource Dashboards
The cluster dashboard also comes with an integrated "Kubernetes Resources" dashboard.
- Click on "Resources" on the cluster card and in a few seconds, all the Kubernetes resources, their status etc is retrieved in near real time and presented to the user. You should see something like the screenshot below.
Note
Learn more about the Integrated Kubernetes Dashboard.
Recap
Congratulations! At this point, you have
- Successfully configured and provisioned an EKS Anywhere cluster on Bare Metal using the controller
- Used the zero trust kubectl service to securely interact with the EKSA Bare Metal cluster's API server
- Used the integrated Kubernetes resources dashboard to view the resources operational on the cluster.