Part 2: Network Visibility
What Will You Do
In this part of the self-paced exercise, you will deploy a test application and view the network traffic flow visualization for that application.
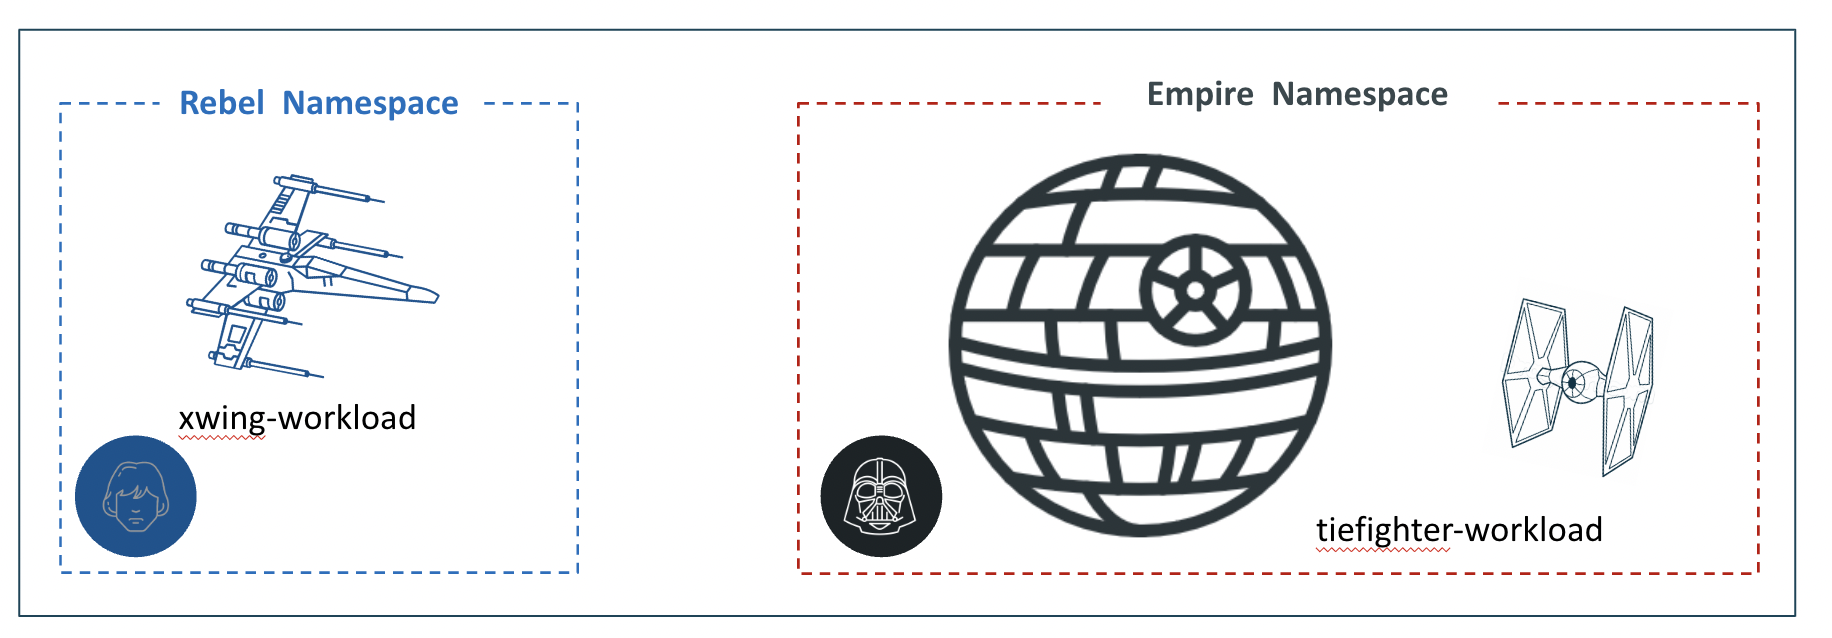
This application refers to Star Wars where we have two teams/groups:
- Empire
- Rebels
a) We will create two namespaces one for each team.
b) Then you will deploy test workloads into each namespace.
- tiefighter-workload: This contains tiefighter and deathstar pods and will be placed into the empire namespace.
-
xwing-workload: This contains an xwing pod and will be placed into the rebels namespace.
Create Namespaces
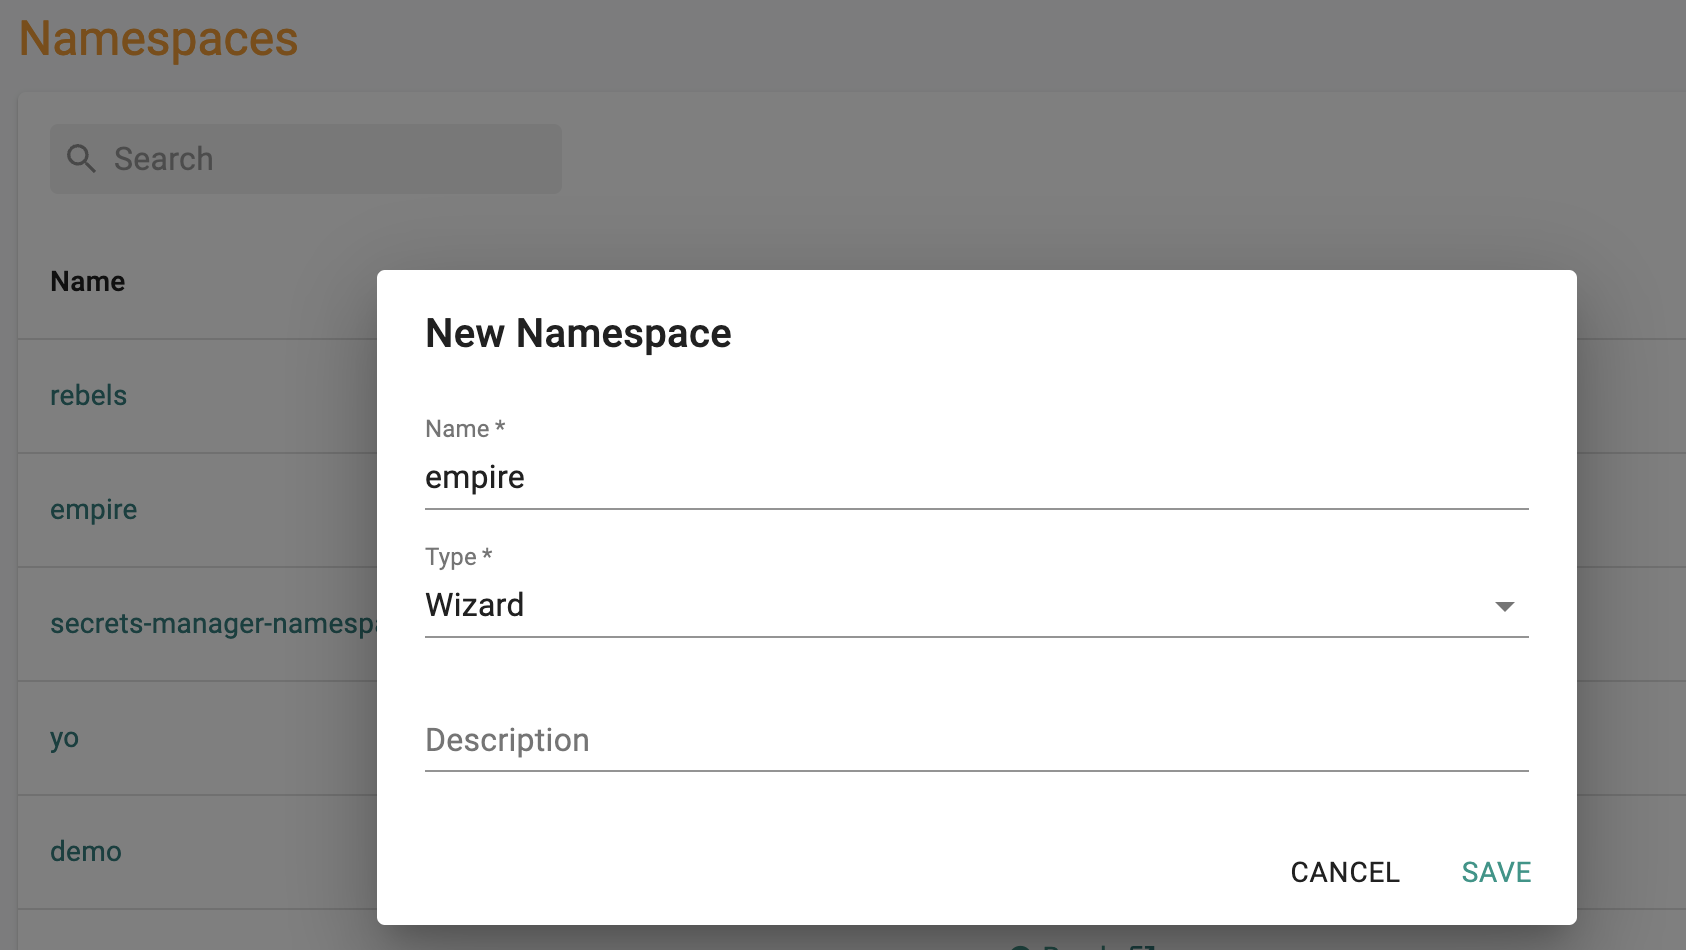
- Navigate to the Namespaces page
- Create a new namespace for empire, specify the name as empire and select type as Wizard
- In the placement section, select the cluster that you want to deploy the namespace to
- Click Save & Go to Publish
- Publish the namespace
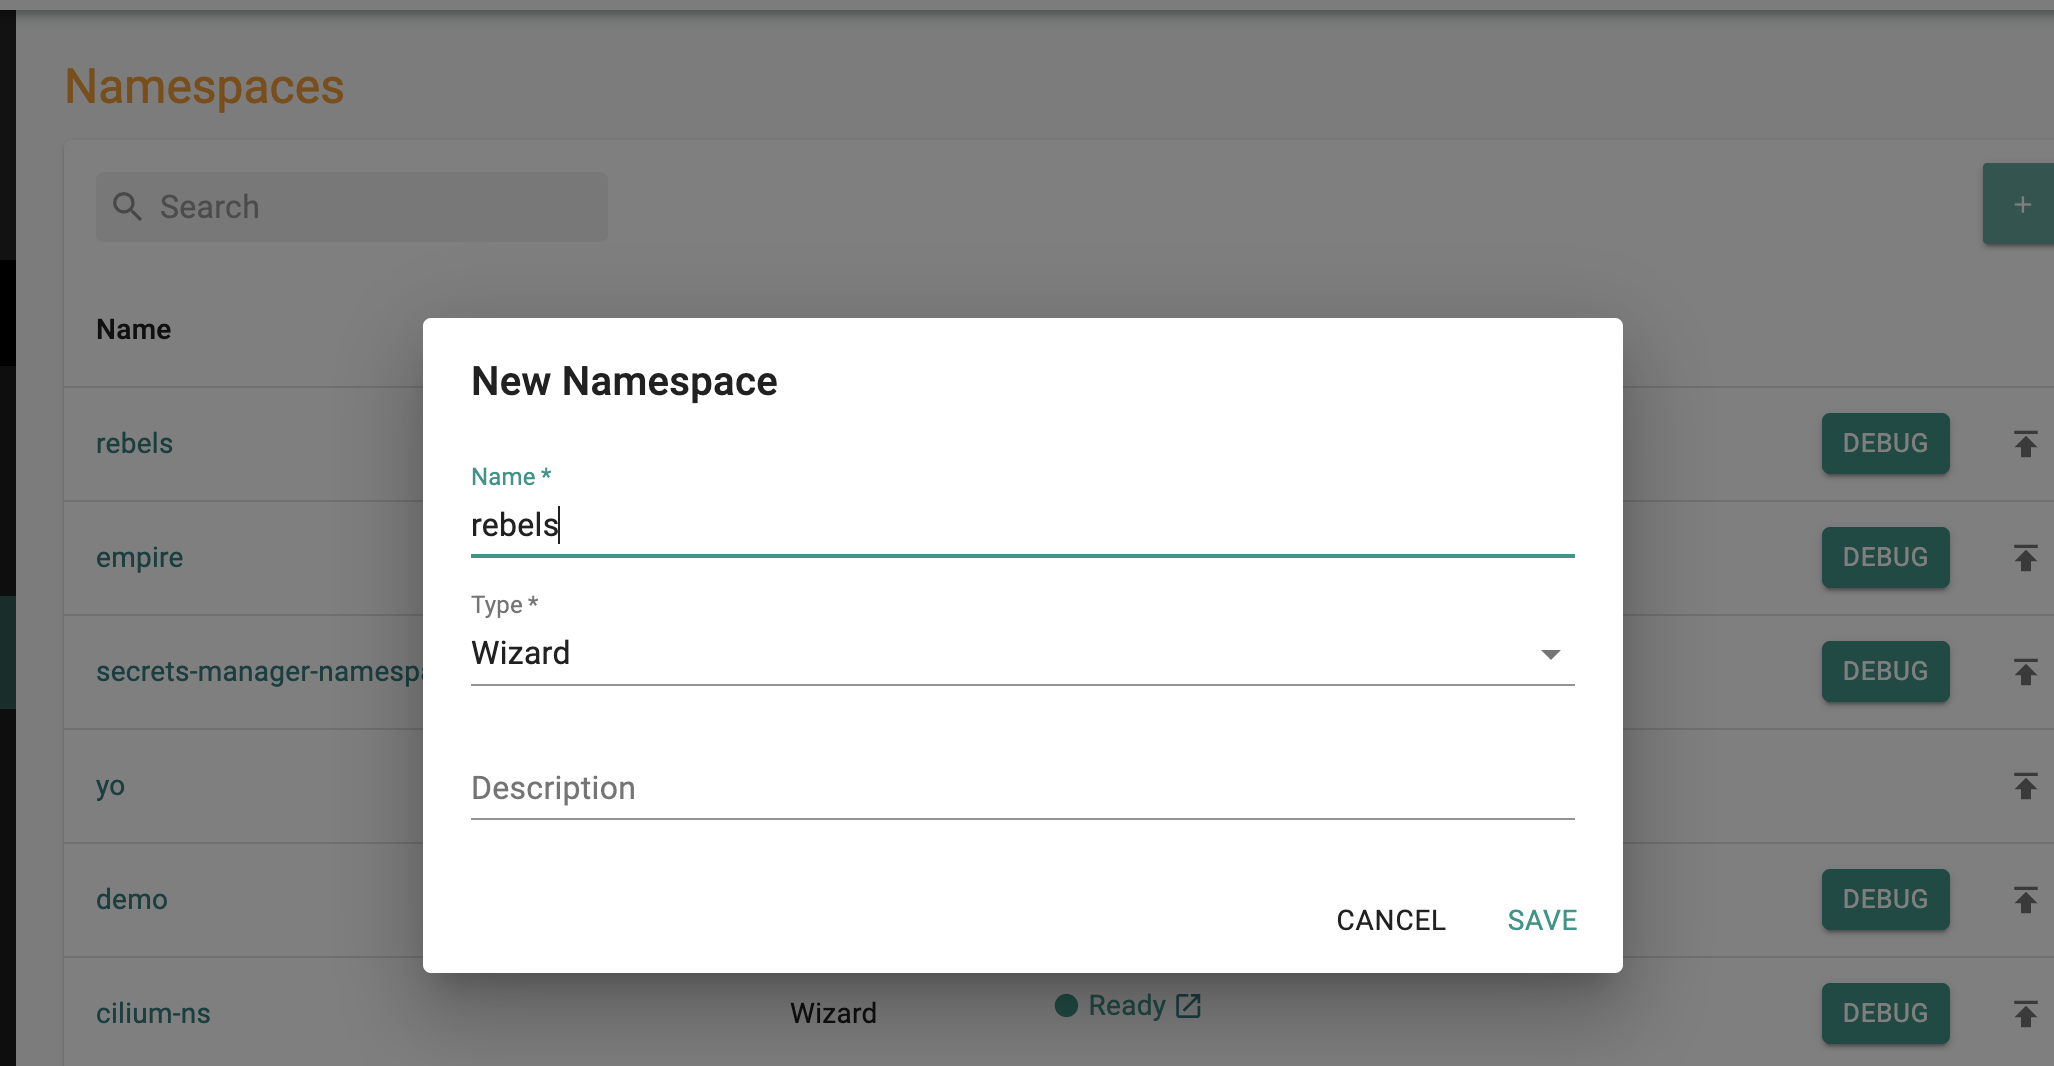
Follow the same process to create another namespace and specify the name as rebels.
Deploy the test applications
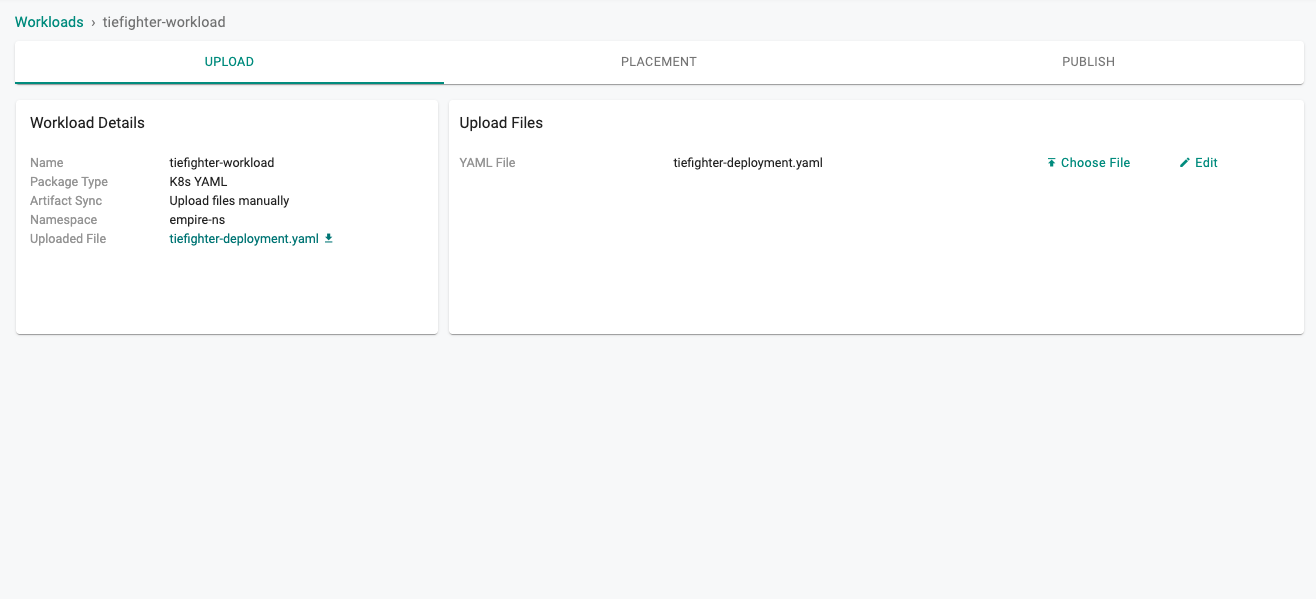
Empire Tiefighter Workload
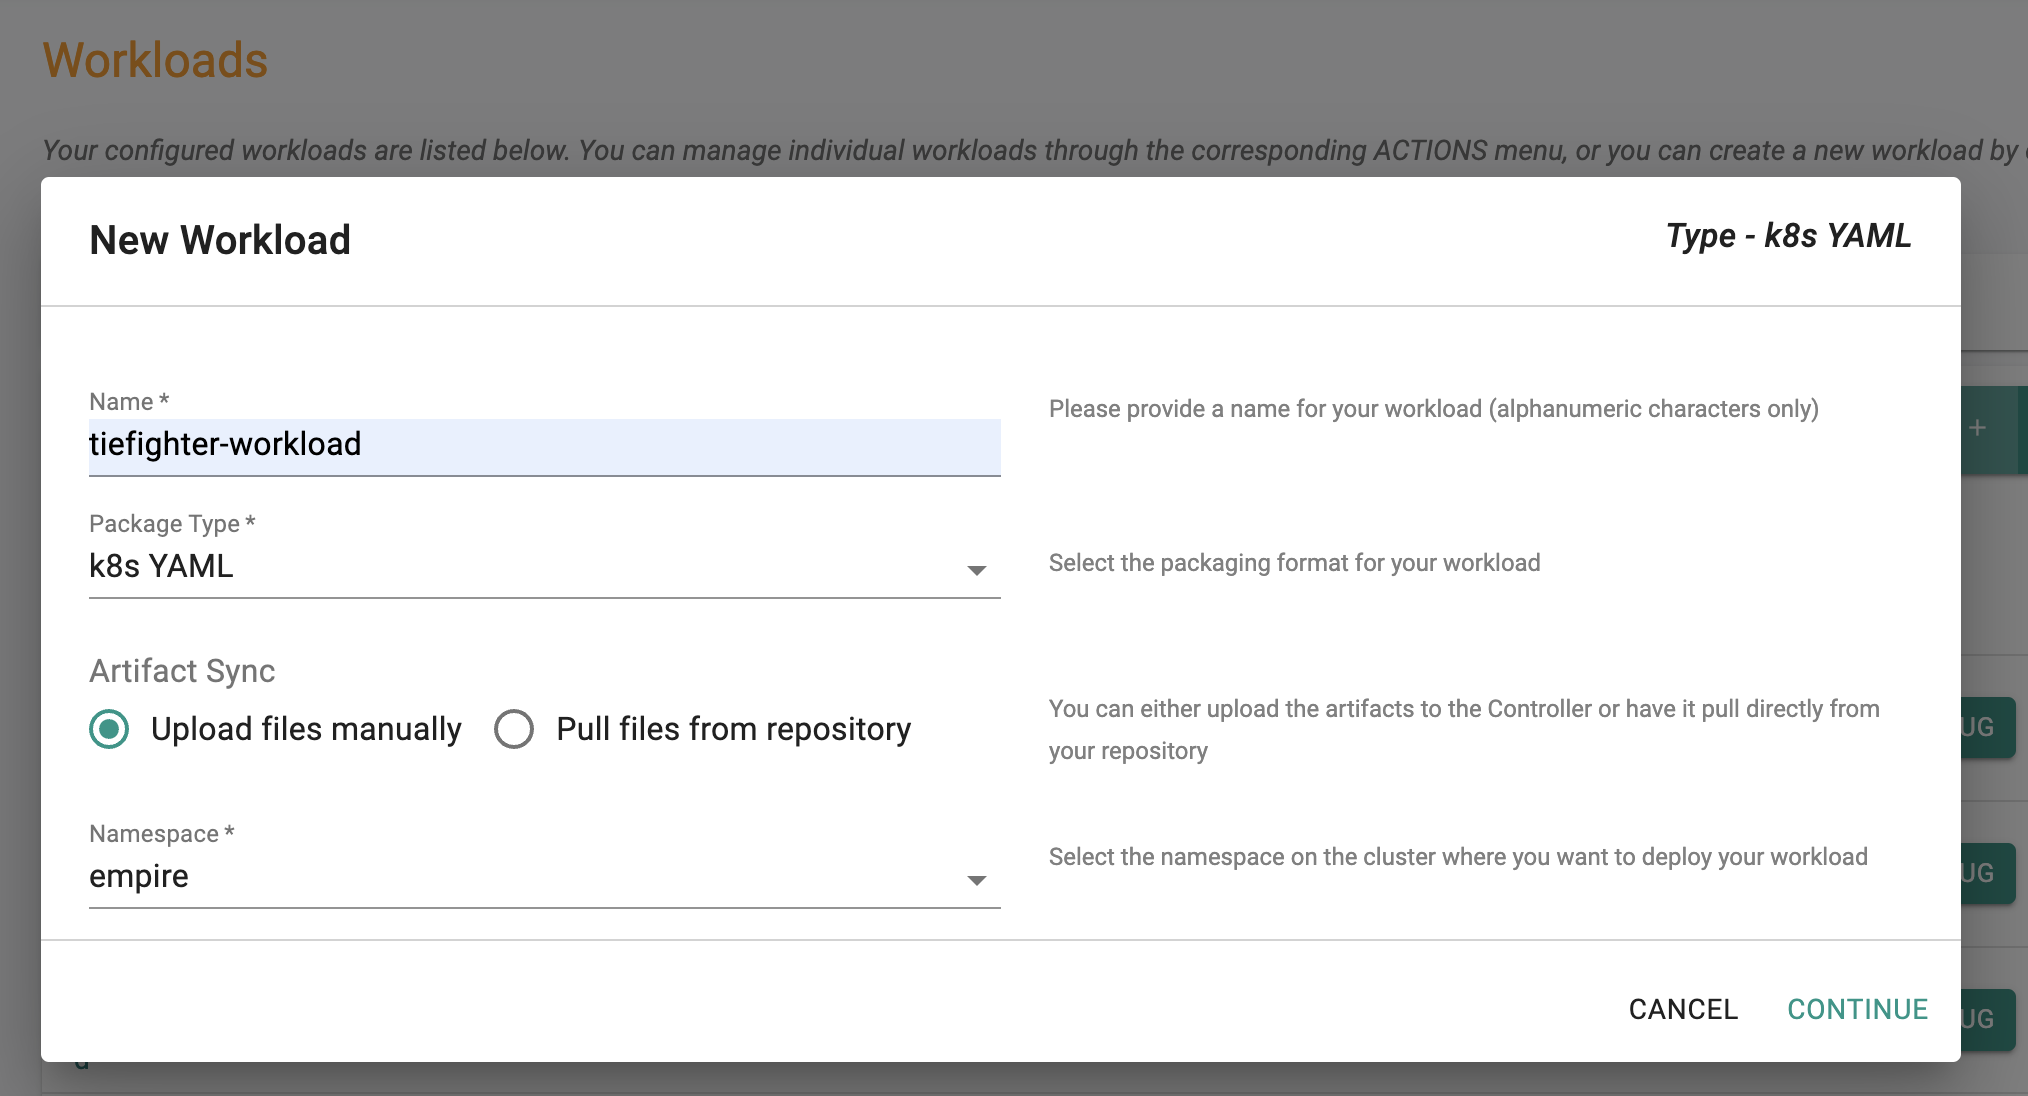
- Navigate to the Workloads page
- Create a new Workload, specify the name as tiefighter-workload and Package type as K8s yaml
- Select Upload files manually as the Artifact Sync option
- Select the empire namespace from the dropdown menu
- Select continue
- In the Upload Section, start by first creating a tiefighter-deployment.yaml file using the code below (copy and paste into editor, then save). Then upload that file as the YAML spec
- Click Save and Go to Placement
- Select the cluster that you want to deploy the workload to. Then click Save and Go to Publish
- Click Publish
tiefighter-deployment.yaml
Notice in the workload below the highlighted line.
If you named your namespace something different than empire, then you must replace empire in deathstar.empire with the name of your namespace.
For example if the name of your namespace was empire-foo instead of just empire, then it should be (ex. deathstar.empire-foo.svc.cluster.local/v1/request-landing).
---
apiVersion: v1
kind: Service
metadata:
  name: deathstar
  labels:
    app.kubernetes.io/name: deathstar
spec:
  type: ClusterIP
  ports:
  - port: 80
  selector:
    org: empire
    class: deathstar
---
apiVersion: apps/v1
kind: Deployment
metadata:
  name: deathstar
  labels:
    app.kubernetes.io/name: deathstar
spec:
  replicas: 2
  selector:
    matchLabels:
      org: empire
      class: deathstar
  template:
    metadata:
      labels:
        org: empire
        class: deathstar
        app.kubernetes.io/name: deathstar
    spec:
      containers:
      - name: deathstar
        image: docker.io/cilium/starwars
---
apiVersion: apps/v1
kind: Deployment
metadata:
  name:  tiefighter
  labels:
    org: empire
    class: tiefighter
spec:
  selector:
    matchLabels:
      org: empire
      class: tiefighter
  replicas: 1
  template:
    metadata:
      labels:
        org: empire
        class: tiefighter
    spec:
      containers:
      - name:  spaceship
        image:  docker.io/tgraf/netperf
        command:
        - sh
        - "-c"
        - |
          while true
          do
          sleep 3
          curl -m 1 -s -XPOST deathstar.empire.svc.cluster.local/v1/request-landing
          done
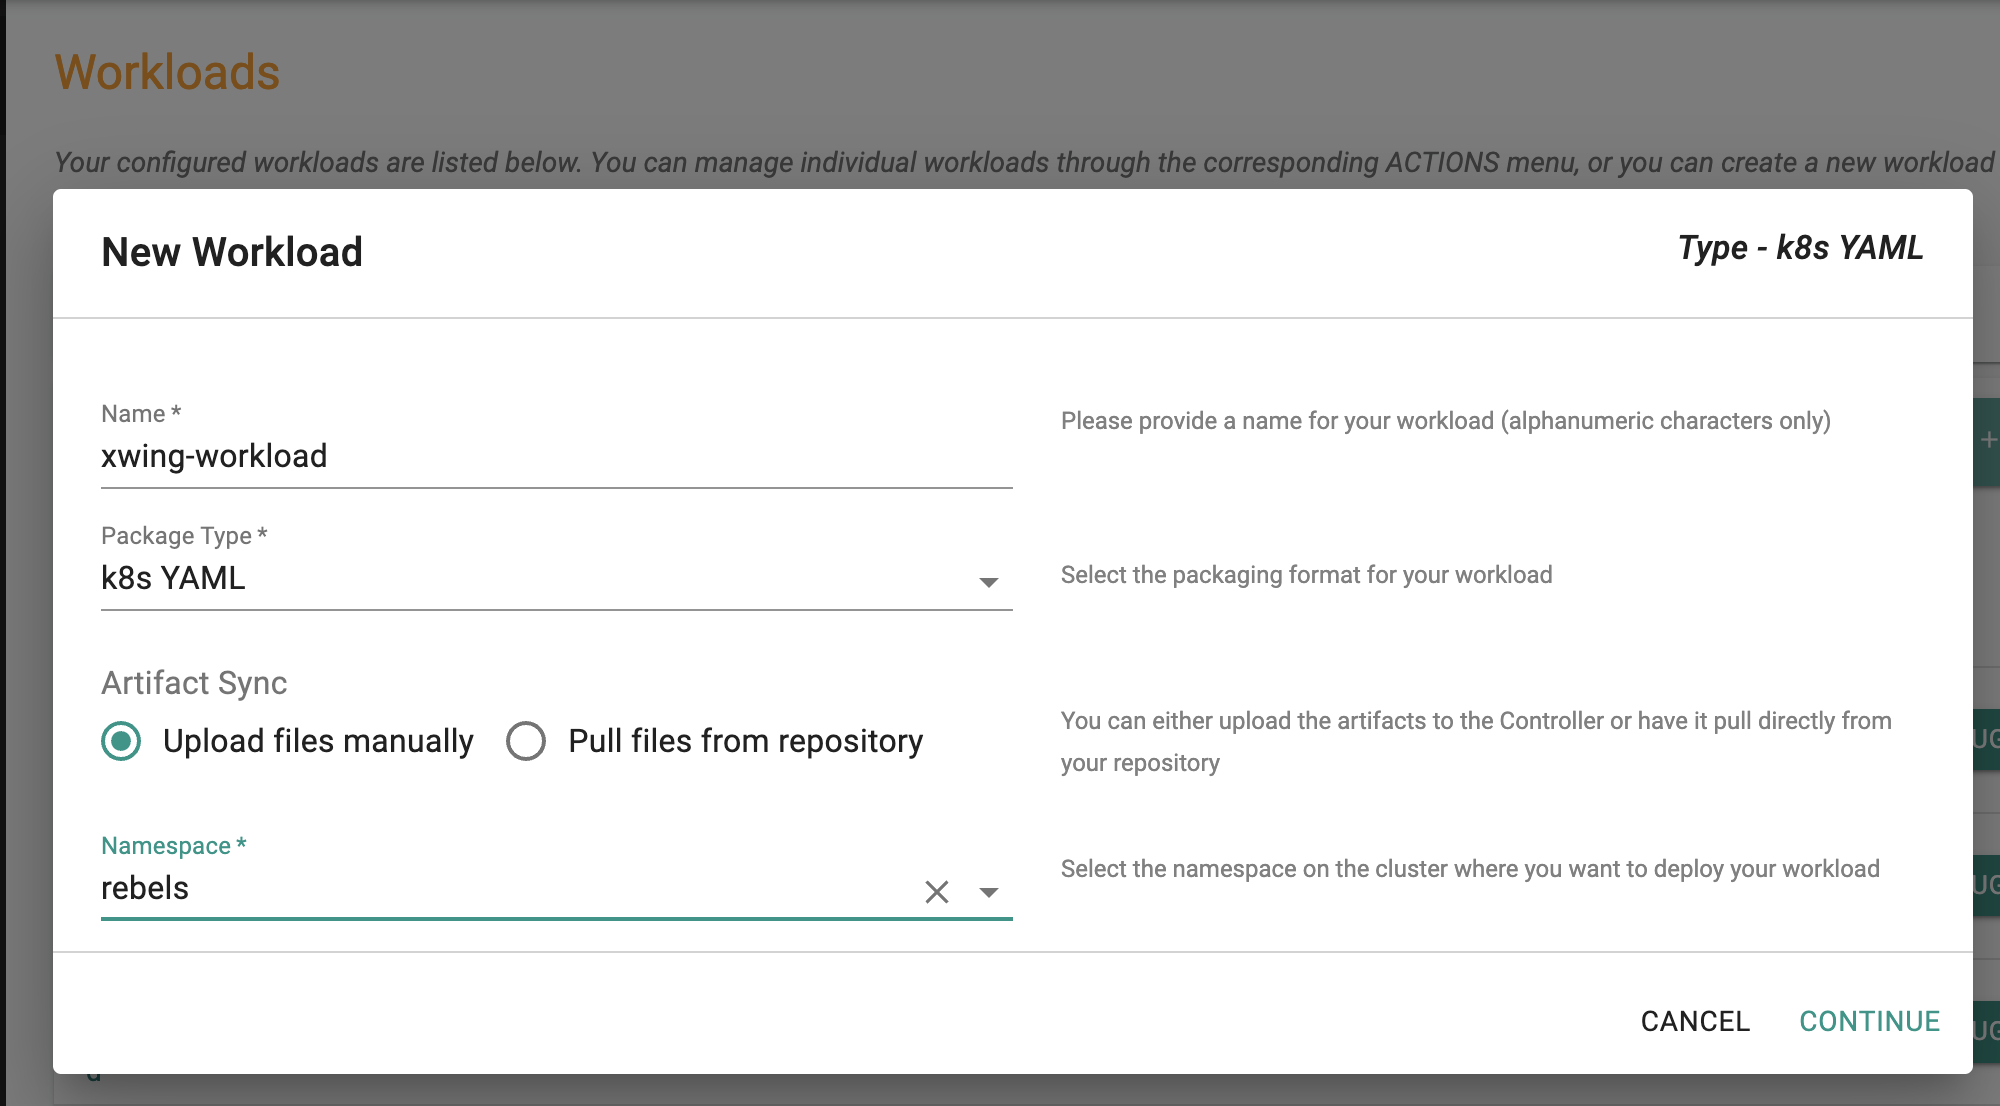
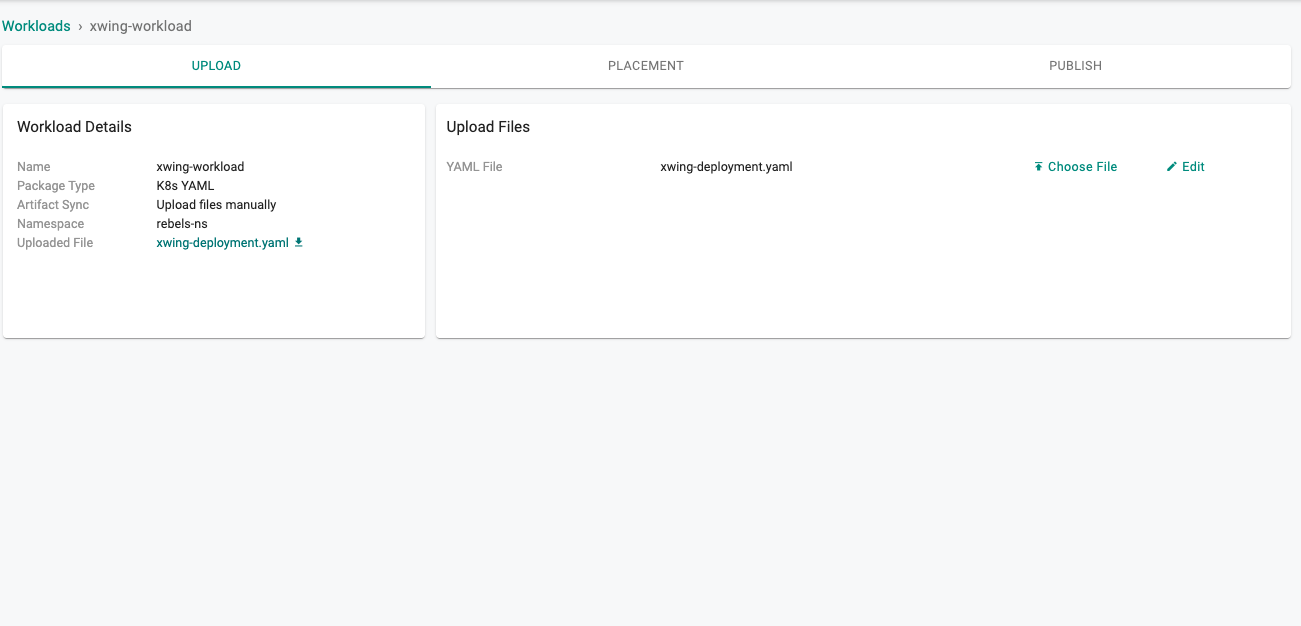
Rebels X-Wing Workload
- Navigate to the Workloads page
- Create a new Workload, specify the name as xwing-workload and Package type as K8s yaml
- Select Upload files manually as the Artifact Sync option
- Select the rebels namespace from the dropdown menu
- Select continue
- In the Upload Section, start by first creating a xwing-deployment.yaml file using the code below (copy and paste into editor, then save). Then upload that file as the YAML spec
- Click Save and Go to Placement
- Select the cluster that you want to deploy the workload to. Then click Save and Go to Publish
- Click Publish
xwing-workload YAML
Notice in the workload below the highlighted line.
If you named your namespace something different than empire, then you must replace empire in deathstar.empire with the name of your namespace.
For example if the name of your namespace was empire-foo instead of just empire, then it should be (ex. deathstar.empire-foo.svc.cluster.local/v1/request-landing).
---
apiVersion: apps/v1
kind: Deployment
metadata:
  name:  xwing
  labels:
    org: alliance
    class: xwing
spec:
  selector:
    matchLabels:
      org: alliance
      class: xwing
  replicas: 1
  template:
    metadata:
      labels:
        org: alliance
        class: xwing
    spec:
      containers:
      - name:  spaceship
        image:  docker.io/tgraf/netperf
        command:
        - sh
        - "-c"
        - |
          while true
          do
          sleep 3
          curl -m 1 -s -XPOST deathstar.empire.svc.cluster.local/v1/request-landing
          done
Visibility into Traffic Flows
- Click Home
- Select Dashboards (option available next to Home)
- Select Network Policy
- Select the Project, Cluster
- Select the empire and rebels namespaces from the namespace drop down
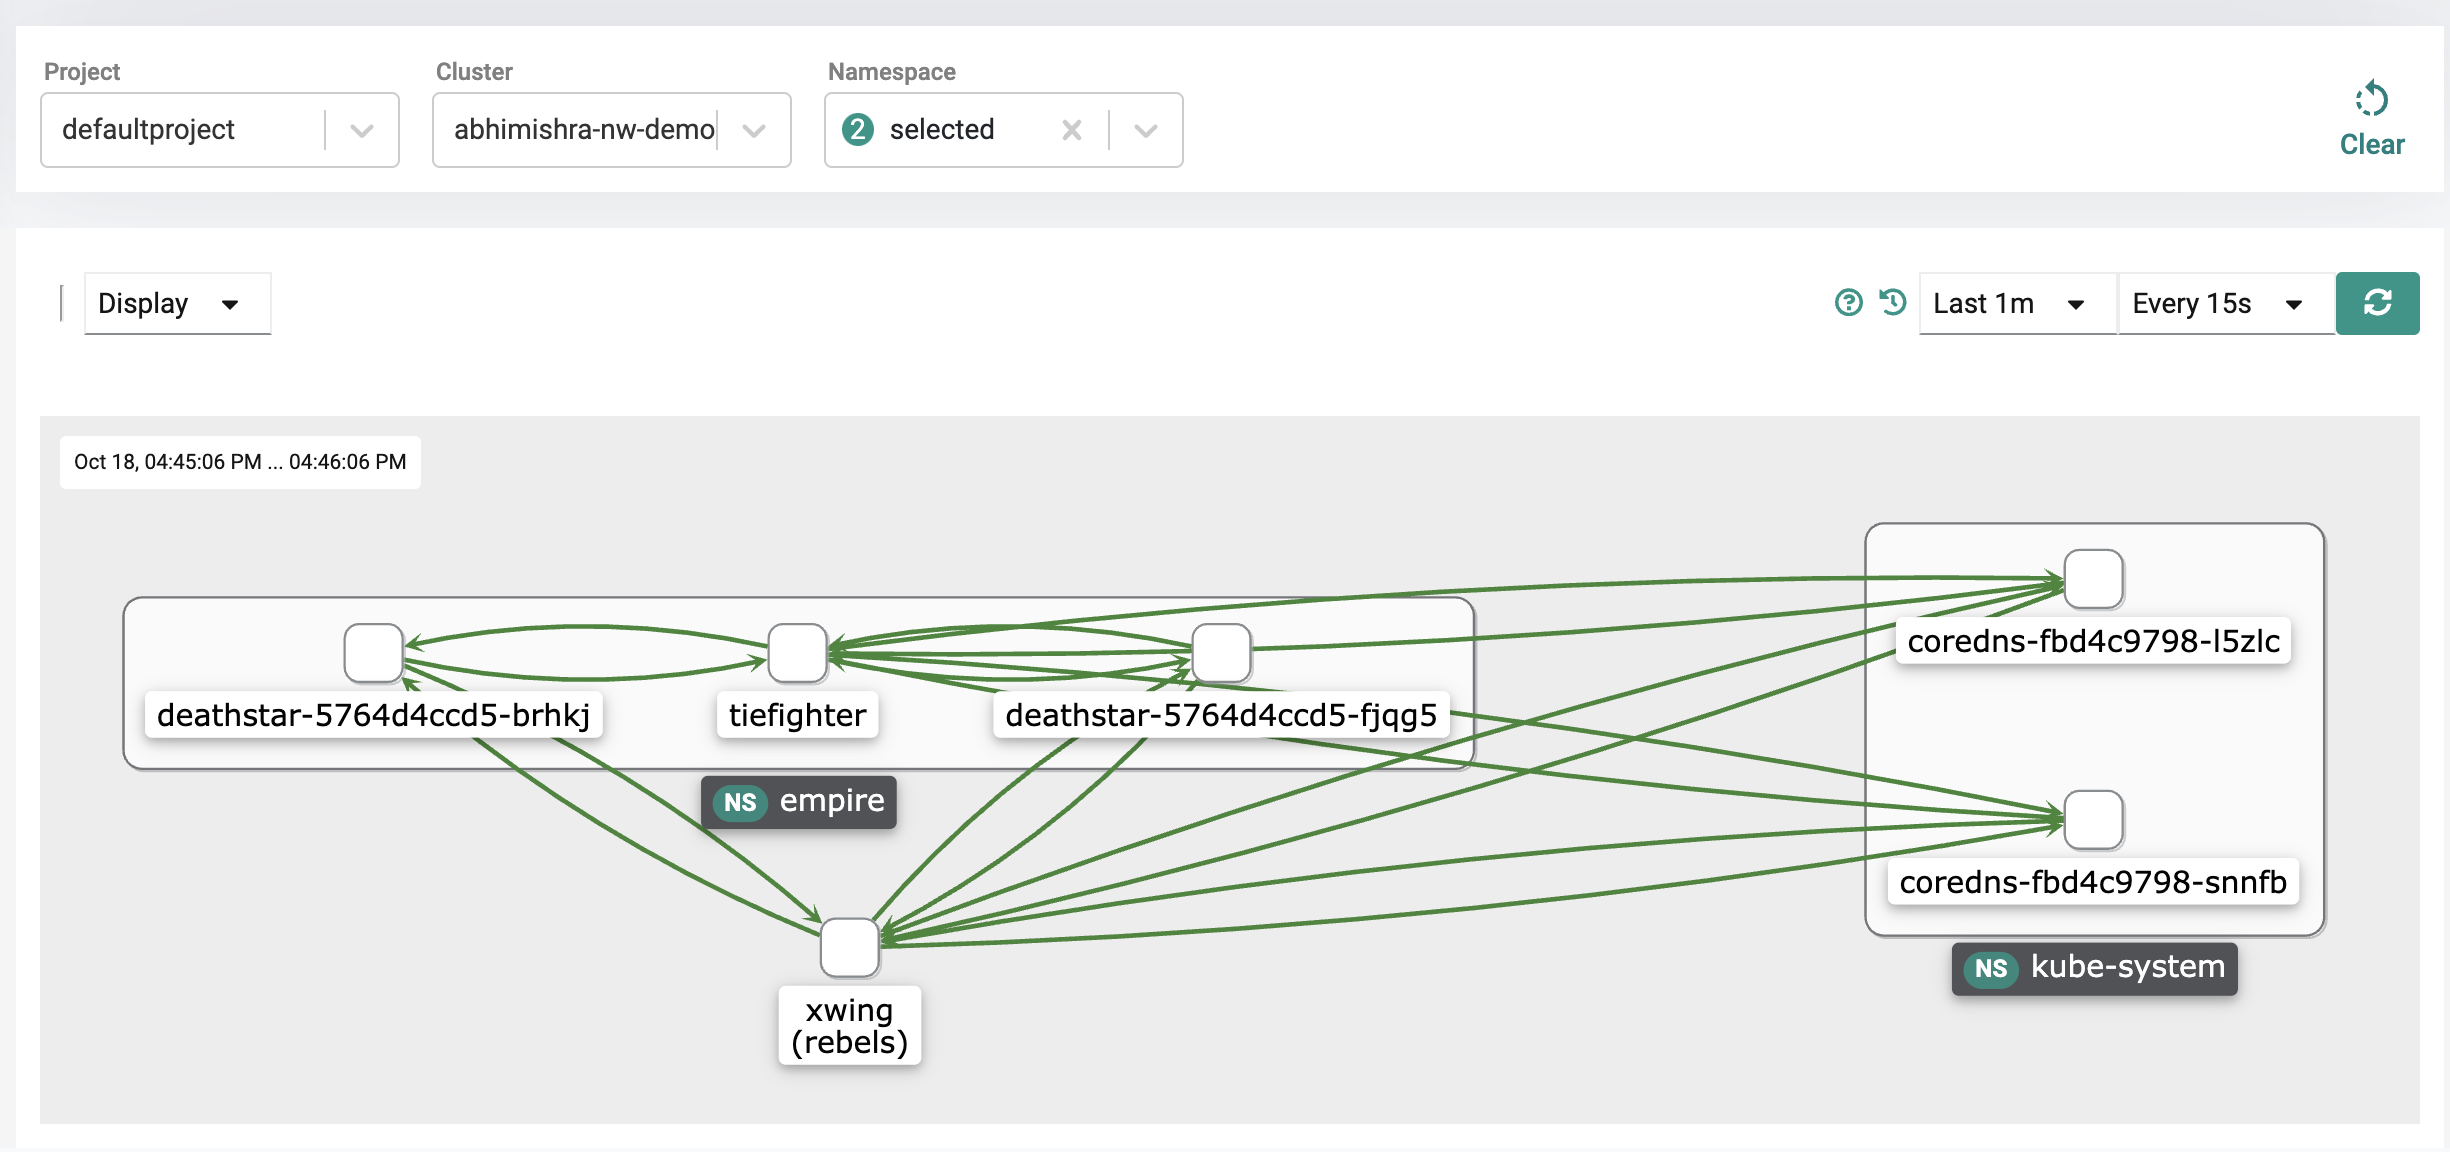
Recap
Congratulations! At this point, you have successfully deployed a test application and are able to view the network traffic flows for the application.
You can alternatively create a namespace by using the declarative spec YAML. For more information on automation via RCTL CLI, refer here
Create Empire Namespace
- Save the following namespace config into a file. For example purposes, let's call this empire-ns.yaml file.
Empire Namespace YAML Spec
Important
Ensure that you update the "project: defaultproject" with the name of yor project and "value: demo-network-policy" with the name of the cluster in your project
kind: Namespace
apiVersion: infra.k8smgmt.io/v3
metadata:
  name: empire
  description: for tiefighter-workload
  project: defaultproject
spec:
  type: RafayWizard
  placement:
    placementType: ClusterSpecific
    labels:
    - key: rafay.dev/clusterName
      value: demo-network-policy
- Type the command below to create the empire namespace
rctl apply -f <path to namespace spec>.yaml
For example if the file is called empire-ns.yaml:
rctl apply -f empire-ns.yaml
- Type the command below to check the status of the namespace creation/publish to the cluster
rctl status namespace empire
After a minute or so, the publish status of the namespace should show as READY. In the ASSIGNEDCLUSTERS and DEPLOYEDCLUSTERS section, you should see the name of your cluster.
Create Rebels Namespace
- Save the following namespace config into a YAML file. For example purposes, let's call this rebels-ns.yaml file.
Rebels Namespace YAML Spec
Important
Ensure that you update the "project: defaultproject" with the name of yor project and "value: demo-network-policy" with the name of the cluster in your project
kind: Namespace
apiVersion: infra.k8smgmt.io/v3
metadata:
  name: rebels
  description: for xwing-workload
  project: defaultproject
spec:
  type: RafayWizard
  placement:
    placementType: ClusterSpecific
    labels:
    - key: rafay.dev/clusterName
      value: demo-network-policy
- Type the command below to create the rebels namespace
rctl apply -f <path to namespace spec>.yaml
For example, if the file is called rebels-ns.yaml:
rctl apply -f rebels-ns.yaml
- Type the command below to check the status of the namespace creation/publish to the cluster
rctl status namespace rebels
After a minute or so, the publish status of the namespace should show as READY. In the ASSIGNEDCLUSTERS and DEPLOYEDCLUSTERS section, you should see the name of your cluster.
Deploy the test workloads/applications
You can alternatively deploy the test application by using the declarative spec YAML. For more information on automation via RCTL CLI, refer here.
Empire Tiefighter Workload
- First save the following Kubernetes application YAML spec. Let's say for example, the file is called tiefighter-deployment.yaml
Empire Tiefighter Deployment YAML Spec
---
apiVersion: v1
kind: Service
metadata:
  name: deathstar
  labels:
    app.kubernetes.io/name: deathstar
spec:
  type: ClusterIP
  ports:
  - port: 80
  selector:
    org: empire
    class: deathstar
---
apiVersion: apps/v1
kind: Deployment
metadata:
  name: deathstar
  labels:
    app.kubernetes.io/name: deathstar
spec:
  replicas: 2
  selector:
    matchLabels:
      org: empire
      class: deathstar
  template:
    metadata:
      labels:
        org: empire
        class: deathstar
        app.kubernetes.io/name: deathstar
    spec:
      containers:
      - name: deathstar
        image: docker.io/cilium/starwars
---
apiVersion: apps/v1
kind: Deployment
metadata:
  name:  tiefighter
  labels:
    org: empire
    class: tiefighter
spec:
  selector:
    matchLabels:
      org: empire
      class: tiefighter
  replicas: 1
  template:
    metadata:
      labels:
        org: empire
        class: tiefighter
    spec:
      containers:
      - name:  spaceship
        image:  docker.io/tgraf/netperf
        command:
        - sh
        - "-c"
        - |
          while true
          do
          sleep 3
          curl -m 1 -s -XPOST deathstar.empire.svc.cluster.local/v1/request-landing
          done
- Next using a text editor, copy and paste the workload yaml spec below. For example, let's save it as tiefighter-workload.yaml
Empire Tiefighter Workload Spec
In the artifact file section, refer to the tiefighter deployment you just created. For example, we refer to the tiefighter-deployment.yaml we created in the previous steps.
Make sure to change project in line 5 to the name of your project and clusterName in line 14 to point to your cluster.
apiVersion: apps.k8smgmt.io/v3
kind: Workload
metadata:
  name: tiefighter-workload
  project: defaultproject
spec:
  artifact:
    artifact:
      paths:
      - name: file://tiefighter-deployment.yaml
    type: Yaml
  namespace: empire
  placement:
    selector: rafay.dev/clusterName=demo-nw-policy
- Type the command below to create the workload
rctl apply -f <path to workload spec>.yaml
For example, if the file is called tiefighter-workload.yaml,
rctl apply -f tiefighter-workload.yaml
- To check the status of the workload being published you can run the following:
rctl status workload tiefighter-workload
After a few minutes, you should see the workload publish status as READY as well as your cluster name.
Rebels X-Wing Workload
- First save the following Kubernetes deployment. YAML spec. For example, let's call it xwing-deployment.yaml
Rebels X-Wing Deployment YAML Spec
---
apiVersion: apps/v1
kind: Deployment
metadata:
  name:  xwing
  labels:
    org: alliance
    class: xwing
spec:
  selector:
    matchLabels:
      org: alliance
      class: xwing
  replicas: 1
  template:
    metadata:
      labels:
        org: alliance
        class: xwing
    spec:
      containers:
      - name:  spaceship
        image:  docker.io/tgraf/netperf
        command:
        - sh
        - "-c"
        - |
          while true
          do
          sleep 3
          curl -m 1 -s -XPOST deathstar.empire.svc.cluster.local/v1/request-landing
          done
-
Next using a text editor, copy and paste the workload yaml spec below and save it. For example, let's call it xwing-workload.yaml
Rebels X-Wing Workload Spec
In the artifact file section, refer to the deployment you just created, for example xwing-deployment.yaml below.
Make sure to change project in line 5 to the name of your project and clusterName in line 14 to point to your cluster.
apiVersion: apps.k8smgmt.io/v3 kind: Workload metadata: name: xwing-workload project: defaultproject spec: artifact: artifact: paths: - name: file://xwing-deployment.yaml type: Yaml namespace: rebels placement: selector: rafay.dev/clusterName=demo-nw-policy- Type the command below to create the workload.
rctl apply -f <path to workload spec>.yamlFor example, if the file is called xwing-workload.yaml,
rctl apply -f xwing-workload.yaml- To check the status of the workload being published you can run the following:
rctl status workload xwing-workloadAfter a few minutes, you should see the workload publish status as READY as well as your cluster name.
Visibility into Traffic Flows
- Click Home
- Select Dashboards (option available next to Home)
- Select Network Policy
- Select the Project, Cluster
- Select the empire and rebels namespaces from the namespace drop down
Recap
Congratulations! At this point, you have successfully deployed a test application and are able to view the network traffic flows for the application.