Get Started with Image Generation in Token Factory
Overview
This guide walks through registering an image-generation model with Token Factory, deploying it via NVIDIA Dynamo, and generating and editing images through the resulting API endpoint. It uses FLUX.2 [klein] 4B — a compact, open-weight (Apache 2.0) text-to-image and image-editing model from Black Forest Labs — as the example model throughout.
By the end of this guide, you will have a running image-generation deployment and know how to call it for both text-to-image generation and image editing.
NVIDIA Dynamo support is available from release v3.1-39 onwards.
Prerequisite: Before creating a Dynamo model deployment, the Dynamo platform Helm chart must be installed on the compute cluster:
helm repo add dynamo https://helm.ngc.nvidia.com/nvidia/ai-dynamo/charts/
helm repo update
helm install dynamo-platform \
  https://helm.ngc.nvidia.com/nvidia/ai-dynamo/charts/dynamo-platform-1.2.1.tgz \
  --namespace dynamo-system \
  --create-namespace
Assumptions
This guide assumes you have already completed the Token Factory basics, including creating a model, endpoint, compute cluster, and provider. If you have not done this yet, refer to the Get Started with Token Factory guide before proceeding.
The following are assumed to be in place:
- A Rafay Platform account with Token Factory enabled
- A compute cluster with NVIDIA GPUs registered in your Rafay org
- The NVIDIA Dynamo platform Helm chart installed on the compute cluster
- A compute endpoint registered in Token Factory
- Partner admin access to the Rafay Operations Console
- At least one tenant organization created in your Rafay org
What You Will Do
| Step | Action |
|---|---|
| 1 | Register the model with Token Factory |
| 2 | Deploy the model |
| 3 | Share the deployment with tenant organizations |
| 4 | Retrieve the endpoint and API key |
| 5 | Generate an image from a text prompt |
| 6 | Edit an existing image |
Part 1 — Register the Model
Step 1 — Open Model Configuration
In the Ops Console, navigate to Token Factory → Models
Create a new model.
Step 2 — Fill in General Details and Capabilities
- Name: a clear identifier, e.g.
FLUX.2-klein-4B - Use cases: select both
chatandimage— this specific model's request handler accepts requests in an OpenAI-compatible shape shared with chat-style endpoints - Input modalities:
text - Output modalities:
image
Step 3 — Set the Provider and Configuration
- Provider:
Hugging Face - Repository: select Hugging Face
- Hugging Face API Key: your personal access token
- Source:
black-forest-labs/FLUX.2-klein-4B - Revision:
main
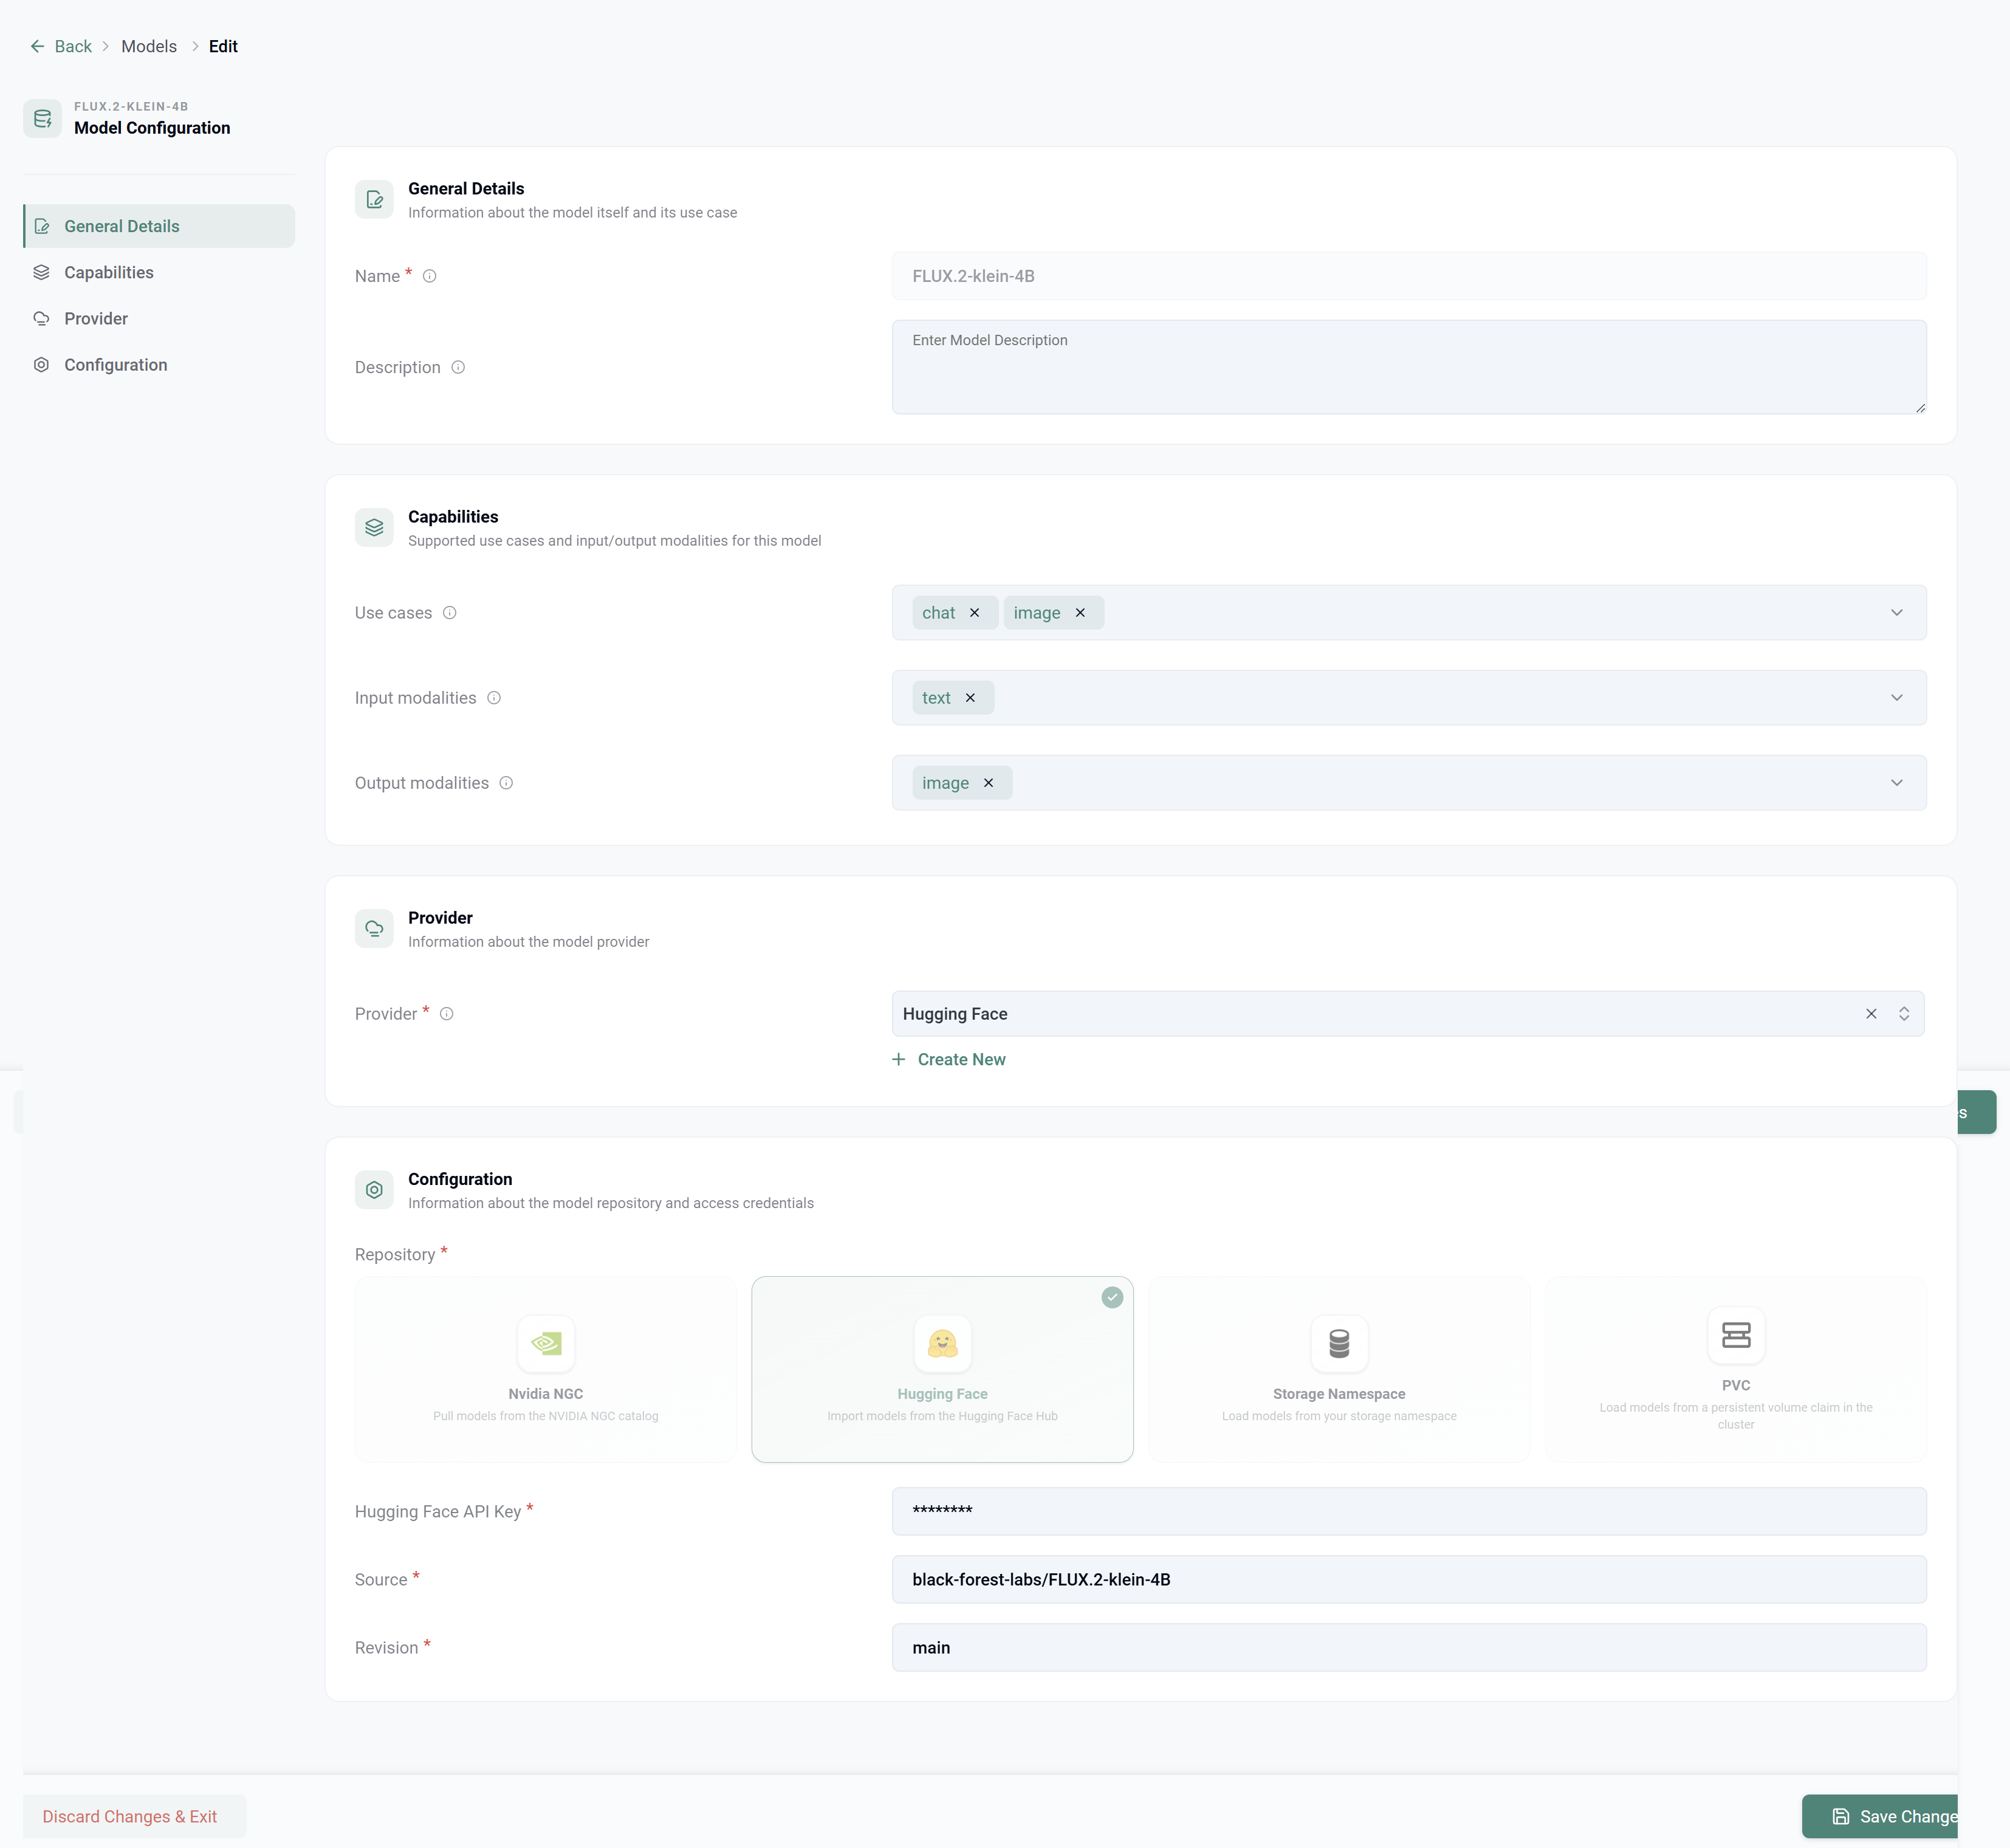
Note: FLUX.2-klein-4B is not gated — no license acceptance is required beyond having a valid Hugging Face token. If you substitute a different image model here, check its model card first: many diffusion models (including FLUX.2-klein's own larger 9B sibling, and Stable Diffusion 3.5) require logging into Hugging Face and explicitly accepting a license agreement on the model's page before your token can download it. Skipping this step produces a
403 Forbiddenerror at deployment time that looks identical to a bad token.
Save the model configuration.
Part 2 — Deploy the Model
Step 1 — Create a New Model Deployment
In the Ops Console, navigate to Token Factory → Model Deployments
Create a new deployment.
- Name: e.g.
flux-klein - Model: select the model you just registered
- Endpoint: select your target endpoint
- GPU Type: confirm the correct GPU is selected and shows availability
Step 2 — Configure the Inference Engine
- Inference Engine:
NVIDIA Dynamo - Backend Framework:
SGLang - Frontend image:
registry.dev.rafay-edge.net/tf/dynamo-frontend:1.2.1-tool-fix - Access Mode:
ReadWriteOnce
Step 3 — Configure the Decode Worker
- Runtime image: the SGLang runtime image for your Dynamo version, e.g.
nvcr.io/nvidia/ai-dynamo/sglang-runtime:1.2.0 - Replicas:
1 - CPU: 10
- Memory:
65Gi - GPU allocation type:
Full GPU - GPU quantity:
1
Add the following argument --image-diffusion-worker
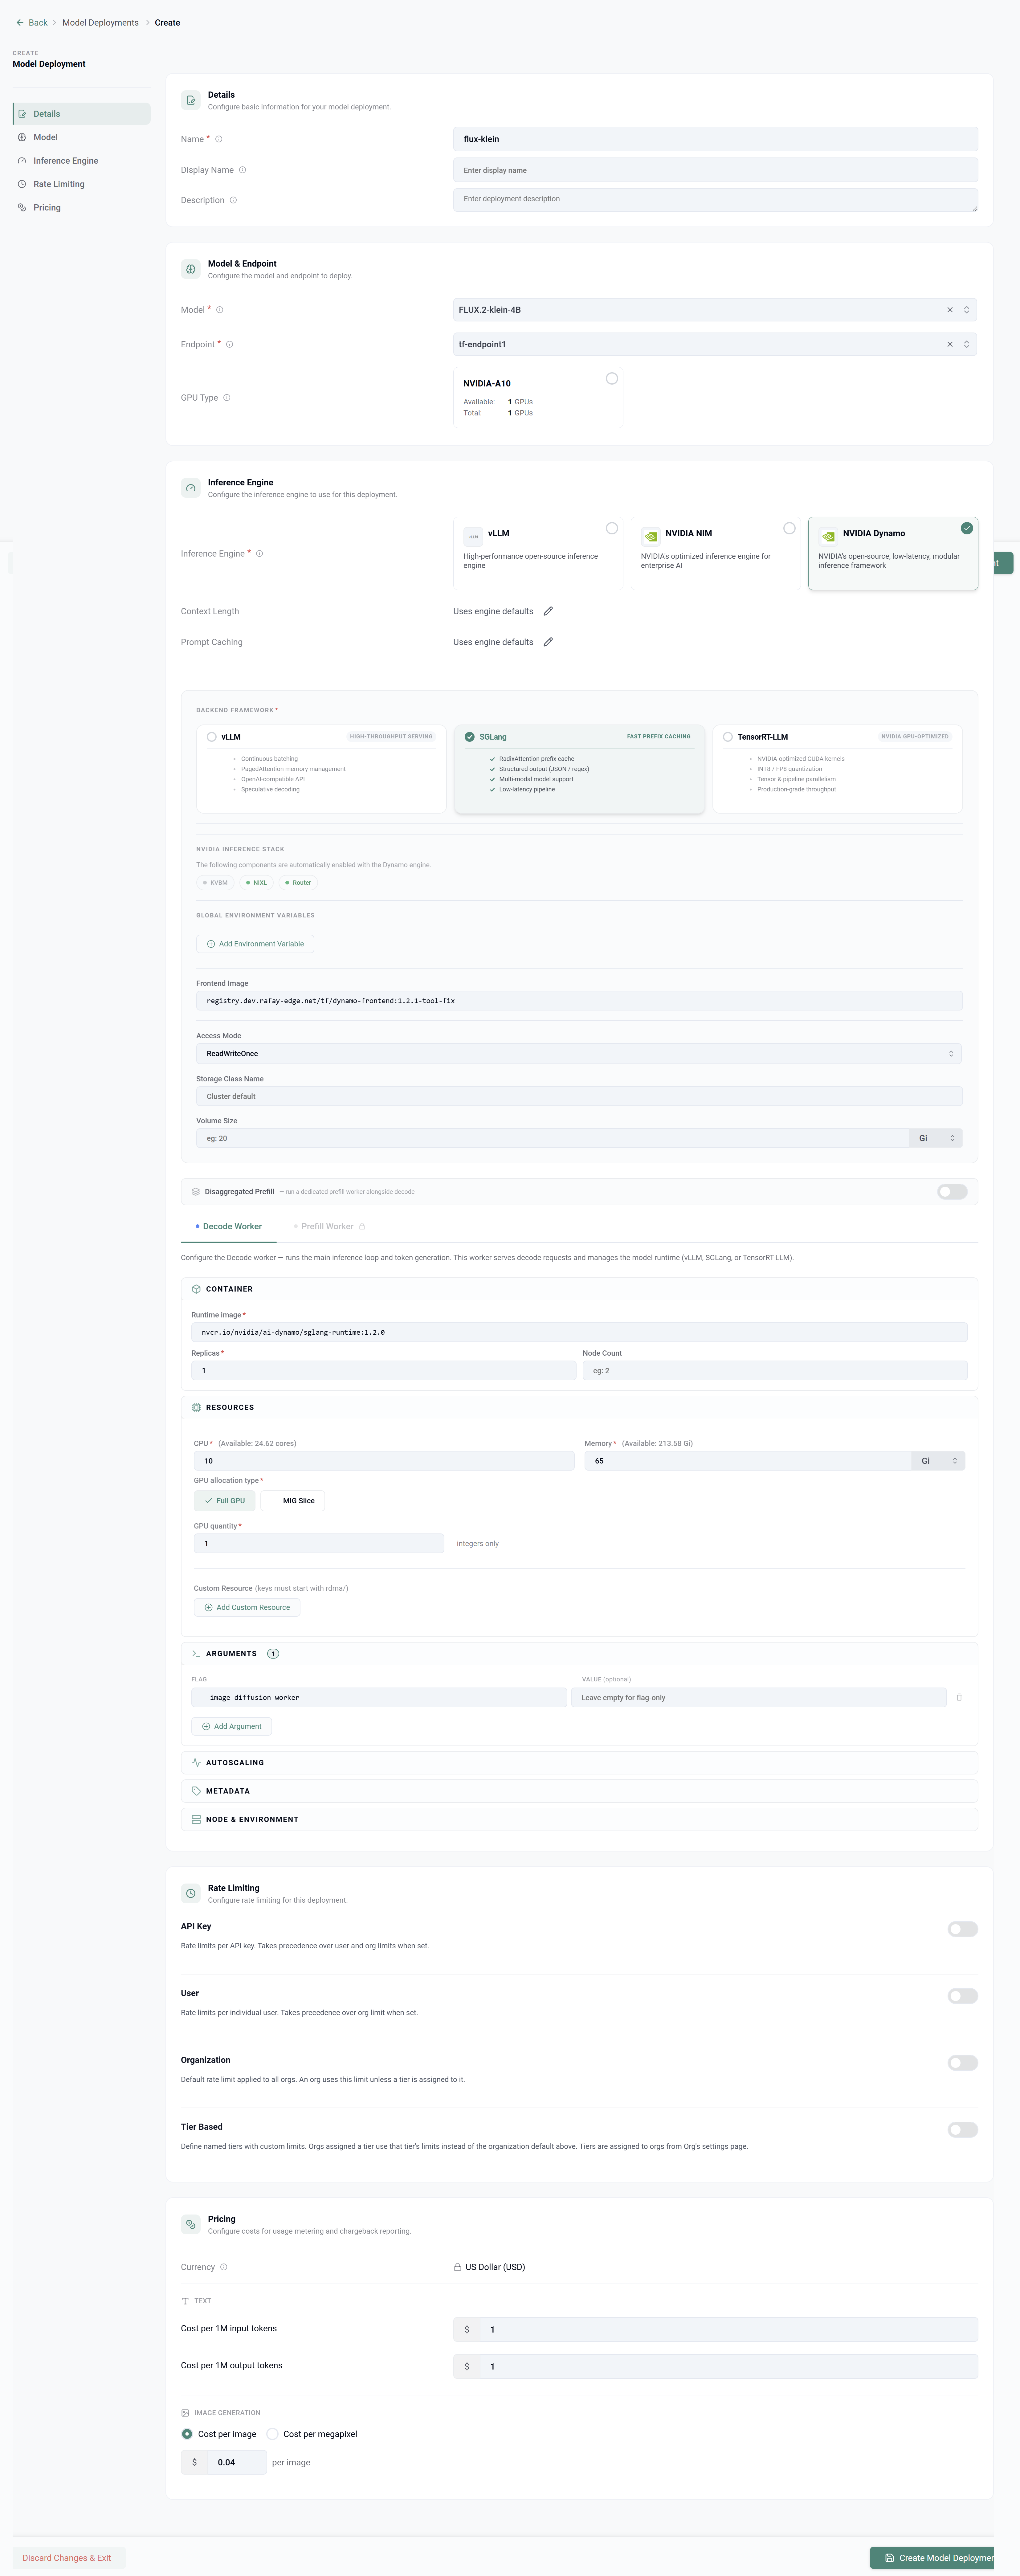
Note: See the prerequisite callout at the top of this guide — confirm the Dynamo platform Helm chart version matches the frontend image tag shown here (under Global Environment Variables → Frontend Image) before deploying.
Note: The Access Mode field under storage should be ReadWriteOnce. This model's cache volume is only ever mounted by a single decode worker on a single node —
ReadWriteOnceis what most local storage classes (likeopenebs-hostpath) actually support. SettingReadWriteManyhere will cause the underlying PersistentVolumeClaim to fail provisioning with an "Only support ReadWriteOnce access mode" error, which surfaces as a pod stuck permanently inPending.Note: If you're running only one replica and your node has exactly one GPU, keep Replicas at
1. Increasing this without additional GPU capacity results in extra pods that can never be scheduled, since each replica requests a full dedicated GPU.
Save and deploy. The deployment will pull the runtime image, provision storage, download model weights from Hugging Face, and load the model into GPU memory. This typically takes one to several minutes depending on model size and network speed.
Part 3 — Share the Deployment with Tenant Organizations
Newly created deployments are not automatically visible to tenant organizations. Sharing makes the model available in Developer Hub for the orgs you select.
Step 1 — Open Manage Sharing
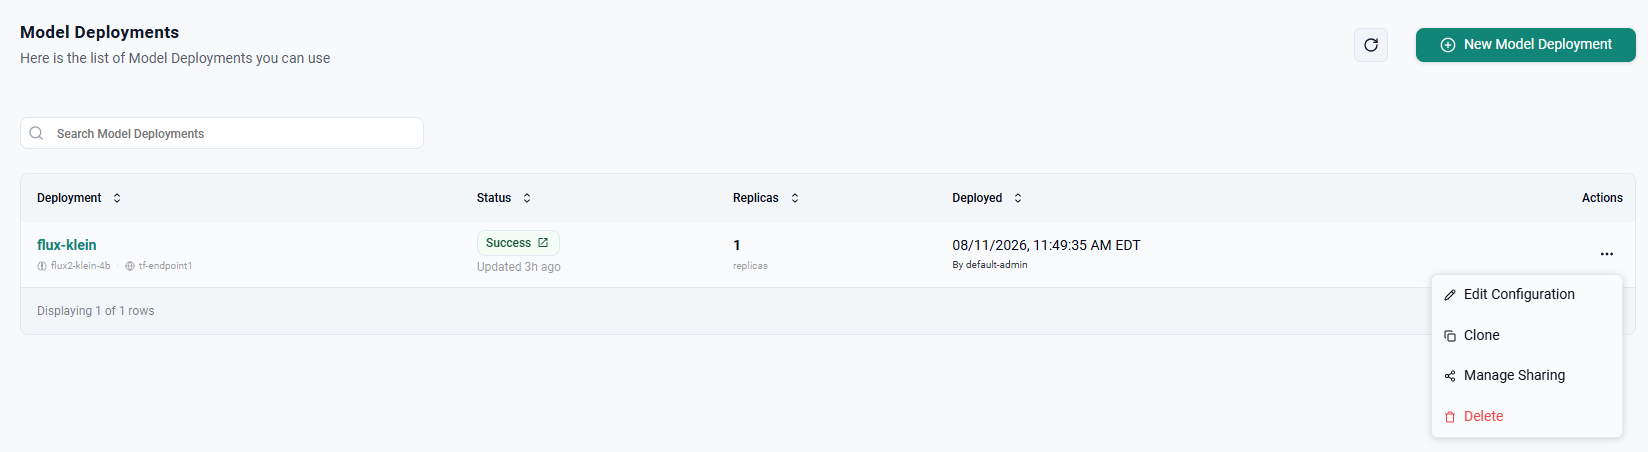
In the Ops Console, navigate to Token Factory → Model Deployments
Find your deployment, click its Actions (...) button, and select Manage Sharing.
Step 2 — Choose Sharing Scope
In the Manage Sharing dialog, select one of:
- None — the deployment is not shared with any organization
- All Organizations — the deployment is available to every tenant organization
- Specific Organizations — select individual organizations to grant access to
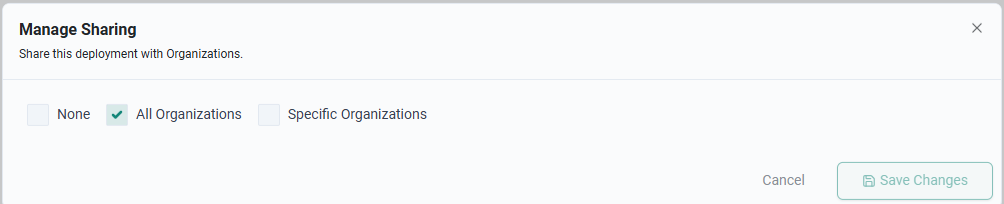
Click Save Changes.
Note: If a tenant org doesn't see this model under Token Factory → Model APIs in Developer Hub after deployment, sharing is the first thing to check — a healthy, running deployment that hasn't been shared simply won't appear in the tenant's catalog.
Part 4 — Retrieve the Endpoint and API Key
Step 1 — Log Into a Tenant Organization
Log into a tenant organization that the deployment was shared with in Part 3 — either All Organizations, or one of the Specific Organizations you selected.
Step 2 — Locate the Model in Developer Hub
Navigate to Developer Hub → Token Factory → Model APIs
Select your deployed model and record:
- Model — the exact identifier to use in requests (e.g.
flux-klein) - Endpoint — the base URL
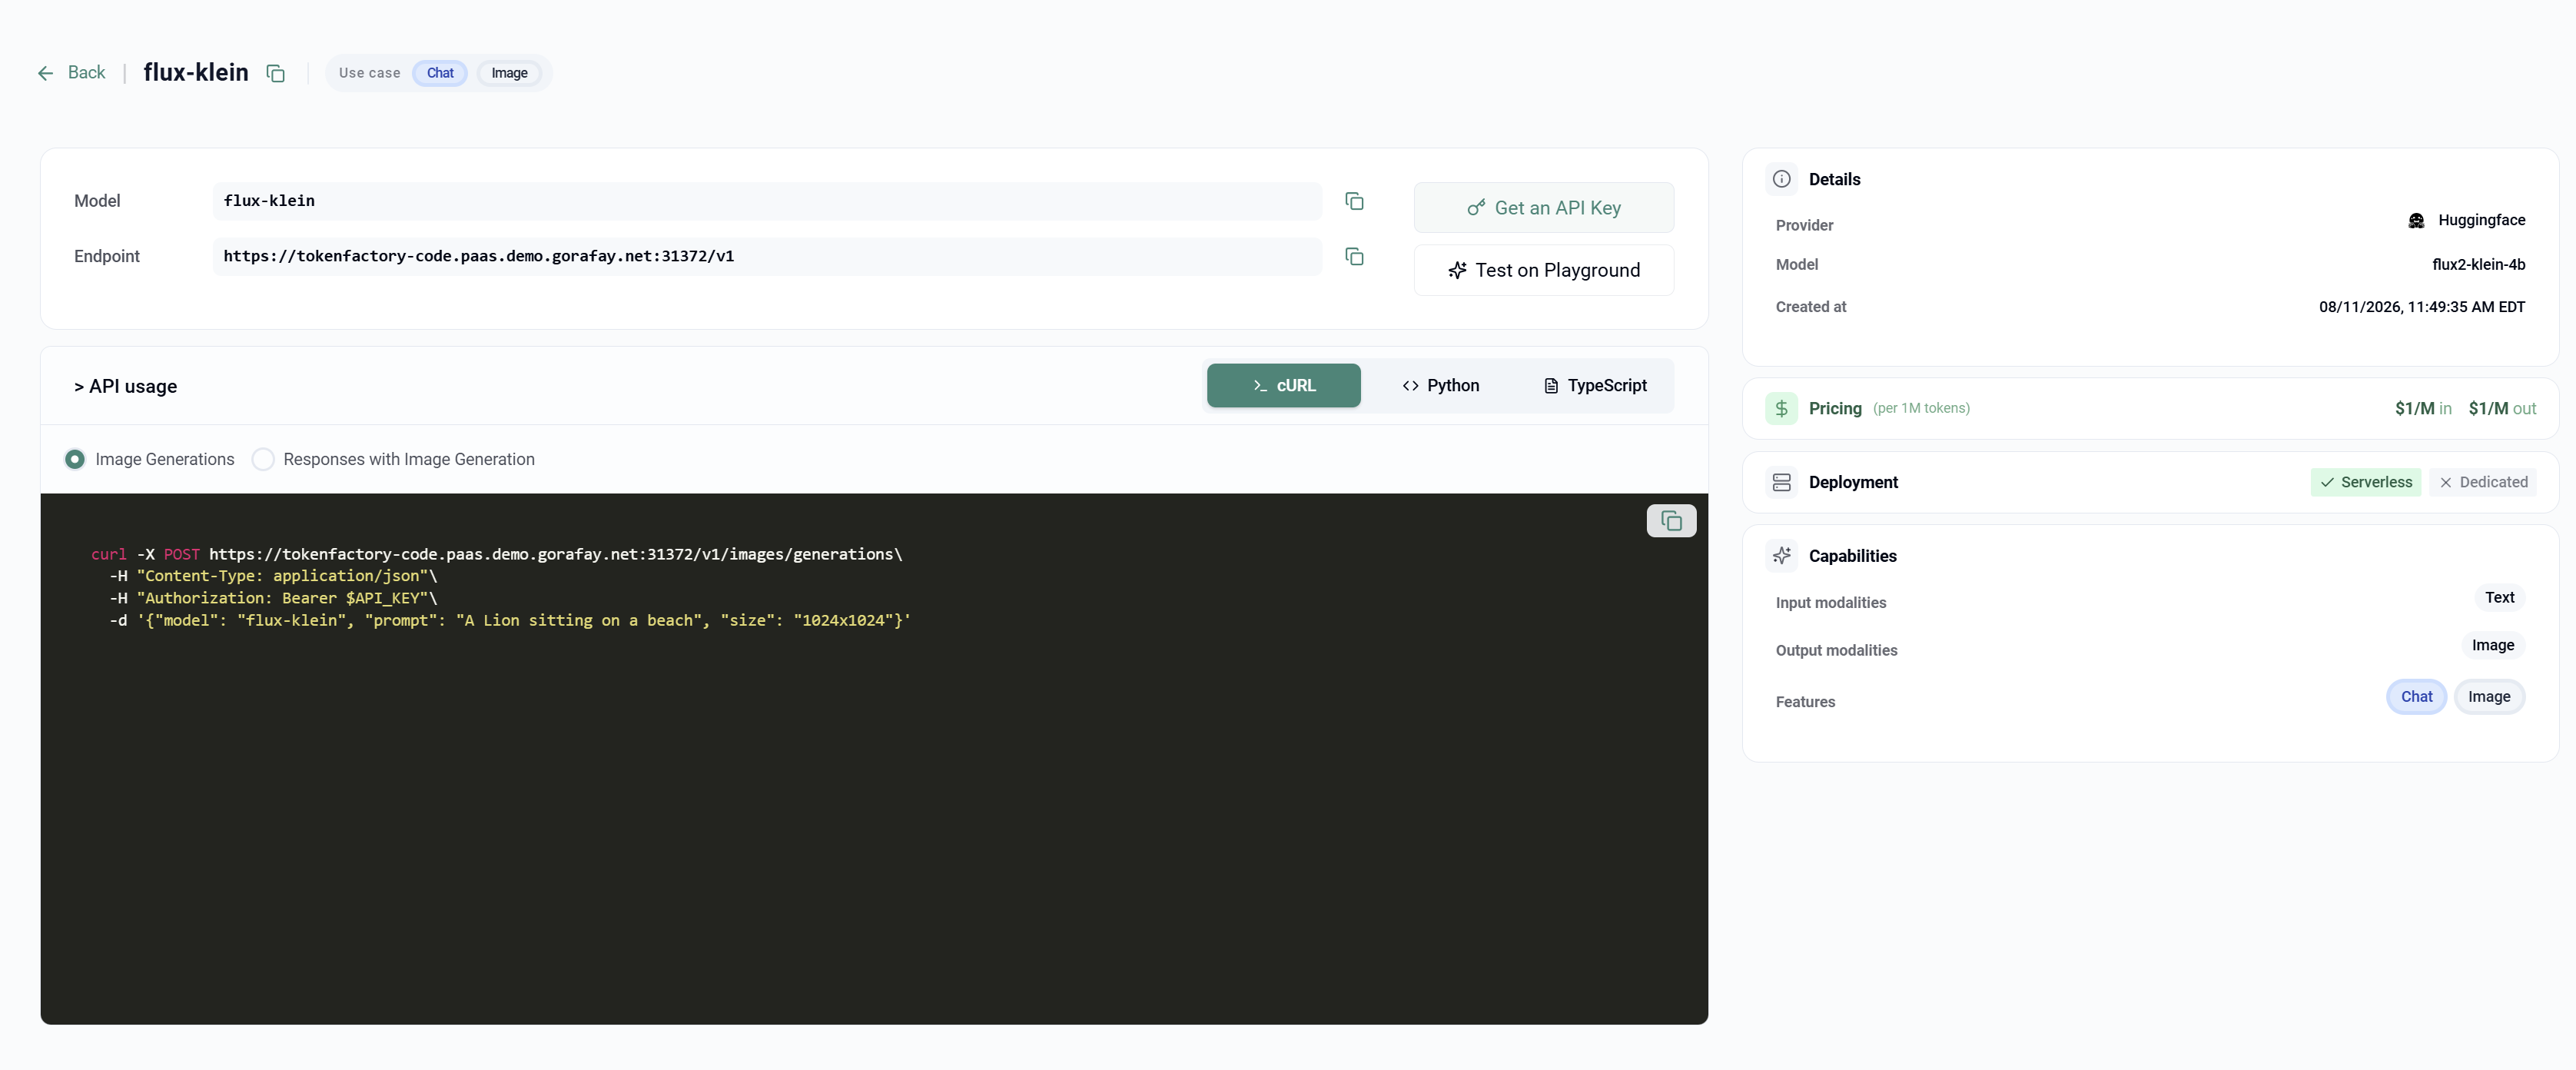
Click Get an API Key to generate credentials.
Part 5 — Generate an Image from a Text Prompt
Step 1 — Build the Request
cat > request.json <<EOF
{
  "model": "flux-klein",
  "prompt": "A lion sitting on a beach",
  "size": "1024x1024",
  "response_format": "b64_json"
}
EOF
Note: Always set
"response_format": "b64_json"explicitly. Without it, some deployments default to returning afile://path pointing at storage local to the worker pod — not a usable URL from outside the cluster. Setting this field guarantees you get the actual image data back in the response.
Step 2 — Send the Request
curl -X POST https://<your-token-factory-endpoint>/v1/images/generations \
  -H "Content-Type: application/json" \
  -H "Authorization: Bearer <your-token-factory-api-key>" \
  -d @request.json \
  -o response.json
Step 3 — Decode and Save the Image
python3 -c "
import json, base64
resp = json.load(open('response.json'))
img_data = base64.b64decode(resp['data'][0]['b64_json'])
open('output.png', 'wb').write(img_data)
print('Saved successfully')
"
Step 4 — Access the Saved Image
Confirm the file was written correctly:
file output.png
ls -la output.png
Part 6 — Edit an Existing Image
FLUX.2-klein-4B also supports image editing: given an existing image and a text instruction, it produces a modified version.
Step 1 — Encode the Source Image
IMG_B64=$(base64 -i your_image.png | tr -d '\n')
Step 2 — Build the Edit Request
cat > edit_request.json <<EOF
{
  "model": "flux-klein",
  "prompt": "change the lighting to sunset",
  "size": "1024x1024",
  "response_format": "b64_json",
  "input_reference": "$IMG_B64"
}
EOF
Note: Only include
input_referencewhen you actually intend to edit an image. Including it — even as an empty or placeholder value — on what's meant to be a plain text-to-image request causes the handler to route into edit mode and fail immediately with zero output images, since it expects a genuine reference image to work from.
Step 3 — Send and Decode
curl -X POST https://<your-token-factory-endpoint>/v1/images/generations \
  -H "Content-Type: application/json" \
  -H "Authorization: Bearer <your-token-factory-api-key>" \
  -d @edit_request.json \
  -o edit_response.json

python3 -c "
import json, base64
resp = json.load(open('edit_response.json'))
img_data = base64.b64decode(resp['data'][0]['b64_json'])
open('edited_output.png', 'wb').write(img_data)
print('Saved successfully')
"
Step 4 — Access the Saved Image
Same as Part 5, Step 4 — confirm the file was written correctly:
file edited_output.png
ls -la edited_output.png